


Bow Tie Crisscross Quilt Tutorial
Jenny Doan
Bow Tie Crisscross Quilt Tutorial
- 3 packs x Print Precut 5" Quilt Squares (Charm Packs)
- 2 packs x Background Charm (5") Squares
- 1 yard x Background Quilt Fabric (includes Inner Border)
- 1½ yards x Outer Border Fabric
- ¾ yard x Binding Fabric
- 4¼ yards x Backing Fabric
Featured products Get the Supplies Featured in this Tutorial


Finish your masterpiece and let us give it the finishing touch it deserves.
Subscribe to MSQC on YouTube
Hundreds of FREE tutorials and a new one from Jenny launches every Friday.
video transcript
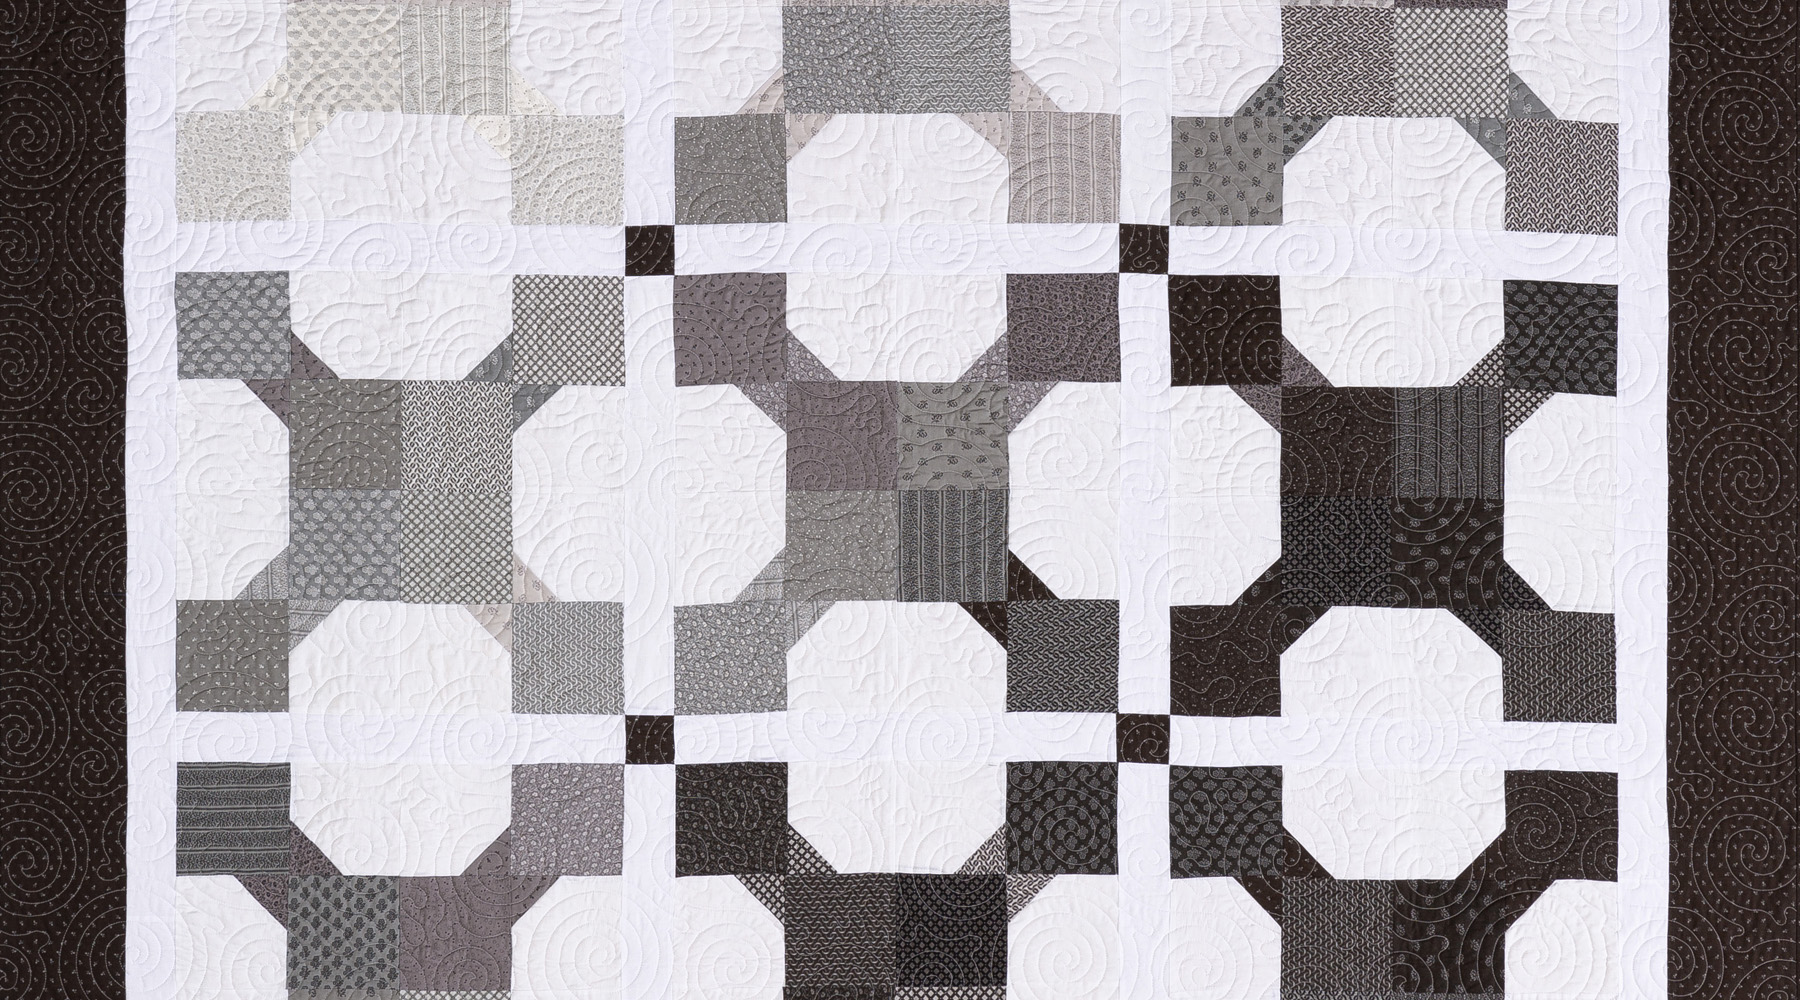
Hi everybody, it’s Jenny from the Missouri Star Quilt Company. And I’ve got a fun project for you today. Take a look at this quilt behind me. I always think it’s fun when a designer designs a line and it’s graded in color from light to dark. So I decided to play with that in my layout and in my blocks. So the fabric we used to make this quilt is called Urban Farmhouse Gatherings. And it’s by Primitive Gatherings for Moda. And you’re going to need three charm packs of that. And so you can see right in the pack, they’re graded in color. You’re going to need some background five inch squares, two packs, that’s 42 squares in a pack so 84 squares. Five inch squares of background fabric and then you want to get some more of that background fabric in yardage because you’re going to use your inner border and your sashing strips are all going to be from that same background. And you’re going to need a yard for that. For your outer border you’re going to need a yard and a half. And this is a big six inch border out here. And also you can cut your cornerstones out of those which are 2 ½ inch squares. And so your background, your, I mean your backing is going to be 4 ½ yards and we used this gray backing on here. Isn’t that pretty? This is one of my favorite quilt patterns. It’s called sticky buns. And it’s just a circular one. And any time I have anything real blocky, I like to use something that has curves in it for the quilting because I just think it adds to it. So let me show you how to make this.
Basically this block is a bowtie block. And it’s a four patch like this with a little snowballed corner in the corner. And we’ve put four of these together to form our big block. So what we’re going to do is we’re going to pick two colors of our grays. Now you’ll notice on my quilt, I kept the darks together, the mediums together and the lights together. I just wanted to see that graded color move but obviously that has to do with whatever pack you pick. Yours may be 30’s and completely scrappy. This is going to make a darling quilt no matter what you use. Alright so now we’ve got two of our five inch squares right here, the color. And two that are white, our background color. And so when you take these we’re going to need to put a little 2 ½ inch square in the corner. Now to get that 2 ½ inch square what I did was, let me scoot these over. I took one of these squares like this, and I took my little 2 ½ inch ruler and I just cut this block in half twice, like this. Now this will make enough little corners for two blocks. So we’ll take two of these blocks and we’re going to add them to our two squares here, like this. So we’re going to snowball those on there. And what you want to do on these is you want to draw the line or you want to iron the line. I’m going to press the line like this. And that’s going to give me a little bit of a line to sew on. And I’m just going to do that right on the edge of my block like this. Line it up right on the corner and sew right on the line. And we’re going to do that to our background squares.
Alright so here’s our little 2 ½ inch square on the corner of our background square and we’re sewing on the line, we’re just going to. Now with this one I’m just going to slide this one under and keep going. There we go. Alright. You’re going to clip your threads. And we like to test them to make sure that we did a good job and got these right. So what I do is I fold these back and make sure the block stays square and it keeps that same square corner right there. And then once I know that they’re good, I can trim them off like this. You can use a rotary cutter or your scissors. Then we’re going to press these nice and flat, nice and flat. And then we basically just put this block together like a four patch. So now we’ve got these little snowballed corners right here and then we put two of our solid ones in just like this. And can you see that that takes the shape of a bowtie. This is a really old block and it’s just fun to play with. So what I’m going to do is I’m going to fold this over here like that, this one over here like this. Line them up and I”m going to take these to the sewing machine and I’m going to sew a quarter of an inch right down the side of this one and. And then I”m going to add this one underneath. And I left them in the same direction so they, they look different going under the needle but I’m hoping that when I open them up they’ll fit right together as a four patch and I won’t even have to trim that little thread. That’s what we call chain piecing and so let’s look and see if it worked. And it did. It’s going to be perfect. So now I can just fold these over. And I’ll start stitching, take a few little anchoring stitches, make sure my squares stay lined up. There we go. Now I”m going to check and make sure my middle, one seam is going one way, one seam is going the other. Then I”m going to line up the rest of my block and sew straight across. Now you’re just going to do this to all your blocks and I’m going to press this open right now. I have my little stitch caught right there. Press it nice and flat.
And then it takes four of these to make our big block. So let me move these out of the way and I have some sewn right here. So we’re going to put them together so that all of our darks come to the middle like this. See how that forms that nice big block. Isn’t that great? So what we’re going to do now is I’m going to fold this over again. And it’s just like sewing a big four patch. And so we’ll take this top piece, line up our corners and sew down the side. We’re going to want to make sure that our little, where our colors come together, because they’re so stark, you know they’re a dark blocks and white blocks, you want to make sure that those line up. So start with your edges lined up. Line up your quarter of an inch and I’m going to sew down the side here. And I’m going to stop right here and make sure that my blocks, that I can feel nothing in between. It’s just lined up, snugged up so nice. And then on this side right here come down. Now we’ll do the same thing on this one and we haven’t moved the direction it’s in. And so again we line them up carefully. Sew our quarter of an inch and make sure that these pieces here are, our seams, you’re going to want your seams to go opposite directions. I’ve got those two seams are running in different directions and we can just sew down that side. Now because this is just like a giant four patch, we’re just going to be able to open these up and check them to make sure they come together perfectly and they do. Fold it in half and sew down this whole nice big block. So now we’re just going to sew down the side of this fabric right here, making sure our seams are lined up opposite sides. You want your seams to go opposite directions and nest them right together. Come down here. I love it when you have blocks where you can line them up on, at every little seam because it keeps our blocks really straight. And that’s a great thing for a sewer like me who’s, I”m not a real careful sewer and so it just helps me keep everything lined up really nice. Alright now we should have this nice big block. Let’s take a look at it. How does that look? Let’s see. Looks good. We’re lined up pretty good on all our seams. We’re going to press it. Now remember that this kind of a pattern is based on a square. So if you want to make it with even bigger squares or smaller squares this is still going to work. And it’s just the cutest little pattern, whether it’s big squares or small. I’ve got a seam going right here that is trying to go both directions so I’m going to turn this over and iron it flat. So that it lays nice and flat. Alright. Now here’s our block right here.
Here’s how it fits in the quilt right here. Squares in the corner. What you’re going to do now is the sides of the square you’re going to cut a sashing that is exactly the same size. All your sashings are going to be that size. You’re going to cut one for every block. There’s three in a row. And you’re going to sew your row together. So we’ve got a square, a sashing, I mean a block, a sashing and a block. Then you’re going to put in this sashing row right here. Your block should be square. It should be right about 18 inches. But in between these pieces you’re going to put a 2 ½ inch square that you’ve cut a strip off your border and cut them into 2 ½ inch squares. And you’re going to put sashing, square, sashing, square. And this middle row will go in and then you’ll sew your next big row of blocks together. So it goes together quickly and easily. It makes a quilt that is 73 by 73 so it’s a great little size. This would be a great little picnic quilt, lap quilt, anything like that. And we hope you enjoyed this tutorial on the Bow Tie Criss Cross from the Missouri Star Quilt Company.
& Progress on Social