


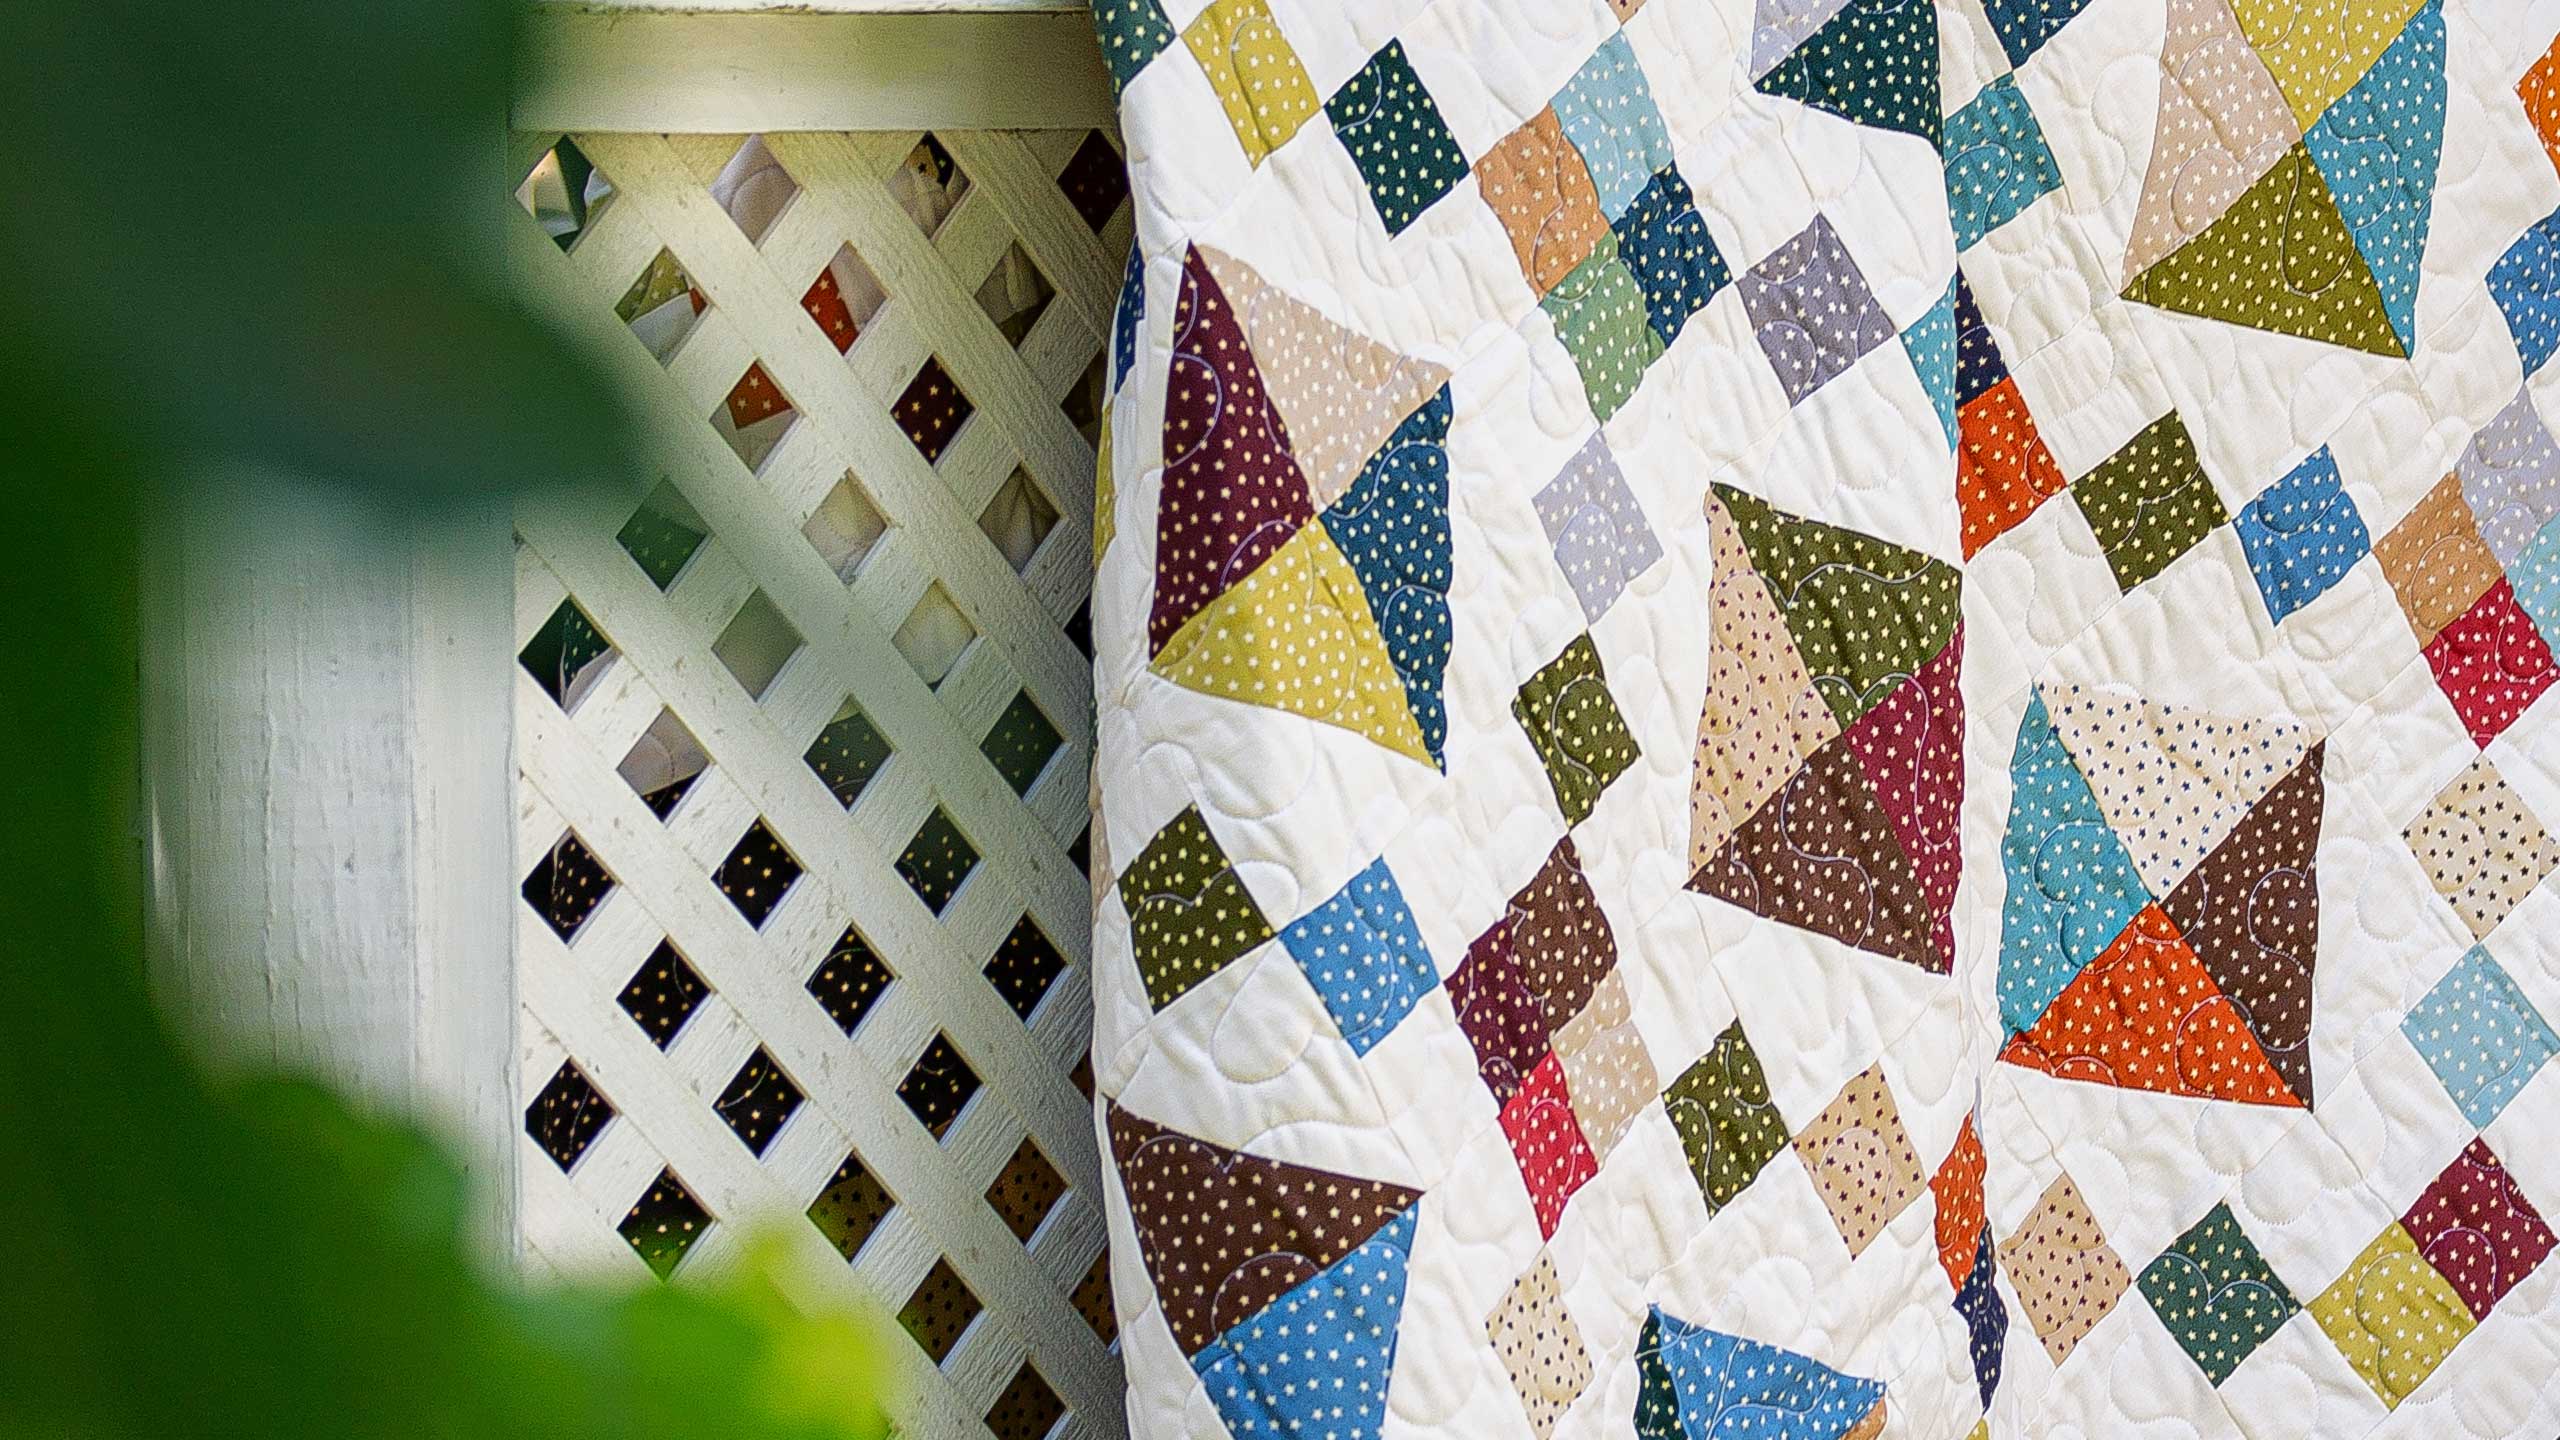
Diamond Chain Quilt Tutorial
Jenny Doan
Diamond Chain Quilt Tutorial
- 2 Packs x 5" Charm Pack Squares
- 2 Packs x 5" Charm Pack Squares Background
- 1/2 Yard x Quilt Fabric for Inner Border
- 1 1/2 Yards x Quilt Fabric for Outer Border
- 3/4 Yard x Quilt Fabric for Binding
- 4 1/2 Yards x Quilt Backing Fabric
Featured products Get the Supplies Featured in this Tutorial


Finish your masterpiece and let us give it the finishing touch it deserves.
Subscribe to MSQC on YouTube
Hundreds of FREE tutorials and a new one from Jenny launches every Friday.
video transcript
Hi everybody, it’s Jenny from the MSQC. Take a look at this quilt behind me. Isn’t this fun? It’s a great quilt. Easy project. You’re going to be surprised how easy. So to make this quilt you’re going to need two packs of five inch squares. And we have used Stars Single Scoops by Andover. And you’re also going to need two packs of a background. Now you want to make sure that your background blends with your print strips because you’re also going to need a half a yard of that same background for this first inner border out here. For your outer border, it’s 6 ½ inch strips, nice big border. You’re going to need a yard and a half. For your backing you’re going to need 4 ½ yards and you can see we’ve used this same little star pattern and we did it with vertical seams. So it makes a quilt that is 64 by 72 which is a great size. It’s one of those that I call like picnic quilts or wrap up and watch TV quilts, it’s just a great little size. Now remember with pre cuts anytime you want to make a bigger quilt you just increase the amount of pre cuts that you’re using and very quickly that quilt grows. So let me show you how to make this because this is based on two blocks that are very familiar to us and that are very easy.
It’s a half square triangle and a four patch. So let’s tackle that half square triangle first. Now for, there’s lots of ways to make half square triangles. On this way we’re going to be doing it with a background square, a five inch background square. And we’re going to couple that with our star square. Now what I want to do first is, is we’re going to take this five inch square and we’re going to draw a line diagonally on this like this, corner to corner. So take your little ruler, lay it on there corner to corner. And you can use anything to draw this line because we’re going to cut on that line that’s inside the seam that’s not going to show. So here’s our little thing. Now a lot of people ask me about half square triangles and why I use, you know, make them different ways. And the reason is I’m looking for a size. I want this size to match my four patch. So we’re using the five inch square. And we’re going to take a seam, sew a seam a quarter of an inch on both sides of this line. And when we do that and take that seam in a quarter of an inch it’s going to be 4 ½, our half square triangles are going to end up 4 ½. And that’s the size we’re looking for. So we’re coming over here to the sewing machine and I’m just going to make sure these two squares are just lined up right on top of each other just like that. And then I’m going to sew a quarter of an inch on both sides of this line. Alright so here we go. One side and then I’m going to come down the other. Alrighty.
Now what we’re going to do is we are going to cut this right in half on the line. Alright so now I’m just going to go ahead and cut this. Now because we want to make sure that these are, that these are exactly 4 ½ because that will really help us with lining up our different squares. We’re going to grab our perfectly slotted trimmer here, our clearly perfect slotted trimmer. And we’re going to lay this 4 ½, we’re going to cut them 4 ½. So you can see I have a little bit of extra here and I’m going to kind of center that up. You lay your stitch line on their stitch line and we’re going to square this block just by doing this and by doing this. And we can come out those little slots and cut the dog ears off and that will just make it line up perfectly. Alright, so now let’s do the other one. And you’ll want to do this to all your blocks because it will make it, it will just make them line up perfectly. So again you put your seam line on their seam line. We’re going to cut up this side and down this side. And then we’re going to come in here. And I think these are made to cut either way but I like to cut to the outside just because safety first you know. Safety first. Alright so let’s press these open. And we’re going to press to the dark side which means I’m going to have my dark fabric on top. And I’m going to set that seam, roll that back and, and this should then be exactly four inches. So that’s how we’re making our half square triangles for this block.
Now what we want to do is make some four patches. So you’re going to take another square. And we’re going to line them up on top of each other like this. Now to make a four patch out of a five inch square, what I like to do is sew just down the sides and then cut it in half and we’ll do that over here. So I’m going to line this up on my quarter of an inch line. And I’m going to sew just down the sides. And then just flip that around and sew like this. Alright now what I’m going to do is I’m going to cut these right in half. So I have this, my little ruler, this is 2 ½ inches wide so that’s half of five. So I can just lay that on the edge and trim that just like this. And then I’m going to press these open like this. So then we’re going to press these open. And then because I like to make my four patches so they’re mixed. So this is made up of two colors. Then I’m going to find another piece I’ve already sewn. And so basically when I do this I do it to a whole bunch of them. And then I start putting my squares together. So then you’re going to line it up like this. And you’re going to make sure that these seams are pushed right nice and tight together just really nested. And we are just going to again sew straight down the sides.. And a quarter of an inch and then on this side as well. Let me make sure now I’ve got my anchoring stitches. Making sure my middle lines up and it does.
Alright so now what we’re going to do is we’re going to again just cut it on the sides. So this is again still five inches this way so we’re just using our ruler laying it on the edge and cutting halfway in, 2 ½ inches. And then we’re going to open these up. Ooooh look how nice that matched. That is right on. I love it when a plan comes together. Alright these came together so nice. Look how great they look in the center. Isn’t that awesome? Alright now I like a scrappy block and because I sew with pre cuts they’re going to be scrappy. But it is really fun to notice and think about what’s going to happen if you use one color. For instance your chains, if you used one color, your chain is going to be the same color all the way through. But of course with mine is going to be scrappy. So we’re looking for some different colors. So I’m going to find another four patch that is a little bit, has different colors in it. And I’m going to find two of my half square triangles that are also different. So we’re going to scrap the whole thing up.
So what I like to do is I put my two half square triangles white into the middle. And then I put these together so that they match color to the white and color to the white. Now in reality when you fold these over and go to sew them together you can chain piece these. If you flip this over we’re chain piecing the same side. It’s all going the same direction. So once you get started you’re going to chain piece these. Now it’s easy to keep track of where you are because one whole pack of your stars, you know you have two charm packs, one whole pack is going to be half square triangles. And one whole pack is going to be four patches. So that’s just a great way to keep that in your head. And we’re going to go ahead and take these to the sewing machine and chain piece them and sew right down the side a quarter of an inch in. There’s no seam to match up on this. Alright so let’s see what we’ve got now. I’m going to go ahead and clip this thread right here and press these open. And one more.
Alright so now we’re going to put these together and you want to remember that you want opposites here. Let me get this thread. There we go. You want opposites here so your whites are coming together and your blocks are coming together just like this. And so we’re going to go ahead and sew these together like a four patch now. And this is our last seam for our block. And the only thing that matters on this seam is this center seam right here. So this little first seam that we’re coming to, it doesn’t match to anything so you can just sew right on by. But this second seam needs to line up. And so I like to make sure that’s matching and then go ahead and just sew right on down. Alright now we’re going to press this. And that came out very nicely.
So this is the block we get. And now we get to put them together. So we’re going to put this together in rows because there’s six across by seven down. And what I like to do is I like to match mine up. So my squares come together, my triangles come together. And then the next one your triangles come together and your squares come together just like that. So let’s look at the quilt so this makes a little more sense. Alright so this one right here, this is our little block. See our two little half square triangles to the middle and here’s our little block. So this one, our squares are coming together and our triangles are coming together up here. The next block, the squares come together up here and the triangles come together in here. So basically you’re just rotating your block to put it across. So six across, seven rows. And it just makes this darling quilt. Then you’re going to add your inner border and you’re going to add your outer border and you’re going to have just a darling little quilt that finishes up. This is a really fun pattern. And it’s based on super easy blocks that we’re familiar with, the four patch and the half square triangle. And we hope you enjoyed this tutorial on the Diamond Chain quilt from the MSQC.
& Progress on Social