


Mountain Lily Quilt Tutorial
Jenny Doan
Mountain Lily Quilt Tutorial
- 1 roll x 2.5" Strips (Jelly Rolls) - Print
- 3¾ yards x Background Fabric (incl. inner border)
- 1¾ yards x Accent Fabric
- 1¾ yards x Quilt Fabric for Outer Border
- ¾ yard x Quilt Fabric for Binding
- 5¾ yards x Quilt Fabric for Backing
Featured products Get the Supplies Featured in this Tutorial


Finish your masterpiece and let us give it the finishing touch it deserves.
Subscribe to MSQC on YouTube
Hundreds of FREE tutorials and a new one from Jenny launches every Friday.
video transcript
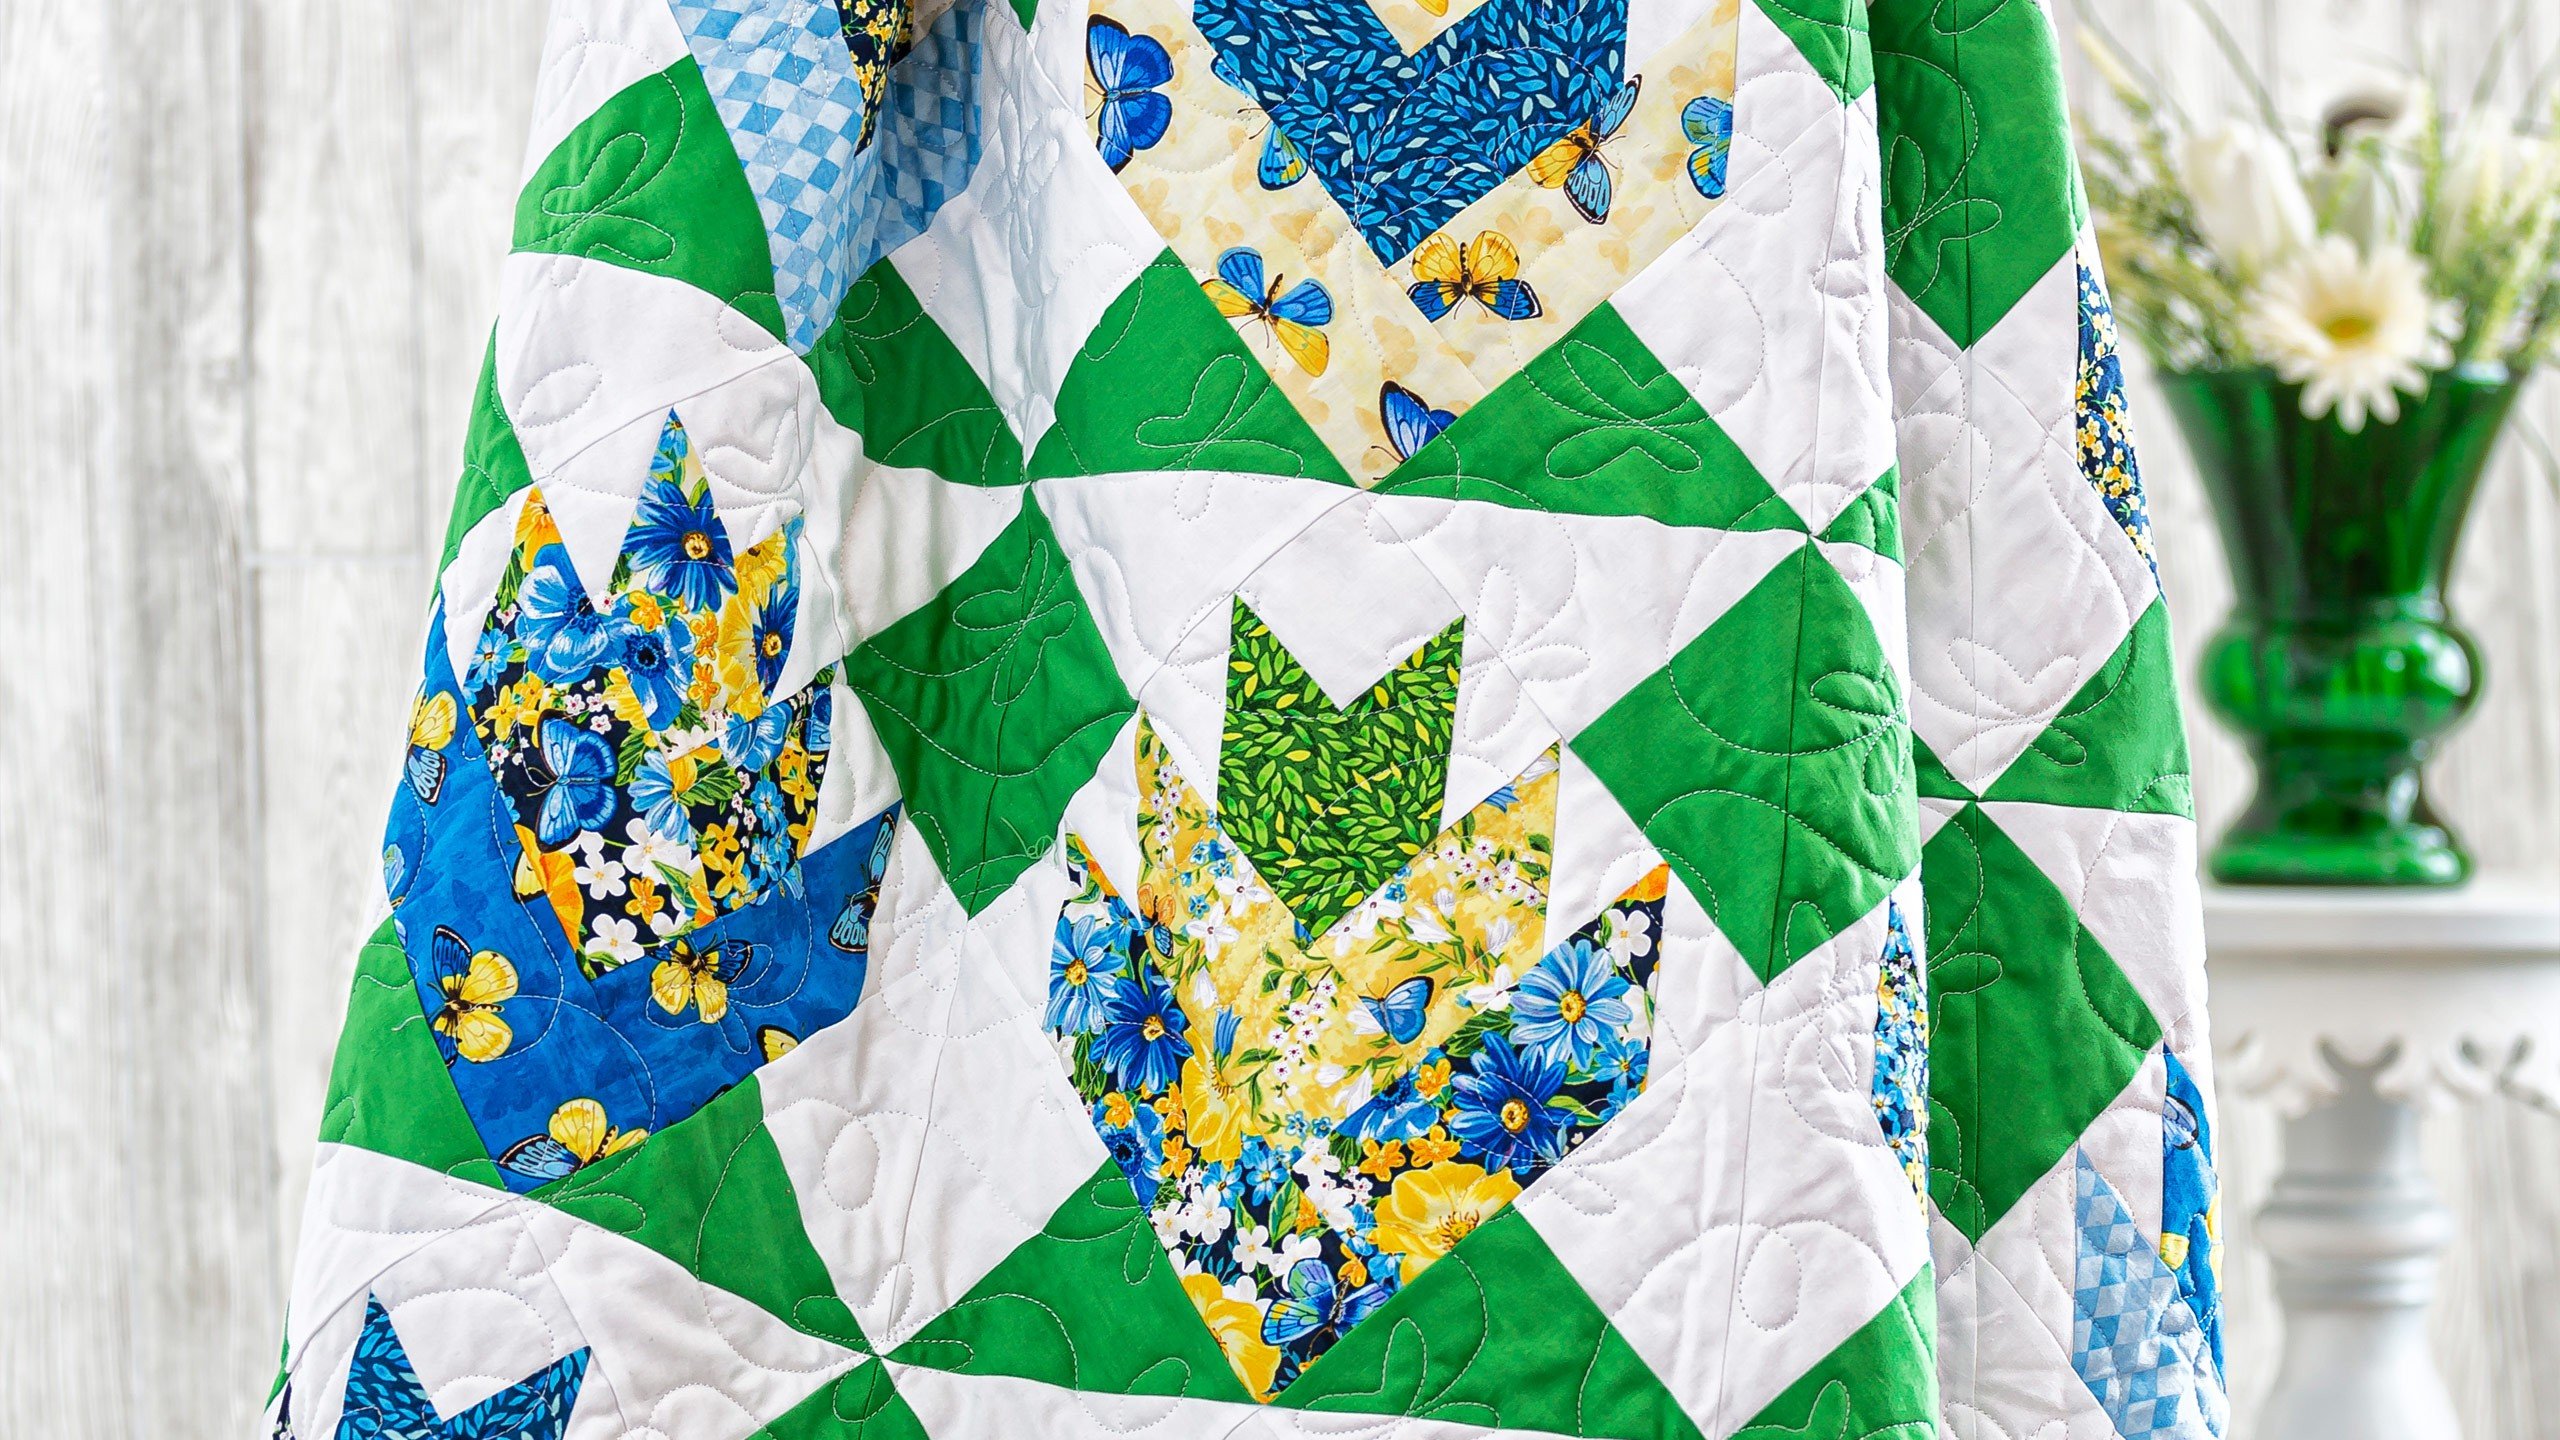
Hi everybody, it’s Jenny from the MSQC. And I have a fun project for you today. Take a look at this quilt behind me. Isn’t this great? I love how the green pops it. And it’s all based around this block. This is a type of log cabin block and it’s just quick and easy to make. And we are setting it with quarter square triangles which are also quick and easy to make. So to make this quilt you’re going to need one roll of 2 ½ inch strips. And we have used this beautiful Madison by Jane Maday for Wilmington. Then you’re going to need 3 ¾ yards of background fabrics. And that’s all this white and that includes that first border. Your accent fabric which is the green, you’re going to need ¾ of a yard for that. And it just makes this whole thing pop. And we’re going to make quarter square triangles out of that. Your border is going to be 1 ¾ yards and we did a nice big six inch border on this. And your backing is 5 ¾ yards and we used the butterflies. Isn’t that cute? So it makes a nice backing. And it’s just a quick and easy block to make.
So this is the flower block we’re talking about. We’re calling this Mountain Lily. And we wanted to set it on point. And Natalie was playing with this and we had just the idea what if we did quarter square triangles? So we’re going to show you how to make quarter square triangles the easy way. And how we’re going to do that is we’re going to take our accent fabric and our background fabric and we’re going to cut ten inch squares of those. So we have, we have two ten inch squares here and I know you’re going to think I’m crazy but trust me on this. We’re going to sew all the way around the outside edge. And so we’re going to come over to the sewing machine and put your foot just right on the edge and we’re just really going to sew on the outside, sew a quarter of an inch. And we’re just going to zoom around. And just pivot at the corners, you can sew off the end or stop and turn. Make sure these are still matched up nice and straight. Alrighty.
Ok so once you’ve got that all sewn around the trick to making these easy quarter square triangles is to cut it like we’re doing an easy eight. So what that means is we’re going to cut it diagonally both directions and horizontally and vertically. So we’re going to make four cuts. And what we’re going to do is we’re going to start off first cutting it in half like this. Just like this. And then because my ruler is five inches I can lay it right along the edge, just like this. And then we’re also going to cut it corner to corner. So I’m cutting this, laying it on here diagonally and cutting corner right through to the other corner. And then you can see maybe I have a little tiny pleat right here. It won’t matter because when I cut, I cut right through that. And it won’t matter at all. Alright so now we have one, two, three, four, five, six, seven, eight quarter square triangles . And this is what a quarter square triangle looks like. See it’s half a block, just like that. So let’s take these over and iron them open. You want to always iron to the dark side. So we’re going to flip this with our dark side up and then we’re just going to iron them open. Just like this. Now you’ll have some going one direction and some going the other. So you’ll lay those in piles. You’ll have four, and you’ll see what I mean in just a second. So see how the green is on this side on this one. You’re going to have four going that way and four that are the other way. Just like this. And that’s good for our pattern, we need that. We need the opposites. I love this. Oops I almost ironed to the wrong side. There we go. So one, two, three and then here’s our fourth one. Of this, ope, no sorry. We’ve got two more. I thought I was almost done right there. Alright so now we have these two stacks right here. And here’s what we’re going to do. We’re going to set these aside now and we’re going to make the flower block.
So this is our flower block right here and it’s basically kind of a take on the log cabin only we snowball the corners. So what we’re going to do is you’re going to take your strip. And you’re going to cut one 2 ½, two 4 ½, two 6 ½ and one 8 ½. And we’ll make stacks of those so they’ll all be stacked in different places. I mean we’ll have different piles of them. So I’m going to cut off this little selvedge edge right here. And then I’m going to cut just one 2 ½ like this. And I’m going to set this up here. And then I’m going to lay my strip back together so I can cut two of each one. Let me clean up this little, my little selvedge edge must have gotten just a little bit off. So I’m going to clean that edge up. And then we’re going to cut two 4 ½ so lay my ruler right on here. Two 4 ½. And we’ll make piles of these. And you’ll do this to all your strips. So two 6 ½. So here’s my ruler, 6 ½ and then one 8 ½. So we’re going to open this up again and do an 8 ½ inch piece. And basically you’re going to build this just like a log cabin. So there’s our 8 ½ inch piece right here. And just make those little piles and do that to all your strips.
Alright so now what we’re going to do to start, I have some little pieces cut. You’re going to want every layer to be a different color. See how this one is green, this one is floral, and this is the yellow. You’re going to want them to be kind of like light, dark, lighter. You know just make sure there’s a little contrast between your layers. And I have some pieces cut over here that I cut earlier and we’re going to put our block together using these. You’re going to need 2 ½ inch white squares as well. So just remember that you’re going to need seven per block and out of every strip you’re going to get 16 of those. So that comes out of the background fabric and so there’s plenty of that to do there with.
Alright so now what we’re going to do is we’re going to take a 2 ½ white square and sew it to our 2 ½ inch colored square just like this. And we’re going to lay them right sides together and do a quarter of an inch down the side. And we’re going to press these open. And then we’re going to add this piece to the side just like this. Now this is how our flower is going to sit like this. And so it doesn’t really matter which side you sew it on, it will work. But you kind of want to keep your strips going on the same side or I did anyway. So I’m going to lay this over here and attach this to it. And just sew a quarter of an inch down the side. Oops, came unthreaded there. Alright, here we go just a quarter inch right down the side. And then we’re going to press that open.
Now what we’re going to do is we’re going to take some more of our 2 ½ inch strips and we are going to snowball these corners, which means I’m going to lay a strip on here like this and a strip on here like this and snowball those. So you can actually, if you lay them on here like this and you want to save yourself a little bit of readjusting, you can put a pin in there and just sew those down at the same time. We’re going to sew, you can see we’ve drawn a line on here corner to corner and we’re just going to sew right down the middle of that block on both sides. So we start here. So now we’re just going to sew straight down the line. And move that pin. And then we’re going to come over here and do the same thing, sew right on the line. Alright. Now we’re going to trim off these edges. So what I do is I look at my seam and I lay my ruler so it’s a quarter inch away from that seam and trim that off. And I catch any threads as I’m going. So again a quarter of an inch. And you can eyeball that or just go ahead and trim that, whatever you like. Let me get these threads off. And then we’re going to press it open.
Now what we’re going to do, this is the beginning, this is our little bud of our flower if you will. And what we’re going to do is we’re going to go and we’re going to add two more strips. So now we have, let’s see, we have this pretty sunflower here and then we’ll add this one here and again snowball the corners. So, now I guess you could snowball the corners on all of these strips before you started if you want to, it would work. Alright so line this up and sew a quarter of an inch . And then I’m just going to finger press this back like this and then I’m going to lay this on the side and sew right along this side, a quarter of an inch. There we go. Alright, let’s press this back now. And now we’re going to snowball these two corners, just like this. We’ve got our line drawn. We’re going to sit this on here like this. And sew right on that line. You know a lot of times when we do this we sew on one side or the other. But not this time. This time we’re right on that line. Sewing down and doing that on both sides. You can see our little lily is beginning to bloom. We’ll trim those off, this way and this way. And then we’re going to iron them back and add our last row. Isn’t this looking so cute? I love when you can see a block coming together. So now we have this side and this side. And we’ll start with the short side, sew it on first. And I love it when there’s good contrast and you can see all the, you know, the light, the mediums, the darks. You can see all of those happening. They really play into a beautiful quilt. Alright, so make sure this is lined up nice and straight. And press this one back and add its corners. Alright so here’s our two little corners are coming on here like this. One here and one here. I actually think the snowballing saves so much time, doing it like this. And of course I love the look. And it also helps out on that math part. You don’t have to measure so many little half square triangles. Alright and we’re going to trim this off and trim this off and press it back. And our block is almost done.
So then you’re going to press this. And you get this darling little block. Now we’re ready, you know most of our blocks sit this way, but now we’re ready to set it on point by using this quarter square triangle setting. So let me show you how that works. Now I have some here. And remember we talked about having ones that go this way and ones that go that way. You need two of each direction for each block. So we’ve got them here. See they’re both going different directions. And the way I do this to keep myself straight is I remember that my green squares are coming together at the bottom. So I have one of each coming together right here. And I put them so the greens come together. See how they form like a little vase for our pot to sit in. And up here, you’re going to make sure that your white is at the top. So they’re going to come on here like this. And this is how that forms your block.
Now to put these half square triangles on, we’ve got nice little halves on our block. We know this is the middle and if you want to find the sides of your block you can actually just fold it in half like this. Give it a little finger press and then line this up on here. We’ll put our two bottom ones on first. And I want to make sure this is lined up. And you’ll see when you get it lined up, it’s just a little bit sticking over each end. And I think that, that, you know, that makes it real doable. You can eyeball that. But if you want to make sure you’re exact you’ll do that little finger press. So we’ll sew this side on. Alright, so that one is sewed on. And now I’m going to add the top piece on here. So it’s easy to go, you know, bottom to top. And this one already has its center line. So we can just lay that, line that up and we’ll sew this right down the side. So it’s good to add opposite sides first. Actually it doesn’t really matter, you can do it either way. But this way you can sew two and press two, which I think is a little bit of a time saver. Alright now we’re going to press this open. And then we’re going to set it back down and we’re going to do side to side. So again, look at where your blocks line up. Make sure you have the little vase at the top and the white at the top up here. And so these have our middle lines on them already. We have a seam there, so we can see that. And this one is a long block so it needs its fold to find its center. So I’m going to pin this one on right here like this. And then I’m just going to fold this over, make sure these are lined up, finger press a little crease. And then line this up on the crease, making sure that my little ends are sticking out about the same on either side. Oh I knew I dropped a pin over there. I’m like, where’s that pin? Alright now we’re ready to sew the sides and we’re just going to do a quarter of an inch right down the side. Alright so let’s start here. Alrighty. Now I pinned far enough in on those that I didn’t even have to remove the pin because I wasn’t running over which was kind of helpful. I didn’t do that on purpose. That was a lucky happening. But it worked. So now I’m going to iron these out. And then this finishes up our block like this. Now this block has to end up 11 ½ so you’ll have a little bit of leeway. And you can see I’m a little bit off here. So I’m just going to straighten up this edge right here. And the way I like to do that is I will actually put my ruler kind of corner to corner. And see what kind of hangs here in the middle. And I generally, if it will fit in the quarter of an inch seam I don’t stress about it too much. But you just want to make sure these are nice and fairly even at 11 ½. Let’s see how close we are. So I can do a little bit of trimming and I’ll be fine.
So I finished trimming this up and I found I was taking off, I have a really small quarter of an inch so I found I was taking off a little more than I thought I should. And really when you’re making a block what you want to remember is that all your blocks need to be the same size. So I did trim mine to 11 ½ and it’s fine. I did lose this little point right here but I don’t think that’s going to matter because it’s all on the white and the block looks great. I got a little nervous there because I felt like I was trimming off a lot. So if you happen to have a thinner quarter of an inch like I do, or like I did on this block, then you know, if it’s 11 ¾ what matter is that all your blocks are the same. And so just work for that and they should be fine.
So this is our finished block right here. And I have a bunch of blocks over here that are done and ready to show you this layout. Alright so what we’re going to do, what makes this super easy is once you get your blocks done you just sew them together. They just go together just like this. And these cool patterns start appearing. So you’ll lay them out in long rows. And there are, let’s see here. We’ve got one, two, three, four, five, six, across so six in a row. And when you come in to lay your second row you’re just going to do the same thing. Oh here I’ll put mine in here. So we’re going to lay them in here. So make sure your flowers are always going up, that’s your compass right there. Make sure your flowers are always going up. And then you see all these cool patterns that are appearing, you know, because of the shapes that we’ve used. Make sure you use a good pop color with your fabric and it will just come together and it will just be so pretty. Now we have six across and one, two, three, four, five, six, seven, down. That makes a quilt that is 81 by 92. So this is a great size quilt. And we hope you enjoyed this tutorial on the Mountain Lily quilt from the MSQC.
& Progress on Social