


Ohio Star Quilt Tutorial
Jenny Doan
Ohio Star Quilt Tutorial
- 3 packs x 5" Precut Fabric Squares (Charm Packs) - Print
- 2-1/2 yards x Border Fabric
- 6 yards x Background Fabric
Featured products Get the Supplies Featured in this Tutorial


Finish your masterpiece and let us give it the finishing touch it deserves.
Subscribe to MSQC on YouTube
Hundreds of FREE tutorials and a new one from Jenny launches every Friday.
video transcript
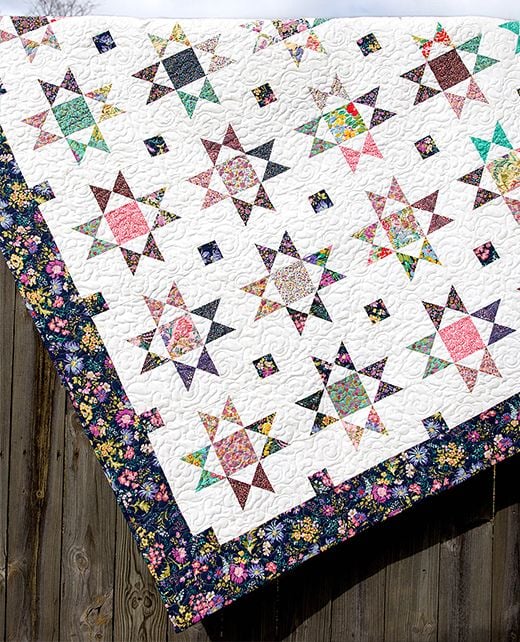
Jenny demonstrates how to make the classic Ohio Star block pattern using yardage and charm packs (5 inch squares of precut fabric. We used Regent Street by Sentimental Studios for Moda.) Learn how to make hourglass blocks, cornerstones, and how to sash a quilt.
Hi everybody, it’s Jenny from the MSQC. And I’ve got an awesome project for you today. Today we’re talking about the Ohio Star. And the Ohio Star is a traditional old block that, that is just really old. I mean it’s been around for a long time. And I’ve got a new easy way to make it that I can’t wait to show you. So let’s take a look at this quilt behind me. Look at these Ohio stars, aren’t they pretty. We’ve separated them by a little sashing with cornerstones. I mean it’s just a great quilt and you’re going to love how we do this.
So to make this quilt what you’re going to need are three packs of five inch squares. That’s 42 squares per pack. And you’re going to need three of those. And we’ve used Regent Street by Sentimental Studios for Moda. And it’s a beautiful line. I mean you take a look at the quilt behind us and it’s just gorgeous. You’re also going to need six yards of background fabric. Now the background fabric are going to fill out the cornerstones in your blocks. It’s going to make, you know, finish up the other side of your hourglasses. And it’s also going to be your sashings, all of your sashings and that first border. So that’s going to come out of the six yards. Now you’re going to need at least 84 squares of those five inch squares. So two of those could be charm packs which brings you down to four yards of fabric that you’re going to need. So I hope that’s not too confusing. Six yards total or four yards if you buy a couple of charm packs as well. You’re also going to need about 2 ½ yards for your border. That’s going to do, it’s going to do this border out here and it’s going to do all your little cobblestones. We made all of our little stones, our little cornerstones the same color which of course you can mix up if you want to. But we used, we used them all out of the same color that we used the border fabric for.
So let me show you how to make this. Now the first thing we’re going to do is make our hour glasses. And the hourglasses, I mean that’s this little block right here. And they’re just adorable. And so what I’ve done here is, I know you’re going to be shocked, I drew the line. Now you can actually still iron this in half or you can draw the line. I wanted to draw the line to show you what I’m doing so that you could see it a little better. Because it’s important, you know the first time you make these, they’re made a little bit different and I want you to see how you make them. So we’re going to take two of our packs and make these hourglasses. This is a five inch square. We’re putting a white five inch square on top. We’ve drawn the line side to side. And we’re going to sew a quarter of an inch on either side of this line. So let’s go to the sewing machine and do that.
Alright so here we go. I’m lining up my presser foot with the line and my needle is set so that it will sew a quarter of an inch away. I’m sewing down to this end. I’m just going to flip this around and come right back and sew down the other side. And you will need two of these for each block that you make. You’re going to need to make two sets of these. So once we cut these in half and of course you can use your scissor or your rotary cutter. Then we’re going to press them open. And you’re going to lay them, your dark color on top because we want to press these because there’s so much background fabric on this we want to make sure that we press so that the color, the little seam part stays on the color so it doesn’t show through your white. And we’re just going to roll those back like that.
Alright now what we’re going to have to do is we are going to draw the line again. So this time, now we have our half square triangle, we’re going to lay our ruler diagonally just like this. And we’re going to draw the line again. And again you can iron that if you want to. I just thought it would be easier to show you this way. And then we’re going to turn these so they’re opposite. So the white nests up with the color and the color nests up with the white. And so you want to feel right in here to make sure there’s no, no empty space in there. You want them nesting up really tight. You want to just match them up so that they line up really nice. And then we’re going to sew again a quarter of an inch on either side of this line. So here we go. And then I just sew down there, pull it around and sew down the other side. Now we’re going to trim this right here and this time I’m going to use my rotary cutter. And then you’ve got this perfect little hourglass right here. Oop. And let’s press those. Again I’m just going to set this seam and roll them back.
Alright now this hourglass determines the size of all the rest of our blocks. And so we need to square them up. To square up an hourglass what you’re going to want to do is you are going to want to get a ruler that makes sense to your brain and you’re going to want to find the two. We want them to end up four inches. And so what we have to do is we have to find the center of that four inch block. And we’re going to have to cut them on either side. So our little dot, this is the two inch mark right here. Our little dot is at the two so that’s directly in half. And then our 45 line lines up right along our seam and we’re just going to trim this right here. And trim this. And we do this because not all of our blocks come out perfect because we’re just not always so perfect. That’s alright. Finished is better than perfect. Remember that, that’s a rule to live by right there. Finished is better than perfect. So there’s one. Now we’re going to trim up our other one. And we’re right here in the center, trimming this side and this side. And again watch this really close. So my dot, my little dot which is on the two inch line, and I know I need two because I want the total to be four. So the two inch line is right in the center. I’m making sure that my 45 line lines up along that seam line. I’m going to hold this down and I’m going to trim both sides. And this will end up being a perfect four inch block. Now you need to do two of those to make the block. And I have two here. Now on my blocks up here, I did all my hourglasses and then I mixed them all up. So they’re all different. Each one of these has a different block on them. I’m showing you I just have made two sets here so I’ll have some matchers but that’s alright. Ok so you’re going to do this to two of your packs.
One of your packs is going to be your center block right here in the center of our block, this one right here. And again we have to make this block match this size. So we’re going to cut it down to four inches as well. So I’m going to lay this on the corner, the corner of my block on the corner of my ruler and cut four inches just like this. So this is actually really the only part that bother me, this little bit of waste because you have to cut that center block down to match your other blocks and they’re all four inches. And so, but you know, for a block this cute we’re just going to let it go.
Now the next thing we need are our corner blocks and they are also going to be four inches because this is really a nine patch. So what we’re going to do out of our yardage is we’re going to cut four inch strips. And just like this we’re going to use our yardage. We’re going to cut a four inch strip. And then I leave mine folded like this because then you can get four cuts at once. And we’re going to go ahead over here and cut that. And cut this. And it give us, you know, it give us a little stack of them right here. And so then we’re ready to assemble our block.
So we’re going to put our square here in the middle, just like that. And then we’re going to put these around it. And again, you know, how you want to lay this out is up to you. You could match them all the way around if you want. I love the scrappy look. So I’m going to put mine top and bottom and side to side so they scrap. You put them with the white square in. See white square in. And then it frames it up right here. It makes it look like a square in a square in the center. And then you’re going to add these to your corners like this. So one here, one here, one here and one here. And then you just sew this together like a nine patch. So you’re going to sew row one, row two, row three and then sew all of those together. So let’s do that. Let’s just head over here.
And I’m just going to take these and sew them a quarter of an inch right along the edge. And I’m actually going to sew all my pieces before I get up and iron because I want my seams to go a certain way so that they nest. So here’s this first row. And I’m adding a white square on either side of my hourglass. And it should, it should match up to the color. You should be sewing color to white, not white to white for the pattern to work. So there’s that one. Now we’re going to sew these two to the center one. And we’re going to line this up along this edge. And all of you will get into a rhythm with how you like to put your blocks together. I mean you can really chain piece these and you know, I mean, I’m, I did all of my, my hourglasses, one after another, after another and then cut them all and then went back and pressed them all. You know I kind of do that assembly line sewing once it gets going. But you have to know how to do one block before you do that. So we’re going to concentrate on this one. And then when you guys get ready to do it, make one so you have a pattern to look at. And then you can go ahead and just, you know, do them assembly line, however you want. Whatever will work for you. Alright, there’s our last seam on these and then we want to iron them. Press them.
What we’re going to do is I’m going to press my top and my bottom strip so that the seams go to, out. Directly to out. So like this, facing out. And we are going to do that to both the top and the bottom.And I like to press from the top first. And then make my seams go the way I want to on the back like that. And then this middle section, I’m going to press my seams in. And then when we go to put this together it will just nest ever so nicely. So let me make sure I have no folds on here. If you have a fold in your seam then it changes the size of your block. And then you can get into some trouble with that. Alright so now we’re going to line these up because our seams are going opposite ways we’re going to be able to just, see how those seams just lay in there so nicely. We’ll be able to nest them right up. So let’s go ahead and sew this together. And one more. End of this seam. And we’ve got to do the other side. I just love this block. This really is one of my favorites. Alright so let’s iron this back. And you have an Ohio star. Look at that. So your block is all done and you’re ready to go.
Now when we put these together we put a sashing in between, which you know, if I’m doing a sashing, it’s going to be 2 ½ inches because I can get those pre cut. You can also cut them. What you want to remember with your sashing is you want to measure your block and you want your, you want to cut the sashing the size of your block. So this block measures 11 inches and so you’re going to cut these pieces 11 inches. So that, so that you can, you can put them right alongside it. So let me go right along this edge right here. Make sure I still have 11. Yep, almost, almost exactly. I’m going to have to cut that little fold off. Come over here and trim this tiny fold. And this should be the size of our block right here. And it is.
So once you get your sashing cut you are ready to assemble your rows. So what we’re going to do is we’re going to take our blocks like this and we are going to put a sashing right in between them like this and sew this together. And you’re going to do that for the whole row. Now we have six blocks across this row. And then once you get your rows done, you’re ready to put your sashings in between the rows. So what you’re going to do is you’re going to take the other pieces of your sashings and you are going to put a little 2 ½ inch square in here. So you’ll just this quarter of an inch on this side, quarter of an inch on this side. And when you go to put it together you’re going to put this sashing row right in between all of your sewn rows of blocks. Super easy to assemble.
So let’s look at this one more time. We’ve got six blocks across and a sashing between each block. Then you’re ready to put in this sashing row here that has your cornerstones in it. And it separates each row and it just separates the blocks enough so that it just let’s them shine and be, be their own stars. So now you know an easy way to make the hourglass block and how to put it together to make the Ohio star. So we hope you enjoyed this tutorial from the MSQC.
& Progress on Social