


Old Mill Path Quilt Tutorial
Jenny Doan
Old Mill Path Quilt Tutorial
- 1 pack x 10" Precut Fabric Squares (Layer Cakes) - Print
- 1¼ yards x Quilt Fabric for Border
- ¾ yard x Quilt Fabric for Binding
- 4¼ yards x Quilt Backing Fabric
- 1 x Missouri Star - Drunkard's Path Circle Template Set
Featured products Get the Supplies Featured in this Tutorial


Finish your masterpiece and let us give it the finishing touch it deserves.
Subscribe to MSQC on YouTube
Hundreds of FREE tutorials and a new one from Jenny launches every Friday.
video transcript
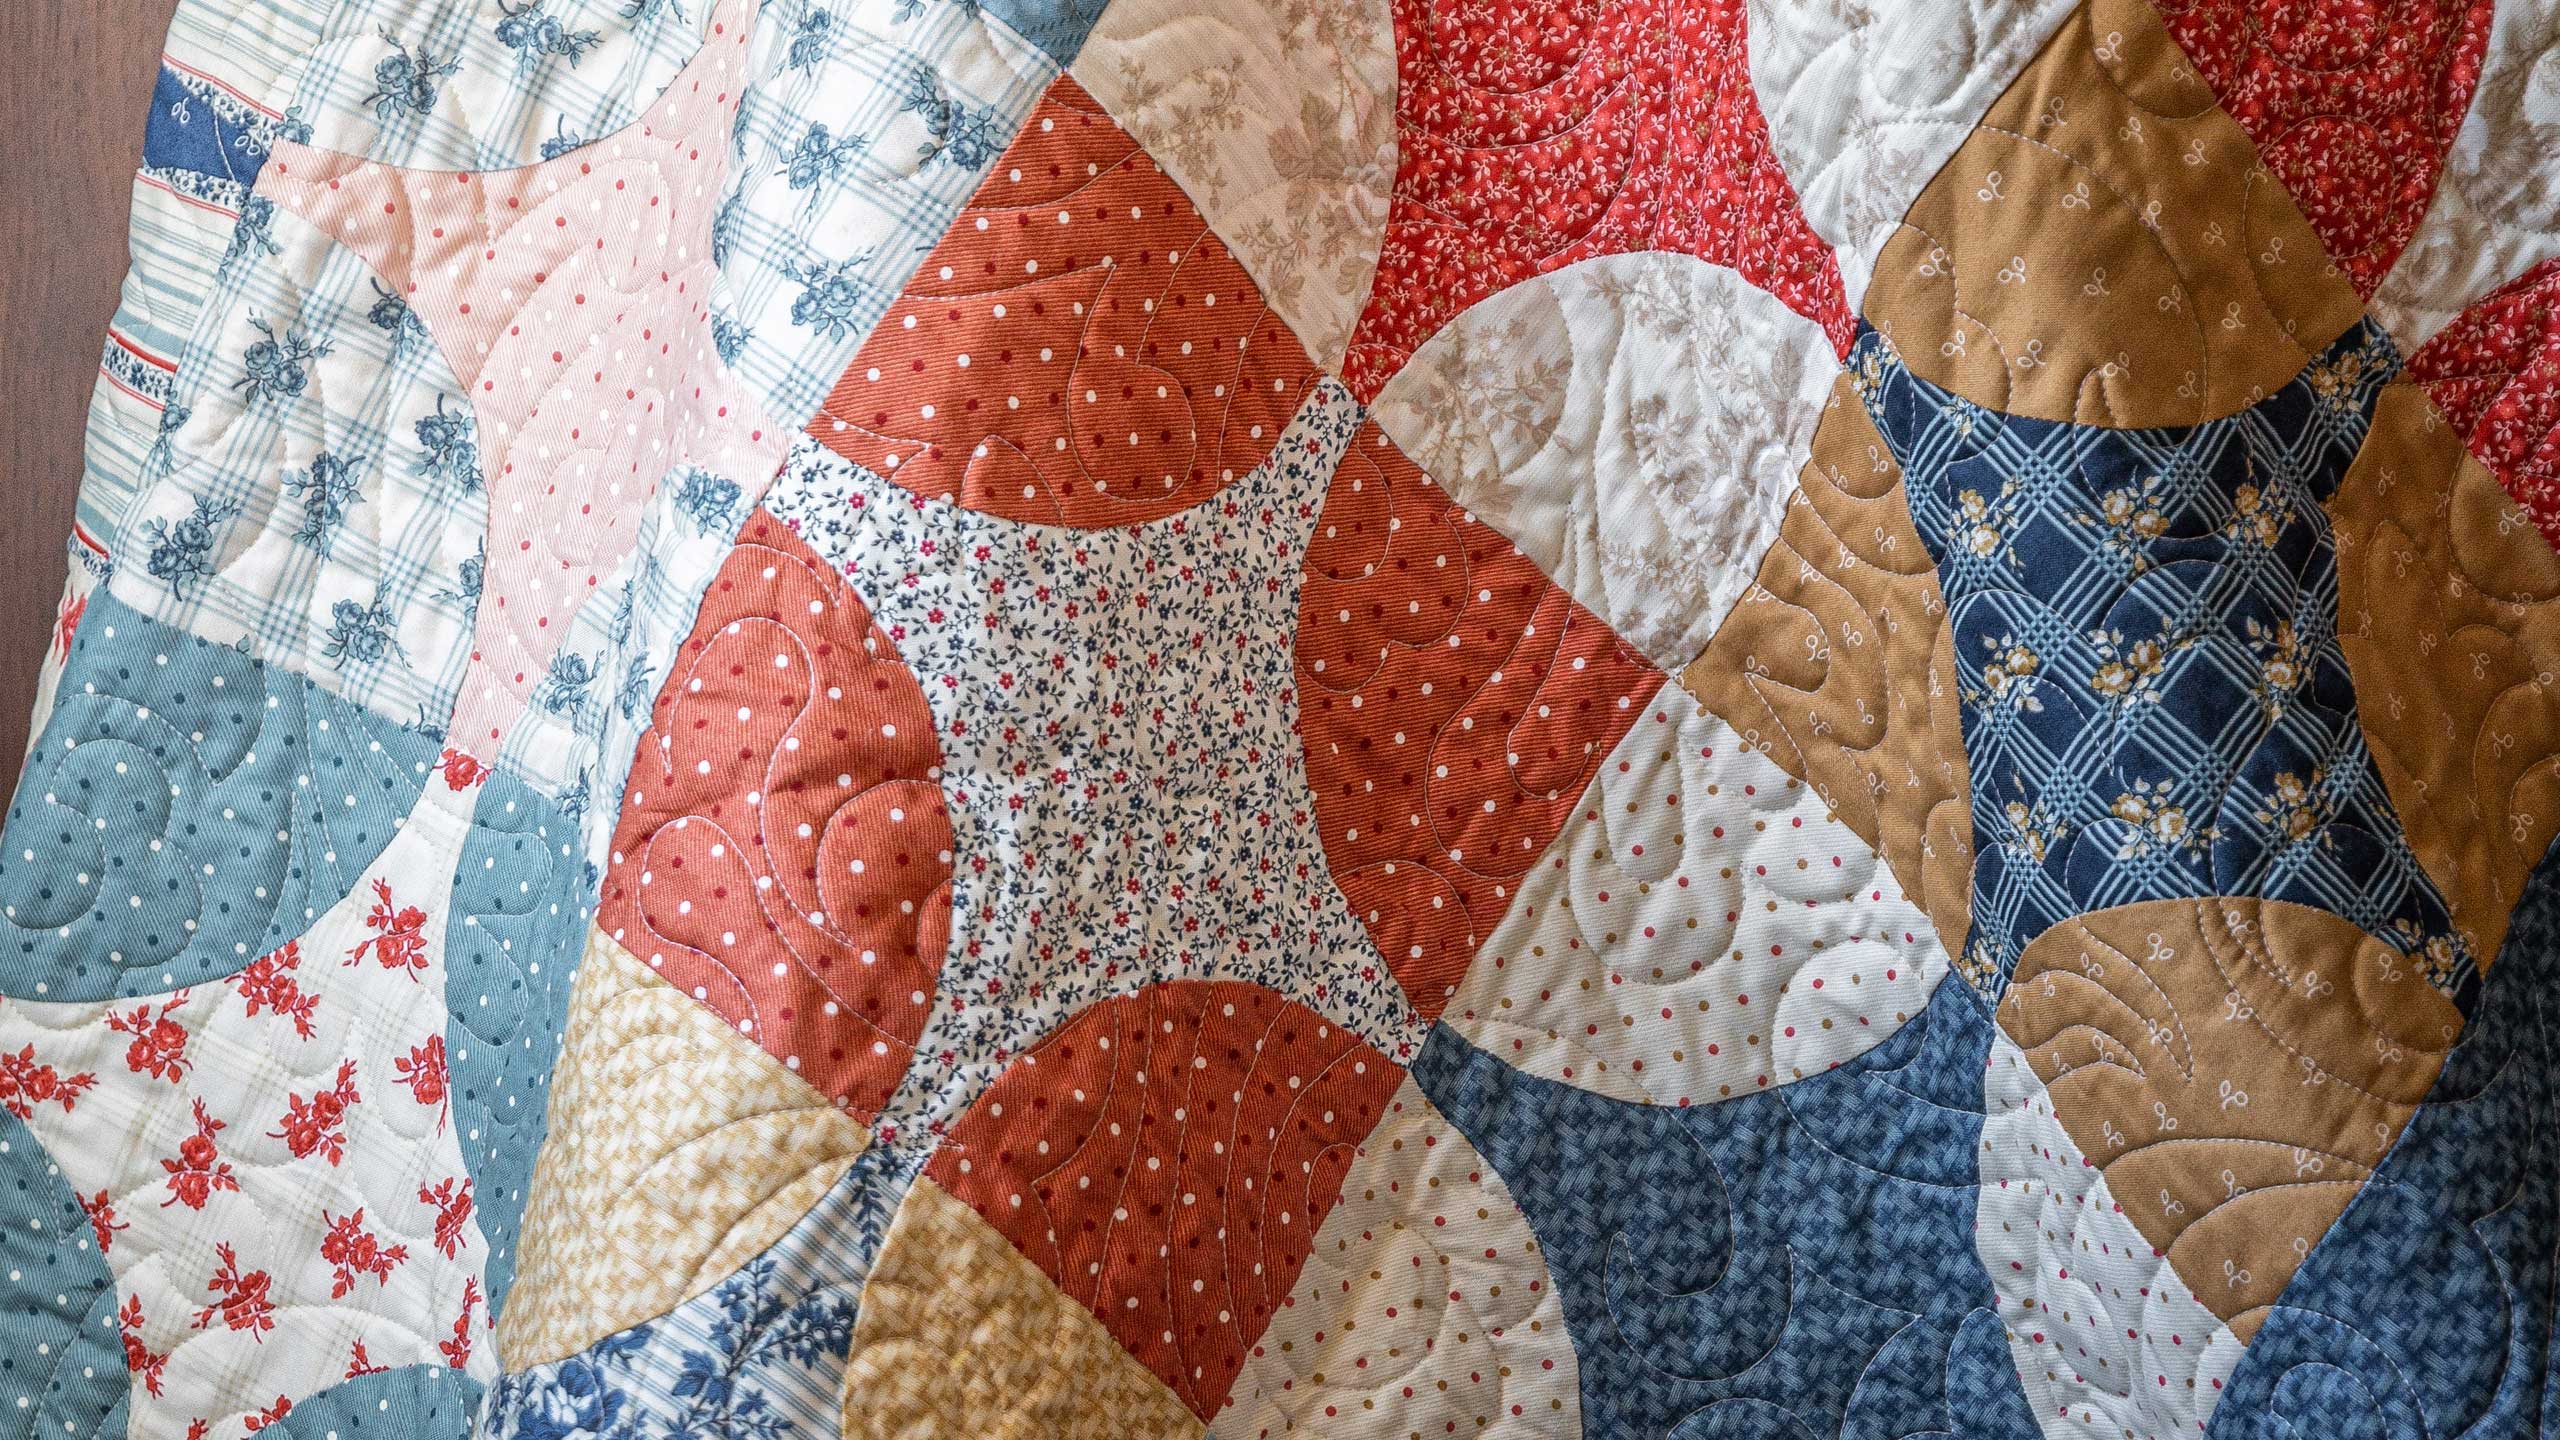
Hi everybody, it's Jenny from the Missouri Star Quilt Company and I am really excited about today's project. There was a lady who came into our main shop one day and she had a whole pile of old newspaper clippings that she had found somewhere in her house that was from her grandmother, and it was all these old patterns. And I looked through them and I was like, I can use some of these and I can make them easy. So this is called the Mill Wheel and it's from 1929 and it's just a great, great block. Of course they have little pieces cut out and all these little things so that you can make it. But I'm going to show you the easy way. So let's take a look at this quilt behind me.
Isn't this fun? You will be surprised at how easy this is and how quickly it goes together, and I can't wait to show you how to do it. So to make this quilt, we used Northport by Minick and Simpson from Moda and it's just a great line, all these red white blues and beiges. I love the fabric they put together and you're going to need that and some border fabric. This is a nice big six inch border out here and you're going to need some backing, as well. Look at our backing. You're going to need about four yards for the backing. The quilt is 60 by 70 and so it's a great size quilt. And remember if you ever want to make them bigger, you just double up on your pre cuts and that's how you do it.
All right, so we're going to take this sweet old block and we are going to thank it for the idea and then we're going to show you how to do it easy. So you're going to go through your pack, you're going to pick a light and a dark. You're going to get two blocks from each two that you put together. And so I'm just going to put them together like this. And basically what we're going to do now is we're going to take this block and we're going to iron it into fourths.
So we're going to fold this right in half and I'm going to press the seam, and it's important to line up your corners exactly. And then we're going to fold it again and press the seam. You're going to do this to all your squares. So let me take this one right here. This is going to be our... One block will have the white on the outside, one block will have the red on the outside. And so on all these blocks up here, you'll see a sister block. All right, now line this up carefully so it's right. Now you're also going to need our Drunkard's Path ruler because the Drunkard's Path ruler is what's going to give us these curved looks. So I'm going to take my Drunkard's Path ruler, and it comes like this, it comes with the outside and the inside curve, and the first thing we're going to do is cut our inside curves like this. And we're going to do same thing to all the squares.
So just carefully cut around this curve like this and do it to both of them. And mine, make sure they stay lined up and I put my corner, this is important. I should've told you this. I put my corner on the edges that are pinked, so they're are all the loose edges, not on the fold, on the edges that are pinked. And so I'm going to put my little corner piece on here and I'm going to carefully cut that up. Now we're going to take this little tiny piece right here that's still folded and we're going to lay this on our four and a half inch line, just like this. Line it up on the corner right here, and we're just going to cut off these little guys right here, and we're just going to cut this little sliver of fabric out of the middle here, like this, and look it, that's all the waste you have.
All right, we'll do the same thing to both pieces. Let me turn this a little bit for my left hand. Nope, line it up. You want to make sure they stay lined up, that's super important, and on the four and a half inch line. It's like look twice, cut once. All right, now what we're going to do... Oops, I have a little hanging on right there. Just a little string. Let me carefully cut that. There we go. And I love that that's all the waste we have. All right, so now we're going to take these pieces right here and we are going to open them up and press them nice and flat.
So here we go. All right. So now you have these pieces and now we're going to put our reds into our white and our whites into our reds. So I'm just going to show you one of these and show you how to do it. You're going to add a corner to each piece like this. So it's going to go around like this and it's going to make this block right here. So what we want to do is we want to just start.
Now I sewed all of these without any pins, without any stress, and I only had to take out four. So out of the whole quilt, I'm sewing four on each one. I only had to take out four total that didn't get come together just right. So just practice a little bit, but you can. You can pin at the beginning, you can pin at the middle, and you can pin at the end. And so, if you want to pin it the middle, I fold a little crease here and I fold this in half and I make a little crease here, finger crease that and then I'm going to line those up. So you put them right sides together, but I didn't love the pins because I like the fabric to be free so I can maneuver it. So here's how I did that. I just started right here, lined my pieces up together, sew a few stitches, pull these together. So basically is, I can move them, I'm sewing straight. And this one is going to come out really close. It's close enough for me.
All right. Now what I did after each one I sewed is I came over here and I pressed it flat and then we're onto the next curves. So I just wanted to take a moment and really dive into these curves. I wanted you guys to see really close up how easy this is. So again, we're going to lay our fabric, we're going to match it up, we're doing it right sides together. I'm going to lift my presser foot, my needle is in the needle down position so that when I let off my presser foot, my needle stays down and I'm just going to pull these so they line up and I'm just going to so a few stitches and pull the fabric so they line up together like this. Now you are welcome to put pins at the beginning and end and in the middle. I'm just going to come along here and sew this a few little stitches at a time and this little end right here is going to come out perfect.
So take a look at this. Look how cool that looks. It just fit in there perfectly. So I'm going to just press it. When I make these, I do a little nest for myself over here. I like my seam to go to the inside, but let's do one more curve just so you can watch it. All right, right sides together, line up the end, put down your presser foot, and take a few anchoring stitches. Now the bottom part, I don't pull or stretch at all, but I keep a nice tight hold on my top. And so I'm moving the bottom and the top to meet up like this and I'm just coming along. Woo, that was a little fast. It scared me to death. All right, here we go. We're almost to the end here. We're going to curve these two together and just like that, we've finished our second curve. Here it is. Isn't that nice?
So you're just going to do that to all four curves and I hope this helps you. Don't be afraid of those curves. They're really fun to sew. So let's get on with making the quilt. And I always put my concave on the bottom. Now you can go along and sew them all without pressing. I like it pressed because it lays flatter as I'm sewing and you have to kind of pay attention when you're doing curves. The curve on our Drunkard's Path ruler is such a great curve that it makes it really doable. I never thought I would ever be a curve sewer but here I am, sewing curves.
This little end is always hard to tuck in. It would be a great place to use one of those stilettos. All right, now just to show you it can be done, I'm just going to go ahead and sew this one in. All right, so I'm going to start here and I just anchor it down. Oh, and I always keep my needle in the needle down position so that when I stop, my fabric doesn't slide around under my foot. That's actually a really important tip. All right. All right, so now we're going to press this out and just like that, look how cute this is. And you think, Oh, should I clip the curves? No, you don't even have to clip the curves. It just goes together so sweet.
So you're going to do this to all your blocks and then we're going to put them together in rows and we just sewed them right together. And so let me get a couple of these blocks I've already done because I want to show you how to do this because these two little hands right here have to match up like they're holding hands. And not all my edges were exactly the same, and so I just laid these together, and I tried to match up this seam right here. So right here, I tried to match this up, and I'm going to put a little pin in there. Let me grab my pins. Whoa, I don't know where that one went, but I got another one here. All right, so now I'm going to line this up and make these edges come together like this, and we're just going to sew down the side because it is important to match up that little center seam right there.
Oh, pin out. All right, now let's see how this looks, because we're going to do this to our whole row. Oh, that came out really nice. I was so surprised how fast this came together. All right, so see how this comes together right here? So let's go look at the quilt behind me, because you're going to sew the whole row like that. So we've got one, two, three, four, five, six across, seven down, one, two, three, four, five, six, seven. So seven rows, six in each row. And because I was matching lights and darks like this, basically I would sew a whole row together, put it up on my design board, and then make sure the next one under it, because it's going to be staggered, so it's okay if some fabrics are close because you're going to have dark, light, dark, light, dark. You're going to have them like that, and so it just lines up. It lays out so nice. I barely had to do any moving around. Just came together really easily and really quick. So thanks to 1929. We hope you enjoyed the tutorial on the Old Mill Path.
& Progress on Social