


Super Easy Hourglass Quilt Tutorial
Jenny Doan
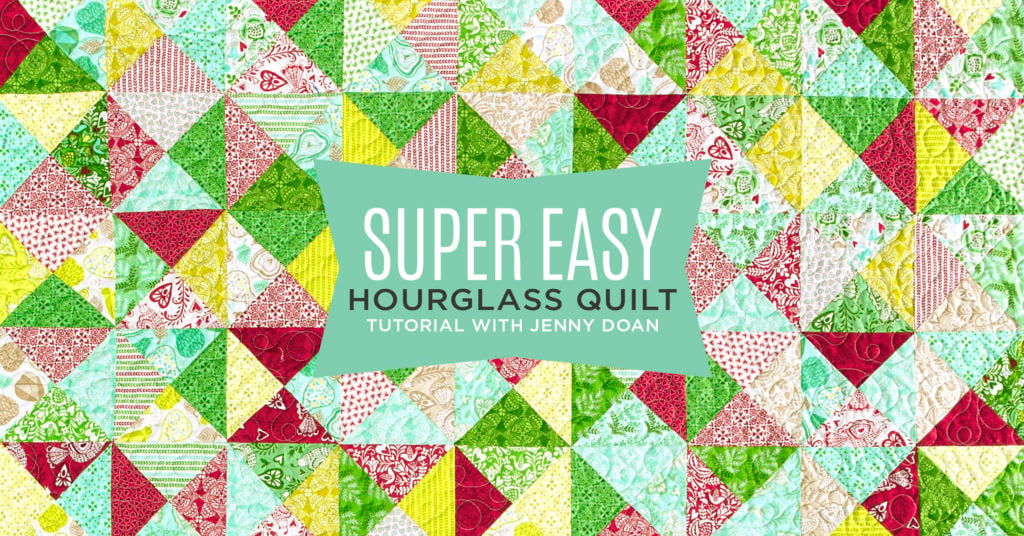
Super Easy Hourglass Quilt Tutorial
- 4 packs x 5" Precut Fabric Squares (Charm Packs)
- 1/2 yard x Inner Border Fabric
- 1-1/4 yard x Outer Border Fabric
- 4-1/2 yards x Quilt Backing Fabric
Featured products Get the Supplies Featured in this Tutorial


Finish your masterpiece and let us give it the finishing touch it deserves.
Subscribe to MSQC on YouTube
Hundreds of FREE tutorials and a new one from Jenny launches every Friday.
video transcript
Hi everybody, it’s Jenny from the MSQC. And I’ve got a fun project for you. Today we’re talking about the Easy Hourglass. Well not just the easy hourglass but the super duper easy hourglass. So let’s take a look at this quilt behind me. Isn’t this fun? All these little hourglasses just nested together. And I’ve got a super easy way to make them. To make this quilt, what you’re going to need is four packs of five inch squares. And we are using Northwoods by Kate Spain for Moda. Darling little line of fabric. You’re also going to need a half a yard for your inner border. That’s this border right here. Your outer border is going to be a five inch border and you’re going to need a yard and a quarter for that. No background fabric, just your little packs of five inch squares. So let me show you how to do this because this is just so much fun.
So what you’re going to do is you’re going to make four patches. I know it sounds a little crazy. But you’re going to come through your pack. And whenever I open a pack of charms I’m going to, I separate them kind of by color so that I have ones to pick from that are, that are different. I just do different stacks. So I’ll separate them like this. See I’ve got some teals here. You know, you just put them out in different colors. And that helps me to be able to kind of balance my quilt a little bit. And so then what you’re going to do is you’re going to make four patches. And so we’re going to choose four of these. So I’m going to choose one. And I’m going to do one of these. And I’m going to take something over here from the blue pile. And maybe oh let’s see, how about this tiny hearts over here like this. That will be a cute little four patch. So we’re just going to sew these together. Two like that. Sew these two side seams and then sew our long seam to make a four patch. So let’s go to the sewing machine and do that.
Alright. You’re going to want to make sure that your quarter inches are consistent. So I am sewing down the side. I have my machine set on a quarter of an inch so that it will, when I line it up with the foot it just naturally sews a quarter of an inch. That helps me because you know I’ll get halfway through this and I won’t be paying attention to what I’m doing and all of a sudden I’m like, uh oh. So we don’t want to have to rip. So we’re just going to put them together. So now I have my two pieces sewn together like this. And I’m just going to put them together like this. And match up that middle seam. So we’re going to come along here and I’m going to sew a little bit. And then I’m going to take a hold of the bottom of my pieces and I’m going to match up that seam. So I’m going to make sure that one seam is going one direction and the other seam the other. And I kind of keep my finger on that until it slides under the foot. Just like that. And then I’ve got a four patch. Now we’re going to iron it down nice and flat. And I like to iron from the top to make sure no pleats are in there. Then I’m going to flip it over and make sure my seams are laying nice and flat.
Now to make this block, you’re going to make two of these. So I have another made right here. And then we’re going to put them right on top of each other just like this. And we are going to sew all the way around the outside edge just like we do our half square triangles. So let me, I’m going to look at these under here to make sure that there’s enough contrast to all my squares. And then we’re going to go sew this all the way around the outside edge. A quarter of an inch. This is so fun. Now people ask all the time, do you slow down at the corner and pivot or do you sew off? I generally sew off. And then I just bring my piece around like that and sew down the other side. Make sure your seams are lined up, they’re nested very well. We want those seams to line up on the side, you know where the two charm packs come together. We want those to line up. One more side and we are done.
Alright now that you’ve got your two four patches sewn together all the way around the outside, what we’re going to do is we are going to cut them diagonally both directions. Now this is where this 15 inch ruler that I have comes in handy because it will span the whole distance. So we’re going to match it up, we’re going to come right here to the corner and here to the corner and then this one should go right through where your seams cross in the center. So we’re going to go ahead and cut. This is going to be a little tough because you’ve got several layers there so just make sure you have some good pressure and some good hold on your ruler. You don’t want that to slip right there. And then we’re going to do the same thing on the other side. Alright, now comes for the magic, are you ready? Super, duper easy hourglass. Look at that. Alright let’s press these open. This is really fun. I love how this comes together. This was a, one of those happy surprise moments when I did, I was like let’s see what happens if I sew a couple of four patches together and sew around them just like I do my half square triangles. Let’s just see what happens. We have one more here. Let me go through the cutting with you one more time because this matters. We’re going to line it up on the seam, at the middle, on the side. Make a cut right across. You might need to get some extra pressure in that middle part right there. Again, this way. Diagonally both directions. And again we’ve got these awesome hourglasses. How cool is this? I mean just like instant. So I’m going to press these and then I’m going to show you how I set them together. And I’m going to talk a little bit about color placement. Because one of the fun things with doing blocks like this is that you truly, well unless you have a computer program, you truly don’t know what’s going to happen. And it’s really like a little present for you.
So now I have a stack of these that are all made. Out of, if you use four packs you’re going to get 84 of these. Now 84 of these, you know nothing adds up quite right so can do, you can do it eight by ten. I chose to do it nine by nine. So mine is more square, so it really, you know when you plop it on the ground it really looks like a picnic blanket. I mean it’s just a really fun size. But again that’s really kind of up to you. So when I put these together, I just decide on the number I need in my row and I did, and I did nine in each row. And so then you want to start putting your rows together and mixing them up so you don’t have too much red in one area or too, too much, you know the same fabrics. You don’t want the same fabrics to meet up. So you just want to start putting them together. And you’re just going to sew them together just like this.
So when you get ready to put them together you’re going to lay them right sides on top of each other like this. And they should match up pretty exactly. Mine are pretty close. If yours are a little off, you have the benefit of the bias so you can make those fit. So what I’m going to do is I’m just going to sew these two together so you can see how that lines up. Your, your corner where your little seam is you can have those going opposite directions or you can just leave them the same direction. Either way is fine. And we’re going to sew them together just like this. And we’re going to make a whole row of them and then just going to sew our rows together. This is really one of the easiest quilts ever. So let me press this so you can see. So right here when you get these pressed together, you’re going to have your quarter of an inch on the, on either side and which means you’re not going to lose your points either. So your hourglasses are going to look really nice and really cute.
So once you’re ready to put your rows together you’re just going to put them together like this. Now I have, I have nine across and nine, nine rows. So I used 81 squares in this and just put them across. You’re going to add your little 2 ½ inch border, a little five inch border. It’s going to make a quilt that is square. It’s going to be about 65 square. Let’s take a look at this back fabric. Isn’t that pretty? This looks really Scandinavian to me with the birds. It’s just really fun. So for the backing you’re going to need about 4 ½ yards. And it just makes a really fun quick quilt. So we hope you enjoyed this tutorial on the Super Duper Easy Hourglass from the MSQC.
& Progress on Social