


Super Simple Squares Quilt Tutorial
Jenny Doan
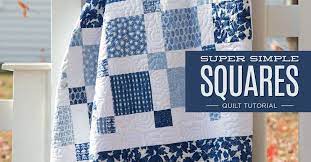
Super Simple Squares Quilt Tutorial
- 3 packs x 5" Precut Fabric Squares (Charm Packs) - Print
- 2-1/4 yards x Background Fabric (solid)
- 1-1/4 yards x Outer Border Fabric
- 5 yards x Quilt Backing Fabric


Finish your masterpiece and let us give it the finishing touch it deserves.
Subscribe to MSQC on YouTube
Hundreds of FREE tutorials and a new one from Jenny launches every Friday.
video transcript
Hi everybody, it’s Jenny from the MSQC. And I’ve got such a great project for you today. So this quilt, as you can see from the quilt behind me is squares. And sometimes it’s those easy things that just really make sense in our brains and that’s what we want to do. We’re calling this one Super Simple Squares because this is a great project and easy to make. So to make this quilt what you’re going to need is three packets of five inch squares. And we have used Ella by Whistler Studios for Windham. And of course, Ella, I have a granddaughter Ella so I love that name. And I love the blue and white as well. It’s just a beautiful little charm pack. You’re going to need about 2 ¼ yards of your background fabric which is all your little sashings and includes this first border. Now that’s almost a roll of 2 ½ inch strips so if you want to use a 2 ½ inch strip roll you can do that as well. The border fabric, we have six inch border out here and you’re going to need about a yard and a quarter for that. On the background, the back I mean, on the back of this quilt, look at that. You’re going to need five yards. Of course I love it. I just love it, this blue and white.
So now we’re ready to put this together. Let me show you how to do this because this is really easy. Basically what you’re going to do is you’re going to open your packs of squares and with, using three packs you’re going to pull out 25 of those squares and we’re going to quarter those to make these little corner squares right here. And so basically what you want to do is pull some out. And I have, I have a little stack here like this. And I think it’s ok to stack up maybe, I don’t know, maybe four of them if you have a good sharp blade. You’re going to put your ruler right along the side and we’re just going to cut these both directions because we want 2 ½ inch squares. So if you can keep them together like that you can bring them and just cut them in like this. And that will give you 2 ½ inch squares, just like that. So that makes it really easy.
Now the next thing you’re going to do is you’ve got to put your little sashings along your block. So you can see I have a little white sashing on here. And how you’re going to do that is you’re going to cut a 2 ½ inch strip. And this is where I say if you want to use a 2 ½ inch strip that’s a pre cut 2 ½ inch strip you can. I’m going to go ahead and cut one here, 2 ½, like this. And then I’m going to turn it. I’m going to leave mine folded. And I’m going to flip it over so I can see the selvedge edges. And I’m going to trim those off and of course I could, I could get a lot closer on that if I wanted to. And then what we’re going to do is come over five inches and cut. And oops and let me flip this guy around. And we’re going to come in five inches and cut again. And when we make this second cut all we have is that tiny little bit of fold right there. Because all your sashing pieces are going to match your pre cut. So really what’s fun about this is that the math is so easy. If you decide to cut your own squares and you want to cut them a different size, it’s super easy.
So then what you’re going to do is you’re going to take a square and you’re going to attach a sashing piece right along the edge. And we’re going to sew that down a quarter of an inch. So we’re going to go over to the sewing machine to do that. Just like this. Alrighty, perfect. So let’s go press this open and I’ll just show you just how easy this is. So I’m going to set my seam and roll this back. Alrighty. So then you get a piece like this. Now when you start putting, you’re going to put an edge on the edge of all your squares. And then you’re just going to sew together your rows like this. And see how that comes together. Just like that. And we’re going to make these rows. So we’ve got one, two, three, four, five, six, seven, eight in each row. And we’ve got one, two, three, four, five, six, seven, eight, nine, ten. So this is eight by ten with a sashing in between. Now it also starts with a sashing and ends with a sashing. So you want to make sure when you get your row done like this, you’re going to add another sashing here on the inside.
Now one thing I want to point out is with our pre cuts they have a little peaked, peaked, pinked, sorry, with our pre cuts we have this little pinked edge right here. And, and it will measure a little over five inches because they are measuring from the inside of the peak to the inside of the peak. So make sure you take a look at that when you’re cutting your things because I cut my little strips at five inches and they will work as long as you go from the inside of the peak to the inside of the peak. But that pinked edge could change from brand to brand. So just watch that and be careful. So once you get your rows together and remember you’re going to need ten of those. It’s time to put our sashing rows together.
The sashing rows are just so easy. They’re made pretty much the same way. We’re going to take our little 2 ½ inch square and attach it to a five inch piece. So on, on our background our cuts are all the same. They’re all going to match that 2 ½ by five inch rectangle. They’re all going to be that. So that makes the cutting real easy. Now I just sewed a quarter of an inch down the side on this. And I do the same thing with my sashing rows. So go ahead and sew a whole bunch of those together. Then when you’re ready to put them together like this, you know, you just attach them, you just start attaching this to this and this to this and this to this. And you get these awesome long rows. So let me lay it out here. Let me show you how the layout is going to work. So we’re going to do, so we’re going to have to start with a white inch strip like this. And then we’re just going to sew these long rows together like this. So these, so my little sashing row is already sewn so I have to move it over a little bit and make it match up. Alright here we go. So see how that’s going to go together really fast. And before you know it you’re going to get a little piece like this. And it’s, you know your whole quilt is going to be big and so it’s just going to look like that really fast. It’s just super simple.
So remember we’ve got our squares are sewn to this little sashing piece right here. A sashing piece to a square, put your rows together. Then you bring in this sashing row and it’s the same little five inch rectangle that we sew to the 2 ½ squares. So it’s just really easy. But look how awesome it looks. It just looks so cool. It’s so fun and so pretty. And I can see this in a bunch of different fabrics. This would make a really fun I Spy quilt for all you grandmas who love to make the I Spy things for your grandkids. So we hope you enjoyed this tutorial on the Super Simple Squares quilt from the MSQC.
& Progress on Social