


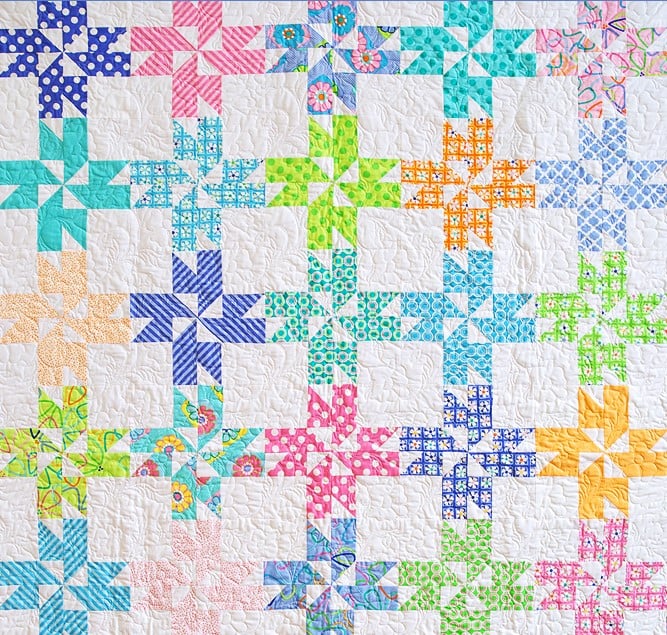
Surprise Pinwheels Quilt Tutorial
Jenny Doan
Surprise Pinwheels Quilt Tutorial
- 1 roll x 2.5" Strips (Jelly Rolls) - Print
- 4-3/4 yards x Background Fabric
- 1-1/2 yards x Outer Border Fabric
- 5-3/4 yards x Quilt Backing Fabric


Finish your masterpiece and let us give it the finishing touch it deserves.
Subscribe to MSQC on YouTube
Hundreds of FREE tutorials and a new one from Jenny launches every Friday.
video transcript
Hi everybody. It’s Jenny from the MSQC. And I’ve got a really fun project for you today. Today’s project is one of those where we are making a quilt that we make all the time. And we put the block together differently. And all of a sudden we got this awesome surprise. So we’re calling this Pinwheel Surprise because it was a surprise because it wasn’t what we were expecting it to look like. But this is how it came out and this is one of those fun What happen if moments. So to make this quilt you’re going to need one roll of 2 ½ inch strips and there are 40 of them on here. And we’ve used Grow by Me & My Sister for Moda. A beautiful fun line. You’re also going to need about 4 ¾ of background fabric. And that’s going to be this right here. It’s going to be these little squares here. It’s going to take some background fabric to make this. So the tutorial this was originally based off is called Sweet Stars and, which is a wonderful star pattern that you can make with a strip. But we happen to put it together wrong one day and guess what happened, this. So let me show you how to do this.
So first of all you’re going to take your 2 ½ inch strip and you’re going to cut it in four 4 inch pieces and four 6 inch pieces. So we’re just going to take our little ruler and we’re going to cut this. And do four 4 and four, four 6. And what we want to do is we want to have, well first this is going to use almost your whole strip which is nice because there’s very little, very little waste. So there’s our two sets of four. Now we need two sets of six. One, two, three, four, five, six. Here’s one and then one more. One, two, three, four, five, six. And you actually have this one little square left and if you were ever to decide to think out of the box and sash this quilt, these would be perfect for those little sashing corners. But we’re going to set ours aside for now because ours are just set together. So now you have two, two 4 inch strips and two 6 inch strips. Let me set these all out here so you can see them just like that. And, and then you need your squares to make the block. Now this going to make this, the cutting directions I’m giving you are for each block.
So then you need some four inch squares and you’re going to need four of those. And again I took a four inch strip. And a lot of times when I cut, let me set these apart, I like to fold my strip in half because it makes my cutting quicker. Because it’s pretty easy to cut through four, four layers of fabric if you have a nice sharp blade. So I’m going to go ahead and cut some of these. So now I’m going to count over four and cut again. And I have four right there. And that’s what you need for each block. You’re also going to need eight 2 ½ inch squares. And so we’re going to take a 2 ½ inch strip that we’ve cut out of our background fabric. And we’re going to put that right here and I’m just going to trim off this fold and my selvedges right here. And then I’m going to come in and cut 2 ½ and 2 ½. And you, as you’re cutting these you know, you’ll get it down to where you know exactly how many squares to cut. But you’re going to need eight for each block.
Alright so now to assemble this block. The first thing we have to do is take our four, our four longs and our four or our four longs over here and our four shorts over here and we are going to dog ear the corners. Now when I talk about dog earing the corners what we’re going to do is we’re going to take one of our 2 ½ inch squares. Because our strip is 2 ½ our square has to be 2 ½ . We are going to finger press that and, and you can iron it as well. And we are going to put it up at the top of our strip, lining up this whole top section up here and sew diagonally right across here. We’re going to do the same thing to all of our strips but there’s one important factor. It doesn’t matter which way these go. It matters that your shorts go one way and your longs go the other. So what I do is I try to sew my whole set of shorts, you know so that’s all done. And then I come back and sew my set of longs so I make sure that they’re opposite. So, so let’s go ahead and sew a set here. And I chain piece these when I sew. So again you’re going to want a line to sew on because you’re going to sew right on that line. It’s easier to sew in the valley than the hill so if you, if you press them like this, you can always draw the line if you want. But if you press them like this then you want to make sure that your, your, your pointy side of your seam is facing down. Alright now all of mine are set on these blocks. And they’re all, now that that one is fixed, they’re all going this direction. So we’re going to sew all of those this direction.
Alright so let’s take these over to the sewing machine. Now we can very easily sew, we’re going to sew right on that line. And we’re just going to start here. And as I get to the end of this, just like that. I’m following the line, sewing right on the line. I’m just going to add my next strip in. And this way it chain pieces one after the other after the other. And let me grab these two over here. And also it helps you because you see that they’re going to same direction which is really important. Alright now what we’re going to do is we’re going to clip these apart. And we’re going to trim off our excess right here, just like that. And then we’ll press them open, as soon as I get them all trimmed. You can do this with a rotary cutter if you like. You want to cut about a quarter of an inch away from that seam. And make sure you cut on the outside, the outside side, you know if you cut in here you’re going to lose your whole strip. So make sure you cut on that outside side. And then we’re just going to set our seams and roll these back. And you can usually, you know if you spread them out you can usually set them all pretty much as once. And then roll them back. Alright so now our short ones are done.
Now our long ones, we want to make sure, go the other direction. So what we’re going to do is we are going to fold this, give us, give us a sew line. And I’m going to lay it on here and I’m going to look at these and make sure they’re going opposites but they’re not. So I have to make sure and I have to do this because I’m angly challenged. You know I don’t see things until they get right together. So now I see that this one is going this way and this one is going that way. And I’m going to do the same thing to all four of these blocks. And I have them done over here already. And you can see that they go opposite directions. So again it doesn’t matter which direction, it matters that they’re opposite.
So then what we’re going to do is we’re going to take four of our four inch background squares. And we’re going to take our little guy right here and we’re going to sew him to the square so we’re putting the color to the white, just like this. And we are going to do that to all four of our squares. So let’s go ahead right over here and do that. Again a quarter of an inch right down the side. And again we can just chain piece these one after another after another. Making sure you’re sewing color to the background. Alright once you get your four short ones sewn on, again we’re going to clip and press. So let me just clip these and we’ll bring them over to the ironing board, set those seams and roll them back. Oop, that one got a little wrinkled up from my iron. Let me fix him up right here. There we go. NIce and flat. That’s what we like.
Alright so then you’re going to take this piece that you’ve got right here like this and you’re going to put your long guy. You’re going to attach him to it. And you are going to attach him right along this side right here. And this little corner is going to hit this side, ok? So it’s, remember this corner goes to your color up here and you’re going to put that together like that. And we’re going to sew a couple of these on as well. So again here we are with this piece right here. What we’re going to do is we’re going to put this on here so that this white touches the color and the color touches the white. And we are just going to put those on, fold them right sides together and sew a quarter of an inch right down the side. Don’t worry about matching up where those two little points come together, you know, where the white comes together, don’t worry matching that up. We’re just going to line them up along the side and sew them down and then we’re going to again press them open like this. And then you’re going to have four of these done. And I have a couple done right here
So let’s look at these and then you get to set them together. So setting them together is really fun because you’re just going to rotate them around like this. And look what happens. Oop, there we go. There’s that little pinwheel right there. How fun is that? So then you’re just going to stitch this together like a four patch. We’re going to put these two sides together. We’ll head over to our sewing machine and sew them down. Alright now we get to press our block open. It makes this awesome little pinwheel.
I love those kind of serendipitous things that happen, you know, when you’re not expecting it or planning it and all of a sudden you’re like, Oh that’s so cool. Alright so here’s our block. Isn’t that adorable? I mean it’s just so cute. Now remember each strip makes a block so it changes the way you think about a 2 ½ inch strip. But that being said there are 40 strips in these roll ups so we’re only getting 40 blocks which doesn’t make, you know, it means you can’t use all the sizes unless you throw a couple more in because it doesn’t divide evenly. So we’ve set ours up five by seven. So we’ve used 35 of the strips to make the stars. And when we put them together we just laid them together like this. So let’s watch what happens as we start putting these together. Now I want you to notice right here, right here it’s a little secondary bowtie block. It makes a little bowtie or a butterfly block. So cute. And we’re just going to sew these straight together. We’re going to keep adding them on here. We’re just going to do it row by row. They go together so adorably. And of course this fabric line is so cute. Isn’t that cute? So we just sew them like that. Again we have five across by seven down. Now one of the things I wanted to show you. People often ask me like what’s on the back of your quilt. So take a look at this backing. This is so cute. I love this little star pattern. I just think it’s adorable. It makes a great back. To back a quilt this size which this quilt is 60 by 75, you’re going to need about 5 ¾ yards of backing. So that’s a good thing to know. Remember we put like a little five inch border on here. And just sewn them together and added our border and our quilt is finished. So this was just a really fun quilt to do because it was just a fun serendipitous mistake. And we hope you enjoyed this tutorial on the surprise pinwheels from the MSQC.
& Progress on Social