


Thankful Wall Hanging Quilt Tutorial
Jenny Doan
Thankful Wall Hanging Quilt Tutorial
- 2 packs x 5" Precut Squares (Charm Packs) - Print
- 3/4 yards x Background Fabric
- 1/2 yard x Black Solid Quilt Fabric
- 1/4 yard x Gold Print Quilt Fabric
- 3/4 yard x Quilt Fabric for Border
- 1/2 yard x Quilt Fabric for Binding
- 2-3/4 yards x Quilt Backing Fabric
Featured products Get the Supplies Featured in this Tutorial


Finish your masterpiece and let us give it the finishing touch it deserves.
Subscribe to MSQC on YouTube
Hundreds of FREE tutorials and a new one from Jenny launches every Friday.
video transcript
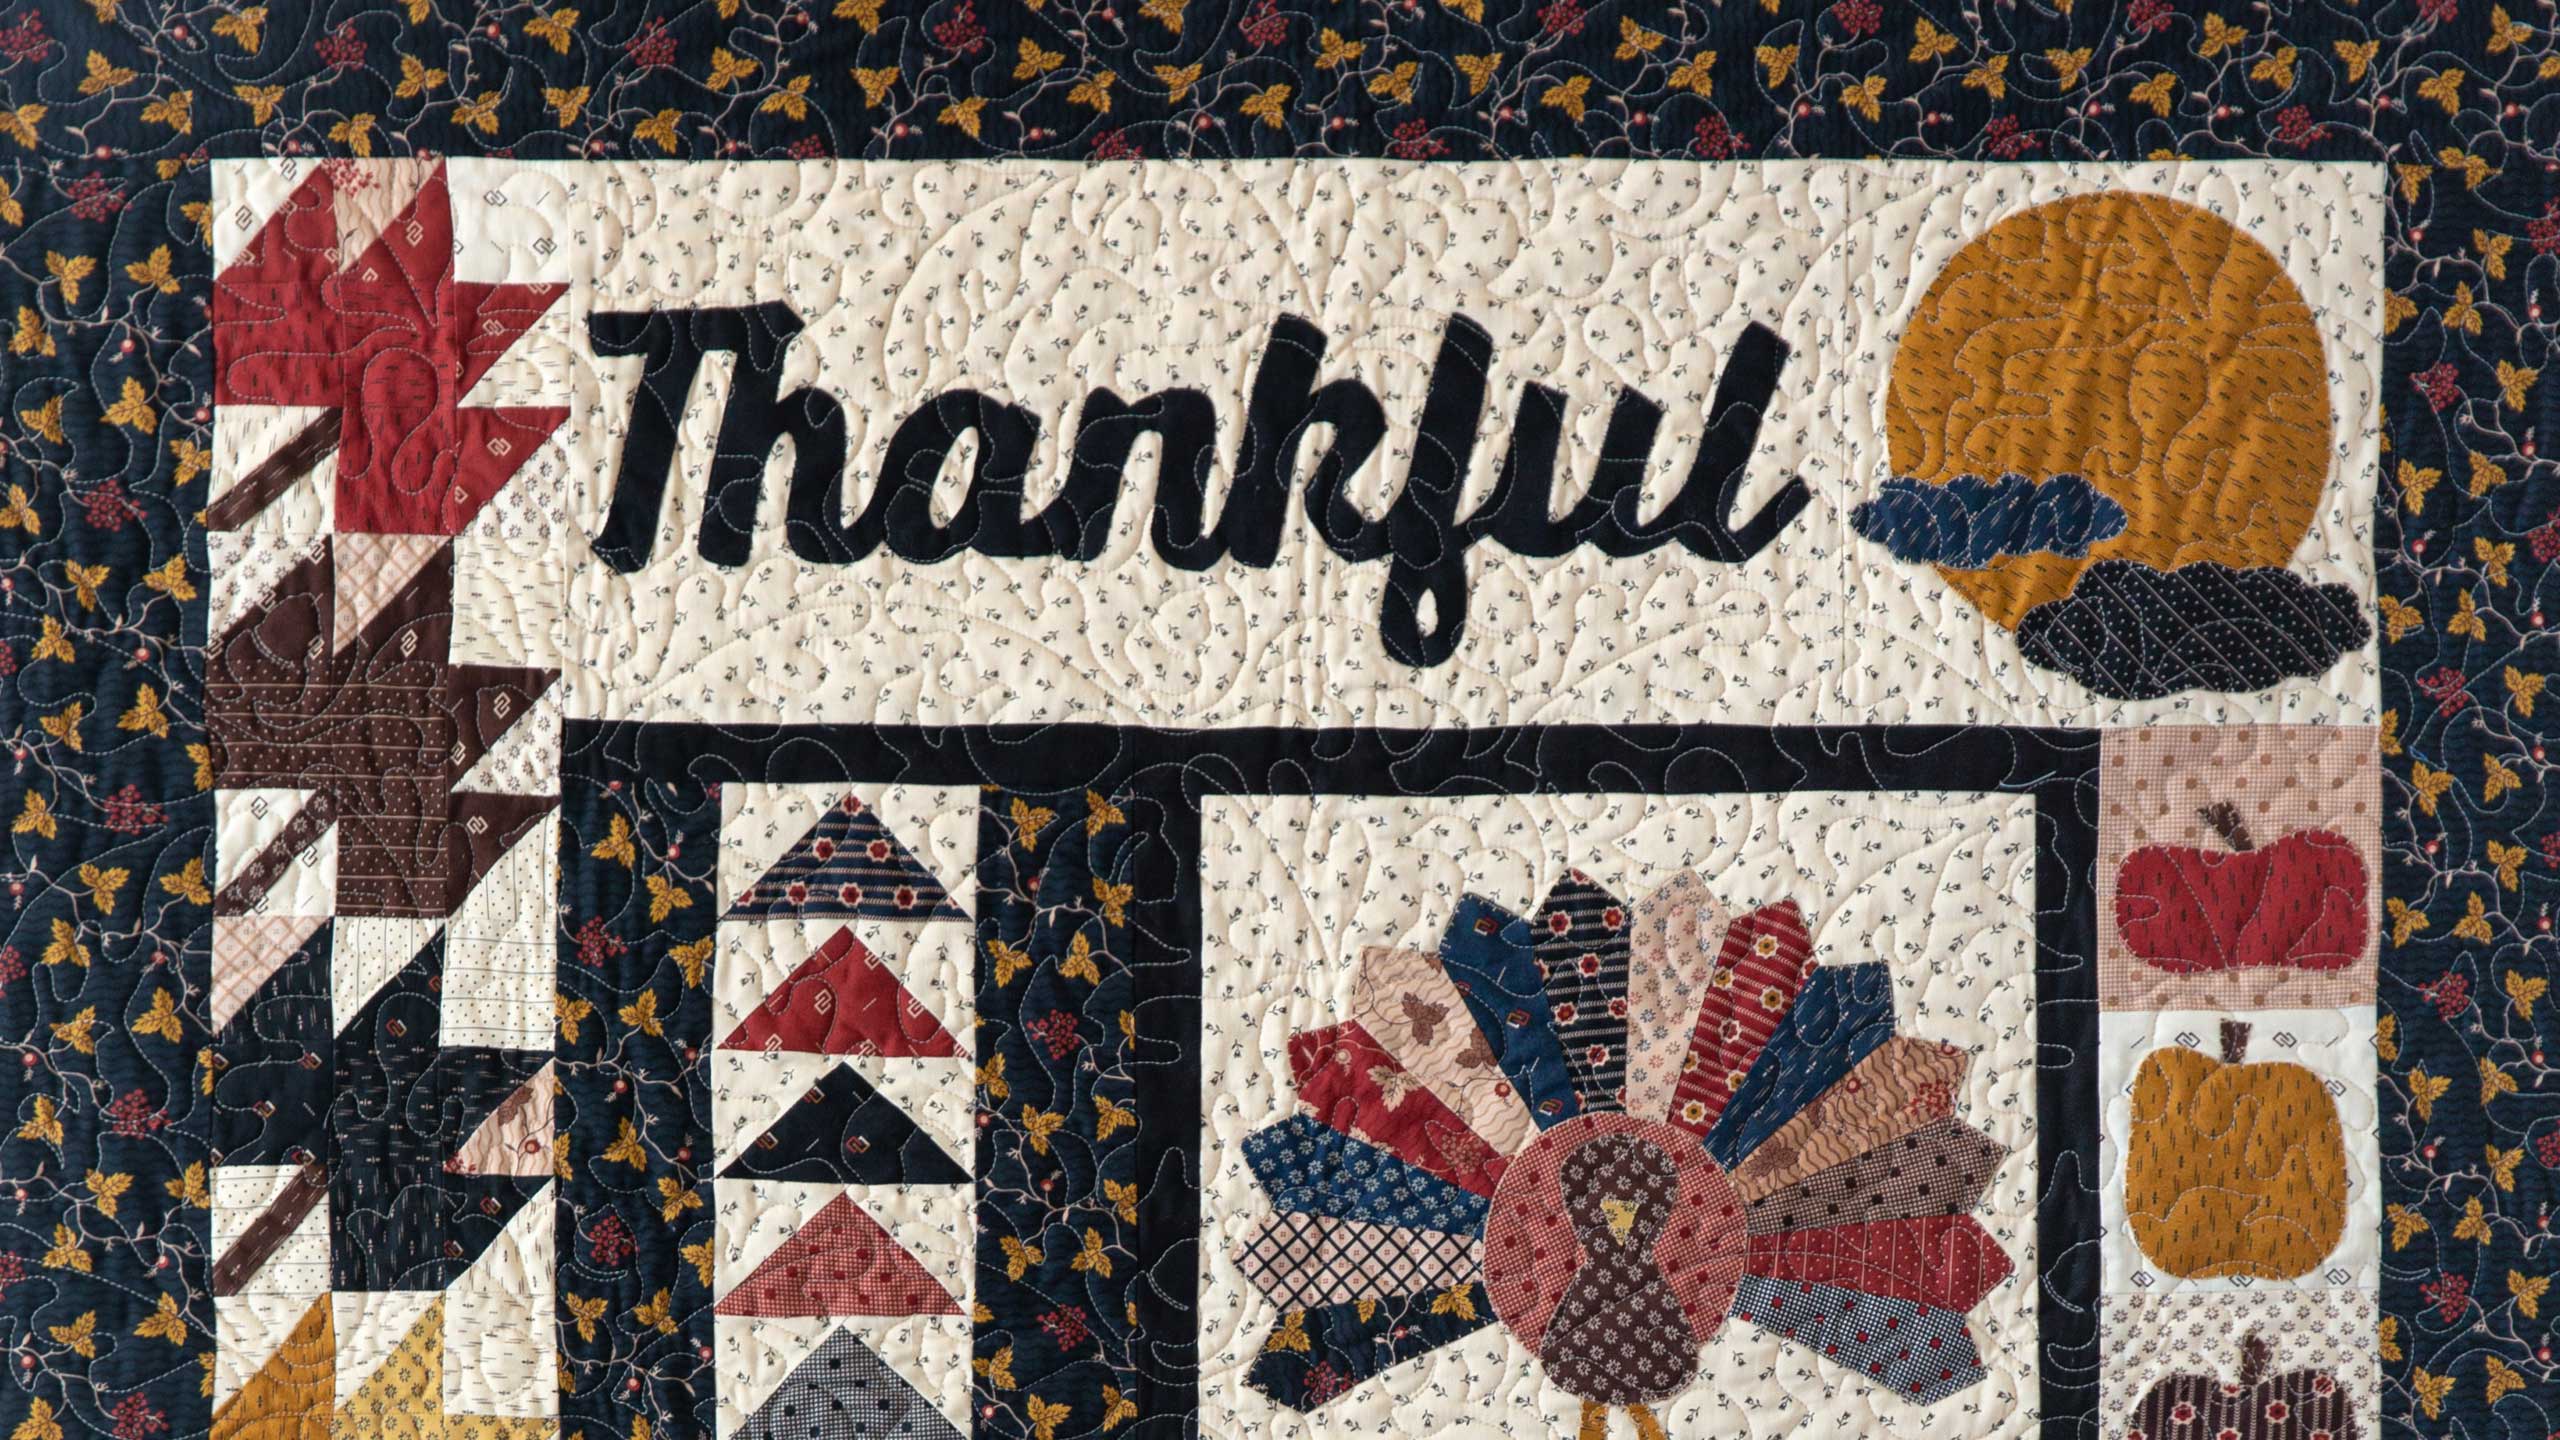
Hi everybody, it’s Jenny from the Missouri Star Quilt Company. And I’ve got a fun project for you today. Look at this. This is our Thankful Wall Hanging. And I love it. It’s right at the right time of the year. It’s the time of the year we all remember to be thankful. Well hopefully we remember that all the time. We all have so much to be thankful for no matter where we are. So to make this quilt what you’re going to need is two packs of Shelbyville fabric. These are five inch squares. And it’s by Jo Morton for Moda. You’re going to need some background. And that’s going to take care of the background behind our turkeys and our thankful. You’re going to need ¾ of a yard. This black fabric, we’re calling this the accent fabric. And it takes care of the thankful word and those little strips. You’re going to need about ½ a yard of that. Our little moon up there, this is just a little ten inch scrap that we cut the moon out of. The backing on this is 2 ¾ yards and we used the gold. And also this border out here, this is a little four inch border. And you’re going to need ¾ of a yard for that. And you’re also going to need a couple more things, the dresden template and some fusible Heat N Bond. You’re going to need 1 ¼ yard of fusible Heat N Bond.
So to get started on this wall hanging, what you’re going to need to do is go to the description below and print out your parts. Your turkey parts, your clouds, your pumpkins. You’re going to want to print out all those parts and get them ready to go. You’re also going to want to separate your charm pack. So what we’re going to do with our charm pack is we’re going to pull out all of the lights. And so let’s take a look at this. I’ve got a whole bunch of lights here. And you’re going to separate the lights. Because let me show you where we’re using them. We’re sewing four together to back these little turkeys. We’re using them for the backgrounds on here. We’re using them for the backgrounds on there. So we’re going to use all those lights. You want to pull those out and set them aside. Then you’re going to go to your pack and you’re going to pull out the pieces you want for your pumpkins. You’re going to pull out the pieces you want for your leaves. There are two squares for each leaf and then a stem square. And this stem square can be a scrap. But, and so it doesn’t have to be all the same. But you just want to make sure you set something aside. So two of whatever color leaves you want. Then you’re also going to need pull out your clouds and your turkey parts. And so the turkey part, the circle is the background. Let me show you right here. So right here we’ve got this circle of the turkey, right here. That’s the background circle. Then you’re going to have the turkey body and you’re going to set those aside. So I’ll do that while I’m talking to you. So I’ll pull, I’m going to use this for my turkey circle. And then this dark one will be my turkey body. And then this one is going to be, this yellow will be my feet and my beak. And so you just want to make sure you set those aside so that you don’t use them. Because you have the feathers, the flying geese. Those can be all the leftovers and then you don’t even have to think about it and later down the road you’re not going to go, oh I wish I had saved out that yellow, you know, so. So, you know, just do it ahead of time and, and that will save you some worry later.
Alright so now we’re going to make some turkey feathers. And this is really fun because it’s just quick and easy. And I was so surprised when I learned how to make a dresden, how easy it was. So I’m going to stack up several different colors here. And I’ve got some blacks and some blues. Let’s see if I can find some reds. Here’s a red. It’s got a little crease in it. I’m going to press it out. We’re going to lay that on here. I’m going to lay about four on here. Now you’re going to take your dresden tool and you’re going to lay this flat point on the bottom of the square like this. And it should hit right at the five point, or five inch mark on the top. And then we’re going to make a cut. And we’re just going to cut this side. And we’re going to cut this side like this. And once you get this little edge off, you’re just going to flip this around. You’re going to use this side along the edge of your dresden, make sure the blunt end is even at the bottom. And then you’re going to cut this side. And this makes your feathers. And so let me show you how easy this is to make the feathers. So what we’re going to do is we’re going to take our stack of feathers and we’re going to fold them in half like this. And we are going to stitch a quarter of an inch right along the top there. And we’re going to do that to all our feathers. So follow me over here and I’m just going to put this on here and lay it down. We’re going to chain piece our feathers. Now you want your stitch to be small enough so that it doesn’t easily come undone. And we’re just going to stitch across the top. And then I”m going to bring this whole stack over here. And I”m just going to fold them like this in half, sew straight across the top. But just keep sliding those under the foot, just one after the other. And you’re going to do this to 14 of them. And you’re going to make a long chain with them. And we’re just going to keep going along here.
Alright so then you’re going to have a chain like this. Now what we’re going to do is we’re going to clip these apart. Now you’re going to need seven pieces if you use two, you know, if you cut two feathers from each piece, you’re going to need seven pieces for your feathers. But if you want all your feathers to be different you can use 14 pieces and just cut them in half, directly in half so that. Because on a half of a strip like this, you’re going to be able to get your, you’ll be able to get your dresden blade out of there on a half of a strip. So you can cut them in half and really mix up your feathers or you’re just going to use seven for the or to make the whole thing. Alright so now what we’ve got here is we’ve got these little guys that are sewn across the top. And I’m just going to fold this over now. There’s a couple things you can do. You can trim it if you want. But I lay my finger, press it over like that and I just flip it through the middle. And look at that, it instantly peaks. I mean it’s just like amazing. It’s like little magic. And so we’re going to press all of these and we’re going to line up this seam right here. We’re going to line up right down the center. We’re going to center that and then press it like this. So watch your fingers on that. And we’re going to do this to all of ours. And you’ll get really fast at this after a bit. And you see on that first one I trimmed. But I didn’t trim on these others and it’s just because it doesn’t really matter. It doesn’t really matter. It doesn’t really show up. And I tend to skip the things that, you know, if it’s going to make my dresden not lay nice then I’ll do it. But if it’s just going to, if it’s just like one more step, I don’t worry too much about it. Alright.
So now I have several of these done, you’re going to do this to 14 and then you’re going to start sewing them together. And again what we’re going to do is we’re going to sew two and two. So I have these two pieces right here. Let me actually get these two pieces because they’re different. And I’m just going to lay them right on top of each other like this. So I probably should show you over here. So what I’m going to do with these is I’m going to take these two. And I’m just going to lay them right on top of each other like this. And I’m going to sew a quarter of an inch right down the side. So we’re going to come over here. And I”m going to sew all of mine, I’ll sew them two, two, two, you know, groups of two like this. And I’m going to take a little backstitch at that beginning. I’m going to sew right down. And then I’m going to put another one in there. So I’ll do this to all my feathers, groups of twos. And I think I have, oh I just have one more because I’m just making a little short piece to show you because once you get this you’re just going to do it over and over again. So then you have them sewn together in groups of two like this. Then you’re going to join them in groups of four. And so let me just stitch this right here. And what I do is I always line up the tail part, the bottom part right here. And then I like to, I’ll sew from the bottom or the top, it really doesn’t matter. But if my top pieces, like if I didn’t get the ironing just right then I can fudge that if I come up the other side. So let me show you what we’ve got here. Well let me add this last one. I’ll just add one more. Alrighty. So now I’m going to press these open. And this is just five. You’re going to have 14.
So I have this background piece right here and I have my turkey tail pinned on. And you can see right here at the edge, the edge of this dresden, all I’ve done is iron it under because we’re going to stitch down on the top of this and it’s not even going to show. So turn the little edge of your dresden under a quarter of an inch. And I don’t center this yet. I don’t center it until I get my body and my circle cut out. So let’s go through that a little bit.
So here’s our, this is the turkey body and this is the large turkey head. The circle behind him and the turkey body. And then what we’re going to do is we’re going to take our paper like this. Now one of the things I love that we do is that we bold these patterns so that you don’t even to, you know, you don’t need a light table or anything and you can just see right through it. So I’m going to put this up here so I make good use of my Heat N Bond. And I’m drawing my circle. And I’m going to draw my turkey body right here. And it doesn’t have to be perfect. You know, I’m pretty sure there are all kinds of turkeys out there and there’s going to be, you know, yours aren’t just perfect we’re not going to die over that. Alright and then I’m going to put these feet on, draw these feet. Now I rarely draw the beak because it’s just a tiny little triangle. And so I just kind of, when I put the Heat N Bond on my yellow, I kind of cover the whole square with Heat N Bond and then, and then just cut a little tiny triangle out of part of it for my turkey beak. So let’s look at these now. I’m going to cut out my circle, just rough cut. You want to save your fancy cutting for when you get it ironed on. And then here’s our turkey feet. And I know that there’s enough room in between the feet for the little beak. Alright I’m going to set this over here. And let’s see, here’s my pieces. And if you want, you know, if you feel, if you feel a little insecure you can trace your beak. It will fit right between the legs. And that will work.
But what I’m going to do now is I’m going to iron this onto the back of my fabric. So I’m going to put my little turkey legs right here on the edge and iron this on. And then I”m going to iron on my turkey body right here. And I always like to save as much fabric as I can but you want to make sure that none of your paper hangs off the edge of your fabric or it will glue to your ironing mat. I promise you. And then we’ve got this big circle here. So let’s see how this fits. I’m just going to trim off that little piece right there. Iron this on. Alright. So now you’re going to take your scissors and you’re just going to cut out on the line. And it doesn’t have to be perfect. It just has to be semi, you know, resemble a circle. There’s that one. Here’s my turkey body. My iron spit a little bit on this one so the paper is kind of wet. There’s, oops, let me get that straight, even. There we go. There’s our body. So you can see it coming together already. And here’s our little legs. And I try to do these little feet like one little snip. I aim my scissor to where the toe comes into the middle of the foot and I just do one little snip. Alright, now right here, coming up the leg. When I drew my leg, he was a little wobbly so I left that part out. Alright so right here, see you have this little piece right here. And you can really just cut a little whew, you know, however long you want your beak. And so here’s our beak. Here’s how this is going to look. Here’s our little beak. And I’m going to trim off this top because I put it on the, where the pinked edge is and I want it straight. So here’s our little beak and here’s our little feet.
So basically what you’re going to do, what you’re going to do is you’re going to take your big piece right here. And you’re going to lay down your, here let me lift this up right here. You’re going to put your tail on here. You’re going to iron this little edge under. And you’re going to stick about four pins in here. And I just center mine by looking at the sides and I get it, you know, top to bottom where I want it. I get everything on here and then I’m going to pin it. So then here is my, the body. And I’m just going to peel this paper off right here. There we go. And I’m going to lay this on here. Now this is a fairly close fit so you want to just look to make sure that you’re covering all your edges. And this one looks pretty good. And then we’re going to put our body on here like this. And you can put him high or low. I’ve seen them all different kinds of ways. I’m going to put my legs, stick my legs in under here like this. And if I were really smart I would have been doing this on my ironing mat so I didn’t have to move it. Alrighty. Let’s get this leg under here. And then our little beak. Oh, so tiny. Alrighty, there we go. Alright straighten him up. Make sure he’s on there right. Alright now very carefully we are going to move this over to the ironing mat. I think I actually did it. Alright, now right here, see this little edge of this dresden blade is peeking out so I’ve got to make sure that’s covered. And if you want, you know, add a quarter of an inch so you don’t even have to think about it, you can do that. Mine, it just is what it is, what I did it. I’m going to push that leg up a little bit. And I’m just going to hold that on there for about this long, just about this long. And then I’m going to look and check and make sure it all, it’s all down like this. And then what you’re ready to do with your turkey is you’re ready to do your applique stitch which can be a tiny zig zag, a straight stitch, or a blanket stitch. And if you look on here you’ll be able to see I did, I did kind of a beige stitching on here and just stitched all the way around with a little blanket stitch, all around the body, all around the feet. I just stitched around everything. And it just holds it all on there and it’s all good to go.
So once you’ve made the big turkey you have to make the little turkey. And he’s exactly the same, except look at. Here’s one I made for, this is a different fabric from a different project just scraps I had. But look how cute they are small. So when you go to attend a retreat at Missouri Star, one of the things they give you is this little dresden keychain. And I wanted to try making a tiny turkey with the little dresden keychain but really it’s just the end of your dresden right here. So it’s just this bottom. It’s just a little 2 ½ inch bit right there. And these are what they give away at retreat center so it’s not, I mean, it’s not even something you can buy but I just wanted to try that. So remember they’re just 2 ½ inch pieces. And I’m going to cut a few of them out here because I want to show you. When you get small like this, when things get tiny, it is not harder. It’s just smaller. So here’s my little, here’s my little, my little dresden blade. And again all I’m going to do is fold this in half like this and sew straight across the top like this. So then we’re just going to sew straight across the top like we did on the other ones. And look at these tiny little feathers. They’re just darling. Here let me press this for you. So how this tiny little feather is. And you’re going to sew them together exactly the same way. I have a little stack of them, I have a few of them here that are already done. And you’re just going to lay them right sides and sew them together like we did on the other one. Now the difference with the turkey is that the background of this turkey is a four patch. So we’ve taken four of our light squares together and sewn them together just like a big four patch and that makes the background that we set the turkey on. So you’ll sew these together like this. And then you’re going to put your little feathers on there. And you have a smaller, on the piece, they’re smaller feet and a smaller, smaller body but the turkey, the circle behind the turkey, that is the same size. . So you’re just going to put another one on there, a big one on there and your little turkey body and head and that makes the little one. Now one of the tips that I discovered into it, is that I had some scraps of this Heat N Bond which I slipped under my feathers and ironed, you know ironed it on, peeled the paper and ironed that and that held my feathers even better than the pins when I was appliqueing around it. Let me think, other tips. So you just need three of these guys. These two guys have the four patch. This guy has just a plain 9 ½ inch square cut out and set him on there like that. And so that’s really it for the turkeys and the turkey can be used in so many things. I like them in long runners. I like them in wall hangings. I use them all the time. So I hope you have fun with this turkey and join us next time when we talk about the leaves and the flying geese.
Hi everybody, it’s Jenny from the Missouri Star Quilt Co. And today we’re talking about the Thankful Wall Hanging Part 2. So today we’re talking about these flying geese blocks and the leaves over here. These are easy pieced blocks. You have conquered the turkey, the whole rest of it and going to be a piece of cake.
So let’s talk first about our flying geese block. What we’re going to do is we’re going to grab a, some five inch squares and we’re going to cut those in half for our flying geese block. So we’re going to directly cut this right in half and we’re going to cut a half an inch off. So we want a 4 ½ by five inch rectangle. And one of the things that I love about this quilt that there isn’t a single part of it that can’t be scrappy. I mean the whole thing can be scrappy. Now for this flying geese unit, what we’re going to do is we’re going to take this 2 ½ by 4 ½ inch rectangle. We’re going to cut out two 2 ½ inch squares. And we are going to put them on the corners to make our flying geese. So what we want to do is we want to fold these wrong sides together and make a little sew line right here. And so we’ll fold this one as well. And we’re just going to make a little sew line. Make sure it’s right in half. Just a sec here. I’ll line it up really even. There we go. There we go. Alright.
So now what we’re going to do is we’re going to lay these one the corner of our 4 ½ inch rectangle like this. And we’re going to sew straight on this line. Make sure your corner is lined up really nice and it will just fit in there perfect. Alright so now I’m going to come right here and I’m going to make sure it’s still lined up. Mine slid a little bit. There we go. And sew right on that line. And alright. Now I’m going to fold this back. And I’m going to make sure that it’s still squares up in the corner pretty good. And mine does and so I can trim this off. Where’s my scissors? Well I’ll just use my rotary cutter. I’m going to trim this off like this. And then I’m going to press this over so it lays nice and flat. Alright now we’re going to put our other square on the other side just by laying this right on the other side, nestle it into the corners. And it should cross over at least a quarter of an inch right here on the top. So let’s go ahead and do that. Alright now let me fold this back and make sure this is good. Alright. It’s a little bit short in the corner. Take a look at this. See it’s just a tiny bit short but I think it’s enough that it’s ok. And I will watch that carefully. I’ll just remember. And I’m going to press that open. And this is your flying geese block. And that’s what a flying geese block looks like is this right here. Now we’re going to make another one real quick so that I can show you how to put these together. Now I used all the same background squares, you can see, excuse me, on the flying geese block right here. These are all the same. But I think it would be perfectly fine if you want to scrap that up. I think it would be ok. So I’m going to do the same thing to this next one. Make sure that I’ve trimmed it off to 4 ½ and I have. Add my corners. And when I do these, I’m going to have one, two, three, four, five, six, seven, blocks. And I’m going to do all one side. So I’ll do my squares all on one side of these blocks, one after the other. LIke right now I just put another one in and keep going and keep going so I get all one side done and then I trim them off and I do all of the other side. So I’m just going to trim this one off real quick here. And finger press it back. You see how I get when I’m in, you know when I get in my little nest and I’m just making my little things one after the other. It’s very, I get, I’m a very rote sewer. I do the same thing over and over. Alright, trim off this. Now we’re going to head to the ironing board and press this open just like that. Alright.
Now let’s talk about how to not lose the point on these geese. So what we’re going to do is we’re going to lay this, this is our point right here that we don’t want to lose. And see how the threads cross. As long as we stay on this side, you know, on the seam side of those threads you won’t ever lose your point. So I”m going to set this on here like this. And we’re going to sew a quarter of an inch right along here and we’re going to make sure that we hit just beyond that point, just above it. And I’m so long legged I keep losing my foot pedal. There we go. So we’re just going to sew along here. I’m going to make sure that I don’t get on the other side of where those threads cross and that will save my point. And then when we look at it, look how good that point looks right there. That is a perfect point. So what you’re going to do now is you’re going to sew seven of these together in a row. So let’s look at our row right here. Hang on. I’ve got this chair in my way. Let’s look at our row right here. We’ve got seven in a row and to either side of that, you’re going to sew a three inch strip. And we used the same fabric that we used for the border. And so you’re going to sew a three inch strip to either side and then you just set that aside because it’s not time to put it all together yet so that becomes your flying geese unit.
Now we’re going to talk about the leaves. For the leaves you have to have two squares that are going to be the same color, just about. And we liked using two that were the same color but not exact. And so what we’re going to do is we’re going to cut these into fourths. And I will show you how this goes together just, it’s so slick. I love these little leaves. Alright so now we have four leaves. And here’s our leaf block right here. Here’s what we’re talking about. So what we’re going to do is we’re going to put two like this. And I’m going to lay it just like the leaf is laying. And then one of these comes up here like this. And then this is going to be our stem block down here. And I actually lay out every leaf like this because I get so angley challenged I get so turned around. And so this block is a plain block and these are all half square triangles. So I’ve got one, two, let’s see, three, four, like this. And then these other pieces from our piece are all going to be half square triangles. So we’ve got one to match the red right here. And we’re going to put this right here. And then we’re going to match a piece to this like here. And match the other side as well. Here comes that one. So we have our, and I have to remember the fabric side goes to the color. You know, I have all these little mantras that I say to myself. And then this one is down here like this, ok? And then this one has a stem. And so what I do for the stem is I’m going to cut a little inch and a half piece like this off of a, this is just a brown for the stem. And I’m going to cut an inch and a half. So an inch and a half for my stem right here. And I’m going to iron this in half. I’m going to fold it right in half edge to edge with the wrong sides together like this. And this is a really slick way to make a stem too. Oh look, this one is turned. Whew, so glad that I caught that. Let’s see here. It goes this way. This way and this way and that way and that way. That looks better.
Alright so here we have our little stem. And what we’re going to do is I’m going to iron a line right here. And you can draw the line. You know when I say iron a line, if you want to draw the line, you can draw the line. So how I make these stems is I’m going to lay my, let me get this out of the way. I’m going to lay my inch and a half piece that is ironed in half right on that seam. And I’m going to stitch a quarter of an inch over it. So this is a really great way to make stems so you’re going to want to, you’re going to want to see this. So my fabric is laid right, not over the line but right up to the sewing line. And then I’m sewing a quarter of an inch from the edge. And so this is what it looks like. It goes right up to it. And I’m sewing a quarter of an inch over. Now I’m going to press this back like this. So I’m going to press this over right here. It’s going to cover up that seam. And then I would definitely use brown thread to topstitch this tiny edge. And you can see I did that on this one and it doesn’t show. Now when I do it with the white on here it will show. But I would, if I were doing it for real I would do it with brown thread. So I go right along that edge and just lightly topstitch right along that edge like this. And so you can see it with the white and it doesn’t even look terrible with the white. But, then we’re going to square it up again. So I’m going to lay my ruler on here and square that stem like this and like that. Then I’m going to do the same thing to the other side. And then this. Alright. And then this goes back in here for the stem block.
Now we need to sew these little half square triangles together. And I’m going to pick these up just like this. And we are going to open these up and we are going to sew right on the folded line. So right on the line, we’re going to sew. And we’re going to do that to all four of them. And make sure your squares match up. And then sew right on the line. Oop, I’m over a little bit. And we’re going to do this to all four. And we’ll do them one after the other. Alright, here’s the last one. We’re going to go right on that sew line. Alright, now what we’re going to do is we’re going to clip these apart. And we are going to cut off one side, just trim it off. So here’s my, we’ll trim that to all four of these. It doesn’t matter which side you cut off because they’re half square triangles and they can turn either way. Alright now let’s press them open. We’re going to press to the dark side. So that means I’m going to lay my dark fabric on top and just slide my iron back like this. Oop, I did that one just backwards. Whoops, whoopsy-daisy. Alrighty, there we go.
Alright so now we’re going to put our leaf back together. And again I’m going to match up these two with this one like this. And these two with this one and they all go the same way. Now this basically becomes a nine patch. And so what I’m going to do is I’m going to lay these over here like this. And I’m going to sew all this row, one, two, three, just like this. So we’ll chain piece these. First one and here’s the middle and the last one. Make sure they stayed lined up. Now what I’m going to do is I”m going to bring these back. I”m going to open them up and I’m going to make sure these are all going the right direction and we are going to add that last piece on here. So we’re all in the right place right here. So we’re going to add this one and then we’ll add the middle one and then the next one. So here’s the first and the second right here. And the last one right here. Oops, I’ve got to check. I lost my place. I’ve got to make sure it’s in there right, I don’t want to rip it. So that goes to that one. Yep, that’s right. Alright so we’re going to put that on here like this. So basically you’re just sewing the three rows together. And then we’re going to attach all three rows. So we’ll make sure these are all going the right direction. We’re just going to fold them over and sew them on each other. I don’t even have to clip those threads if I’ve done it right. But I’ve clipped them many times because I’ve gotten them, you know, in not quite the right place. You want to make sure these look like leaves at the end of the day. And this is one of those things where because you sew like four or five of them I”m not sure how many are behind me, but four or five. And because you sew those over and over you’ll get really good at leaves. I’ve seen some cute leaf table runners and quilts and all kinds of things they do to do with leaves. And remember if you want to make this block bigger you just have bigger squares. Alright. Now to see if I really did it right. I’ve got some threads on here but other than that, I think we are right on. This looks like a great little leaf. Let me clip my threads. Get one out of this little seam right here. There we go. Look how cute that looks. Isn’t that darling? Now let’s see, it goes right up here in the block, right here. And we’re having one, two, three, four, five, leaves.
So you’re going to add all your leaves. And then you’re going to add this 4 ½ by 6 ½ inch block on the bottom and that’s again the same size as our border. Just like we’re adding a filler piece in here. That’s the fun of making a wall hanging, you get to make the blocks and then you make them fit and you make them go in there. So now you can make the leaves and you can make the flying geese. And we’ll see you next time for part 3.
Hi everybody, it’s Jenny from the Missouri Star Quilt Company. And we are at part 3 of our Thankful Wall hanging. And it’s the applique section and so we’re going to talk about the words, our moon block and these pumpkins right here. And let’s start with the pumpkins because they’re pretty easy. So you’re going to choose your pumpkin color. And I think we might like, what color do we have up here? We have a red, a gold and a brown. So let’s start with the gold. And we’re going to put that on a background square. Now you can see on our pumpkins up here. Every pumpkin has a different background square. Remember in the first video we saved all the lights out for all these backs. What you’re going to do next is you’re going to trace your pumpkins onto your Heat N Bond and then you’re going to iron those on there. And I kind of just did them all different shapes. That was just for fun. I imagine you could do three of the same kind but mine are kind of all different shapes. So what I did then was I took my drawing and traced it onto the Heat N Bond. And then I”m going to iron it onto the back of my fabric right here. And just going to hold that for a few seconds. It only takes a few seconds. And then we’re going to carefully cut this out. And we’re going to cut on the line now. When you cut out the Heat N Bond you don’t need to trim closely or you’ll be trimming twice. That’s twice as much work for one little pumpkin. Alright so then you can peel from the edge. You can also make a little slit right here in the middle and peel it up there. There’s a couple of ways to do that. I’m going to take this piece right here and I’m going to put this pumpkin on here. And just iron it on like this. Now right above the pumpkin right here, there’s a little stem. And I’m just going to roughly cut that. And I’m going to put it on, let’s see, maybe this one right here. Alright I’m going to put on this one right here. And I”m going to kind of lay it on the leaf. I’m just going to kind of fussy cut my little stem so it has a little bit of fun and texture to it. And I’m not too worried if it’s exact or not because it’s just a tiny little stem, right? And it’s these tiny little details that really, I think that really make it look, look like you worked really hard. And it’s just not that really hard. Alright here’s our little stem right here. I’m going to stick it up there. Now you want to always watch where you place things because you don’t want to get into your seam line. Your seam line is going to be a quarter of an inch all the way around. And then what we’re going to do is we’re going to blanket stitch, zig zag or straight stitch around this whole edge to keep that applique on there. And we’re going to make three of these. And we have three different ones here.
Now we’re going to make the moon block. The moon block is super easy. I’m using just a plain square. You can see on this one, I’ve used the same fabric that’s on my binding and on the back here. But we can use this big yellow moon right here. And I’ve got it traced out as well. And the reason, you know, it looks like this is to my thankful words to my moon is one big piece. But it’s not. It’s a separate block right here. Because when I was designing this I wasn’t sure where I wanted to put it. So it’s on a separate little block just by itself. So let’s go ahead and applique this on here. I mean sorry, iron this on here. We’re not appliqueing yet. We’re just ironing it on. And I’m going to cut out my big yellow moon. Now the reason I want to do the moon block, it’s pretty easy and it’s not too much to, you know, to show or talk about. But it’s because of those little clouds. And let me show you why. So I’m going to like crease my paper here, roll that back. And here’s my background square and it’s a 9 ½ inch square. And I’m going to lay that over here and I’m just going to kind of center my moon up on there. And I’m going to let that sit for a minute because it’s the clouds we need to talk about. So I”ve got my clouds here. And they look, they look pretty good sized. And it looks like they won’t fit on a five inch square. But they will actually fit diagonally on a five inch square so let’s take a look at that. So we’re going to fit them in here just like that. See how easy that works. So we’re going to put them on here diagonally. We’re going to press this on. We’re going to trim it out and we’ll be able to lay it right on there. So just remember you’re going to put your clouds on diagonally. You’re going to trim them on like this, cut right around it. I love iron on applique. I just think it’s such a, you get such a big wow for your, for your work. And I generally use an applique stitch and that’s the one where it goes, stitch, stitch, over, stitch, stitch, over. It does that. And it just, you know brings a little bit of thread over the top to hold it down. And I enjoy that. That’s one of those things that I like. So then, see how you’re going to put your, here let me move this over here so you can get it with the overhead camera. See how you’re going to put your little clouds, on the moon like this. And you have the other one over here too. It’s a little smaller one. You can see it right up here. So you have your cloud down, you know, your two clouds and position those where you want. This is where the designing part of you doing it comes in and makes it really fun.
Alright let’s talk about the thankful words. The piece for the thankful words is 9 ½ by 20. And it’s right here. And this is our thankful printout. Now the only one you have to cut off your paper is this one because it’s already reversed for you so that your letters come out right and you to, they’re on two different sheets of paper. So you have to put them together and there’s a line to line them up so that they’re exactly right. Now I’ve cut mine out here already. And I just want to show you some tricks about the thankful thing. So when you’re dealing with little tiny things like this, it’s nice to use a little pair of scissors to do this center cutout on these little holes. Don’t stress over that too much. Just go a little slower and pay attention and keep it. And if you nick it or it doesn’t come out exactly on the line, nobody is even going to notice. But what we want to do is we want to peel this off. And you want to be a little careful with that because when you’re dealing with little pieces it’s easy to get that fraying. And so I’m just going to kind of peel this off. And, here we go. One more. Now we’re going to lay it back on here. Now one of the things you want to make sure of is you want to make sure that this is even. And so here’s a little trick for that. Hang on here, let me get this over here. We tried to make the thankful a little bigger so he would be easier to cut out and I think it is. But I just think it looks really fun. Alright, there’s our thankful words. We have about the same amount on either side. And now what I’m going to do is I’m going to take my ruler here and I’m going to lay it right along the bottom. Now on the one behind me, it’s about three inches from the bottom of the fabric so we’re going to line this up right here. And you really, you can put, obviously you can put it anywhere you want it. But three inches seemed fairly in the middle. And I like the idea of using the ruler to do it. If you only have a little ruler you can measure it from, you know, from place to place. Just to make sure it stays lined up. You’re going to then move this over to your mat. Let me move these out of the way. And you’re going to press it down just like this. And this is key right here. You don’t want to slide this across here. You’re going to tap it. You’re just going to take it like this and press, press, press and not do the. Well hang on, this little, this little guy folded over so I’m going to straighten him out. And you just want to tap it down. And tap it down. If you slide your iron you could stretch your word and that would be, that would not look very good.
So once you get your word all ironed on, it goes together just that fast. And you’re just going to applique it down with the same applique stitch, whichever one you choose to use. And we are ready to assemble our wall hanging. Now if you just look at the diagram, we sewed the thankful to the moon block. There’s a seam right here. And I did this like in little sections so you can see this. I put a border around my turkey and continued it over on the top of this. So I sewed this block to this block with a sashing in between. I sewed these three turkeys together. And then I sewed this block up here. I had my little pumpkins on this side with this little piecer block in here. And this is like, you know, 2 ½ by five right here. And then sewed it to this side. So it all kind of goes together like a puzzle. And you’ll be able to see that. And then this whole side right here, you’ve got your five leaves and your rectangle here on the bottom and it just matches up with the whole thing and then you just border it. Then you just put your little four inch borders out here and you’re going to put them on your sides and your top and your bottom. And your wall hanging is going to be ready to be quilted. So we hope you enjoyed making this wall hanging with us. It’s good to remember to be thankful. It’s a great time of year to do that and we should do it all the time. And we want you to know how thankful we are for you and for all the support that you give us. So we hope you enjoyed this tutorial on the Thankful Wall Hanging from the Missouri Star Quilt Company.
& Progress on Social