


Playground Quilt Tutorial
Jenny Doan
Playground Quilt Tutorial
- 1 roll x 10" Precut Fabric Squares (Layer Cakes) - Print
- 1 roll x 2.5" Precut Fabric Strips (Jelly Rolls) - Background
- 1¼ yards x Quilt Fabric for Border
- ¾ yards x Quilt Fabric for Binding
- 3¾ yards x Quilt Backing Fabric
Featured products Get the Supplies Featured in this Tutorial


Finish your masterpiece and let us give it the finishing touch it deserves.
Subscribe to MSQC on YouTube
Hundreds of FREE tutorials and a new one from Jenny launches every Friday.
video transcript
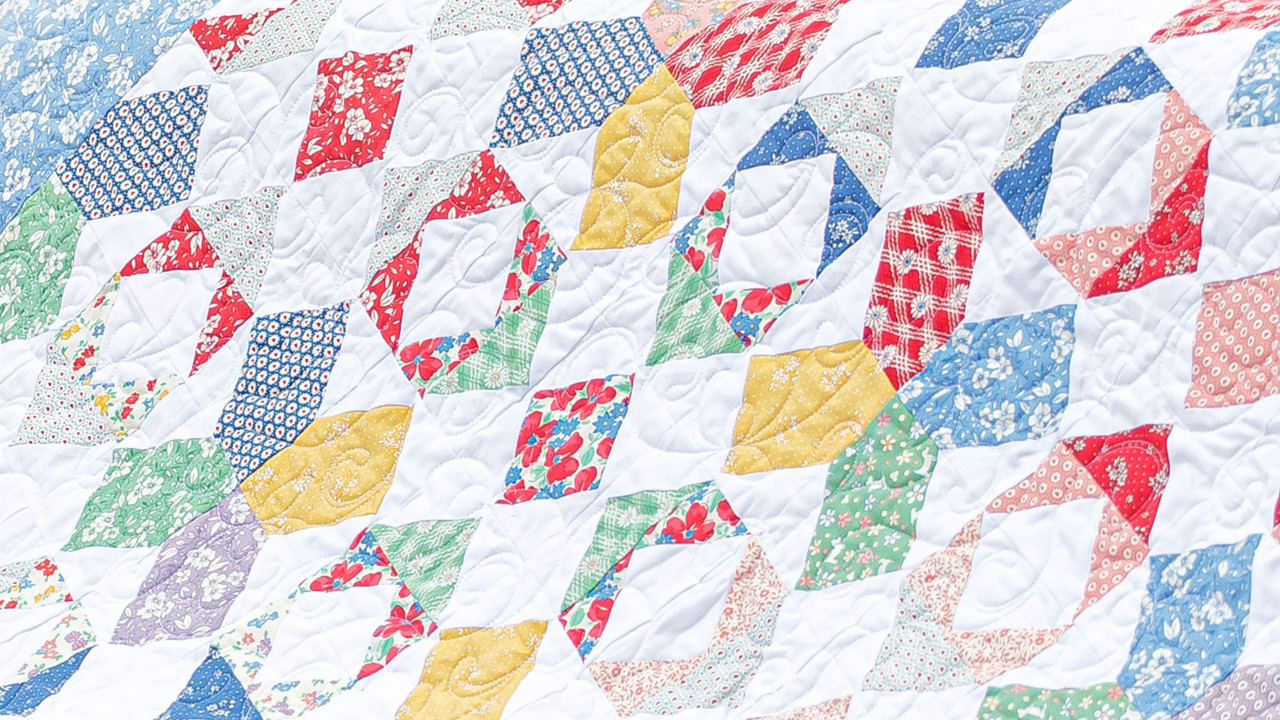
Hi everybody, it’s Jenny from the Missouri Star Quilt Company. And I’ve got a fun project for you today. Take a look at this quilt behind me. Isn’t this great? I love 30’s. 30’s are just so cute and I think this is so sweet looking. This is a nice big six inch border out here. And here’s our backing. And we used a darling little quilting pattern called Faster Posies and it’s just really, really cute. So to make this quilt you’re going to need one packet of ten inch squares. And we have used 30’s Playtime by Chloe’s Closet for Moda. You’re going to need a roll of 2 ½ inch background strips. You’re going to need 1 ¼ yards of your border fabric. And your backing, you’re going to need 3 ¾ yards. And it’s going to be horizontal seams. So let’s get straight to making this quilt.
This is the block we’re talking about. I know when you put them all together this block kind of disappears but look at all the secondary things that happen. We’ve got the X’s going on here. We’ve got the little window blocks. I mean, there’s so many fun things that happen when you just put a block together like this and snug it up right next to each other. If you want your block to shine, you would put a sashing in there and then this block would be the star. Now this block is actually made up of three different blocks. We’ve got this corner block right here. We’ve got the double flying geese. And we’ve got the square in a square in the middle. So let me show you how to do those. So the first thing you’re going to do is you’re going to take your layer cake and you’re going to divide it into three stacks. On this block you’ll notice there are three different colors on this block. And each block is made a little differently and so we’re going to divide it into three stacks. In stack A you’ll have 16. In stack B you’ll have 16. And in stack C you’ll have ten. This way when you do your cutting you can do it all at once and then you’ll be done and ready to go and ready to put all your blocks together. And then I would suggest that whatever three fabrics you put together, you keep them together as a unit because you know this is going to make one block. So let me show you the cutting.
For stack A we’re going to cut four 4 ½ inch squares. Now because we’re dealing with a ten inch square what I like to do is I’m just going to cut 4 ½ inch strips like this. So I’m going to cut one here and then I’m going to cut one here. And these are 4 ½ inch strips. And then I’m going to stack these two again right here like this. And I’m going to do the same thing from the other direction. So right here. Make sure they’re lined up real nice. And I’m going to cut 4 ½ just like this. 4 ½ and 4 ½ right here. So you’ll have this little leftover piece right here and then we’re going to keep these in one stack. From stack B right here is where all of our little pieces for our flying geese are going to come from. And so what we’re going to cut from here is we’re going to cut a five inch square, I mean a five inch strip off the side like this. And off of one side we’re going to cut a 4 ½ inch square. That’s going to be one of your center squares. So right here I have my ruler over 4 ½ and then I’m going to turn this and cut it again at 4 ½. So that’s our center square right here. Now this little piece, that’s a whole other project right there. And so you just want to hang onto that and put that in some other place. Alright so now we have this five by ten inch strip here and we are going to cut this into eight 2 ½ inch squares. These are for our flying geese block. And so what I’m going to do is I’m going to cut 2 ½ inch strips and you should get two of these out of here like this. I’m going to stack those and then I’m just going to cut two and I like to use my little ruler for this because it’s exactly 2 ½. And so I’m going to cut two, scoot this out so I can see the edge, four, I’ve got six right here. And then eight, I’m going to make sure those are right. Just cut the little tiny edge off right here. So we’ve got two, four, six, eight. You’re going to set those aside.
From block C we’re going to cut two 4 ½ inch strips. And these are going to be our flying geese. And so I’m going to take my big ruler. And again I’m going to cut 4 ½ because our flying geese units are going to be 2 ½ by 4 ½. And so we’re going to cut two 4 ½ inch strips just like that. And then I’m going to stack these like this. And then we’re just going to cut 2 ½ inch strips like this. And these are the bodies of our flying geese right here. And because I’m using my ruler to measure with I don’t have to line it up on the mat because my ruler is, I can see that it is straight. I can see my lines are along the edge. And so there’s two, four, six, eight for our flying geese. Alright.
So now we need to cut some white. And there is quite a bit of background material on here so I just pulled out that 2 ½ inch strip. And we’re going to need, for each block, we’re going to need four 2 ½ by 4 ½ inch rectangles for the other side of our flying geese. So we’ve got 2 ½ here by 4 ½. And 2 ½ by 4 ½ right here. And so you’ll notice on these, let me just show you this. When people make pre cuts they put these little pinked edges in them. That’s not part of the fabric measurement. So if that actually bothers you, you can lay your ruler on here. And if you like to sew from the edge of the peak, put your ruler over to the edge of the peak like this. And then you’re just going to trim off this tiny part. And you’ll feel like it lines up better for you. Or you can center it in the middle of these peaks and trim those off. Or if you’re good at eyeballing like I am, I rarely trim them off because I just make it work. But I wanted to show you, there’s a lot of people who get confused by these little tiny peaks. And so this is going to make it feel a little bit more clean to you if we take those off, a little bit off both sides like that. Alright so that’s our flying geese. We’re going to set those over there. So once you get all your pieces cut, remember you’re going to need 24 2 ½ inch squares. So you’re just going to cut the rest of your strip and part of another strip into all these little 2 ½ inch squares just like this. And then you’re ready to assemble your block.
So what we’re going to do is we’re going to start with our center square which is a 4 ½ inch square and we are going to snowball two sides at once. And we’re going to lay these snowballs, these little blocks, 2 ½ inch blocks right directly in the corners. And we are going to sew right corner to corner diagonally, right down the middle. And so you can put a pin in there or you can just lay them on there and I’m going to use my diagonal seam tape. And I’m going to sew a line from where my needle is, the red line here and sew straight across to the other side. Cut my thread, flip that square around and I’ll get both of these done just like that. Alright. So then what we’re going to do is we’re going to trim off these little edges right here so just put your ruler a quarter of an inch or so out. And we’re going to press this open and then add the other two sides. Move this out of the way. So we’re pressing this open. And then we’re going to add these other two sides and we’re just going to put those right in the other corners like this. And they will overlap, your white squares, and we want them to because we want it to set it in to save those little points. So here’s my two little corners. And we’re just going to sew here and here corner to corner. Alright so right down the middle, put my needle down, line up my square, the point of my square on the line of the tape. Now you can draw a line, if you don’t have the tape, just draw that center line and sew right on it. And that will work. You can also iron a line, you know, I’m a big fan of ironing the line. So we’re just going to do the same thing here on this other square, sew corner to corner. And this makes a block that is just commonly called square in a square. And it’s just a cute little way to have a center of your block. Alright so here’s what we’re going to do, just trim these off. And then we’re going to press these out. Now because I’m sometimes not perfect, I know that will be a surprise to you guys, I like to take my block and look at it on a 4 ½ inch square and make sure that I’m in the general ballpark. And make sure that it’s pretty close. And mine is pretty close. Sometimes you get a corner that kind of wings out you know, and then it throws the rest of the block off and we don’t want that. Alright.
So then our corner blocks which are these blocks right here are our 4 ½ inch square and we’re snowballing three sides. And so I have one here to show you. And on this one we’re going to do the same thing. We’re going to go ahead and we are going to snowball two opposite corners and we’ll cut those off, iron those back and then we’ll fill in the last corner over here. So we’re going to snowball two of these. And again go corner to corner. And I’m actually going to slide my block in here because we need four of those. And so I’m going to slide this in here. And then I’m going to come around and put the other block on the other side. Did my little block fall off over there? Alrighty, here we go. Corner to corner on this. This is a good time to chain piece these two. Just make sure you don’t get one caught on the other one. Alright. Now we can trim these off. And I’m just going to take these apart like that. And we’re going to trim these two sides like this and that, press it open. Then I’m going to trim this one like that. And trim the other side. And I just guess. I just guess at that line. It’s just a little bit over. Alright. So then we’re going to put one more square on these, it can go on any side you want but it’s just going to go on one of these other corners like this and like this. And it will make this block like this that is cornered on three sides. Alright. Yes I just dropped that paper on the floor. Alright, here we go. Everybody always asks me, where does all that stuff go down there. We have a drawer down here, you know, that stuff just goes into but sometimes it’s like, hmp. I know, some of your sewing rooms look like mine and some of them do not. We are all in different places. I’m a pretty chaotic, messy sewer. Alright so now I’m going to trim this off over here and trim this one off. And then we’ll press this out and then we’ll have our corners done. Just like that. Again I just kind of like to check myself and I’ll be like, how does that look. And, oh see I have a little bit of extra over here so I can quickly just square that up. You know, if you’re perfect you’ll never need to square. But I am just so far from that. Alright, so this one looks pretty good. And then what we have to do are these flying geese blocks.
Now one of these, these are two flying geese, one is the solid white with the two colors.And the other is the color in the middle with two whites. And so that makes our four blocks. So we have to make four sets of four flying geese which actually comes out to eight the way we’re doing it . So we’re going to start with our white ones. And what I’m going to do is I’m going to put one corner on here like this on each one. Because these are 4 ½ and this is a 2 ½ inch block, they’re going to overlap and that will give you your point. So I’m going to lay two colored strips or two colored squares on my 4 ½ by 2 ½ inch rectangle, sew corner to corner. I’m also going to do that with my colored ones. So we’re doing the same thing just opposite. So I have this purple with one 2 ½ inch square, on the side like that. Let me stick these pins in here. And then we’re just going to sew diagonally from the center out like this. I line it up on my tape or you can draw the line and sew right out to the side like this. And the next one. And then I have one more. This is my purple with the white corner. And then this one right here. Alright so now what we’re going to do is we’re going to trim off all these little corners like this. Let me cut these apart. Go ahead and cut these apart and this one. Going to trim this one off. I’m getting a pretty good little stack of little corners that I’ve cut off over here. I know we have our corner collectors out there. If you want to save your corner without less work you’re going to sew this line and you’re going to come back and sew another line and cut in between them and then those little corners will stay together and you will have little tiny half square triangles if you do that. Alright. So now let’s press these back. This is my purple set. And this is my white with the green corners. And then we need to add one more square to the other side. And so here’s my green to the white and my 2 ½ inch squares, I’m going to set those on there. Make sure it lines up real nice and sew corner to corner. And this one the same, sew right sides together on the fabric, corner to corner. And here’s our purple with the top white corners and sew corner to corner just like this. And this one, the same. And the other one I went from the middle out and this one I’m going from the corner in. It doesn’t matter. You can go either way. Alright. We’re going to clip these apart and trim this off. And one more. Alrighty, now let’s press these open.
So then these pieces are going to go together just like this. And we are going to put this right on top of each other right sides together and sew a quarter of an inch right across the top. Now this is where if you don’t want to lose that point, the thread criss crosses, make sure that you sew on that point or on the seam side, out there, not in further or you will lose your points. Just watch that if these points are important to you. And so we’re just going to sew a quarter of an inch right down the side. I have the point part up so I can watch where I’m going, making sure that I’m going to have a nice clean point on that. And so we’re going to turn this over and I’m going to flip it so I can see my little thread criss cross. And we’re going to sew along here. And this one is a little bit higher. So I’m just going to carefully wiggle it a little, make a little curve, make sure I don’t lose my point. Just a tiny curve, it’s just a tiny one. Alright so now we have these two done. Let’s look at my point. Oh that’s a pretty good one. Let’s look at this one. Oh not bad on that either. Alright so we have four of these. And these will be our middle blocks. And let me show you, once we get this done, I can show you how to put this all together. Now I’m going to do the same thing with my little square and put it on here. Make sure that I have, sometimes these little blocks particularly, for me, came out just a hair bigger. They shouldn’t but you know, I don’t know. So I’m just going to trim that up just a little bit. And then this one I’m going to look at here as well. It’s not much. It’s just shaving it really. But let me turn this, this looks like. So right here, all looks good. I’ve got a little corner over here. There we go. Alright.
So now these are our corner blocks. I’m sorry, these are our center blocks, these are our corner blocks and this is our center. Now on this one we kept our star legs and our center matching. And we did that with a lot of our blocks. And so here’s our center. And we’re going to put these on all four sides. So we’ve got one, two, three, four. We’re going to slide in these corner blocks. And it’s going to be the white is going to go in. And it’s going to make that secondary block right there with the little square. So let’s go ahead and close my rotary cutter. And we’re going to put these all the way around like this. Isn’t that a fun block? So now what we’re going to do is we’re going to sew these together row by row. I’m going to pick up the first row. And I’m going to sew these right together like this. There’s nothing to really match on these so you don’t have to worry about that. You can actually just sew them on. And if your block is a little off, you know, generally you can catch that in the quarter inch seam so it’s not going to really matter. Alright so now I’m going to grab this center row, put that one together and my geese on the other side like this. And then our bottom row right here, make sure that your white is touching the white of the top of the geese. And then one more corner over here. You want them to point in like that. Alright so now I am just going to take a little stitch, sail down the side. Now I’m ready to put these blocks with my middle block. And what I’m going to do is I’m going to put this middle block on here like this and I’m going to make sure that all my little purples are pointing to the center. And I’m going to put this on here. Now I purposely did not press this because I want my seams to go different directions. You may press if you want. But I’m going to have my middle is going to go in toward the middle. So I’m folding this seam toward the middle and my bottom seam will go out. And sometimes when I press I forget to do that and so a lot of times I like to do it before I press and just sew my strips together. But you do what you like. I hope nobody ever looks into my quilt to see which way I pressed. Alright so here we go. And our last little block right here. Alrighty. So let’s take a look at this block. All of our purples should point to the middle and they do. Our corners are in there right. Isn’t it just fun to see all the secondary things that appear when you do a block like this. That’s actually, people always say, what is your favorite block? And my favorite, I don’t have a favorite block. I have that moment when you get it done and you put it together and you see all the additional, little things that appear. I love those secondary blocks.
Alright in our quilt back here we have one, two, three, four, across by one, two, three, four, down. So it’s a four by four layout, 16 blocks. And that’s because we made so many different blocks for each block. So once you get your blocks done it’s time to lay them out. And when we laid these out it was just so fun to see all the secondary things that appeared. So we’ve got this block here. And look what happens when you put these together. You get an additional square in the square. You get these points that kind of accent that. This whole block section is fun but what’s happening here? When you put these down here you get this X block over here which is super fun because all of a sudden in the middle you have this big X block. And it’s just a lot of fun. This block is traditionally called Swing in the Middle. We’re calling it Playground because it just felt playful and fun. And then also I wanted to show you when you go to set your quilt out, if you decide you don’t want it to be smashed next to each other but you want this block to be the star, all you have to do is sash it like this. I would sash it, put a little cornerstone in here and sash it again. And then each of these individual blocks will be the star. So it’s your preference, whatever you feel like doing. For me it’s a lot of fun to see what happens if and this is the if factor for me when we put these together.
Now on every block there are one, two, three, four, five, six, seven, eight, nine, ten, 11, 12, 13, 14, 15, 16, 17, 18, 19, 20, 21, 22, 23, 24, 25, 26, 27, about 27 corners that we cut off. Look at these. So you say, I can’t throw all those away. I need to sew them together. Well look over here. Look at this. This is what we got from one quilt. Garlands, fun, I don’t know what you’re going to do with this but look how cute and tiny these are. I mean I couldn’t bear to just pitch them all. Look how cute that is. Think of all the things you can make with a tiny, what size is this, let me see, one, two inch. Two inch half square triangle. My gosh. Now if not all your seams are the same you’re going to square to the smallest one of these and then you’ll make them all match. And when you start to put them together you’re going to make something amazing, I just know it. So I hope you guys will let me know what you do with all these half square triangles. I mean to be honest mine are probably going to stay in this jar for a while but it’s fun to think about. And it’s fun to do and it’s absolutely no wasting when you go ahead and sew that one more seam. And you have all those half square triangles. So we hope you enjoyed this tutorial from the Missouri Star Quilt Company.
We hope you enjoyed watching this video. If you’re not already part of the Missouri Star quilt family you can hit the subscribe button below so you won’t miss a thing. And if you click that bell it will notify you every time a new tutorial comes out. See you next Friday.
& Progress on Social