


Solar Flare Quilt Tutorial
Jenny Doan
Solar Flare Quilt Tutorial
- 1 roll x 2.5" Precut Fabric Strips (Jelly Rolls) - Print (42 total needed)
- 1 pack x 5" Precut Fabric Squares (Charm Packs)
- 2 yards x Background Fabric (incl. Inner Border)
- 1½ yards x Quilt Fabric for Outer Border
- ¾ yard x Quilt Fabric for Binding
- 5¼ yards x vertical seam(s) or 2¾ yards of 108" wide Backing Fabric
- 2 yards x Heat n Bond Lite
- 1 x Missouri Star Circle Magic Small 5" Circle Template
Featured products Get the Supplies Featured in this Tutorial


Finish your masterpiece and let us give it the finishing touch it deserves.
Subscribe to MSQC on YouTube
Hundreds of FREE tutorials and a new one from Jenny launches every Friday.
video transcript
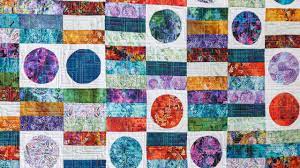
Hi everybody, it’s Jenny from the MSQC. Take a look at this fun quilt behind me. Isn’t this awesome? So this is a coin quilt. It is made, these are called when you stack up fabrics like this it’s called coins. And this is also a coin but when we got it all together on this gorgeous fabric it looked more like outer space something. So we called it Solar Flare. So let me show you how to make this quilt. So to make this quilt you’re going to need one roll of 2 ½ inch strips and one packet of five inch squares of the same fabrics. And we used Flora Graphics Five by Jason Yenter for In the Beginning Fabrics. You’re going to need some background fabric, about two yards. And it will make all these that the spheres sit on and also this first inner border out here. Your outer border is 1 ½ yards and it’s a nice big six inch border. So look at the back of this quilt. Isn’t this gorgeous? Such a pretty back. Now if you used 45 inch fabric you’re going to need 5 ¼ yards. But if you want to use a 108 piece of backing you’re just going to need 2 ¾. Now there’s a few more things you’re going to need. You’re going to need a little Heat N Bond. That’s what we’ve attached these circles with. And you’re going to need a five inch ruler. We used this circle magic ruler for our five inch squares. Honestly you can use, when I start looking for a circle, I head to my cupboards first because I’m looking for a cup or whatever it is that’s the size I want. We happened to use our circle magic template. And it’s just five inches and it works perfectly for this. So let me show you how to make it.
So what you’re going to do is you’re going to take your roll apart and you’re actually going to need two extra strips. So a roll has 40 strips in it. We need 42. So we cut two off of our border fabric and threw them in with our roll because you need 42 strips for this. And so one this, what we did with our strips was we kind of paired them in threes, lights and darks, mixed them up. And we just sewed them together a quarter of an inch right down the side and sewed three strips together just like this. And pressed them however you want. They don’t match up with anything so it doesn’t really matter how you press them. My seams are all going one direction. But if you want them open. You know, whatever you want. And then what we’re going to do is we’re going to measure how tall these are. And they should be 6 ½ ish. But however tall they are, that’s how wide we’re going to cut them because we want squares. And so I’m going to look at mine. And mine are going to be cut 6 ½. And so the first thing I’m going to do right here is I’m going to cut off my selvedge edge right here. And I’m going to make sure these are lined up nice and even. So I’m cutting off my selvedge edge. And I’m going to come in here because my bottom piece has some deeper selvedges. Alright now what we’re going to do is we’re going to come over 6 ½ inches, so I’m at five here, six and a half. And we’re going to cut this whole strip. And we’re going to cut the whole thing into these little squares like this. And we are going to do that with all of our strip sets. So you’ll end up, you’ll just keep those in a pile and you’ll end up with a pile of these. We’re going to set these aside and then we’re going to move on to our little sphere blocks like this.
And so what we’re going to do is we are going to take our round circle and we’re going to put it on the paper side of our Heat N Bond. And we’re going to draw a circle like this. So see how I have this circle here. I’ve drawn it on here. And then we’re just going to kind of roughly cut it out. Now I’m actually going to cut this out just a little bit around the edge of the circle because if you’re cutting a five inch circle out of a five inch piece of fabric you’ve got to get it pretty close. And we don’t want to get this stuff on our iron so I’m just going to kind of use my rotary cutter and trim around this like that. So out of your heat n bond you’re going to cut 41 of these. You’re going to trace and cut about 41 of these. And I’m going to move this off to the side. And then you’re going to take your background fabric right here and you’re going to cut a 6 ½ inch strip because we want our blocks to match our strip set because they’re all going to go together. And so I’ve cut a 6 ½ inch strip here and let me cut a couple of squares off of that. So I’m going to line this up. Whenever I cut fabric that’s selvedge to selvedge I always keep it folded because it makes it easier for me to, you know, I’m not dealing with my ruler way out here. So here I have five inches, six and a half. And I always count it out like that to make sure that I’m not getting it wrong because it’s a lot of squares to cut, 41 exactly. And so I’m cutting two at a time by doing that.
Alright so what we’re going to do now is we are going to iron our heat n bond onto the back of our five inch circle. And I’m going to pick one here, a pretty one. And it goes on the back. Remember you’re ironing your heat n bond on the back. Now if you have a lot hanging over and you don’t want that to get that on your ironing mat you just want to make sure that you trim that up a little bit. Alright. So it’s just a few seconds of pressing. It doesn’t take very long at all. And then I’m going to cut this out with my scissor. I could actually use my circle and my rotary cutter. But I find this is just as easy. So we’re going to trim this out like this. Stay on the lines. Alright so now we should have a pretty decent looking circle. And we’re just going to peel that paper off the back. And I do it by folding it over like this and just kind of running my thumb nail along it. And it just lifts up and comes off. And then I’m going to center this. I’m just going to eyeball it. You can fold your square in half twice and you can do that if you want to and eyeball it up. Fold your circle in half, you know. But mine, I seem to be able to get them pretty close to the center. And I’m not worried about perfection. I don’t think anybody is going to come measure my circles so I”m ok with how this looks. And I think that it looks pretty centered so I’m going to use my iron. And I’m going to press. I’m not going to move my iron back and forth. I’m just going to press and hold it for a few seconds because we want it to stay on there. And then we want to sew this edge down.
Now what I did on these right here, you can see, I did a little zig zag. Now because there is a whole bunch of different colors of fabric in this line I’m using invisible thread. When I use invisible thread up here on the top I just use my, leave my regular bobbin in, it’s just a regular white bobbin. I don’t know if you’ve ever tried to wind a bobbin with invisible thread but it does not work very well. So leave your regular bobbin in. And then we’re going to sew on the top. So I have this set up for a zig zag and I’m just going to sew. And what I’m looking for with my zig zag is I don’t want it to be too big. But I want it to, I have my needle right on the edge where it comes in next to the fabric. And I want that zig zag to go cross over on both sides. So it’s catching the whole thing. And so I’m going to watch my zig zag. And I’m just going to keep my fabric like right toward the middle and watch that it keeps crossing over. You can go as fast or as slow as you want. But with that invisible thread it’s so nice because you don’t have to change your thread with every single square. And if you get off a little bit nobody will know because it’s invisible. Alright there we go. We’re back to the beginning. Now this is a tiny little zig zag . See if you can see it here. Let me cut this off here. And it just looks perfect. You know I would have never used a zig zag pattern. I would have always done the applique stitch where it comes in and grabs it but you know what, Lori Holt uses a zig zag stitch and her applique is gorgeous so I started using some of those on mine and I just think it looks beautiful.
So now that you have all of your blocks made, the fun part is up to you in putting them together. They’re all the same size so you can literally do whatever you want. But to make it simple for my brain what I did was I did one block that was a four patch so it had a coin block and the sphere and the coin block and a sphere, just like this. The other one had, it has let’s see, here’s one right here. So there’s one, two coins on this side and coins on this side with only one sphere. And so let me show you what I’m talking about. So what we did here is I have this together right here. Now one of the things that tripped me up was the coins, to get this look, the coins all have to stay horizontal. And so as we’re putting it together we can make one block set that looks like this. And then you can turn it so that the sphere is in this corner or in this corner but your coins are all still going to line up. That’s the look you’re going for. So basically we’re giving you creative license to play with these however you like. You can do them in four patches. You can do them with three strip blocks to one, turn them however you want. We’ll have a diagram for you to make it easy if you want to. But go ahead and play and have some fun with this on your own.
So basically we’ve got ten blocks across of our six inch blocks and 12 blocks down, 120 blocks. It makes a quilt that is 73 by 85. Oh and we quilted this in meandering squares. And I think anytime you have something that’s round, it’s just really fun to put something that has edges on it and squares like that. It gives it this really modern feel. I really enjoyed making this. And we hope you enjoyed watching this tutorial on the Solar Flare quilt from the MSQC.
We hope you enjoyed watching this video. If you’re not already part of the Missouri Star quilt family you can hit the subscribe button below so you won’t miss a thing. And if you click that bell it will notify you every time a new tutorial comes out. See you next Friday.
& Progress on Social