


Cactus Carnival Quilt Tutorial
Jenny Doan
Cactus Carnival Quilt Tutorial
Jenny Doan demonstrates how to make a gorgeous Cactus Carnival quilt using 10 inch squares of precut fabric (layer cakes). For this project, Jenny chose "Nouveau Soul Batiks Stacks by Kathy Engle for Island Batik. She also used Heat N Bond iron on adhesive and the following templates:
- Missouri Star Orange Peel Templates in small, medium and large
- Missouri Star Tumbler Templates in small and large
- Missouri Star Petal Template for 5" Squares
- 1 pack x 10" Precut Fabric Squares (Layer Cakes) - Print
- 2 yards x White Background Fabric
- 1¼ yards x Gray Background Fabric
- 8 yards x Heat n Bond Lite
- 1¼ yards x Quilt Fabric for Border
- ¾ yard x Quilt Fabric for Binding
- 4¾ yards x Quilt Backing Fabric
Featured products Get the Supplies Featured in this Tutorial


Finish your masterpiece and let us give it the finishing touch it deserves.
Subscribe to MSQC on YouTube
Hundreds of FREE tutorials and a new one from Jenny launches every Friday.
video transcript
Hi everybody, it’s Jenny from the MSQC. And take a look at this quilt behind me. Isn’t this the cutest thing? This is our Cactus Carnival quilt. And isn’t it fun? And for all you guys who have bought templates, you know that if that template can do one thing it’s a great tool. But if it can do a lot of things. Well then it becomes a very valuable tool. And I use them as much as I can and in this one I think I’ve used just about every template. And so if you have the templates this is the quilt for you. So to make this quilt what you’re going to need is one packet of ten inch squares. And we have used this lovely batik line you can see. It’s called Nuevo Soul by Kathy Engle for Island Batik. You’re going to need some background, a couple of yards of white and a yard and a quarter of gray. Now that depends on your backgrounds and I just used, it’s all based on layer cake squares so they’re just ten inch squares. So if you have some extra squares of white or gray this will work for you as well. You’re going to need a yard and a quarter for your border out here. We’ve got a nice big border out here. And our backing is 4 ¾ yards. This is a great little size quilt. It’s 68 by 77 and so it’s just a really nice size. Now the templates you’re going to need for this are you’re going to need your large peel, your medium peel, your small peel. You’re going to need your small and your large tumbler. You’re going to need the petal. And so there’s just lots of templates that we used in this. You’re also going to need some Heat N Bond because this is an iron on applique project and for Heat N Bond you’re going to need eight yards of Heat N Bond.
So the first thing I did to get started on my cactus plants was I took my Heat N Bond and I started to trace shapes. So I just took a piece of it, and again you’re going to have eight yards of this and so you know you don’t need to have it all rolled up at once. You can cut smaller pieces to work with or whatever. And what I did was I started tracing shapes and I traced a bunch of the same shape at the same time. So I would trace my petals like this, and you know, just come around, trace them. They don’t have to be perfect. And we’ll trace a couple of these. We’ll trace a couple of the, you know, these little guys right here. You want to leave room in between them. I’m tracing on the paper side. And so the other side is the sticky side, the iron-on side, you don’t want to trace on that side. And obviously you can squeeze these together, you know, get as many as you can in one place. Then you’re going to rough cut these out. And I’m just going to grab my scissors here and I’m just going to rough cut these out like this.
Now what I would do is I would go to my layer cake and decide what color I wanted to use, say for my pot. So let’s look at how to make one of these blocks. So I have a pot here that I traced out of my small tumbler right here and I ironed it onto my fabric. And I’m thinking that this fabric because it’s lighter, it will look best on a white background. So I pick my background fabric, I pick my pot fabric. You’ve traced some of these and then we’re going to trace some of these and we’re just going to cut them apart and we’re going to iron them onto the fabric for our plant. Now the plant I’m going to show you is this one right here. So this is made of the petal but we cut it in half and put the little petal right in between. And so let’s do a couple of these. And I’m going to do I think, I think I’ll do it on this purple. I think that would be really pretty. That’s the other thing that’s fun to me. When you take a, I mean if we were left to design our own quilt it would be, you know green, the normal colors. But when you have to do is out of a layer cake like I do, you know, it’s like this is the fabric you get to use, Jenny. Then I have to be creative with it. And I have to just play it and let it happen. And every single one of these look like cactus, even though I’ve probably never met a blue cactus. But it looks like a cactus, right? And so I love that. I love that it becomes very playful to me when we do those kind of things.
Alright now I’m going to trim this a little closer but not close. I’m rough cutting it. And I’m just doing that so I can save some room on my fabric. And I’m going to lay it glue side down, so this is the shiny side, glue side down and just press it on. And make sure it’s adhered there and stuck on. And then what I’m going to do is I’m just going to let that cool for a minute. And I’m going to do my little middle. And what’s fun about this is that there is so many, and see that is just rough cut. But there’s so many little things on here that we can be like I want to use something color but I only have a piece this big. And I’m like, it’s got to be perfect. And so actually look at this, I have one cut out. I might even use that one. Let me see. I’ll show you how to iron it on though. Alright so here’s a tiny piece and this will work just about perfect. Oh, it is perfect. Let me scoot it down in this corner. I’m going to cut this end off. Because you don’t want to iron this onto your ironing board. So personal experience, let me just say, you want to make sure that your pieces are on there but don’t hang over the edge. You know, because it’s not fun to get out of your ironing board. Especially these little wool mats. So now this is cool enough I can trim it. And because I’m using batiks it doesn’t matter what side I’m cutting on. And you’ll check with your fabrics and it won’t matter what side you’re cutting it on but if you have fabric that has a definite right and wrong side you’ll want to look at that. Now it is not bad to use the wrong side of fabric because if you want a lighter piece in there you can use the backside of the fabric. But you’ll want to always iron it on to the backside of your fabric whether it’s the real backside or the backside that’s going to be that backside. So mine, on batiks obviously it doesn’t matter. So what I’m doing I have my petal here and then what I’m going to do is I’m going to take my little ruler and I’m going to cut it right in half. And this is where playing with the templates is so fun because, you know, we have this normal petal but we’re going to make it do something else. So it looks like this is about right in half right here. And what I’m going to do is I’m just going to take a rotary cutter and just cut that in half. And I’m going to set it up here like this. And then I’m going to trim out my little inner spike here. And then I’ll bring it over here so you can see what I’m doing. And so then what I’m going to do is I’m going to stick this in here and I’m going to put it like that. Do you see? And all of a sudden we have a different looking cactus. Now some of the cactuses are made where this comes together and maybe one of these is off to the side like this, you know. And so let’s talk about some of these shapes.
Actually first let’s iron this down. Now I kind of made a rule on mine that my pot would be to the bottom of the layer cake squares so that the bottom of that pot would be included in the seam. And so here’s this one. And I’m going to get my petal that I’ve cut in half. You know Natalie and I do a lot of designing together and we had a lot of fun designing this one because it’s fun to come up with a different look. You know, out of what feels like the same kind of things. Alright so here’s our middle petal and we’re going to slide this underneath but it could go on top if you wanted. So just like that, make that go over. How cute is that? Really. Alright now we’re just going to press this down. Now when I press mine down you can’t hold it on there too long. It’s just a couple of seconds. And it will adhere and you can just test it to see if it will peel up. If it doesn’t it’s on there. And then what you’re going to do is you’re going to do a machine stitch, a zig zag, a straight stitch, whatever kind of machine applique you want to do all around this. And do it block by block. Don’t do it after you get your whole top together because then you’ve got to wrestle that thing. It’s way easier to do it block by block.
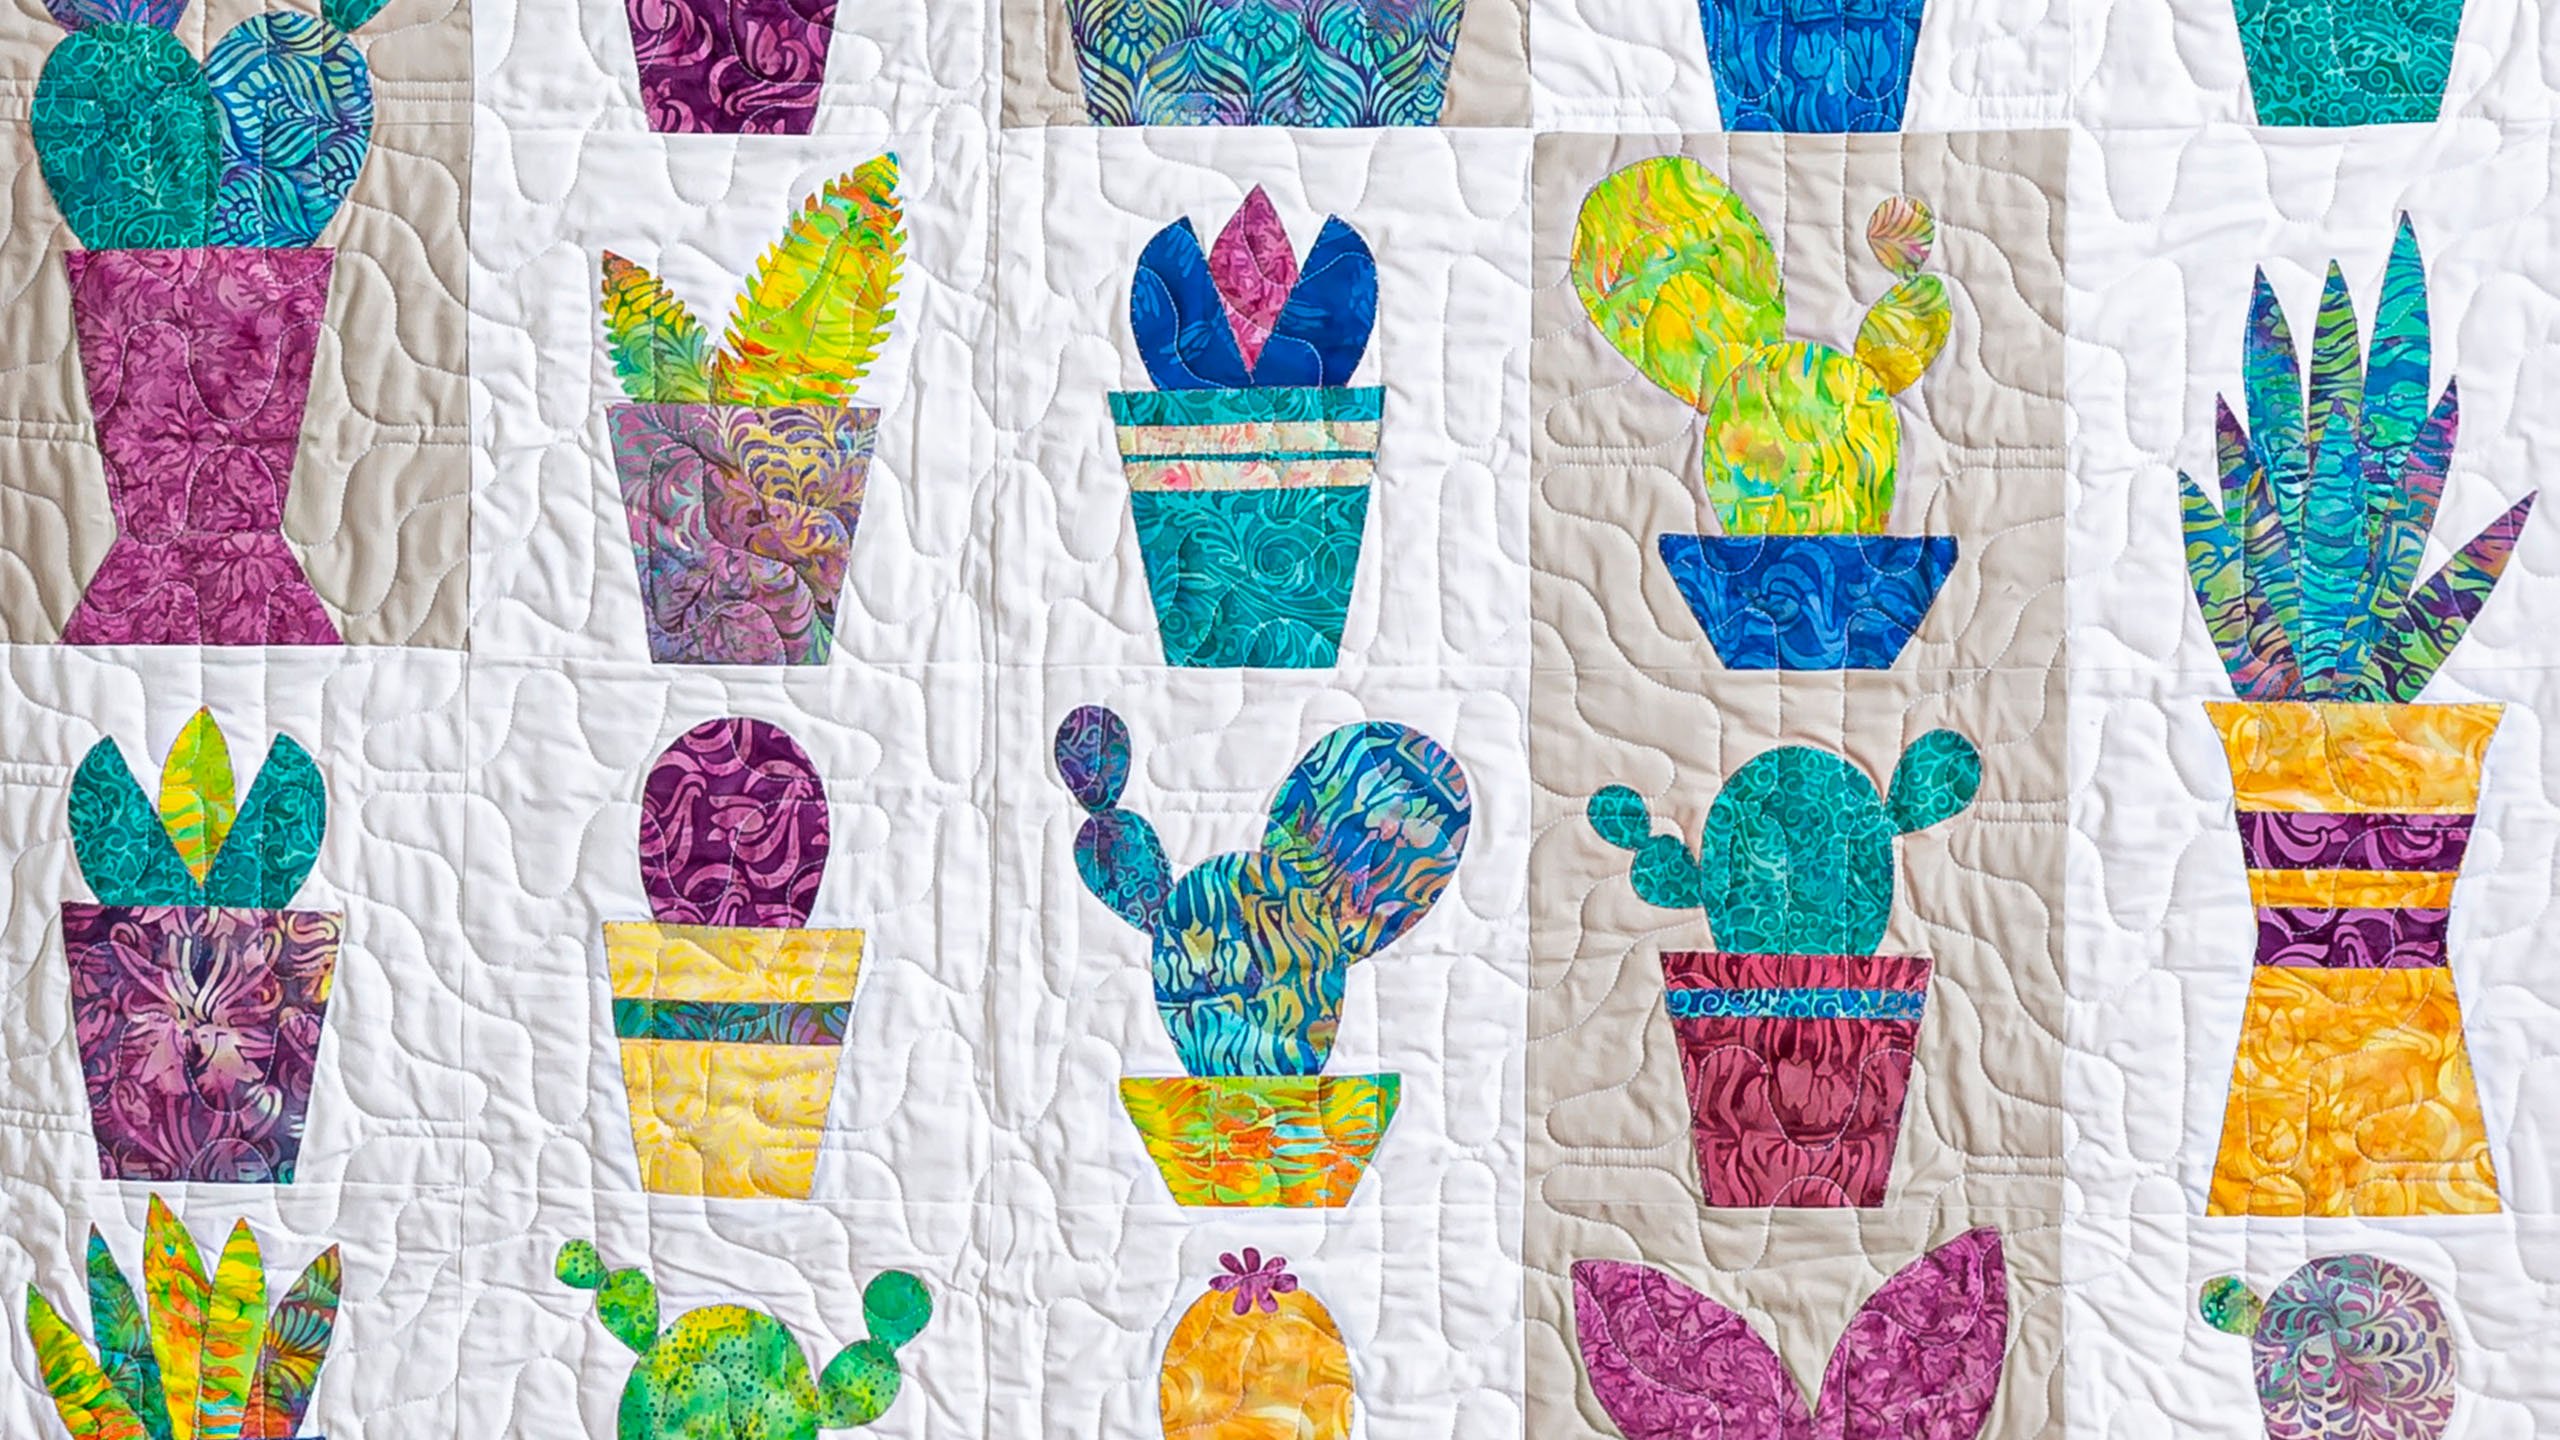
Alright so let’s talk about some of the other blocks. Now this really big guy right in the middle here. He has this big one starting him. And then we have two petals or all these petals up one, two, three, four, five. And we’ll have a PDF. We put a couple little cute flowers and those will be on the PDF. And these little things right here just like little teardrops we cut out. But for some of them like these, this little small little petal right here, if we wanted one of these like to have a rounded edge like this. We used the bottom half and then we just very easily just rounded that top like that. And so that became all of these in this one. And here’s our split one. Now this one right here, this is this big petal right here. And we’ve got it rough cut and we’ll trim it out just right and get the other side. Alright so then what I did on this one to make it look palm leafy, and you can do this by folding it in half or you can leave it whole whatever you want to. Just open but it would make sense now that I’m showing this to do it this way. And I just came in and I just cut little Vs out like this, all the way down. And it just gave it that jagged look. I’ll do a few more. Pull those out of there. And when you open this up, there we go. When you open this up, you know, I went all the way down the side. But this is again one of those things where, you know, and look how cute that is. And so then that becomes in this pot right here. And I did a little one and a big one on that. These are like an aloe plant so they’re long, cylindrical like fingers. And there is going to be a PDF for that where you can draw those and trace those on.
Oh, you know what, let’s talk for a minute about pots because we used the big tumbler for some of our big pots right here. And this takes a whole layer cake square. It will do that. And let me look on here. So this pot right here is just the bottom part of that tumbler. So I made a shorter pot, you know, put it on there like that. This one down here, can you see this one way down here? So this one down here I sewed a couple of strips together and that’s the big tumbler pot. Now any of these pots, see this one right here, how it has a foot on it? That’s just this part flipped over. So it’s like this is the tumbler pot right here and then I cut a half tumbler down here for the bottom half of that. And so it’s so fun to be creative. And on a lot of these pots, you know, like I’d get it finished and I’d think, oh that’s a little plain and I just cut a tiny little strip. And because you’re ironing them on and you have loads of this stuff leftover, you know, right away, like I would just iron this onto a piece like this. Let me show you how easily I did this pot decoration. We don’t want to go off the edge too. I’m going to cut this a little shorter. And I’m just going to press this on. And because you’re machine stitching it down it doesn’t even have to be on there perfect. It just has to have a little bit of sticky on it. So right here I would just take this and I would just use my rotary cutter and I would just cut it like this. And decide on the size and then look how much this adds to this pot if we stick this on here. And so then I would just take my little scissor right here and I would clip this at a little slant like this and clip this one over here at a little slant. And I would just peel off this paper and lay it on here and give it a press. And you can complete every block. You know whatever you want to do so to me this is the fun part about this quilt is that it’s all about your imagination, about coming up with some new ideas, you know what happens if. We based it all on a ten inch square so when you get all of your pots done we’ve got one, two, three, four, five, six, by seven. So 42 ten inch squares and we used a lot of more whites than we did grays. But we wanted a little bit of contrast in there. And I just love how this came together. I just think it was so fun. You’ll be able to have this picture of the quilt as your diagram if you want to make them a lot like this. You know I just think it’s just a fun project and it will use your imagination and you’ll be able to just come out of that shell and make something amazing and fun. So I hope you have fun with this. I hope you let your imagination run wild and I hope you enjoyed this tutorial on the Cactus Carnival quilt from the MSQC
& Progress on Social