


Cross Your Heart Quilt Tutorial
Jenny Doan
Cross Your Heart Quilt Tutorial
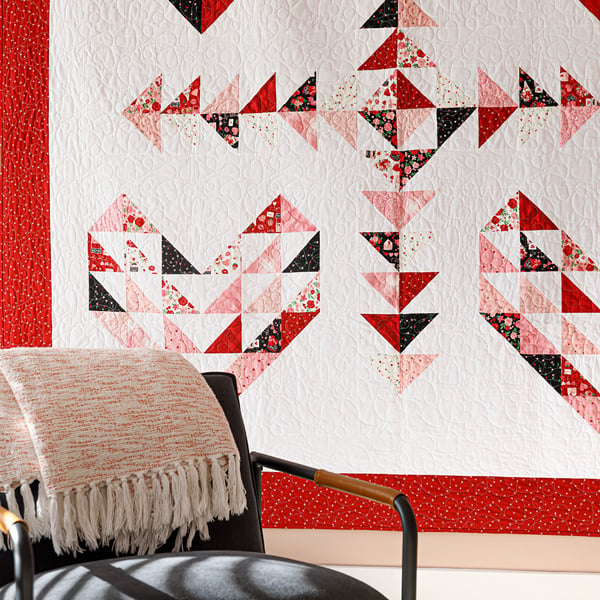
Jenny Doan demonstrates how to make a super sweet heart quilt using 5 inch squares of precut fabric (charm packs). For this project, she chose the "Falling In Love" collection by Dani Mogstad for Riley Blake Designs. These pretty hearts come together in a flash with quick and easy half-square triangles.
- 2 Packs x 5" Print Squares
- 2 Packs x 5" Background Squares
- 2¼ yds. x Background Fabric - includes Sashing & Inner Border
- 1½ yds. x Outer Border
- ¾ yd. x Binding Fabric
- 7½ yds. x Backing Fabric
Featured products Get the Supplies Featured in this Tutorial


Finish your masterpiece and let us give it the finishing touch it deserves.
Subscribe to MSQC on YouTube
Hundreds of FREE tutorials and a new one from Jenny launches every Friday.
video transcript
Hi everybody, it’s Jenny from the Missouri Star Quilt Company. And I have a really fun, quick-to-make Valentine project for you that you can actually finish by then. Let’s take a look at this quilt behind me. Isn’t this great? Love the hearts, love the flying geese. We’re calling it Cross Your Heart. And we just think it’s darling. And it is all half square triangles so you’re going to love making this. So to make this quilt you’re going to need two charm packs of five inch squares. And we have used Falling In Love by Dannie Mogsded for Riley Blake. You’re also going to need two packages of a background color and we have used this Kona white. You’re also going to need a little more background fabric. This includes your sashing and your inner border. You’re going to need 2 ¼ yards of that background fabric. For your border you’re going to need 1 ½ yards and we’ve used a nice six inch border. And for your backing, this is a gorgeous backing, we have used 7 ½ yards or you’re going to need 2 ½ yards of a 108 wide. It will also be helpful to have a 4 ½ inch squaring tool.
So this is basically a half square triangle quilt. You’re going to take your two charm packs and your two packs of background fabric and you are going to make half square triangles out of all of them. So we’re going to start by doing that. And I’m just going to draw some lines on these squares. Now you can use the diagonal seam tape, you can iron a line, whatever it takes but this works super good. And we’re going to sew on both sides of that. And this quilt uses almost every single one. I think you just have four left over. And so just go ahead and draw some lines because you can chain piece these as you go and we are going to chain piece these so I can show you how to do that so what that means. Alright, one more line and then we’ll just do a set of these. Alright.
So now what you’re going to do, when you get your lines drawn on all your background fabrics, which I just did a whole bunch of them and then as I ran out I did a bunch more. So what we’re going to do is we’re going to line these up together with our fabric with the drawn line on the top. And we’re going to sew a quarter of an inch on both sides of that line. And so I’m just going to sew this one side and then I’m going to add in another square. And so we’re just going to keep going along here and adding in another one and another one and that’s what chain piecing is. It’s where you don’t cut them apart, you just keep going along. And you’re using, I use my foot right along the edge of that pen line so that I stay pretty accurate. And let’s see we’ll get a couple of these in here, give us some variety. This is such a gorgeous line and this is such a fun quilt because it will be really easy once you see how I do it. You’ll find it will be really easy and you will really be able to make one of these by Valentine’s Day. And I also think that even just one of these hearts bordered a couple of times would make an awesome baby quilt. A really cute baby quilt. Alright so we’re going to say you’ve done a whole bunch of these and we’ve done one side. So then we’re just going to flip these around and we’re going to sew down the other side. Because they’re all still together we can just sail down here. We don’t even have to pick them up. Whoops, I came in a little wide on that one. It’s probably ok but I’ll start back up. Watch my line. Sometimes I get so used to the rote sewing that, you know, something gets a little off, but don’t worry about that a bit.
Alright so now what I’m going to do is cut these apart. You can use your cutter, you can use your scissors, you can use, you know, whatever you want to cut them apart. And then we’re going to cut them apart this way. So we’re going to put a ruler on the line. Let me move these out of the way. And again you’re going to do that to your whole pack, both packs. So we’ve got these and as I cut them I’m just going to lay them over here on my ironing mat so that I can press them open. Now if you use the clearly perfect slotted trimmer to square up your squares you’re going to square them before you press. Today I’m using the bloc loc and so I will be able to, I need to press these open before I square them. Alright so now what I’m going to do is I have them all laying over here, I’m going to put my darks to the top. And so we’re just going to pick these up and roll them back like this. You can set your seams. Maybe it will work if we do the whole pile like that. Every once in a while I’ll get a text, why did you stop setting your seams? I’m like, I don’t know, I just get in a hurry. . But we don’t need to hurry today, we’re just going to make this one because this is super easy. This is one of those quilts, honestly for me, that was so relaxing because it’s a square we know, you know. And we’re just doing all of them this way. And then we just get to set them in a really fun and different way. Alright, so let’s go ahead and finish up this. Alright so now we’re going to bring these over here.
Now with the bloc loc ruler, it has this little groove in the middle so it will lock up against that seam. And so what we’re going to do, how I remember it is wherever the words are: bloc loc, they go on the background fabric if you’ve pressed to the dark side. And so I pressed to the dark fabric. So that then cinches up there. I’m going to slide this as far as I can in the corner. And then I’m just going to trim and I’m going to trim around all four sides like this. Just turn it and trim the other sides. Alright so there’s that one. Let me do a few of these so that I have some to work with. Some of these will need more trimming than others. This one barely needed to be trimmed at all. This one also barely needs to be trimmed. But we’re cutting off the dog ears. But look at that tiny little bit of trimming. I guess it depends on how wide your quarter inch seam is. So on this, actually that brings me up a really interesting thing. These are all 4 ½ inch triangles. Because this is an all half square triangle quilt you can actually make these triangles any size you wanted and it would just make a bigger heart. And it would just be, you know, it would go together really cute. And so, Just remember that every thing, if it’s 4 ½ on here, all the sashings, everything is 4 ½. So if you change the size of your half square triangle all those sizes just change to that size. And so if you want to make, use a three inch square then you’re going to use three inch sashings and it’s all going to work. So that’s kind of fun because sometimes we don’t need a quilt that is quite this big. This quilt is pretty big. It’s like 83 by 83. And so it’s a good size quilt. This is a great porch quilt, wall quilt, whatever you want to use it for. Snuggling up with your friend quilt because it’s a quilt filled with the hearts of love. Alright. Oh let me do one of these. You can hardly stop once you get started. And I always love looking at my little pile of scraps. I save that until it’s a nice big pile on there and I just love that. And trim off this dog ear. Alright.
So now what we’re going to do, you’re going to look at the diagram and it’s going to show you how to put these together. And so what we’re going to do is we’re going to make big heart blocks like this, there we go. Like this right here. This is our big block. There are four of these in the quilt right here, one, two, and then three and four. And so you’re just going to follow the diagram to put this together. So what I do, so you can see right here in the middle, this top row, it’s two colors sewn together, two white squares and two colors. Our white squares, again our half square triangles are 4 ½, these squares are going to be 4 ½. So that first row we can go ahead. Here’s two already sewn together and I’ll take two of these and sew them together. And then out of your background you’re going to cut a 4 ½ inch strip and you’re going to cut some 4 ½ inch squares. So we’ve got this and so this first top row is just going to be these two with two 4 ½ inch squares in the middle like this, just like that. So you’re going to sew that row together and that makes the top row of your heart. So let me just show you on here how we’ve done this because this is super easy.
Alright so this is something is you need to pay attention to because all of our half square triangles, some of them are turned a little differently. So this row they all go down like this. Over here you’re going to make one turn and they all go the other direction. That happens for these two whole middle rows. Down here we’re going to start with one up and then one down, one up, one down just like that. So if you do it as a row this one will have one up, one down, one down and then this way and this way and then one up. And that forms this edge of this star down here, or this heart down here that gives it that point. And so you’ve just got to follow the diagram and it will go together really easily.
So once you get your heart blocks together and you’ve sewn all of these together like this, your extra ones you’re going to put together as flying geese. So they’re going to go together this way. And you can do them any colors you want. And so make your four hearts, then every other one that’s left you’re going to sew together in twos like this to make a flying geese. And they can be scrappy. So we’ve got these two right here and I’m just going to press those. And this makes a great little flying geese unit. So then your flying geese come together here like this. And then they come together in the center they’re going to come together because this block is going to go this way and this block is going to go this way. And so it’s going to go together and form this square in the center. And so you put two four inch squares at the top. I mean, sorry 4 ½ inch squares, then all your flying geese all the way down to here. And then they go the other direction down here and two more 4 ½ inch squares. And then the same on the sides.
But let’s talk for a minute about sashing these hearts. Every heart is a little bit differently. The top two rows, one is sashed in the middle like this and on the side. So let’s look at that heart. So this one here is on the side 4 ½ inch on the side. You sew it to the block. Then you’re going to sew in your bottom piece. So the next top heart is sewn on the opposite side, both on the inner sides and on the bottom. When you get ready to sash your bottom hearts, it’s going to be sashed on the top and then down the side and that’s going to be on the left side and this one is going to be sashed across the top again and down the right side. And so they’re, each one is sashed a little bit differently so make sure you pay attention to that. It’s no fun to rip those out.
So once you get your hearts sashed then you can sew them together by adding this flying geese block. These are all 4 ½ inches. So 4 ½ inch squares and then one, two, three, four, five, and you’ll sew it to this side and you’ll sew it to this side. Then you’re going to add the center sashing right here. So two 4 ½ inch squares and one, two, three, four, five, six here and then turn your flying geese and run them out this way so six and your two hearts. And down here you’re going to sash your hearts as well with this same flying geese pattern but it will be flipped upside down. So these will go opposite and these go opposite as well. So after the quilt was all together I went ahead and put a 4 ½ inch inner border out here and then I added my nice big six inch border. And the border has the X’s and O’s on it. It’s really cute. Such a great line for Valentine’s Day. And look at this back. I used the floral on the back. It’s beautiful. Our quilt pattern is these great little meandering hearts that are all over which speaks to us of love. And I just love that. So the quilt actually measures 83 by 83. And so it’s a great size quilt, really a fun project. And if you love half square triangles like I do you’re going to love to make this quilt. And we hope you enjoyed this tutorial on the Cross Your Heart quilt from the Missouri Star Quilt Company.
Hi everybody, it’s Jenny from the Missouri Star Quilt Company. We hope you enjoyed watching this video. If you aren’t already part of the Missouri Star Quilt Company family be sure to subscribe so you won’t miss a thing. And if you click that bell it will notify you every time a new tutorial comes out. See you next Friday.
...& Progress on Social