


Disappearing Four Patch Weave Quilt Tutorial
Jenny Doan
Disappearing Four Patch Weave Quilt Tutorial
- 1 Pack x 10" Precut Fabric Squares (Layer Cakes) - Print
- 1 Pack x 10" Precut Fabric Squares (Layer Cakes) - Background
- 3/4 yards x Quilt Fabric for Inner Border
- 1 1/2 yards x Quilt Fabric for Outer Border
- 3/4 yards x Quilt Fabric for Binding
- 5 yards x Quilt Backing Fabric
Featured products Get the Supplies Featured in this Tutorial


Finish your masterpiece and let us give it the finishing touch it deserves.
Subscribe to MSQC on YouTube
Hundreds of FREE tutorials and a new one from Jenny launches every Friday.
video transcript
Hi everybody, it’s Jenny from the MSQC. And I’ve got a really fun project for you today. Take a look at this quilt behind me. Isn’t this great? Now this is a quilt that looks like you worked really hard but wait until you see how I did it because it’s super easy. So to make this quilt you’re going to need one packet of ten inch squares. And we have used Autumn Days by Wilmington Essentials. You’re also going to need some background squares, one packet of those. And these are just kind of an off white color to go perfectly with the ten inch autumn squares. You’re going to need ¾ of a yard for this inner border. And for this outer border out here you’re going to need a yard and a half. And this is a big six inch border. Our backing right here, you’re going to need five yards. And the quilt pattern we’ve used on this is loops and swirls which is just a nice all over quilt pattern. So let me show you how to make this because this is really fun.
This is actually a four patch. This is a four patch block and we’re just cutting it a little bit differently. So to make a four patch with the large ten inch squares, let me just show you how I do this. What I’m going to do is I’m going to pick one of these. And I’m going to put it with a background square. Let me move all of this stuff over here for a minute. I’m going to put it with a background square like this. And then I’m just going to sew straight down the sides. So let’s go over here and do that. So the fabrics are right sides together. And we’re just sewing straight down the sides. And we are just sewing a quarter of an inch and we’re going to flip this around and do the other side. Alright so now what we’re going to do is we’re going to take this and we’re going to use our five by ten inch ruler. We’ll lay it right on the edge and we’ll cut this directly right in half. And then we’re going to press these open like this so that they are ironed to the dark side and this one also. Now on this quilt, this particular quilt I kept my blocks together. You can scrap yours up if you want. But I kept all the same ones together.
And so now what we’re going to do is we’re going to put this together like this. So we have color opposites. So once you’ve got these together, make sure these are nice and nested. You can feel that there’s just no space in between. And then you can roll this up and peek right there and make sure that they’re right together. And then these are the seams that you’re going to sew, where they cross the colors right here so you’re going to sew this side and this side. And so let’s do that at the sewing machine. Alright so now I’m sewing a quarter of an inch right down the side and still feel to make sure that those fabrics are nicely nested in there. You can feel with your finger. Make sure that nothing is, no space is in between and then you’ll have a nice seam right there. So now we’ll just sew the other side as well. And we’re just going to come over here now and we are going to cut it in half again. So here’s our, we’re laying our ruler right on the edge. And we’re just going to cut this in half again. And just like that you get two awesome four patches. So we’re going to go over here and press this. And you just want to make sure that your seams, your block is laying nice and flat. And you’re going to do this to all your squares. Now there’s lots of ways to make four patches like this and, I mean you could even cut your whole ten inch squares into fourths and sew them together that way. You can do whatever you want. This is just a way that I do it that is quick and easy for me so don’t let that stop you, you know, if you want to do it a different way, that’s going to work out just fine.
Alright so what I do because I’m a rote sewer is I will go through and do all my four patches. And then it’s time to work our magic with them. So what I’m going to do on this four patch right now, so I have this perfect, beautiful little four patch. And I’m going to measure and make some dots. And these are cutting lines. And so what I’m going to do is I’m going to measure two inches from the corner all the way around the square. And I’m going to put a dot there. So I’ve got a dot right here on my two inch line and I’m going to come here and put a dot here. And then I’m going to come down here and do two inches again and put a dot right here. And I want you to be careful because your dots can go through your fabric and so it could dot up your mat a bit but you can always slide, like slide a little piece of cardboard underneath there. And then just make your little dot and then you’re for sure not going to mess with your mat underneath. I have to admit, I do have a few dots on my personal mat. So let’s go ahead, now again, two inches from the edge and put a dot. And right here. Two inches and a dot.
So now that we have all of our dots on here we’re going to start the cutting. And I’m going to take this ruler and I’m going to make, line it up and make the dots intersect, just right through the middle. And we’re going to make a cut this way. And then we’re going to just move, keep your fabric right together. And we’re going to move our ruler over here and make the next cut this way. And then we’re going to take our ruler, stay together, and we’re going to do it the opposite way on the opposite corners lining our dots up. Just like that. Now because we’re cutting diagonally this way and this way I found that I didn’t need a rotating mat but you could surely use one if you needed to. Make sure your dots are lined up, that’s important. Alright so then you have this cool block where you’ve made all these cuts and what we’re going to do is we’re going to swap these right here. And we’re going to swap these, the white ones and then we’re going to swap the dark ones in with the light just like this. Alright? So you will notice on mine, here’s a square, a finished square. And the middle little hourglass is a different color. And so I sewed my hourglasses together and then I swapped them out so it would just add a little more pizazz to the quilt.
So the center is the first thing I’m going to sew together. So I’m going to take these two pieces right here and line it up with this and we’re going to sew these three units together, a quarter of an inch right down the side, making sure that your background is going against the color. And so I’m just going to sew this side right here. And then I’m going to flip it around and sew one on the other side like this. So when I sew my blocks together I often sew two and I would swap those two out. Or sometimes, you know, I’d make a little stack of them. This isn’t a block that you want to leave all your pieces open and then sew. So I’m just going to set this one up here because we’re going to use that in a different block and I’m going to sew these pieces together. So these two pieces are going to go next to here, always remembering that your background goes against your color. And I tell you these mantras so you don’t get, so that it doesn’t, you know, mess with your head too much. But the way I line these up, I lined them up just so they went right across the top and then you just sew down the side like this. And I’m going to add the other side here making sure that my background goes against the color. And then we’re going to press these. And I’m going to press the seam on this one toward the middle. So you just want to choose. I kind of let my seams decide which way they want to go. And you do have to be careful with these a little bit. There’s a little bias in these blocks, so you want to be careful. So now we have to sew the other side. And I’m going to show you right here exactly how I do this. So I’m going to lay this block right here. And I’m going to square it up to this whole corner right here and then I’ll sew right down this side. And so it just goes together really perfectly and really easily. And don’t worry if your pieces, like if your cutting gets a hair off and your pieces are a little short or something like that, we’re going to square this block up at the end. So that really won’t matter too much, as long as you’re not way off. Alright so this one again I’m just going to line it up, square it across the side and the top. Alright.
So then I’ll do this to a few of the blocks. And make sure this goes in. There we go. And this one goes in. So I’ll do this to a few of the blocks so that I have a center to swap out. Now over here I have a green center and a set of green blocks that are already done. So I’m going to go ahead and put this green center in this brown square. So basically now what we’re going to do we’re going to lay these on here. These center seams right here need to match up. So that’s what you want to pay attention to. And so I’m going to just lay this on here, sew a quarter of an inch right down the side, making sure that this seam and this seam are nested. So we’re going to quarter of an inch it right along the side. And I take a few stitches, I call those anchoring stitches and then I make sure that my next two seams line up. And then I come down the other side. Now I found for me, as I was sewing these, I made a little nest and have my iron right next to my, where I’m sitting because I found it easy to press these as I went rather than waiting until the whole block was done. Alright so now we’re going to take this right here. And we’re going to do the same thing, just line it up and sew it right down the side. Alright make sure these are nesting. And we’re still keeping our quarter of an inch that lines up right along the side. And now we’re going to press this out. Alright.
So now this is our kind of finished block but it’s a little wonky and it needs to be squared up. So these get squared up to eight inches. And so what you want to do is you want to, I did by lining this center seam right here up on a line and going out four. That gives you your perfect eight inches. And so I’m going to come across here. And I’m going to just trim this off. And you’ll see that you’re barely trimming off the corners. That’s your little bit right there. And then I like to just put this over here, make sure that my seams are still lined up on that line and come over here and trim again on the eight inch line. And then we’re going to do top and bottom as well, making sure that these lines line up on this right here. And we’re counting four out from there. And we’re putting our ruler down and cutting right on that line. So they’re super easy to square up as long as you keep that center, this center seam right here on these lines right here. There we go, one last side. There we go. And it is as easy as that. Look how cool this block is. Doesn’t it look like you did so much work? And all it was, it just began with a four patch.
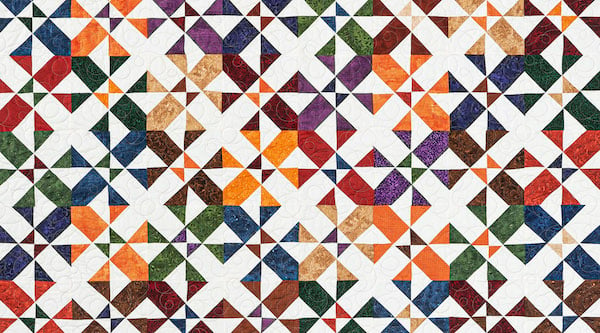
So let’s see how many of these you’re going to need. We made, because you get two four patch sets out of each ten inch square you’re actually going to get 84 blocks. And we did one, two, three, four, five, six, seven, eight by one, two, three, four, five, six, seven, eight, nine. So eight times nine is 72 and this pack will actually make 84 blocks. So you’ll have extras like I have right here so make a whole other project. And I love that. That’s a quick easy project. But let me show you how I put these together because you know all blocks can be set a lot of different ways. And I set these so they created this cool weave pattern. And so how you can see the designs that appear in this quilt. And that’s just how we set them together.
So this is how I did it. I put my colors together like this. Oh let’s get a different color so it’s not so brown together. And I did my whole row so you have the colors together and the whites together and the colors together and the whites together. Just like this. So right here we’ve got color together and the next two, whites are together and then color and then white. And so you’re going to go the same thing when you start the next row. You’re just going to match up your color to your color and your white to your white like this. And by doing that you get these cool interweaving patterns. And so it just makes a quick easy quilt. It’s a fun block to put together. And it’s a really cool twist on the disappearing four patch. So we’re calling it the Disappearing Four Patch Weave. And we hope you enjoyed this tutorial from the MSQC.
We hope you enjoyed watching this video. If you’re not already part of the Missouri Star quilt family you can hit the subscribe button below so you won’t miss a thing. And if you click that bell it will notify you every time a new tutorial comes out. See you next Friday.
& Progress on Social