


From The Heart Quilt Tutorial
Jenny Doan
From The Heart Quilt Tutorial
- 4 packs x 5" Precut Fabric Squares (Charm Packs) - Print
- 4 packs x 5" Precut Fabric Squares (Charm Packs) - Background
- ½ yard x Quilt Fabric for Inner Border
- 1¼ yards x Quilt Fabric for Outer Border
- ¾ yard x Quilt Fabric for Binding
- 5 yards x Quilt Backing Fabric
- 1 x Missouri Star Half Heart Template
- 5 yards x Heat n Bond Lite
- 1 x Pigma Micron Pen - optional
Featured products Get the Supplies Featured in this Tutorial


Finish your masterpiece and let us give it the finishing touch it deserves.
Subscribe to MSQC on YouTube
Hundreds of FREE tutorials and a new one from Jenny launches every Friday.
video transcript
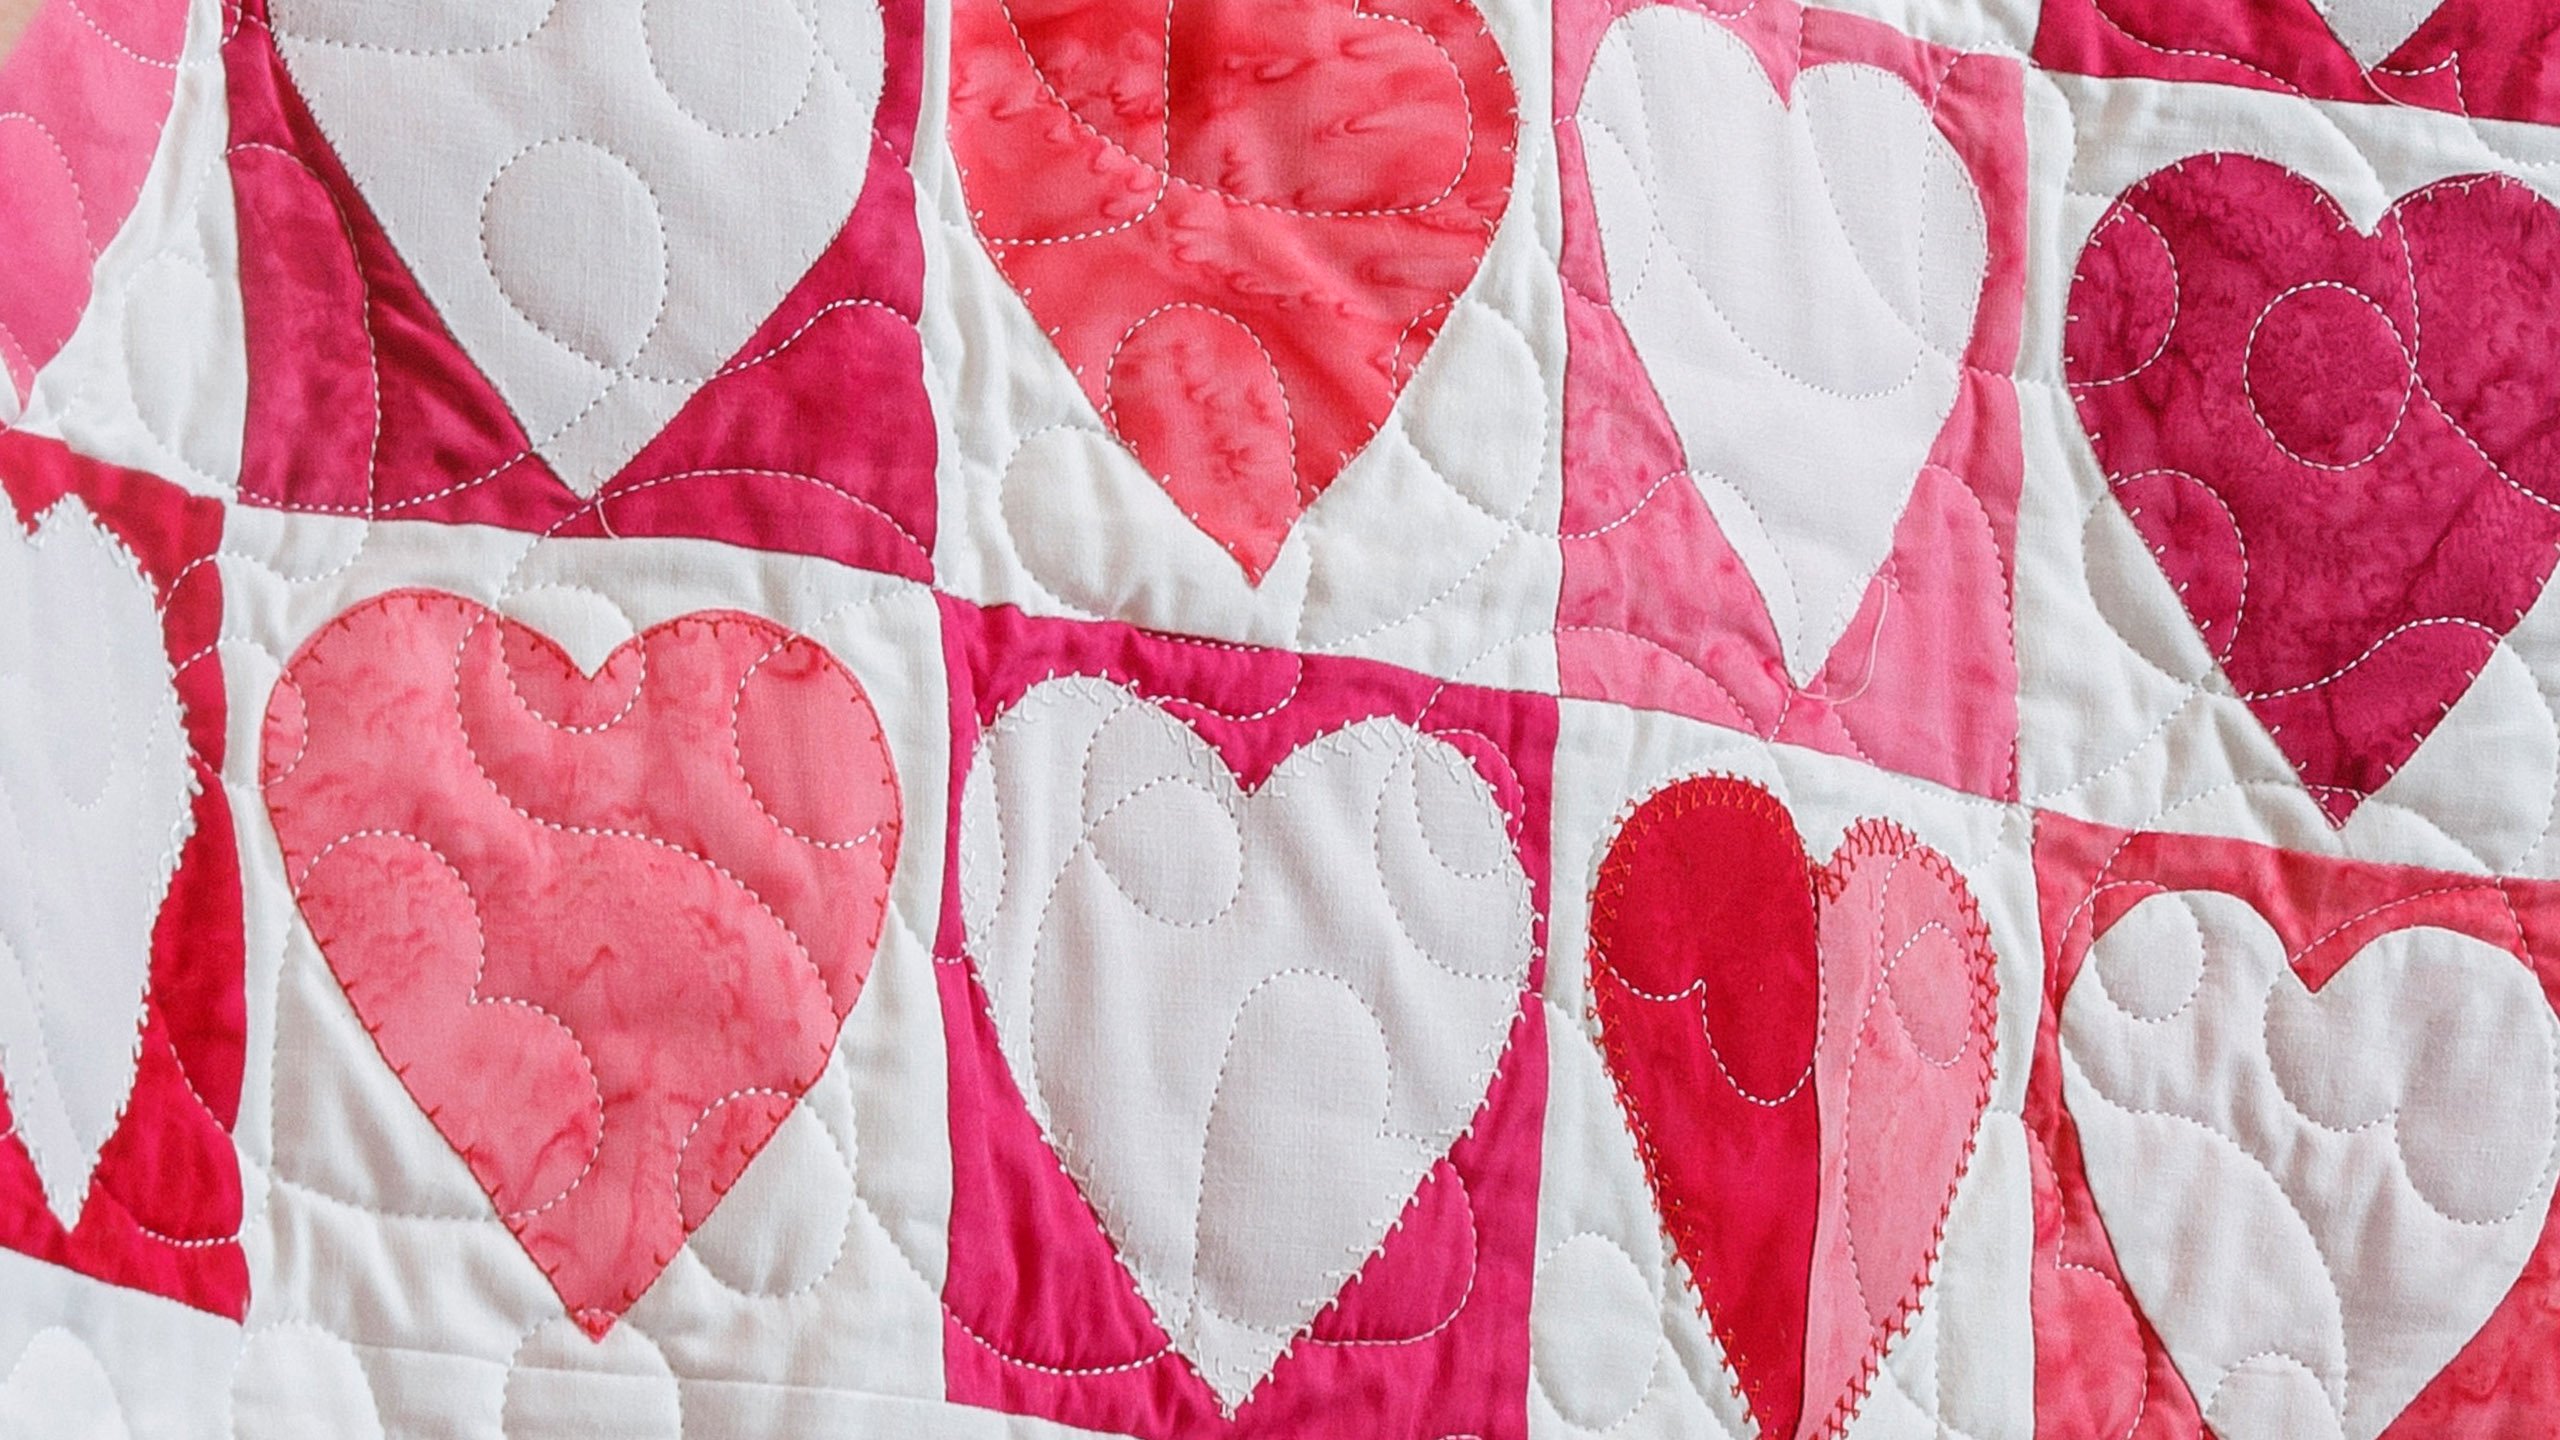
Hi everybody, it’s Jenny from the Missouri Star Quilt Company. And today is a pretty special day and you can see that there’s a lot of pink around me. Our template is pink, our fabric is pink and that is because that is the color that we use to show our support for those around us who are struggling with breast cancer. Now that being said this quilt actually could be made in any color because there are lots of different colors that represent lots of different things so you can go ahead and think outside the box. But today we’re all pink. So let’s take a look at this quilt behind me. Isn’t this fun? Now there’s several reasons which I will get into why I decided to go for the simple heart quilt to show our support this month. But I love this and I think this is darling. And it’s super easy and I’m going to show you three different ways to applique today. And we’re just going to have some fun making this quilt. So we have used Lava Batiks Flirt for Anthology and you can see it’s just great with all these different colors of pink. We also are going to need four packs of five inch background squares. And we’ve used white here. And again you could use a layer cake and cut that into fourths to get how many you need because each one of these little hearts is actually two of those five inch squares. For our inner border you’re going to need a half a yard. That’s right here, a little 2 ½ inch strips all the way around. Our outer border out here is a nice six inch border and it is 1 ¼ yards. And this back right here has the little ribbon on it which is darling and you’re going to need five yards for that backing on that.
Now on the border I don’t know if you noticed but there were words. And this is some of the fabric from the border. And to me words have power. And one of the reasons I created this quilt was so many times somebody gets sick around us who is part of our circle and we all want to make them something to show our love for them and our hope and our hearts are with them and all those things. And so my thought on this is that as we make these hearts you can actually assign a five inch heart to people in the group but we can write words of encouragement on these hearts. Wherever there’s a heart where you can see, we can write words of encouragement. And you can see I made this little extra bonus project. It’s a nine patch pillow. But I have written words on these. And as you cover yourself with a quilt that has handwritten messages of love from the people who care around you, you can feel their strength and power and you feel that hope. And you have the courage to fight. Now also one of the things I wanted to point out about this pillow is I did a nine patch but there are a lot of things that people who have ports use a pillow for. So maybe if you do a, maybe if you did two hearts for like where the seatbelt hits you and made a little port pillow. Or you know whatever size you need I think that it would just be cool to be able to do this. Now on the hearts I used the micron fiber tip pen so it won’t go away. And, you know, so I used, there’s a five and an eight that I particularly like that are good for writing. You could also probably use a sharpie marker because it is also permanent and won’t go away. But this is a little bit finer. So let me show you how to make these hearts because they’re quick and easy and I think that especially if you are a group of friends or a guild and you want to support someone in your ranks that this is a really easy way to do it.
So first of all half of them are white backgrounds with colored hearts. The other half are colored backgrounds with white hearts. And so you just want to remember that so that’s two of your charm packs are going to go to the hearts and two of them are going to go to the backgrounds. So for the hearts what I did was I took some Heat N Bond right here. This is Heat N Bond and it has, I have a couple of strips I’ve cut here. And it has this bumpy side on one side and a smooth side on the other side. And what I did was I cut these into 4 ½ inch strips and then I cut them again in about 4 ½ inch blocks. And so, oh I’m just going to use my cutter and I’m just going to cut this right here. Alright. So then what I’m going to do is I’m going to iron these onto this. Now the cool thing about batiks is it doesn’t matter which side you iron on because both sides are good. So you can’t make a mistake with this. So I’m just going to iron this on like this.
And then we have this cool little heart template. Now this is a half heart. And the reason we did the half heart is because when you go to cut a heart out and you have to come down to the middle it’s a little more difficult with a, well actually it’s nearly impossible with a rotary cutter. And so I thought the half heart worked better. We can fold our little charm in half like this. And then we’re just going to lay this on the fold. So for all the hearts that we are ironing on, this is how you’ll do it. So what I actually did here was I actually preferred using a pen to a rotary cutter, I know completely old school. But I just drew around my heart like this. And then I took my scissor and I just cut them out. Just like how we made hearts when we were in grade school for Valentine’s day. You just keep it pinched together and I cut out my heart just like this. Alright.
So then what I did was, I’m going to fold this back like this and loosen up that tip and then just peel the whole thing off. And then I’m ready to add it onto a square like this. Now this heart looks, it looks like it’s really small on this piece of fabric and there’s a bit of waste but the reason we had to do that is because you have very little seam allowance on the top and the bottom and it really fills up the five inch square. So I’m going to go ahead and press this and I’m just going to eyeball it and make sure it’s in the center like that. And I’m just going to press it down. Now one of the very fun things about this method of applique is that you have a raw edge so now you’re ready to sew down this raw edge. And our sewing machines, literally most of us have sewing machines that, I mean there’s a million little stitches on there and so I want you to look closely at this quilt behind me because I have all kinds of stitches around here on this quilt. And they’re just darling. Look at this one with the little X’s and there’s scallops and all kinds of things. So lots of fun stitches you use. And I literally tried just about every stitch on my machine. So here’s some right here you might be able to see these a little better. And this is just like a little stipple edge. This is a little scalloped edge. This is just the straight applique stitch. So whatever you want to do around the edge of these hearts is fun. It is also fun to use different colors of thread. So I have some on here like this one right here has the red thread. And this one has the red thread. You know, I just put on a different color. I have pink on some. I have red on some. And so it’s fun just to be able to play with that. So this is one way to raw edge applique a quilt.
So another way is to do these patchwork hearts which are like this one right here, where we have two sides. We have one here. We have one here. You know there’s just several on the quilt. Not a ton but I thought it added interest and color. To do that we’re going to take two of our five inch charm packs and you want to make sure they’re contrasting colors. You’re going to lay them right sides together like this. And then we’re going to sew a quarter of an inch on each side this way. And we’re just going to sew down the sides only. So I’m going to sew this side and the other side just like this. Alright, so only the sides and then now we’re going to add our pieces of Heat N Bond to it. So let me cut another square here. And again these are just about measurements on the Heat N Bond. You just want it to be smaller than five so that when you iron it, you don’t get anything on your ironing pad. Alright so here’s this one and I”m just going to iron this one on this side like this. And I’m just going to flip it over and I’m going to iron this one on this side. Now the Heat N Bond is basically just used for, you know, so that you have something to stick it on because you are going to sew this down afterward. So now we’re going to grab our little heart template and we’re going to lay this straight edge right here, we’re going to lay on the stitch line. So that goes on the stitch line. And then I’m just going to draw my heart around. And because I’ve used two squares I can actually do it on both sides. So lay your little heart on your stitch line and trace around like this. And then we’re going to go ahead and cut. And then we’re going to go ahead and cut this out. And I’m going to go ahead and just start here. But remember that middle side of the heart goes on the stitch line, not on the edge. Alright so then when you open these up, when you open these up you get this darling little two color heart. And so that is really fun.
Now if I put my, if I sewed it on the other side I would actually get, my line would come in the middle and it would be top and bottom would be different colors. So don’t be afraid to try some fun things with this as well. You are then just going to do the same thing you did before where you peel these off. You’re ironing it onto a white square. And then you’re just going to machine stitch around it.
Now for those of you who love needle turn or hand applique, I have some of those. And let me show you how we do that. So here is this one right here. And this was actually one of the reasons why the heart had to be the size it is as well because when you do a machine applique, or I’m sorry. So when you do a needle turn applique you have to lay your heart template on. You’re going to draw the line. And then you’re going to cut it out a quarter of an inch bigger so you have something to turn under. And so I went ahead and used, I’ll do this on one of these pieces right here, a nice white piece. And so I actually am going to draw this, set this on the fold, trace right around the heart like this. And then I’m going to cut this out just like a quarter of an inch bigger all the way around. Now for those of you who do needle turn applique, the way I do it is I use that trace line. And you’ll see it’s only traced on one side. So I would actually flip my heart, lay it over here and add an additional trace line because I use that line so that I have a guide. It’s like a little pattern for me. And then what I’m going to do is I’m going to clip this middle right here, right down to where my line is. And then I’m just going to slowly start putting it on the line and folding it down. And I do this to my whole little applique, fold that all the way around like this.
And then when you’re ready to stitch it on what you’re going to do is you’re going to lay this on here. Oh let me do this one right here because he’s already been kind of pressed. So you can see by centering up your heart on your little five inch square, there’s not a lot of wiggle room anymore because we have this little outer edge. But we are going to be folding that under. So I clip this down in the middle and then we’re just going to start sewing this down. So I have one little pin in there to hold it. And what I’m going to do is I’m going to take this and I’m going to bring my thread through the line with the knot. So I have needle and thread here so now my knot is going to be inside that fold. And I’m just going to take my needle and fold this under. That’s why it’s called needle turn is you’re using your needle as your tool. And you’re going to do the same stitch that you do for your binding except a little bit closer together. So you’re going to go down where your thread came out like this. And you’re going to come up just about, oh I don’t know, an ⅛ or so inch away. But as you go, again you’re going to fold that down. Go straight in where your thread came out and come out just a little bit away. And that will hide your stitches and you will be able to needle turn these and hand sew them down if you want to. I have about 20 of them on the quilt right here. I just did it for some difference and to teach you different ways. Obviously you can do them all the same way. It makes no difference at all because the golden part of this quilt is the message and the heart that comes with it.
So let’s see how many I have here. I have one, two, three, four, five, six, seven, eight, nine, ten, 11, 12 by one, two, three, four, five, six, seven, eight, nine, ten, 11, 12, 13, 14. So 168 hearts. And it makes a quilt that is 69 by 78. So this is great for sitting over them while they’re getting chemo in a chair, keeping them warm, giving them encouragement all the day long. Now I did not write on this quilt because I think it’s important for the people who are giving a quilt to be able to put their own messages on.
I want to share a little story with you. When I first started this, there was a quilt that I was quilting on the quilt machine. And every time I would get near it I would tear up. And I’m like what is wrong with me. You know, I thought, am I like having a breakdown. What’s happening here? And so when the gal came to pick it up I said to her, can you tell me about this quilt? And she said, oh it’s a quilt I’m making for my friend. And I said, it has to be more than that. Every time I get close to it, I can feel the emotion in this quilt. And I know that sounds, it might sound a little crazy to some of you. But for me I could feel that emotion as I got close to that quilt. And she said well I’m making it for my friend who has cancer. And I just could feel that power. And so to me words have power. And this border fabric has words on it. And when you write words, when you’re in the middle of chemo and you see, fight, that gives you some power and it gives you hope. And it gives you strength. So we always want to be supportive and care for those around us. And honestly most quilters I know, probably 80% of what they make, they give away. So we hope you enjoyed this tutorial on From the Heart quilt from the Missouri Star Quilt Company.
We hope you enjoyed watching this video. If you’re not already part of the Missouri Star quilt family you can hit the subscribe button below so you won’t miss a thing. And if you click that bell it will notify you every time a new tutorial comes out. See you next Friday.
& Progress on Social