


Man Sewing: Disappearing Pinwheel Quilt Tutorial
Man Sewing: Disappearing Pinwheel Quilt Tutorial
- 1 pack x Layer Cake - Patterns
- 1 pack x Layer Cake - Solids
Featured products Get the Supplies Featured in this Tutorial
Finish your masterpiece and let us give it the finishing touch it deserves.
Subscribe to MSQC on YouTube
Hundreds of FREE tutorials and a new one from Jenny launches every Friday.
video transcript
I was so blessed to attend a Jenny Doan trunk show recently. And halfway through the show she started going into her routine where she starts to create these disappearing blocks. Well the Disappearing Pinwheel blew my mind so much that I had to get right into my graph paper and start drafting my own creation. Let’s get started.
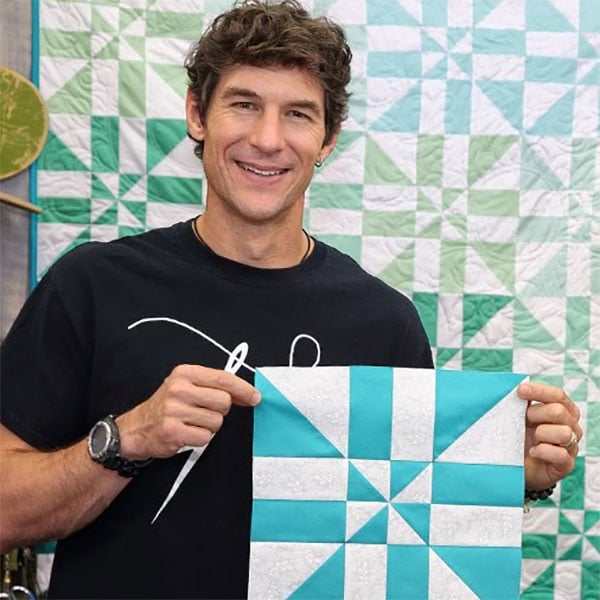
Look at this lovely quilt behind me. This is going to be such a fun block to create. Now check it out, right down here you see the base unit of the Disappearing Pinwheel. It is much more complicated looking than it actually is to sew. I’m going to build you up step by step. Now in order to do it though let’s talk a little bit about our fabric choices here. I have both ten inch square packs from Robert Kaufman. Now these are solid fabrics. There’s a beautiful variety of color. This was one actually of those kits that when I saw all of these fabrics I had to design a quilt to go with it because I fell in love with this. So I’m going to refer to these today as my solid fabrics but they are actually not the neutral that you’ll see in the background. The neutral I’m using is actually a white on white collection from Kaufman. And if you look kind of carefully there’s a different series of shades in there. I’m going to refer to these as our prints as I go through the video because they have a texture to them. Now I specifically chose pre cuts that had at least two of each fabric in there. So if you look at this block we’re going to build this exact block twice. So the two same solids with the two same prints together to create this. A mouthful but I have a feeling you’ve got a good understanding of what we’re going to do with our fabrics, right?
So in order to get started we are simply going to take two of our squares, right? It’s going to be our print. And they’re white on white so make sure you really know which is the correct side. And the correct side is going to be buried underneath one of your solids. Make sure you know which side is the correct side is on your solid too. There will be a quiz on that later. Now once you have your two ten squares all matched up you’re going to simply sew around them with a quarter inch seam allowance like you see that I’ve already done here for you. Now once all that stitching has been done we’re going to simply, and I’m on a lazy susan mat because this is going to help me be able to rotate with my cutting today. I’ve got one of the MSQC 13 inch rulers which fits perfectly across there. I’ll talk about the tape in a little bit. I’m going from the cross in the threads to the cross in the threads. And I’m going to cut once across here. And I am not going to move that fabric. I’m going to peel my ruler up so I don’t move anything. And I’m going to rotate it. And I’m going to drop that again, thread cross to thread cross. And I’m going to slice. And when that opens up look at what we have. That’s the magic of creating these half square triangles. And I just think it’s absolutely genius. Almost all of the sewing today until we get to the fine sewing at the end we are going to basically be doing pressing to the dark side. And the way to do that is to grab onto your dark fabric, carry it over to your ironing station and then just press that seam right over to the dark side. And when I’m building quilts like this I usually build one block start to finish to make sure I actually know what I’m doing. Well at least I think I know what I’m doing. But then after that I go into assembly mode style. So I keep that one block on an orientation up on the wall that I can see as I’m working throughout the day. And then I just keep doing all of my pressing, all of my sewing of each step so that I can stay focused on where I am. And I was too busy talking and guess what I just did. I pressed to the rebels, I pressed to the light side.So I’m going to back to the dark side. The empire. We’ll get that one. And the reason that that is so important is it really helps my seams nest later on, ok?
So from here we’re going to actually build a pinwheel block. So what I learned to do was kind of look for these triangles. They’re going to be the opposite fabrics touching like this. And when you’re building your pinwheels you can actually make left sided pinwheels or right sided pinwheels. So this is the point where I want to make sure you make them all the same, ok? So as I’m laying that out that doesn’t look correct. But that certainly does, right? So the first step here is I’m going to join seams. So what I’ll do is I’ll pull those over. And I’ll take it over to the machine and run it through the machine like that. And of course I’ll join those two center seams here as well. Once those are technically all done we have this approach. And yes I opened it up incorrectly on purpose for you because I want you to be very careful before we do our next series of seams, right? If you put it together like this it’s not a pinwheel anymore ladies and gentlemen. So we need to make sure we put it together just like this. So after I have two squares joined I am going to make sure that I set this seam here. Remember when I was talking about those dark sides, all of that just nests perfectly in there. And then I’ve got this pinched and then I’m going to go, I’m sewing this side, I’m sewing this side, I”m sewing this side, I’m sewing this side, I’m sewing this side until I get that right underneath the presser foot correctly and then I’m going to go ahead and just make my quarter inch seam allowance. There’s really no reason to backstitch, we’re just going to cut that off here in second anyways. But I am taking my time to go nice and slow because accurate piecing for this project is really going to help. With these half square triangles on the bias there is a little bit of fudge. You can actually stretch you pieces here a little if you need to nest them together. And when you’re all done it’s going to open up and look at that. How perfect and easy so far, right?
Now again at this point when I said most of our seams are going to press to the dark side. How am I going to do that? So I’m just going to press it to a side. It’s not going to be the end of the world. And then we’re going to have to take this and we’re going to divide it down actually into some more sub cuts. We’re going to make this into what would be considered a nine block or a nine patch kind of thing. I’m using my ten inch square so I’m going to tell you what math we can use. If you’re making a different size you’re going to want to figure the distance across your raw block like this. And then you’re going to want to divide it into thirds. Because what we’re going to do is we’re going to make a cut here. We’re going to make a cut here, here, here kind of thing. Now I’m going to go slow to show you how. I promised I would talk about the tape. If you’re using ten inch squares and you’re following my steps, step by step you’re going to need a 2 ⅛ inch cut. I’m very used to make quarter inch and half inch cuts with my ruler so that ⅛ inch mark was really hard for my eyes to keep track of. And one bad cut means that you get to recreate that block. But remember we have matching blocks. I really want you to get each one of these correct. The reason I’ve put this tape over here is my eye is going to come right off my center seam, right off of my 2 ⅛ mark, 2 ⅛ there. And then what I’m going to do is I’m going to go ahead and I’m going to cut once across here, ok? I’m going to rotate 180 degrees and then I also have to rotate my ruler, ok? I”m going nice and slow. Remember I only get one opportunity to get this correct. Again I’m securing it. And I’m slicing through there. So you can see we’re starting to get that division. I don’t want you to pull your blocks apart like that to check them, ok? That’s just because I’m confident in what I’m doing. And my quilt is already finished by the way, ha, ha. Now I’m going to rotate because we have two more cuts to make. We have that same 2 ⅛ right off the center seam allowance, ok? Again nice and slow. Nice and accurate. Making sure all my adjustments are good. And I’m going to sew through here. Sorry I said sew, I meant to say cut. Told you I was focused. Ok, I’m rotating that ruler again to 2 ⅛ right back on the center seam of the pinwheel. Everything looks great. And I’m making my final cut here which is going to give me technically nine new units to play with. Isn’t that cool?
Now from here you can go a million different directions. From the quilt behind me all you have to do is take, these are called your bar blocks. They don’t have any triangles in them. And they’re rotated 180 degrees, ok? And the easiest way to make sure you’re getting that right is if you look here your green will touch your white or your color will touch your print if we’re talking about other colored fabrics, right? From this point on we’re just going to go through here and join the seams and I’ve already started that to speed up the video a little bit. And here we go.
So you can see that these seams have been joined. These seams have been joined. I’m going to still show you how to do these here. So I want to make sure, and I literally did, I kept coming back to my block to make sure I had everything in the appropriate orientation. And then I’m just going to take a pinch that and fold it. And then I found that I really enjoyed starting from where that little triangle seam allowance was. It seemed to give me a very, very accurate finish. Again no need to backstitch. We’re going to catch that here in a second. But there is a need for good quarter inch. And the key to any kind of quilting like this is make sure that your seam allowance is the same from the very first seam to the very last seam. Don’t switch machines halfway through. It will just be problematic for you. That’s the key to this consistency here. We’re going to put that one on. Fold it over. I look for that same seam I like. In order to get that correct though I’m going to have to flip it upside down. Not much weight to this piecing so that won’t be a problem. And we’re going to stitch through here.
Now one of the things I did again talking about that pressing to the dark side and whatnot. When my block comes back together I double check to make sure. The first block you can see I just did basically pressed the seams in one direction. Kind of off of my lead seam off of the bar block. But then what I wanted to do was make sure that these seams were in the opposite direction. They’re folded like this and that is going to help these seams nest together as well. So when I go to press this one I want to make sure that these seams are heading this direction. Ok I’ve over explained that. But I want you to be aware of it because it really could help the piecing and more than the piecing it really helps in the quilting process. You don’t get any of those big mountains or big like teepee shapes forming in your seams which makes it much easier for your machine quilting, ok? Do I have it right? Does it look good? I think so. So now we’re going to nest those seams together to finish this whole block out, ok? And I’m going to come in from the top and we have a little bit of bias if we need any stretch at all. And I found that by doing this very accurately I had no trimming or squaring of the blocks required when I was done. And if you’ve been watching my work for years you know I”m really an applique artist and I really fear the piecework. But this has been such a fun project for me because I feel so confident and loved the way that it looked like I really knew what I was doing. When all I really did was just take my time and enjoy the process, ok? So when that’s joined, we’re going to join this last one and our blocks will be done. And if you bounce into our description below I have a free printable. And in that free printable are all these steps we’ve walked you through. And then there’s also a fun little chart at the bottom that talks to you about how we’ve laid out our actual squares. And I’m going to show you that as soon as I finish our seam. Ok, perfect. Oh I love it. Now if you want you would come on over here and you would hit it with the iron. Again I’m just going to go one direction at this point if I can. There you go, kind of pressing from the center out I guess is what I really said. Should have said, that’s what I did there. And then you can see how beautiful these blocks will line back up, right?
And then check this out, follow me over to the quilt because what really starts to happen is we get all kinds of fun things. Now you get your small pinwheel which we just created. You get a bigger pinwheel right? And then you get this fun kind of checkerboard thing going on. So there’s all kinds of different dimensions. Now let me show you this printable real quick. I want you to understand how to use our graph. So when you look at this printable, these letters refer to colors. Remember I said you’re going to make two identical blocks. So these two A blocks are the same exact blocks. And they’re located down in the bottom corner. But I have a four by six layout so if I always did the same two it would be very, I don’t even know a word for that. That’s how very it would be, right? So what I wanted to do was I wanted to make it more creative and I wanted to move the colors around. So in the quilt I basically did two of the same blocks on the bottom corner. Then I added in a new color and I put the other block from the new color up in the corner. So down here, well I can actually do the opposite from up here. Watch this. Let’s call this A, A. B, B. C, C. D, right? So then I can start to lay it in so you only have the same ones touching here and in the very bottom corner. And that way it was a really fun way to kind of play within my colors that came basically just as they were organized from Robert Kaufman in their pack.
Last thing here. And I really was jazzed about the quilting. This is one of the first all over fairly intricately pieced quilts that I have machine quilted myself. And in looking at it I wasn’t quite sure what to do. So what I really did is I took, I wanted to kind of have a wind swirl effect. It is a pinwheel quilt, right? So I actually laid some circles, salad bowls, some circles down on the quilt and kind of echo quilted around them. I’m hoping you can see that at home. And then I created my wind swirl motifs coming off of those bases. Now that did two great things for me. It quilted a lot of the section of the quilt quickly and made me not so concerned about the design. And then it also gave me the opportunity to blend in those two bases. Those two circles together which gave me nice direction without the concern. Now I have to confess I was a bit, I was a bit worried that my quilting wouldn’t turn out the way I wanted it to. So I did it in all white thread. And that is actually another good trick. If you’re not quite sure about your machine quilting you can always match your threads. You’ll still get the wonderful loft and texture but if you have any mistakes in there it will be much harder to see, see? You can’t see the mistakes. So I actually got so motivated about it I wanted to start working on some new quilting styles just like that for you all. But right now I’ve got to know, did you love the Pinwheel Quilt or what? I bet you have a million ideas running through your head. So you better get back in your studio and I’ll get back into mine to keep creating great stuff. And we’ll catch you next time right here at Man Sewing.
& Progress on Social