


Missing You Quilt Tutorial
Jenny Doan
Missing You Quilt Tutorial
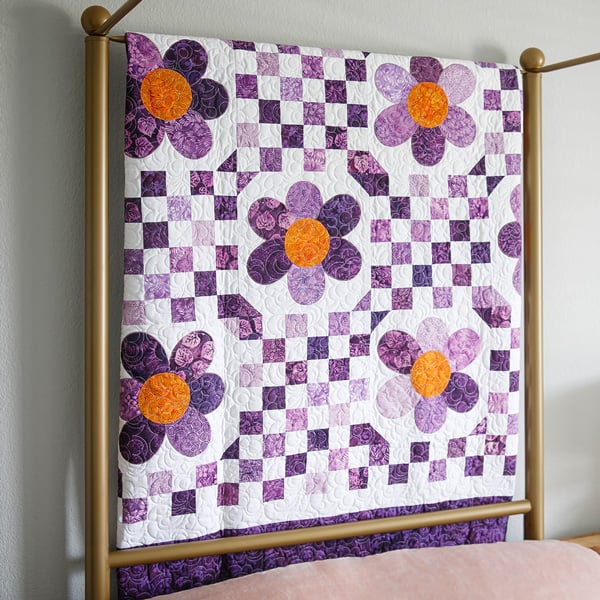
Jenny Doan demonstrates how to make a beautiful appliqué flower quilt using 10 inch squares of precut fabric (layer cake). This quilt was designed to show support for Alzheimer's Awareness Month and is dedicated to Jenny's sweet mother-in-law, Irene Doan, who lost her life to Alzheimer's in 2000. Missing You combines elements from two quilts that were also created in Irene's memory: The applique flower blocks are made with the same petals as our Forget Me Not quilt, and the 36-patch blocks come from Goodnight Irene. Of course, Jenny has a clever trick to whip up those 36-patches at lightning speed, and the appliqué petals are made easy with our Missouri Star Petal Template
- 1 Pack x 10" Print Squares
- ¼ yd. x Orange Print Fabric
- 4 yds. x Background Fabric - includes Inner Border
- 1½ yds. x Outer Border Fabric
- ¾ yd. x Binding Fabric
- 2¾ yds. x 90" Cuddle Backing or 5¼ yds. 42" Wide
- 1 x Missouri Star Petal Template Medium
- 3½ yds. x Heat n Bond Lite
Featured products Get the Supplies Featured in this Tutorial


Finish your masterpiece and let us give it the finishing touch it deserves.
Subscribe to MSQC on YouTube
Hundreds of FREE tutorials and a new one from Jenny launches every Friday.
video transcript
Hi everybody, it’s Jenny from the Missouri Star Quilt Company. And we like to take some time in November and focus on Alzheimer’s and think about and remember and honor those that we’ve loved and lost. Today I honor Mamie Irene Crisp Doan. And she is Ron’s mother and we lost her to Alzheimer’s many years ago. And so for me, I have lost her. I am missing her. And my quilt today is called Missing You. This is my quilt. Let’s take a look at it. So this is the actual shape of the petal for the Alzheimer flower and we have combined it with a quilt we made years ago in her honor called Goodnight Irene. This is a little bit bigger block but we thought it was fun to combine the two. And the purple color represents missing someone or losing someone to Alzheimer’s. And Missouri Star has come out with four layer cakes all in four different colors for four different reasons. And this one is Purple Passion and it means that you’ve lost someone to Alzheimer’s. We have a yellow layer cake, it’s called Mellow Yellow and Mellow Yellow means that you are a caregiver to someone with Alzheimer’s. We have this beautiful blue one; it’s called Beaming Blue. Lots of different shades of blue, just gorgeous. And this one is if you are living with Alzheimer’s. And last of course but not least, we have the orange layer cake and it’s loads of different colors of orange, just beautiful. And this means that you support the cause of Alzheimer’s.
So to make this quilt behind me what you’re going to need is one layer cake of color and I have used the purple passion, again because I’ve lost my mother-in-law to Alzheimer’s. It’s by Island Batik. It’s a great layer cake. You’re going to need about a quarter yard of accent fabric, that’s this right here. And that’s what I used for the centers of my flowers. You’re going to need some background fabric, that’s these big squares that the flowers sit on. And that background fabric, you’re going to need four yards and it includes this first inner border out here as well. So for your outer border you’re going to need a yard and a half and it’s going to make this nice big six inch border. The backing on this, we have used cuddle on this. And it is just gorgeous. Isn’t this beautiful? I love a cuddle backing. I love the way the quilting shows up on a cuddle backing. And if you use cuddle it’s wider than most fabrics so you’re going to 2 ¾ yards of that. And this is a 90 wide. If you use regular fabric, a 45 wide fabric you’re going to need 5 ¼ yards to back it with. So you’ll also need to use this petal template. It makes the shape of the petals that I used on this quilt and there’s also a free PDF for that. You’re also going to need some Heat N Bond light. And we used 3 ½ yards of that. And then you’re going to need a circle for tracing your center flowers right here. And if you’re like me you just hunt around your house for a circle that’s the right size. And this is the lid to my candle and it just was the right size for the center of my circle so I believe it’s about a three inch circle.
So the first block we’re going to talk about today is this 36 patch block. And so it’s six by six. And the way we’re going to do it is we are going to take our layer cake. Now I like to stack about four of these up and have them be all really different so that I get four scrappy looks all at once. Oh look at this big purple sunflower. That’s so pretty. Alright we’ll do this dark one. We’ll do a really dark one back here. And we’ll do another medium up here. Let’s go with this dot. Wait we have a dot already. Let’s go with this one. There we go. Alright so now what we’re going to do is we’re just going to line these up very carefully. Make sure they match right up. So once you have your blocks all lined up and they’re nicely stacked on top of each other we are going to cut some 2 ½ inch strips off the side. We’re going to cut two of those. So I’m going to cut one right here. And I’m just going to move this out of the way and I’m going to cut one more. And again we’re at 2 ½. And then I’m going to set this over here. And this one I’m going to turn and then I’m going to cut a 2 ½ off the end right here. Now this piece I’m going to save for my petals. And this one I’m going to cut into two 2 ½ inch squares for cornerstoning my flower block. So that is this block right here. These little cornerstones out here like this.
Alright so to make our 36 patch what I do is I like to take all of these 2 ½ inch strips and then I’m going to sew them to a 2 ½ inch background strip. And so I have one, two, three sewn on here like this. And I’m going to attach one more. We’ll move Irene over here. And we’re just going to sew one more on here like this. And you can do this with your whole set. You’re going to do this with your whole layer cake, cut them all up and sew them onto a strip like this because what we’re going to do is we’re making strip sets. Alright, so just line this up along here. And you should get four of those on a 2 ½ inch strip. You’ll get your 2 ½ inch strips out of your background fabric or you can use a jelly roll as well. So you’ll put all those on that. We are then going to cut these apart and press them open like this and one more. And if you snug them up real nice next to each other you won’t have to cut in between. But if you leave a little space make sure you just cut that out. Alright now let’s press these open. Oop I’ve got a thread there. Trim that off. And I’m going to press to the dark side so I want to put my dark color on top like that. And I love pressing batiks. They are so, they just press so crisply. And this one. And then one more here. Press it back just like that.
Alright so now what we’re going to do is we’re just going to sew these together and alternate our colors. So you’re going to do, you know, purple white, purple white and we’re going to sew them together this way. And we’re just going to make long strip sets. Alright so we’re going to add one more to this so that will give us our six across like this. And you want to do a bunch of these, you want to do a bunch of these because you want your block to be all scrappy. So I’m going to iron this up. And you can see right here this makes the length of the whole block. So this is the same as this right here. See that. And so what we’re going to do now is we’re going to come in and we’re going to cut 2 ½ in like this. And you should get, with no cutting errors, you should get four of these. And one more. We’re going to trim, we have these little edges peeking out right here. Alright. So then what I would do is I would do this to a bunch if not all mine and set them over here and then when I go to put the blocks together I will just randomly grab them. So what I’m going to do right here is I have these two blocks and I can swap them like this so they look like different blocks in each one. And I have a couple of these already sewn together over here to make six. And so we’re just going to look and make sure that this looks pretty good. So again, the first thing we’re going to do is we’re going to take these two strips, we’re going to put them right sides together. Now if you press to the dark side always these seams will nest up really nicely. So we’re just going to nest those up, make sure that they just lock with one another. And if yours aren’t nesting well check your quarter inch seam because this is, when you do little blocks like this, this is one of those places where it matters. And so we’re just going to go ahead and start, make sure that this nests. Also when you have a lot of little tiny seams to match up it keeps you in line better. I mean you just know that you’re exactly where you’re going to be. Alright so we’re just going to sew down this side. There we go. Then we’ll press this open and we’ll add it to the other two I’ve already done. I’m going to sew this to the other two and that will give us our big 36 patch block. So just make sure when you put them together that they stagger. So I’m going to sew this one here and then we’ll add the other one and that will give us our finished block. I love how a simple patchwork block just, I just love how it looks. It just really shines. There we go. And then we’re going to add one more piece on here. And again I’m just going to line it up from the top, sew a few anchoring stitches and then make sure that I, that my next little seam is matched. Alrighty. So now we’re going to press this open. And you’re going to make 12 of these, these little 36 inch blocks. So you’re going to make 12 of those.
Alright so let’s talk about the flower block now. Remember when we cut our fabric we ended up with this piece right here that was smaller. So let’s talk about making the petals. To make the petals you’re going to need this little piece that we cut off and saved when we cut our layer cake. And you’re going to need some Heat N Bond. And you can actually buy this on the roll or in the package. And what I like to do is my strips, this piece is going to be this wide right here. Let’s see one, two, three, four, five, six, seven, and a half. And I’m just going to cut a strip that wide and then I’m going to lay my fabric on it. So I’m going to go ahead and when I use Heat N Bond I actually just kind of use it to hold things down because I know I’m going to come along and topstitch it down or put an applique stitch around it. So I’m not worried about it being perfect on there. But close is always good. Alright so now what I’m going to do is I’m just going to lay these on here like this and lay these on here like this. And so I’ll be able to fit three of these on here. But what I’ll do is I’ll save this little strip and I will put maybe two little strips on the next piece from when I start to do them on the other thing. So let’s go ahead and iron these on. And you want to make sure, you know, if you’re worried about getting the Heat N Bond on your iron use a pressing cloth. And I’m just going to set it on here. My fabric pieces are right together. Whoops, close, that was close. Fabric pieces are right together so I can go ahead and set those on like this. Use the tip of mine. I’m kind of living dangerously here but you know, we’ve all got to do it sometimes.
Alright so once your pieces are attached to your Heat N Bond you’re going to want to trace your petal. And what I like to do is I like to fold these like this. And then I’m going to trace my petal here. And I am going to just trace around here like this. And you can actually use your rotary cutter to cut it out if you want. I kind of prefer just cutting it out with scissors. So I’m going to trace two of these like this. And this is actually a little tip. If you do love to rotary cut yours and you want to cut, this is a nice easy curve. It cuts around it fine. But if you have a smaller rotary cutter it actually cuts out just as easily. I just always feel a little bit unsure cutting around curves with a rotary cutter. And I’m old school so I didn’t start sewing with a rotary cutter. I started sewing with scissors so now you know how really old I am. Alright so let me see if I’ve got most of that. I’m going to cut this piece off here. I’m going to cut this off here. Detach it from there. And I’m going to look at what I’ve got here because I’ve got a piece here on the bottom that isn’t all the way through. I just feel like this takes me longer than if I used a pair of scissors. There we go. Alright. So there’s those. Whew! That was a little more work than I thought. Alright let me grab my scissors. So I’ve got my scissors and because I folded these I only have to trace it one time. And so I’m just going to come across here and then cut all on that line. Just like that. And then what I’m going to do is I have to cut out a background square because the flower blocks are super easy. It’s just placement. So your background square is 12 ½ because your 36 patch is 12 ½ so you want those to be the same size. So this is 12 ½. We’re going to iron it. And then if you’d like, I tend to eyeball things, but if you are a little bit more of a perfectionist you can actually press this in half and in half to give yourself some lines to guide you with, so you know exactly where the center is and that sort of thing. Alright. So now we have our block ready to go and we can put our petals on it.
And I have some petals over here and I have some petals that I’ve cut. You’re going to remove your paper and I do that by just folding it over onto the paper side and then it just lifts right back. And we’re just going to put these on here like this. You should be able to get six. And so let me go ahead and just peel this back. And we’ll get some darker ones in here so we can have some contrast. And then we have, let’s see, one more little light guy. And that made six petals. And so what I’m going to do is I’m going to put them here and I’m just going to kind of carefully set them. I’m going to look at it, I’m going to see which ones, oh these two are the same. We don’t want that up there. Put this down here. See how far I am from the top on my middle. See how far I am from the sides. So let’s talk about our circle. Literally I do, I hunt around my house until I find something that is the right size. This looks like it’s going to be about the right size for the center of my circle.So what I’m going to do is I’m going to put that on a piece of Heat N Bond. I’m going to trace around it just like this. And I’m going to iron it on to a little piece of my contrasting color. And of course this can be whatever you like. And I’m going to put it on here. Now do remember to put it on the back of your fabric. I always, you know, this is batik so it’s good both sides. But every once in a while I forget and then I’m like, oh that didn’t work. So then we’re just going to cut this out like this. Just like that. Alright so once you get your circle cut, the circle is a great helper because it will let you know if your petals, as long as you’re covering up everything in the middle, it lets you know, you know, if you’ve got everything scooted under there just right and it’s just ready to go. And it looks right to you. It’s all visual. It’s how you want it. I’m going to carefully take this over to the ironing board. If I were at my studio at my desk I would have done this on the ironing board. And so, you know, just keep that in mind. Make yourself a little nest where you can, you know, where things work easy for you because then you don’t have to carry it and move it. So then what I’m going to do is I’m just going to press this down. And I’m going to press, not iron so you don’t want to do a lot of this or that will shift your pieces but you want to press it on like this so that it just attaches and stays down. Just like this. Nice and firm and it doesn’t take very long.
And then what you’re going to do is you’re going to choose whatever stitch you’d like to applique around these edges and enclose these edges. So you can use an applique stitch, you can use a tiny zig zag, you can do a straight stitch around them, whatever you’d like. But you’re going to want to do that while the block is here and not in the whole quilt. So I want to show you a couple of examples of the other flowers I’ve made from the other block. So this is again a purple one with the yellow center. And this is a yellow one right here. Isn’t that cute? And then here’s the blue with a little yellow center. And you’ll see we put these little cornerstones on our block as well. Those were the little corners that we cut out the other ones. And here’s an orange. And they’re just so pretty. All of the flowers are going to look just gorgeous with their patchwork counterparts. So once we get this all appliqued on and you can look closely here at this applique stitching right here. So this actual stitching around here, this is an applique stitch. It’s a beautiful stitch to use and so you can finish your block with that. Once you get your applique stitch together then you can add your corners. And we have four little corners right here. We’ll just lay them on just like this. We’re going to sew diagonally corner to corner on each one. And I will probably put those on when I come over.
So I’m going to start here. Now we’re sewing directly down the center so you draw the line, iron it half or use your diagonal seam tape because we are sewing on the line not to one side or the other. So I have finger pressed this and now I have a crease and I can set it right, put it right in the corner. And then we’re just going to sew across it diagonally, just like this. And then over here. Then add my other ones on here like this. Snug it right up in the corner. And I’m using the diagonal seam tape on these and just following it straight across. And one more. There we go. Alright. So then what we’re going to do to reduce bulk is we’re going to take our little ruler and we’re just going to trim off these outside edges like this. So you put your ruler a quarter of an inch away from the stitch line and just trim them off. And then one over here. And then we’re going to press these back.
And so of the flower block you’re going to need 13 of these. So 13 of these and 12 of these. And when you go to put them together you’re just going to sew them right to each other just like this. Now one of the things that I noticed is that because I used some jelly roll strips to mount mine up, sometimes mine were just a hair bigger. And so you can set a 12 ½ inch ruler on there and just trim those tiny little bits if it bothers you. But they should fit fairly close. So let’s take a look at this quilt. So we start with a flower here and we have a flower and a 36 patch and a flower and a 36 patch and a flower. And then we staggered them on the next row. Now because I’m not a waster I did have a bunch of my little pieces leftover, these little strips leftover and so I put a row of two right here, you can see them on the top. I put a row of two at the top and a row of two at the bottom. Because this is five down by five across, I like a little bit rectangular quilt and so adding this little leftover patchwork on the top and the bottom just made it perfect for me.
So this makes a quilt that is 75 by 83. So it’s a great size. By using the cuddle on the back it’s nice and cozy.And our stitch pattern is called Daisy Days so it’s just a beautiful pattern. So this is a great easy quilt. And it will help you commemorate any facet of Alzheimer’s you’re going through. I know it did for me. So I hope you enjoyed this tutorial from the Missouri Star Quilt Company.
Hi everybody, it’s Jenny from the Missouri Star Quilt Company. We hope you enjoyed watching this video. If you aren’t already part of the Missouri Star Quilt Company family be sure to subscribe so you won’t miss a thing. And if you click that bell it will notify you every time a new tutorial comes out. See you next Friday.
...& Progress on Social