


Periwinkle Plates Quilt Tutorial
Jenny Doan
Periwinkle Plates Quilt Tutorial
- 1 x Pack 10" Print Squares
- 1 x Pack 5" Print Squares
- 3¾ yds. x Background Fabric
- 1½ yds. x Border Fabric
- ¾ yd. x Binding Fabric
- 5 yds. x Backing Fabric
- 10½ yds. x Lightweight Fusible Interfacing
- 1 x Missouri Star Small Periwinkle (Wacky Web) Template for 5" Charm Packs - optional
- 1 x Missouri Star Mini Periwinkle (Wacky Web) Template for 2.5" Squares - optional
Featured products Get the Supplies Featured in this Tutorial


Finish your masterpiece and let us give it the finishing touch it deserves.
Subscribe to MSQC on YouTube
Hundreds of FREE tutorials and a new one from Jenny launches every Friday.
video transcript
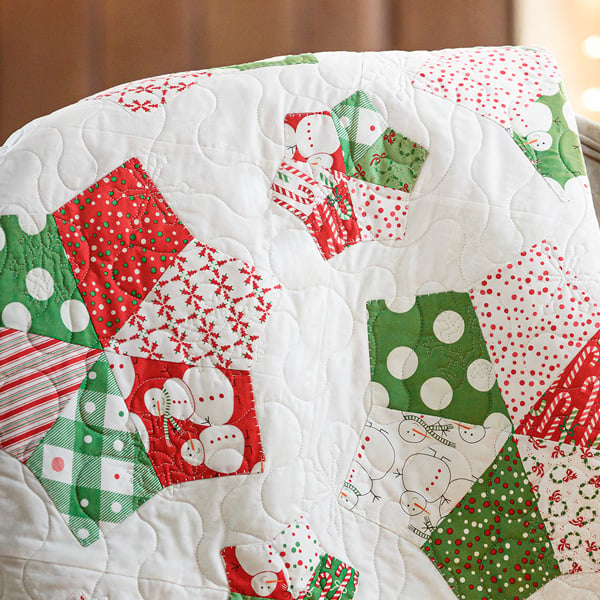
Hi everybody, it’s Jenny from the Missouri Star Quilt Company. And take a look at this quilt behind me. Isn’t this gorgeous? This is made with our periwinkle template. Such a quick, easy quilt but such a great impact. And it works great with all fabrics. I’ve chosen this cool Christmas fabric because I just think it’s beautiful. It’s made by my friends Me and My Sister and it’s just fun. So to make this quilt you’re going to need one packet of ten inch print squares and one packet of five inch print squares. And we have used Merry and Bright by Me and My Sister for Moda. For the background you’re going to need 3 ¾ yards of fabric. For your border we used 1 ½ yards of this cute dot. For your backing we used five yards of vertical seams or 2 ½ yards of a 108 wide. For the binding, and I show this because it’s the cutest little stripe ever, you’re going to need ¾ of a yard of binding. You’re also going to need 10 ½ yards of 20 inch wide lightweight interfacing. The tools you need to make are the wacky web templates small and the wacky web template mini. These are also called periwinkle templates.
So these are the templates you’re going to need to make this quilt. You’re going to need the mini periwinkle and you’re going to need the small periwinkle. There is a large periwinkle but it is quite large and we’re not using that in this quilt. So this is the block we’re talking about right here.This is our periwinkle plate block. And it’s made with six periwinkle cut outs. And so what I did was I took my layer cake and I divided them up and I put six fabrics that I thought would be fun together. So two reds, a couple of whites and a couple of greens in the whole stack. So then when I go to cut them out I’m going to get four periwinkles out of here. I’m going to pin these together and they’re ready to go. They’re ready for me to sew. They have all the different colors in so I’m not picking one from here and picking one from there. I’m actually just going to lay them all together and sew them up. So I’m going to show you how I cut these. And on the back, you know, on the back of our thing is a cardboard sheet on the back of our layer cake. And so I tried really hard to see if I could get my little ones out of any of the extra space. There’s just not really room. So normally when I cut a single periwinkle I’m going to take my fabric and I’m going to fold it in fourths like this and I”m going to set this on it like this. And just cut out four. But because I want to do it six at a time, what I’m going to do is I’m just going to lay these out and I’m basically going to do the same thing but I’m going to keep these together. I’m going to put my periwinkle along the edge. Now these aren’t stacked exactly straight and so I’m going to come in just a little bit from that edge. And I’m going to go ahead and cut this. And to cut six at a time, you know, usually we cut four, it’s not that many more but you will want to make sure you have a nice, sharp rotary blade. And so let me see if I got that all out of there. Oop, I’ve got a little corner right here. But don’t cut too far off the corner either because you want to get all your pieces out of it. So then what I’m going to do, oh my goodness, I’ve got trimming everywhere. Then what I’m going to do is I’m going to grab a pin and I’m just going to stick a pin in this because I know this is going to make a whole plate. I’ve already got it all together and it makes a whole plate. So then I’m going to come down here and I’m going to cut another one. And we’re just going to cut all four of these and I will have four ready to go. Doing this, it goes together very quickly. I’ve got to turn that for my left hand, make sure it’s still lined up. There we go. And then I’ll grab this one and put a pin in that as well. I might as well stick this thing over here. And then we’ve got two more here so I will line this up in here. Let’s start in this corner. Move these off. Alright so then the last one you’re going to get out of this last corner and you get the drift. We’re just going to cut these out. This makes a whole plate. So let me show you what we do from here. Very little waste on these.
But I love that I, you know, that’s it all together as a plate. When you cut you’re done, you’ve picked all your colors, you’re ready to go. So then basically what you want to do, let me put this down here. You’re going to want to lay these out first and then you’re going to sew them together by twos. And so we’re going to put a red here and we’ll stick this green here or this white and then a green and then a red. And you just want to make, what you’re looking for, is you just want to make sure that you don’t have like colors right next to each other so that it lets all the colors be the star. So what I’m going to do is I’m going to sew two of these like this and then I’m going to add the third. So we’re going to come here and sew a quarter of an inch down the side. And then just like that I’m going to open this up and I’m going to add this red over here. And you notice I didn’t press it but I’m going to fold my seam to one side while I sew over it. And then we can take this over to the ironing board and press that. We just want to make sure it’s nice and flat and your seams are laying down nice and flat. I’m going to encourage this center seam to go to the outside right there. But your seams aren’t going to nest too much so you don’t want to have, you don’t really have to worry about that. So this right here, we’re going to sew these two together and then we are going to add this last green one over here. And again I’m just going to lay my seam over and line up these points up here and lay the seam over here. Alright then we’re going to press this one. And we’re just going to lay it like that, press it down. And these I’m just going to have go to the, well this one I think I’ll have go out. So you’ll notice when you press seams sometimes, you know, they want to go a certain way because of the bulk of the fabric. And so I rarely fight that, you know, if they, if my seam has an opinion he gets what he wants. And so what we’re going to do then is we’re going to make sure these are in the right way.
We’re going to lay them right on top of each other and we’re just going to sew straight across this middle line. And that’s going to form our plate. And we’re going to just kind of nest up this center seam right here where one seam goes one way, one seam goes the other and your edge. And if you have one piece that’s a little bigger than the other one just put that bigger piece on the bottom. But these should be because you know we’re cutting these pieces, they should be pretty close to perfect. Alright so we’ve sewn that seam right down the center. We’ll open it up. We have this cute little plate and we’re going to press that so nice. And I’m just going to lay this over and press it down.
So then what we’re going to do is we’re going to take this lightweight fusible interfacing like this. And I am just going to lay this on here like this. And there’s the side that has the sticky bumps and a side that has the smooth bumps. And you want the sticky bumps next to the front of your quilt like this, the front of your fabric. So sticky bumps to the right side of your fabric. And we’re going to put this in here. And I’m just going to try to get it to fit as good as I can. And because the size of this stuff you can’t get two together. In all these extra places is where we’re going to put our small periwinkles. So it won’t go to waste. I’m just going to pin this one here like this just to hold it in place. And then I’m going to take my rotary cutter or a pair of scissors and I’m just going to kind of gently go around it like this. And then what I’m going to do is I’m going to sew a quarter of an inch all the way around the outside of this, completely sewing it shut. And because we’re dealing with long straight sides it’s just very easy. And you don’t have to worry about any little points or anything like that. You know when I was making this I was thinking of the dresden plates all the little points. And I love a dresden. But this is like the super easy dresden. Now I sew to where my needle hits the seam line and then I’m going to turn and go up the other side. Coming down this side. Alright so here we are back at the beginning. We’ve completely sewed this thing, enclosed it.
And now I’m going to trim this excess off right here. We’re just going to go along and trim this off. I’m going to go ahead and trim this. And as I’m trimming I’m going to clip the point. Don’t cut into your stitch line. But I’m going to go ahead and clip that point. And if you had very deep curves this is the seamstress coming out in me, you can also clip this point right here, just right up to that stitch line. Don’t slip your stitch but right up to that line and it will help it turn easier and so you can do that. On this one I didn’t find it was really necessary because the curve is so gentle. So again I’m just going to cut off this point right here. I want to make sure you can see this. I’m going to cut off this point and just come down this other side. And we’re trimming it nice and close. Or at least even with our quarter of an inch. Trim this point off and then we’re back here. Alright so now what we’re going to do is we’re going to turn this right side out. And so what I’m going to do is I’m going to take this piece of interfacing and I’m going to pull it away from my fabric and I’m just going to cut a little slit in here. And then I can stick my scissor in here and just cut a little slice across. Being careful not to ever catch your fabric. And now I have a way to turn this. And then I’m just going to flip it around like this. And I’m using my finger to go in and grab those points and push them out. And then you’ll need a turning tool to get right in there and get those little points out. There’s lots of great turning tools out there. You can use the purple thang. We have a bamboo thing. You can use a skewer from the kitchen. I think that’s what I have right here is my shish-ka-bob stick, you know. Anyway just gently put them through there. I also, you know, because I live dangerously I’ve also used my scissors when they’re closed and gently pushed that out. You know, danger that’s living dangerously but sometimes I do that. But I don’t recommend it always.
Alright so now I’m going to move this out of the way. Now in my mind I thought this would fit on a ten inch square because it came from a ten inch square. But it does not. It’s too big for that. So your background squares are going to be 14 inches. So I have a 14 inch one cut right here. And we used this cool fabric that has a snowflake motif on it because I just thought it was so cute with this. Now to be fair I have made many of these in red, white and blue, you know, for 4th of July to hang as a garland, to use as a mug rug, to put on the table with a vase. So these are just a great little project for any little thing that you need in any fabric. Don’t get stuck on just this one fabric because it can go for any little thing you want. You do want to make sure that your little seams here don’t have folds that it’s all the way rolled out and you can use your pressing stick to do that. Make sure that that whole seam is just pushed nice out flat. And remember you can’t iron this because if you press this it will stick to your iron because the bumpy part is now on the outside. Now that we’ve turned it, the bumpy part is on the outside. So I took my 14 inch square and I folded it in half and I folded it in half and I gave it a little press on these lines so now I have centering lines. So what I’m going to do now is I’m going to put this on here. And what I did was I lined up my centering line here and my points on this line right here. And I just made sure that they were about the same top and bottom, you know, so that you can, then you can go over and press this on. So make sure that all your points are good. And make sure that your little periwinkle plate lays nice and flat. I can move this over to the iron. And then we’re going to press this down. Now remember your little glue beads are on the outside now so this is going to adhere this to the square. It’s going to stick to the square. And then, wait a minute. I’ve got a little string I need to clip. Little scissor here. So just iron it from the front and back to make sure it gets a nice, good, firm bond on there.
And then what you’re going to do is we’re going to put a finishing stitch on here to hold it down. So you can use a tiny zig zag. You can use a tiny straight stitch. You can do an applique stitch. And you’ll see on this one I did the applique stitch on the edge of mine, you know. And I just used white thread for all of them regardless of what the fabric was because I wanted to hide it. I think it hid very well. But you can see even when it shows up, you know, it shows up, it looks fine so that’s what we did. And so what I’m going to do now because this machine right here is a straight stitch only, I’m going to swap out machines for one that has some decorative stitches and so I can show you how to stitch this on here.
So now you have your block ready and I’ve got my machine here that does several different decorative stitches. And honestly this is a fun way to try them out if you want to try something different. I mean every star could have a different stitch. Also don’t forget, just like a dresden, you can hand stitch these down. And so if you want to do that that’s ok too. I wanted to just do it on the sewing machine. And because this is such a nice gentle curve right here you can actually just sew, you know, it’s not like you’re stopping and starting. You can just sew this whole curve, you know, in one fell swoop. So find the stitch you want, get some scrap fabric and stitch with it. So on this machine, you know, if I turn to the number, my number is 23 right here, it comes up with a preset setting. And so if I stitch a little bit, if I don’t love that preset setting then what I’m going to do is I’m going to look at my length and width buttons over here and see if I want, you know, because I’m doing a blanket stitch which goes stitch, stitch, stitch, grab, stitch, stitch, stitch, over, you know, like that. And if I don’t want that one that long or it’s short or for whatever reason, if you want to change it up don’t be afraid to change that up.
Alright so what I’m going to do now is I’m just going to sew right along the edge of this curve. And my stitch will come over and grab it, just like that we’re sewing down the side. And because you’ve iron on appliqued this to the block you don’t even have to pin it. Alright so then I get to that point and I’m going to turn it. And you can see how nice this looks. It’s very finished and pretty. And so I just make sure my needle is going to go in the right place because I want it right off the edge of that. And then we turn again and make sure we’re going right there. I always like to put that needle down to make sure I know where it’s going to start and so it doesn’t catch me by surprise. And don’t feel like you have to do this swoop in one fell go. You can stop in the middle. It’s, you know, you can do whatever you want. And then I’m going to turn and I have this one more side right here. Again I’m going to put my needle right in there on the edge of that. Now on this machine, another thing it has that’s really nice is that it has a slowdown and a speed up. So if you’re not comfortable going this fast or if this is your first time doing this kind of thing, just slow those stitches down and even if you have your pedal to the metal, the sewing machine will only sew so fast. And so then you feel a little bit more confident. But by the time you’ve done the last one of these on your quilt you’re going to be whizzing through it. I always start on a point but you can start down in the middle. I mean you can start anywhere you want. But as I’m coming here to this finishing right here I’m just going to make sure that I overlap my stitches just a little bit so that, you know, it’s like backstitching a bit. And if you have a locking stitch on your machine you can use that as well. And so my little plate is done here. Let me go ahead and clip off these threads. And you can see how cool this looks. So let’s press this nice and flat again. Now what you sew these on, you can see, it does kind of schooch up that fabric a little bit. But then when you put it together it just looks so cool.
Now take a look at this. See, you can see very clearly right here these little stitches. So on these big periwinkle stars you’re going to make one, two, three, four, five, by one, two, three, four, five, so 25 of those. And then you can see I have little ones on here. This is the size of the little periwinkle right here. It’s just as cute as it can be. It’s done exactly the same way. Six, you’re going to sew three together and three together. So don’t be afraid of these because they’re just smaller not harder. Also you’re going to do the same thing, you’re going to put it on your piece of fleece that’s leftover on this side. You can put a couple of periwinkles on there, sew around the outside, cut a slit, turn them. And what I did because this quilt is pretty good size, it’s 78 by 78, so it’s a pretty good size. So once I got my blocks made, I went ahead and sewed them together and I put four together like this. So one, two, three, four and then added my little periwinkle to the center. Now you can center this up on all seams so your lines are going to be right there perfect for centering. And I put this little guy right here in the middle. Then I added two more blocks and added another periwinkle. Then two more blocks and added another periwinkle. And then two more blocks and added this last periwinkle over here. And that makes it so much easier because if you put your whole quilt together and then add your small periwinkles it’s going to be very cumbersome under your machine. It’s going to be a lot of quilt. I mean it can be done but it is going to be a lot of quilt. So then there was enough white on the edge of these blocks that I didn’t feel like I needed to add that inner border. So my outer border out here is just a nice big six inch border. And you guys know how I love a diagonal stripe. And that makes the binding. And on this quilt with Christmas fabric it just looks like a candy cane. It’s so cute. So the back, is this not the cutest back ever? This green. And our quilting pattern is a meandering snowflake. And it just shows up so pretty on the back. And on the front I just love how you just catch a snowflake here and there. And it just looks so pretty. Also you’ll notice that when you put these plates in, all the plates are sitting going up and down the same direction. And it forms these cool ovals that just highlight this little periwinkle. And so it just makes it really cute. The quilt is 78 by 78, nice big quilt. And we hope you enjoyed this tutorial on the Periwinkle Plates from the Missouri Star Quilt Company.
We hope you enjoyed watching this video. If you’re not already part of the Missouri Star quilt family you can hit the subscribe button below so you won’t miss a thing. And if you click that bell it will notify you every time a new tutorial comes out. See you next Friday.
...
& Progress on Social