


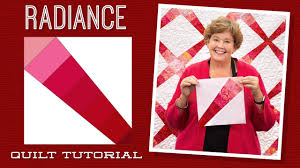
Radiance Quilt Tutorial
Jenny Doan
Radiance Quilt Tutorial
- 1 pack x 2.5" Precut Fabric Strips (Jelly Rolls)
- 1 pack x Solids Layer Cake (10" quilt squares)
- 1/2 yard x Solid Fabric for Inner Border
- 3/4 yard x Quilt Fabric for Binding
- 4 1/2 yard x Quilt Backing
- 1 x Missouri Star Burst Block Template
Featured products Get the Supplies Featured in this Tutorial


Finish your masterpiece and let us give it the finishing touch it deserves.
Subscribe to MSQC on YouTube
Hundreds of FREE tutorials and a new one from Jenny launches every Friday.
video transcript
Hi everybody, it’s Jenny from the MSQC. And I’ve got a fun project for you today. Take a look at this quilt behind me. Isn’t this great? So this is actually made with Rob Appell’s burst block template. And this summer when we did our birthday bash or fall actually, we did a birthday bash. Rob and I had a sew off. And his quilt actually gave me this idea. And I just am so happy with how it turned out. So to make this quilt what you’re going to need is one packet of 2 ½ inch strips and we have used this gorgeous Cherry Sweet Batiks from Wilmington. And I mean it’s just a fun line of fabric. You’re going to need some background squares, 36 ten inch background squares. Your first border right here is a little 2 ½ inch border. And it’s a half a yard of fabric because this quilt is just 70 by 70. Your border, your outer border is five inch unfinished border and it’s made with all the little strips that were leftover that we didn’t use in the actual blocks. And so it’s this cool piano key border that we made all the way around. And I love it when we can use all the pieces and I love a piano key border as well. So let me show you how to make this block because it’s really fun.
The first thing you’re going to do is sew seven strips together. And you’re going to sew them so they gradiate in color from light to dark. And that gives it this radiance look. Then you’re going to get your burst block template over here and because I wanted mine to line up along the top seam line I actually put a little piece of tape corner to corner so it gave me a straight line. And I was able to line that up on my, on my top seam line. And then when I get ready to cut the next one I’m going to flip it and I’m going to line it up on the bottom seam line. So just like that. And I’ve already cut one off of here so I’m going to go ahead and line this one up on the bottom. And what’s fun about that is then half your color gradate from light to dark and half gradate from dark to light depending upon which way you cut this. Now I chose to leave all my pieces in here. But I could easily see how this could make two quilts because it’s got, you know, if you want them all going from light to dark or all going from dark to light. So we’re just going to cut these out like this. And make sure our tape is lined up on there and make sure our seam is lined up. Our cut line, our template matches on the seam. So basically I was trying to see if this would work like a dresden and it does. It’s just really fun. Alright so here we go. We’re cutting these. And you’re going to do this to your whole strip set. And you’ll do three strip sets where you cut all these out like this. Alrighty and one little piece here. Ok.
So then you’ve got your pieces like this and we’ve got to set them into a block. So how we’re going to do that is we are going to take our ten inch square just like this. Get some of this off here. Take our ten inch square and we are going to take our ruler and cut it in half diagonally corner to corner. So right like this, just corner to corner. Now because I like things to end up kind of the same what I’m going to do is I’m going to crease this. So I’m going to fold this in half and give it a little crease and that’s going to tell me where the middle is. So finger press that. And then this one is the same. And then I”m going to do the same thing to these. So I’m going to fold these in half, match up my points and just give this a little crease right here. Alright, there we go.
Alright so then what we’re going to do is we’re going to lay these together. And I’m going to lay this one right in, match crease to crease. So there’s that one. And I’m going to put this on that side like this. And I’m going to stick a pin in here so it doesn’t move. Then I”m going to put it on this side. And this is just for ease of going to the sewing machine. You can actually sew these on separately but this is just for me because I’ll be able to do two sides at once. And we’re going to pin this one in here. Alright so now what we want to do is we want to come over to the sewing machine and sew a quarter of an inch down each side of this template. And I”m going to make sure they stay lined up real nice. And you’ll notice that the square sticks off of both sides which is what you want because we’re going to square this up as soon as we get these sewn on and make our block. Let me pull that pin out of there. Alrighty. Now let’s press this open. And I’m just going to roll these sides back. Press it nice and flat. Now it has kind of a weird looking wonky shape. But we’re going to take care of that real quick.
We’re going to take a ten inch square. And I’m going to line this up point to point on the burst. So the burst actually lines up exactly ten inches either side just like this. And then I’m just going to trim off these outer pieces out here. So trim here. And I’m going to turn it. I was going to like almost, you know, climb over the side of the table. Did you see that? No we’re just going to keep these points lined up and turn this. Alright so we’re going to do this side and this side. Make sure that stays lined up. Alright so really this isn’t too bad. This isn’t too bad of waste. And you get this cool block like this. It sets right in the square really nicely. Half of your blocks are going to be going from the dark to the light. And the other half are going to be going from the light to the dark.
And so let me show you how we set these together. Because you’ll see this whole row is light to dark. And down here it kind of makes the switch and then this row goes from light to dark the opposite way. And so you’re able to use all your blocks. Now if you want the whole quilt to go one way you’re going to be able to make two quilts. So let me show you how we put these together because we actually did it in rows. And we went ahead and gathered up all of our blocks that were going the same direction and we just sewed these together in rows like this. So they’re going to go this way. And then the next row that we added on we just did it like this on the bottom like, we just added a whole other row and made them come together so they came together in these long pieces like this. It’s just really fun.
So once you get your blocks done then we’re going to cut the border. And I want to show you how to make this cool piano key border. So our border is five inches which makes it real handy with this ruler because the ruler is five inches. So you just lay it on the edge. And you’re going to make your cuts. And we’re going to make a couple of them. And I’m going to show you how they go together just like that. And then we’re going to sew them together. We’re going to put them light to dark, light to dark and sew this together like this. And you’ll do this to all your pieces. And it’s just a little quarter of an inch seam. And you’re going to sew a whole bunch of these together. And before you know it you’re going to have this awesome long border to put around the sides. And it’s just really fun to see that come together. I love a piano key border. I think it makes a quilt really fun. And I think it adds a lot more to this quilt particularly because we’ve stripped it on the burst block pieces as well. So we hope you enjoyed this tutorial on the Radiance quilt from the MSQC.
& Progress on Social