


Seeing Spots Quilt Tutorial
Jenny Doan
Seeing Spots Quilt Tutorial
- 1 x Missouri Star 8" Equilateral 60 Degree Triangle Ruler
- 1 roll x 2.5" Precut Fabric Strips (Jelly Rolls) - Print (incl. Pieced Border)
- 1 roll x 2.5" Precut Fabric Strips (Jelly Rolls) - Varying Solid Colors (incl. Pieced Border)
- 1¼ yards x Quilt Fabric for Background (incl. Inner & Middle Borders)
- 1½ yards x Quilt Fabric for Outer Border
- ¾ yard x Quilt Fabric for Binding
- 5¼ yards x Quilt Backing Fabric
Featured products Get the Supplies Featured in this Tutorial


Finish your masterpiece and let us give it the finishing touch it deserves.
Subscribe to MSQC on YouTube
Hundreds of FREE tutorials and a new one from Jenny launches every Friday.
video transcript
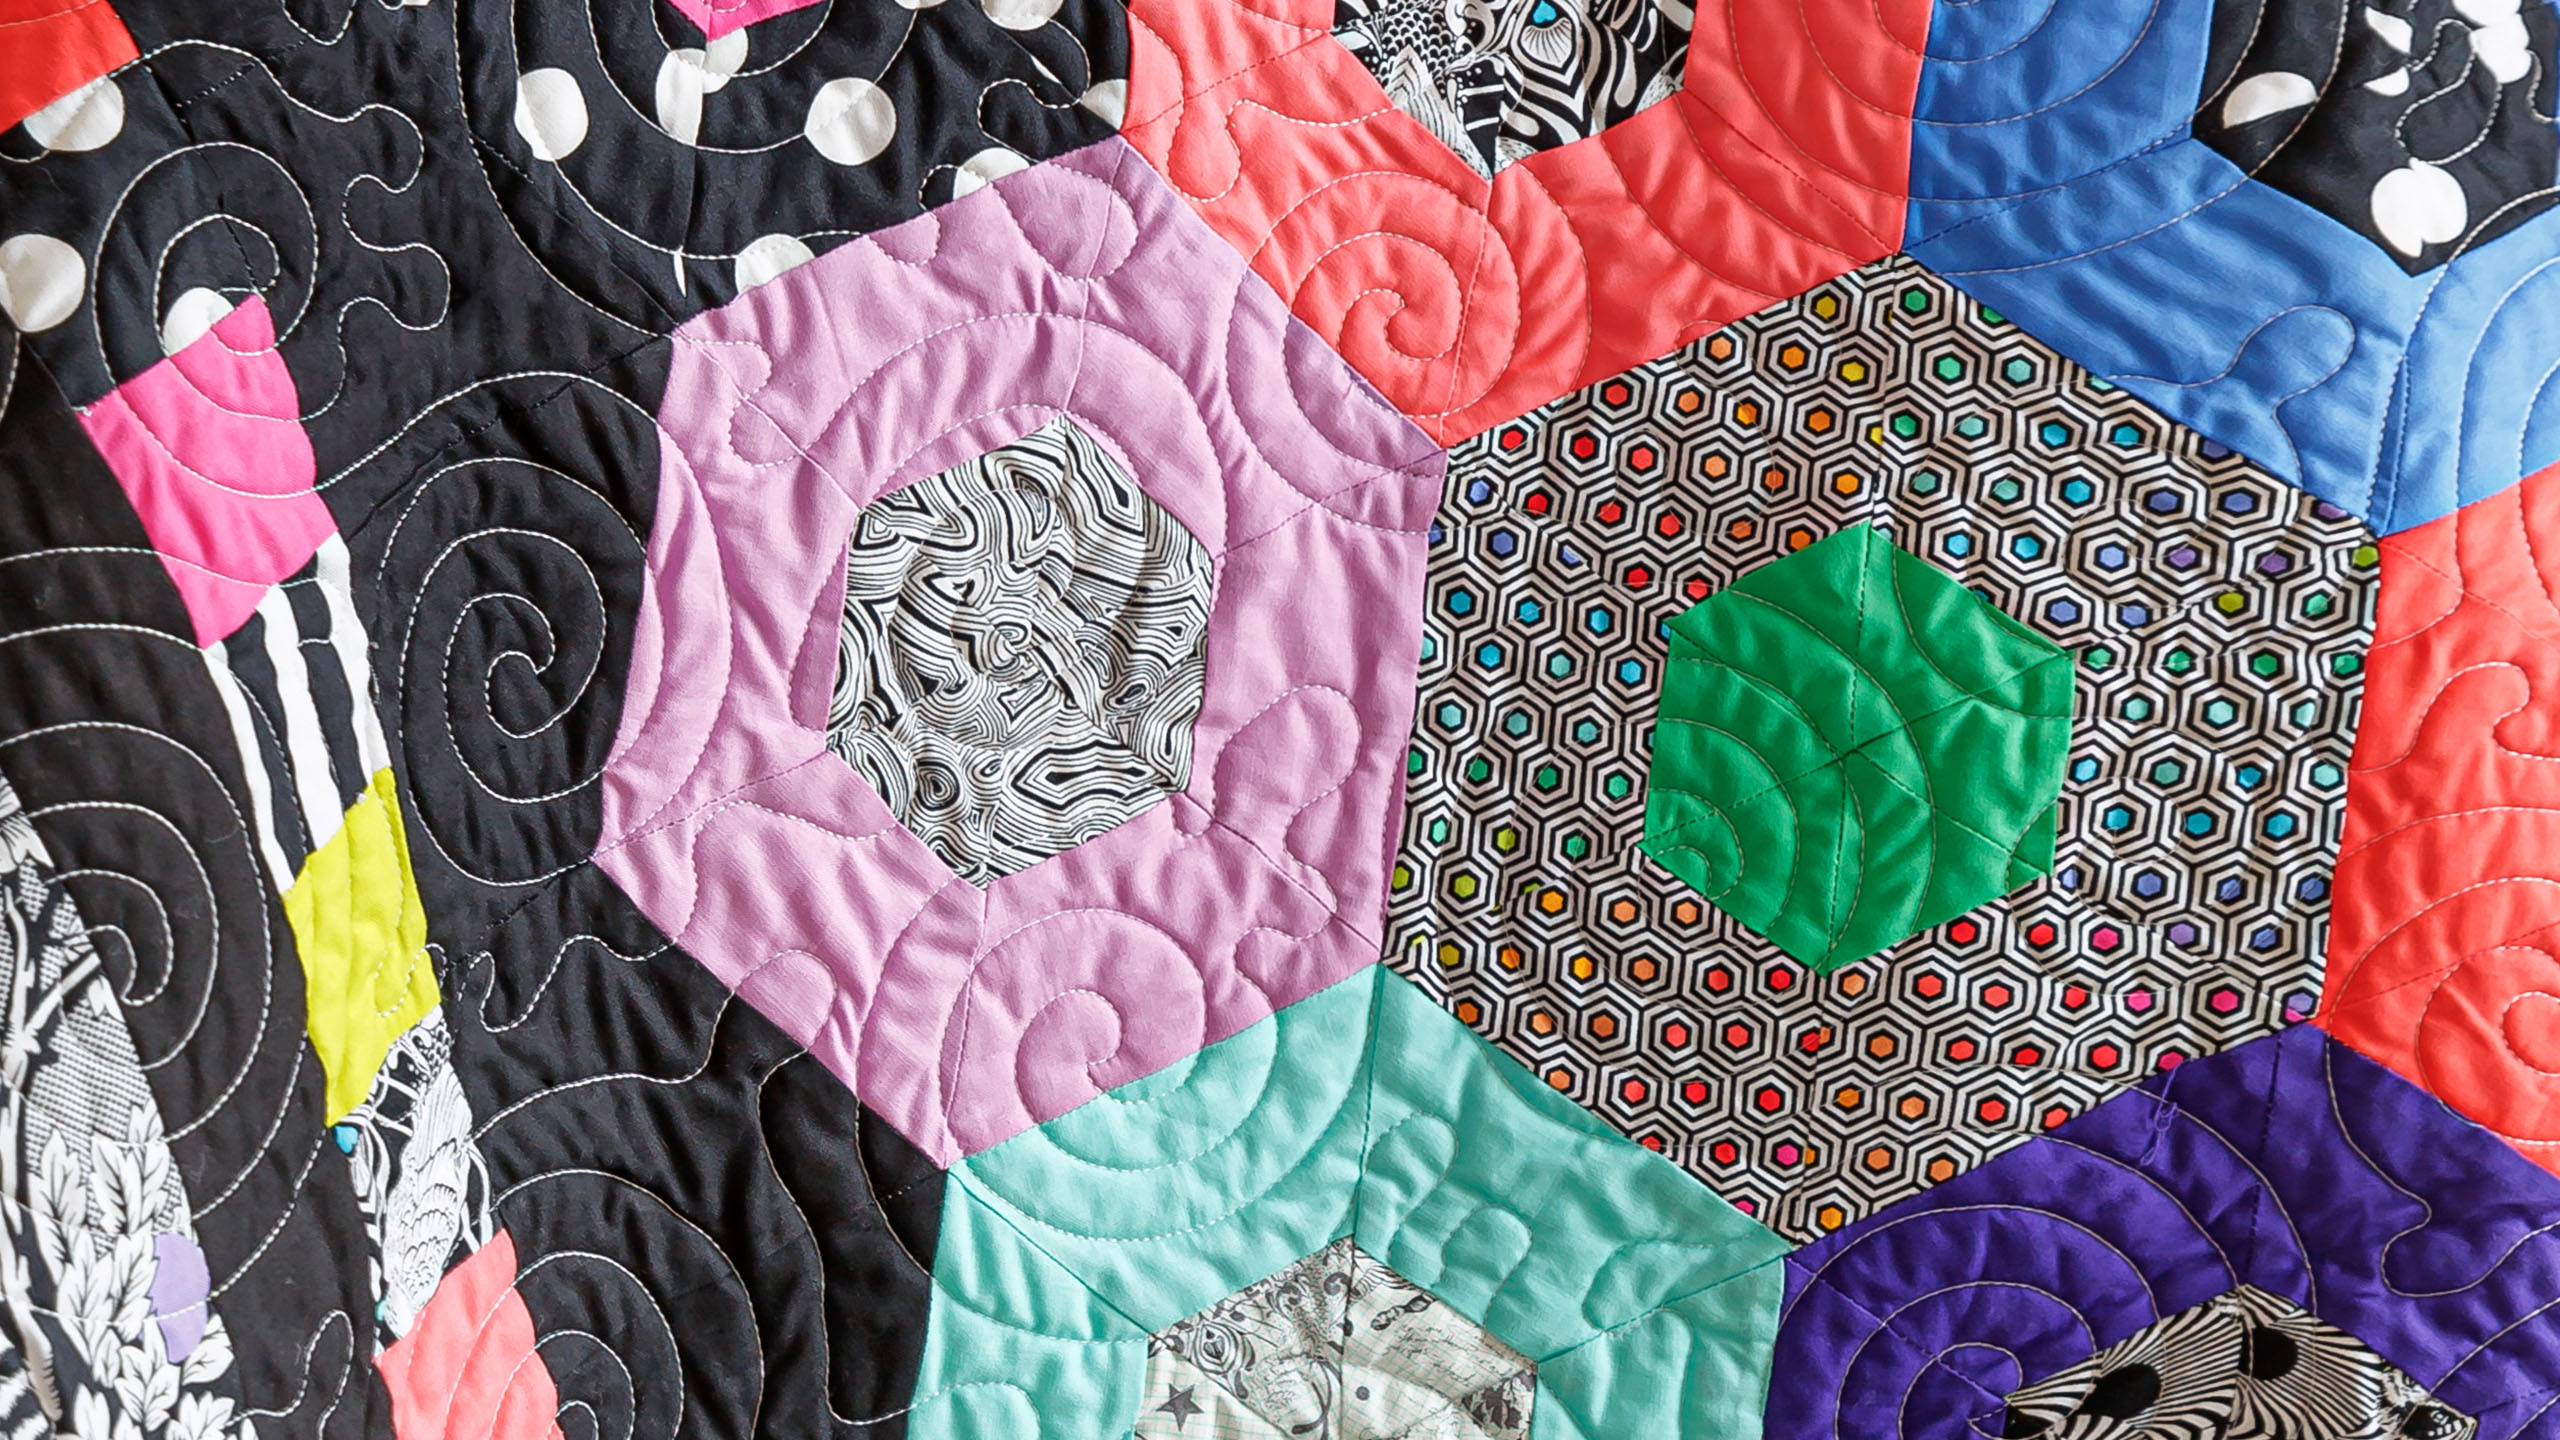
Hi everybody, it’s Jenny from the MSQC. And I am super excited to share today’s tutorial with you. First of all it uses a 60 degree ruler. Now 60°rulers aren’t new to the quilt world. We just make our templates to fit the pre cuts so that’s why we did one. But it’s going to be able to help you make this amazing quilt. Plus we’ve got a whole lot more in store for this ruler. So let’s talk about the quilt behind me. Isn’t this just gorgeous? Now the whole world waits for Tula Pink’s fabric and that’s what this is. This is her Tula, her Line Work Fabric and we combined it with her solid to make these and wait til you see how easy this is because I know it looks like you worked really hard but it’s super, super easy. So to make this quilt you’re going to need one roll of 2 ½ inch strips. And again we have used Line Work by Tula Pink for Free Spirit. And you’re going to need one roll of solids. Now keep in mind that this quilt is gorgeous and you can use any fabric with it so, you know, don’t be afraid to try it out on some other ones. But when I saw these two lines I just had to try them together. You’re also going to need a little bit of background fabric, that’s this black right here. And you’re going to need 1 ¼ yards for that. Now for this outer border out here. This is a nice big six inch border and we used 2 ½, I’m sorry 1 ½ yards for that border. And then the back, look at this backing. It’s all the drawings put together and it’s just a great fabric. And it’s 108 so it’s a nice backing fabric for all kinds of things and you’re going to need 2 ¾ yards for your back. So let me show you how to make this because it’s just really fun and way easier than it looks.
Alright so let’s get to making this quilt. The first thing we’re going to do is we are going to choose a strip and as you see these unroll, are these not fun and gorgeous? Alright I’m going to choose this strip right here just right out of the middle. And I’m going to choose a color to go along with that. And I think that I will choose, let’s go with one of these beautiful blues, teals, aquas. Let’s go, how about this one? Alright so what you’re going to do, now that I’ve made a real mess of these. What we’re going to do is we’re going to take these two right here and we’re going to sew them right together, so wrong sides together and we’re going to sew a quarter of an inch right down the side. And so I’m just going to lay these right on top of each other. And we are just going to the sewing machine and sew a quarter of an inch all the way down. Alright let me get my chair out here.
Alright so line up along the edge of your quarter of an inch line, grab a quarter of an inch foot, use the diagonal seam tape, whatever you want. And we’re just going to sew right along here. And if you keep it lined up you can sew for quite awhile. Now mine is scooting just a little bit so we’ll readjust. And the line I’m focusing on is just that quarter of an inch line right there. And it is pretty important that your quarter of an inch line is pretty straight on this when you’re sewing it. You know if you find yourself weaving it’s not going to be good. Alright so we sew those down. Now we’re going to press them to the dark side which is going to be our Line Work color. So I’m just going to lay this up like this, grab my iron and I’m just going to press this from the top to make sure there’s no folds. You don’t want any folds in this. And you can feel to make sure that our blue piece is folding up toward our darker piece. Oh my gosh this fabric is so fun.
Alright so then you have a long piece like that and let me show you my ironed line is all going to the dark side. And then we’re going to put it up here and we are going to grab our 60° ruler and we are going to use this from the 4 ½ side. This has quarter of an inch measurements on it as well. But it goes from one to eight and it has the, we’re going to go at the 4 ½ line. So I’m going to lay this right along the edge and let me move these out of the way. I’m going to go right along this edge right here and I am lining my 4 ½ up on the bottom edge of my strip. Now the point of your ruler should be very close to the top . And that’s if you get your quarter of an inch right on it should be very close to the top. So I’m going to go ahead and cut this from both sides. And I’m just going to scoot this out of the way like this. And then I’m going to turn my ruler. So I’m still on the 4 ½ always lining up from the bottom of the strip. And I’m going to cut this side to side like this. Now you need six of each of these. See how different these are. On this one the color is on the bottom, this one the color is on the top. And you’re going to need six of each. So we’re just going to keep cutting here.
Ok so now I have six of each and we have this little bit at the beginning of waste. And this part right here is where we’re going to get our border out here from. All these little pieces right here. And so I try to use every bit. You know I do. But let me show you how to put these together. So what we’re going to do with these is we’re going to keep these in two separate piles and we’re going to make half hexis with these. So we’re going to put three of these together like this. And this makes one side like that. And then we’ll sew these three together up here and it will make the other side of the hexagon. So it goes together very easily. When you go to lay these together they match up exactly. You don’t have to lay a quarter of an inch off on each side. You’re just going to line them up exactly. And so we’re going to sew some of these together and show you how easy that happens. And we’re just going to sew a quarter of an inch so let’s line these up.
And what I do is I’ll sew one half first and then I’ll show you how I do it a little bit quicker so just to save a little bit of time. So first we’re going to sew these two. And then we’re going to sew the other piece on here to make three. And you’ll see if you press right then this little point should stick up and you’re still going to use that, you’re still going to line it up exactly and line it up right on there. And if you match up exactly your lines where the color comes together should be just perfect. Alright so this is our half right here. And I’m going to sew another one together so you can see that even better. So we’re going to sew these two right here. And we’re going to line them up exactly and we’re just going to sew a quarter of an inch right down the side. You do want to look to make sure that your colors are lining up but they should match really close.
Alright so now on this part right here, I want to show this where we can get a really good shot of it. When you go ahead and, I’m finger pressing this back, you can see this little point right here is still sticking up off the top. And so that’s, you’re still going to use that to measure, you’re going to line it up exactly so it matches up with this one point and this point, no hang over, it’s just lining up exactly. And then we’re going to sew down that side. Now just like that I have two of these sides done like this. But let me show you, when you get going this is a little trick to do it a little bit quicker. So now we’re sewing the opposite where our color will be to the outside and our line work will be in the middle. And what I’m going to do is I’m just going to take two of these like this. So now I’m just going to sew a quarter of an inch right down the side of these and we’re going to do these two like this. And then I’m going to push two more in and just do the same thing by lining them up exactly and sewing them on. And this is just a little bit of chain piecing. Then we’re going to take these out and we are going to do the same thing, chain piece them right through but then just add that other piece. So again make sure that your little point is sticking up and you can use that as a guide to line up exactly. And we’re going to chain piece them through. And I’m going to look to make sure that my color matches up. There was a tiny bit of variance on that seam so I just wanted to check to make sure that it really lined up. They’re so easy to line up though. I was actually so tickled as to how easy this went together and how quickly it went together. Alright so now we’re just putting the other one through. And just with a little bit of chain piecing we’ve got both of these sides done.
Now let’s press these open and I’ll show you how we lay it out. So I’m just going to press these. I’m not too worried about the direction the seams are going because they’re, you know, they’ve all got to go somewhere and they’re laying down pretty nice. So there’s that one. And you don’t want to sew the whole hexagon together yet. So we’re just going to lay them out like this and I’ll show you how they go together. Alright let me make sure these are, the one thing I don’t like in my seams is I don’t like folds, you know, not too many folds. Like see how this one is kind of folded over right here? I don’t like that so I’ll go back and press that and make it nice and flat.
Alright so now let’s look at our quilt behind us because the easy way to put this quilt together is to put it together in rows. This actually goes together in little rows like this. And the way we’re going to lay it out is I have a couple sewn here but you know it’s going to look real matchy because I just have two sets from two different strips but you’ll have all your different strip sets so it’s going to look really scrappy and fun. Alright so we’re going to take this one and then this one we’re going to turn and put here. And then this one we’re going to turn and put here. And then this one we’re going to turn. We’re going to take one of these. Now you’ll notice on this right here that I have used a solid on the outside and a line work on the outside. A line work on the outside and a solid on the outside. That’s because when you layout this quilt and you have to lay it out on the floor unless you’re like amazing at putting these things together. I had to lay mine out on the floor to see where everything went because the second row has to line up to make the rest of the hexagon which means this one is going to have to go up here and this one is going to have to go down here. And this one is going to have to go up here. And then you’re going to start a whole other one down here. But we’re going to sew these together in rows just like this. Now when you’re ready to sew them together, again they’re going to line up really, really perfectly especially if your little points are ironed to give you that, you know, that little place and they’re just going to go together just like the hexagons went together. So then you can see how these rows go together. You know, they just go together in straight rows but you have to match them so that this guy, this guy, every pot has its lid. It’s got to have the whole block to make it look right.
Then we need to talk about this outside edge out here. Now we did a black framing border. This top one is a 2 ½ but along these sides we had this angle. And so what we did was we took a black strip that is 4 ¼ and because when you get your hexagons sewn together you have that seam in there it’s going to measure out to 4 ¼ or close. And so what we’re going to do is we’re going to take this right here. And I’m going to trim off these edges right here the selvedge edge. And then I’m going to cut a 7 ½ inch rectangle. And the reason we’re doing that is because it’s just, it just wastes less fabric . So we’re going to do that. I have this right here folded in half so I have two. What I’m going to do is I’m going to come over here to this edge. And because we cut it at 4 ¼ we have to line it up on the 4 ¼ line. Now there are these little tiny lines here that are in between the four inch line and our 4 ½ inch line and that’s the 4 ¼. Your point should be right at the top. And this edge over here should be right at the edge of your block. And so what we’re going to do is we’re just going to cut this one side and then these should be the same size. And they are. They just lay perfectly. And because we’re using black you can use either side so it doesn't matter which way you do it. But when you are ready to do the end of your row on this you’re going to have one block that ends this way and then, let me find the top of this guy. And then the next one right here when you sew these rows together this one will go the opposite direction. So it’s going to go like this. And you will sew a black square to the end of all your rows before you sew your rows together so that it gives you this awesome, you know, border that goes in, out, in, out, in, out which I love that look.
Now let me talk about this right here. First of all when you get done cutting your strips you have a piece about this big leftover. And I actually did some playing with this so the first thing I did was I took the straight end right here and made sure my selvedges were cut off. And I cut a couple of 2 ½ inch strips like this. And I did have some leftover of this. But I cut a couple and I still had this piece which was big enough to take my 60°and cut another one out of this. So I cut another one out of this like this, just because I could. And you can actually probably get, no you can’t quite get a 2 ½ out of that one. But I had all these pieces now that were random and leftover and so I put together these fun, I mean they just kind of look, they’re so happy. Look at these little blocks I did off the extra. And so don’t be afraid to scrap them up if you want to. You know, change them up. I kept mine together for the look of the quilt. But I’ll tell you I have some fun things in mind. And this was only six pieces off of all my strip sets so you know there’s a lot of these to be had out there. I mean I have quite a stack of these left over that I can still get, you know, one of those orphan wedges, if you will. And so it’s just something else fun to play with. Maybe you can make a little pillow, a little table runner something like that with your leftovers. I always love to show you what to do with the leftovers.
But on these right here, what I did was I cut all of these and then I started sewing them together in twos and I made long strips. So let’s take a look at the quilt one more time. We’re sewing these together in rows. You have to lay them out to make sure that you have tops and bottoms. Actually our layout was kind of interesting because we actually kind of concentrated on making some flowers. So you can see right here, see we have all solids around this one print in the middle. And you can see that in several other places, you know, that we’ve done some half ones up here and that sort of thing. And that’s kind of how we did our layout. This first framing border out here, I love how it goes in and out. We added our second 2 ½ inch border just by sewing those pieces together. I made a really long chain put them on the sides, put them on the top and bottoms and then added another 2 ½ inch border to frame again and our big six inch border. Our quilting pattern on here is called Sticky Buns and anytime that I use anything that is angular I like to have a pattern that has a bit of a curve to it. And this makes a great size quilt. So it’s 77 by 87. And so it’s a great size and you get a new tool and a bunch of new ideas. And we hope you enjoyed this tutorial on Seeing Spots from the MSQC.
We hope you enjoyed watching this video. If you’re not already part of the Missouri Star quilt family you can hit the subscribe button below so you won’t miss a thing. And if you click that bell it will notify you every time a new tutorial comes out. See you next Friday.
& Progress on Social