


Serendipity Infinity Quilt Tutorial
Jenny Doan
Serendipity Infinity Quilt Tutorial
- 1 Roll x 2½" Print Strips
- 3¾ yds. x Background Fabric
- 1¾ yds. x Border A Fabric
- 1¼ yds. x Border B Fabric
- ¾ yd. x Quilt Binding Fabric or 2¼ yds. For Quilt & All Table Runners Binding
- 3¾ yds. x Quilt Backing
- ¾ yd. x Each Table Runner Backing
Featured products Get the Supplies Featured in this Tutorial


Finish your masterpiece and let us give it the finishing touch it deserves.
Subscribe to MSQC on YouTube
Hundreds of FREE tutorials and a new one from Jenny launches every Friday.
video transcript
Jenny: Hi everybody, it’s Jenny from the Missouri Star Quilt Company. And today I’m joined by Natalie, my daughter Natalie. And we have a really fun project for you. So years ago, do you remember how many?
Natalie: Probably ten at least.
Jenny: Many years ago we made a quilt called Serendipity and we’re going to show you the original ones right here. We decided to do a remake of it because it’s really a fun quilt.
Natalie: Well it’s been a really long time and our video skills have improved a bit since then.
Jenny: They have improved a bit. So this is actually the original quilt. And these are the little blocks but we’ve put color in the corners here. And you can see on this one we put white so it enables you to see the block more clearly. But what’s cool about it is that when you put those sides on and cut those pieces off, you get a whole other quilt. So this was the secondary quilt that we made right here. And so we called it Serendipity because you could get two quilts for one work.
Natalie: One block
Jenny: One block and so then we remade it for Block. Let’s show you this one right here
Natalie: So many versions.
Jenny: We have so much to show you today. And so here’s the one that we did for Block. Hold that up.
Natalie: It’s still very cool.
Jenny: Ya and this is, it’s interesting because in our original quilt we did Christmas fabric and then we have Christmas fabric that came up to do it on this one. But it’s fun to see it in these bright colors as well.
Natalie: Ya this is a Stonehenge fabric line.
Jenny: And then here is another, here is the secondary block. So not only do you learn how to make a quilt today but you get a little trunk show as well. Isn’t that fun?
Natalie: Yep, so many fun things.
Jenny: And this is the same block just not separated by a sashing. And so we want to show you how to do this.
Jenny: So to make the Serendipity quilt you’re going to need one roll of 2 ½ inch strips. And we have used Farmhouse Christmas by Echo Park Paper Company for Riley Blake. You’re going to need 3 ¾ yards of background fabric. For your outer border you’ll need 1 ¾ yards. And for your backing you’ll need 3 ¾ yards of fabric. And so what we did, this is a jelly roll quilt. It’s made with 2 ½ inch strips. And what we did was we sewed those together in strip sets like this. And however tall they are, that’s how wide you want to cut them. If you sew your seams perfectly it will come out to 6 ½ and so ours are pretty close I think. Yes they are. And so then what we’re going to do is we’re going to cut those whole strip sets into 6 ½ inch blocks. So here’s five, six and a half like this. Make sure you’re lined up. And so you’re going to cut all your strip sets into these 6 ½ inch squares. You’ll make 14 strip sets and once you have all of those strip sets cut up then we can start making the blocks. So what we’re going to do is we’re going to take this block. Natalie, will you press that a little bit for me?
Natalie: Sure.
Jenny: And then we are going to snowball the two corners. It’s a 6 ½ inch block, we’re going to snowball with five inch squares. So that’s a lot of, that’s going to take a lot of the quilt out, a lot of the block out. So what we’re going to do right here is we have ironed these so that we have a sew line. And then we are also going to come over here and sew about a half an inch away from there and cut in between those.
Natalie: I will say that at this point it’s important to remember that all of your strip sets get done the same way.
Jenny: They do.
Natalie: So as you’re going along, you know, make sure that your strip sets are all horizontal and that you’re not putting the snowballs the opposite direction because then you won’t end up with the same types of secondary blocks.
Jenny: Good point. That’s a whole new quilt.
Natalie: It makes a difference with the secondary blocks, ya.
Jenny: Awesome. Alright, so I’m just going to sew on this line and line up my corner in the corner of my block and sew straight across. And then I’m going to flip it around and I’m just going to go about a half an inch away.
Natalie: And really it just has to be far enough that you can cut down the middle without getting too close to either of your seams, right?
Jenny: Ya and so we’re going to do it to each side of the block, opposite sides. And then go down the other side about a half an inch. Alright. So then your block is going to look like this. And this you can see, is this block here, that’s what this block is. Alright, so I’m going to trim these off and then Natalie I’ll have you press it back.
Natalie: Ok.
Jenny: You can press this one while I’m trimming the others. So you’re going to get, for every one of these blocks, you’re going to get two corner blocks that you trim off. And you can see I’m putting my ruler right in the middle of those lines. And you can press this one and this one.
Natalie: Ok.
Jenny: Now these smaller blocks are going to get squared to 4 ¼. And so I’m just going to use the bloc loc ruler here and come in 4 ¼ like this. And here’s your ¼ line right here. Here let me scoot this up and make sure you can see it.
Natalie: Honestly, I think if you’re quilting at home and your blocks are all smaller than 4 ¼ you can make them four inches, because it’s a secondary block and you really just want them all to be the same size.
Jenny: Ya, now my seams are pretty small. I think I could actually square mine to 4 ½ .
Natalie: You think you can get 4 ½ out of it.
Jenny: Maybe, I don’t know.
Natalie: Probably not on all of them.
Jenny: But as long as your blocks are the same size, that’s what you’re going for so whatever you want to do.
Natalie: Yep, you just want them to go together easily
Jenny: Now is this the other one?
Natalie: Yep.
Jenny: Now because we’re cutting our blocks off of two sides of the block we get one that has the green and one that has the black so these two blacks
Natalie: And they all have this cute little white corner.
Jenny: These two blocks are both from the same block but they’re just a little bit different. Alright I’m going to have to trim this one.
Natalie: It’s hard to talk and think while you’re trying to square.
Jenny: I know. It really is for me.
Natalie: Only focus on one thing.
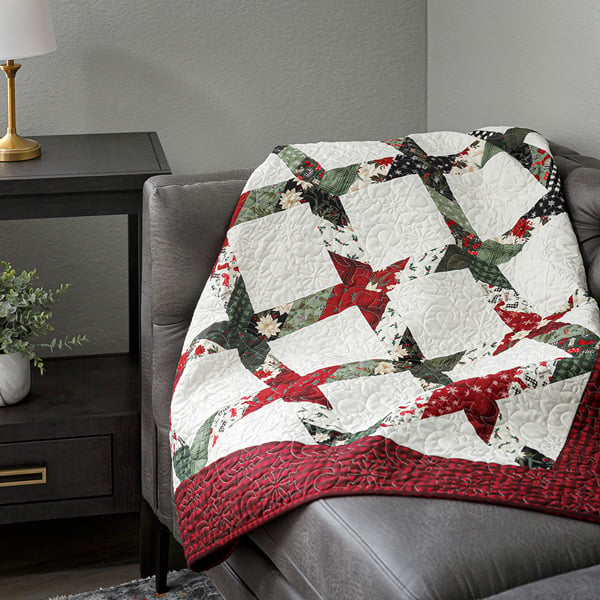
Jenny: Truly it is for me. Alright, so now 4 ¼ there we go. And then we’ll just trim this off. And trim that off right there. Alright, look that’s not too bad for waste. Alright so you’re going to stack these up. And the first thing we’re going to do is we’re going to talk about this big quilt now. And we put these together in an X pattern. And so I have three other blocks made here. And you can put them this way so that all your darks come to the center. And it almost makes a little star look to the center. You could do it so your green comes to the center like this. Or you can make all your blocks and just totally scrap them up which is what we did. So we made all the blocks and we just put them together in twos. You know, we put the reds to the center, blacks to the center, reds to the center. Just, you know, however it struck our fancy.And we mixed all of our blocks up and did that. And you can see here, if we do this, I mean it’s just going to work fine. The pattern is still going to be there. See what’s happening here. So if they’re all scrappy, the pattern is still there. It just gives it a lot of variety and a lot of fun. So for this big quilt here we have one, two, three, four, five, six, seven, eight by one, two, three, four, five, six, seven, eight, nine, ten. So eight by ten, 80 of these blocks and it makes this quilt. And this quilt works out to be 58 by 70 so it’s a great size quilt. We have a little four inch border out here. You can see especially on the border, we quilted it with the pattern called Snow Winds and let’s look at the back.
Natalie: It’s a really pretty snowflake pattern.
Jenny: It’s beautiful. It’s got a snowflake and some swirls. And this back with this poinsettia, this is just so pretty.
Natalie: This is a really beautiful Christmas line. I love the buffalo check and the greens are kind of sage. It’s just really pretty.
Jenny: Yes, it truly is. Alright, so now let’s talk for a minute about our other blocks. So these are our other blocks right here.
Natalie: This is where the fun begins.
Jenny: And so you can make a whole quilt with these but what I want you to notice right off the bat is that these are half square triangles so when you think about all the things that we’ve done with half square triangles you can do those things with these little squares. And so let’s just walk them through some of the things that we can do with half square triangles.
Natalie: Well first I want to point out that they’re going to be different. So some of them are going to have the print down here with the little triangle in the corner and then others are going to be going the opposite direction. So see how this one, you can’t make it, the print is up in the top corner instead of the bottom corner. So you kind of, so if you’re worried about, you know, positioning those things you’re going to want to make two piles so that you know that all of these are this way and all of those are that way.
Jenny: Yep. So see when you put this together, these are two half square triangles, if we put this together like this, you know, you can actually do something like this where it makes a diamond.
Natalie: But then you have, see how these two match and these two don’t?
Jenny: So you make two piles
Natalie: So you kind of have to pay attention to which ones are going which way and see what you like
Jenny: Unless you don’t care.
Natalie: We’re about ready to show you a bunch of really cool things you can do.
Jenny: I do want to show them some blocks first just so that they can see how they happened, you know. So if we turned these in like this then this is going to make, this will make a little pinwheel. I think I have one more. Oh I can’t do it with this little bunch because I need one more.
Natalie: Well
Jenny: That will go the same. Ya, so this one right here. So if we did this maybe.
Natalie: You have to have your two opposites.
Jenny: So these are the two opposites, so now we have that little white pinwheel in the center if you want to make a pinwheel. So it’s a double pinwheel actually with the fabric.
Natalie: It’s really fun.
Jenny: If we turn these in this way that we have the dark part and our little small pinwheels are out in the corner, it can go this way.
Natalie: Yep.
Jenny: We can put them together so that we make chevron blocks. So we would do, wait for it. There we go. This one and this one. So now we’ve made a chevron block. What else have we got for them? We’ve got all kinds of things.
Natalie: Well that diamond you had going before was really cool.
Jenny: The diamond is cool.
Natalie: Or you can do little diamonds like this.
Jenny: Ya you can do herringbones. Let’s see. I’m so angley challenged. Like that.
Natalie: Yep, just like little diamonds.
Jenny: So what we decided to do is we decided instead of making a secondary quilt which you totally can make a secondary quilt. There’s plenty of blocks here to make a great size quilt. You saw the two quilts we showed you. But we actually made
Natalie: A bunch of table runners.
Jenny: A bunch of table runners. How many do you think? Nine? Ten?
Natalie: Ya I think there’s about nine different versions
Jenny: I don’t know, let’s look and see what we did. We’ll talk about them
Natalie: We’ll start, let’s see. Oh here’s the little diamond one.
Jenny: This is little diamonds, herringbones kind of one.
Natalie: I thought this was cute because we put the little things together like a bow tie.
Jenny: It looks like a bow tie. So how cute is that?
Natalie: Super cute. And on these table runners we did anywhere from a 2 ½ to a three inch border. It just depended on what we wanted. So you can, you know, do whatever makes you happy. No specific rules on any of this.
Jenny: And you don’t even need a border if you don’t want a border.
Natalie: Nope. I don’t know if we have one of those or not
Jenny: Next.
Natalie: Here is a pinwheel.That has the little white squares on the outer edges. So it kind of looks like it’s got the spinning effect.
Jenny: So it’s got the darker piece in the center
Natalie: Super cute.
Jenny: Really cute. And this is just one, two, three, four, five blocks.
Natalie: This one is one of my favorites. It’s a cute little chevron. I think the little flowers kind of look like eyes
Jenny: Oh it looks like a little fox
Natalie: So it looks like a fox face.
Jenny: Look how cute that is.
Natalie: I thought it was adorable. I couldn’t resist.
Jenny: A little fox block. Ya it’s fun when fabric comes together like this. Alright, oh this is the diamonds.
Natalie: This one is diamonds and I think it’s really cute.
Jenny: Look how cute that is. And think, you could, if you needed a longer table runner, you could just keep on going.
Natalie: This is, I think one of those really great serendipitous projects where you were like, I want to make a cute Christmas quilt for my couch and it turns out all my friends and loved ones are getting table runners for Christmas.
Jenny: That’s right. That is right. Alright, so this one is, let’s see.
Natalie: Another, oh it’s a cute bunch of trees. The chevron tree with the triangles.
Jenny: We had so much fun with these.
Natalie: That’s a great wall hanging. It would cute to just pin your Christmas cards to it as they come in
Jenny: Oh absolutely. Or you could do a tree going this way and a tree going that way and a blank place in the middle just to put your candle or whatever.
Natalie: Ya you could put the trunks together in the middle and have them pointing out. Either way.
Jenny: It’s so cute.
Natalie: So many fun ideas. Ope, here’s another triangle quilt. And this one is, or diamond, sorry. And this one is different because we put the points on the outside so there’s not that little bowtie effect in the middle. It’s just made using the blocks that go the opposite direction.
Jenny: Right. So one of each. And then?
Natalie: And then we’ve got these pinwheels. And there’s a few different versions of the pinwheel because they’re all opposites. So one pinwheel will have all the color on one side and then the next runner will, it will look the same but if you look closely you’ll know that the color is on the opposite side.
Jenny: Absolutely. So we just wanted to show the difference with the color variations.
Natalie: That one has the large strip in the middle and the little points on the outside.
Jenny: Oh ya and this one also has a sashing. You know, a little sashing.
Natalie: Yep. Some of them we sashed. Some of them we didn’t. This one has the small points to the middle with sashing. And it is going the opposite directions. So if you look at them side by side, see these pinwheels have the print on the top and these ones have the print on the bottom.
Jenny: And also these ones go this way and this one, it’s the opposite way so it comes fat this way.
Natalie: Yep. Exactly.
Jenny: Probably didn’t make any sense to you but it made sense to me.
Natalie: You’ll be able to see it when you’ve got your own blocks out and you’re working on things. It’s pretty interesting. And then one more pinwheel. Cute little guys in the middle. And we just matched up some fun colors and added some cute sashing.
Jenny: Ya a little bit of sashing in there.
Natalie: And then also we had a couple of little blocks leftover
Jenny: From the main quilt
Natalie: From the main quilt and I thought we could make a cute little throw pillow or a table topper.
Jenny: Because, why not?
Natalie: Why not? Just keep right on going.
Jenny: But wait. There’s more.
Natalie: There’s four blocks left over. We can still do something with them.
Jenny: We can still do something else with them. So it was really fun. It was fun to do this remake. Fun to see, you know, I love the idea of all the runners because sometimes, you know, we need runners versus a quilt.
Natalie: Well hey Christmas is covered.
Jenny: Christmas is coming. If any of you have, you know,
Natalie: Wrap them up. Throw a loaf of bread in there if you want, for me
Jenny: A little candle to sit on it. Whatever you want to do. It makes a fun project. And you get your two blocks from the one main block and the two pieces off the sides. Just a quick and easy, fun tutorial.
Natalie: Ya we just wanted to create some inspiration
Jenny: Absolutely. So we hope you enjoyed this Serendipity tutorial with Natalie and me from the Missouri Star Quilt Company.
Jenny: Hi everybody, it’s Jenny from the Missouri Star Quilt Company. We hope you enjoyed watching this video. If you aren’t already part of the Missouri Star Quilt Company family be sure to subscribe so you won’t miss a thing. And if you click that bell it will notify you every time a new tutorial comes out. See you next Friday.
& Progress on Social