


Stargazer Quilt Tutorial
Jenny Doan
Stargazer Quilt Tutorial
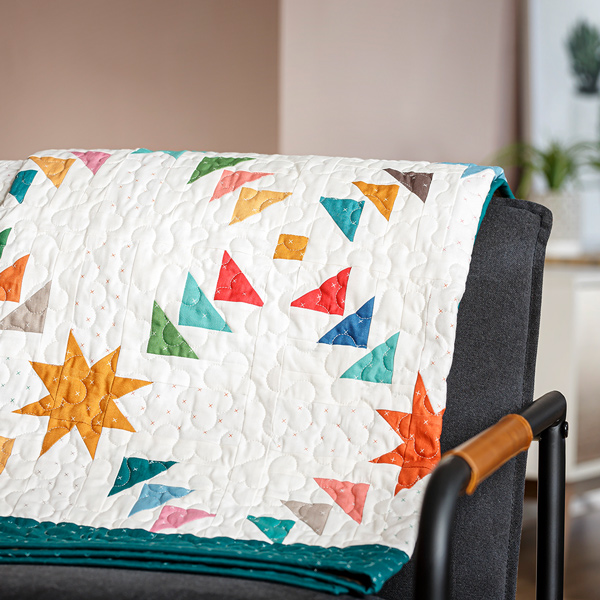
Jenny Doan demonstrates how to make a dazzling Stargazer quilt using 2.5 inch strips of precut fabric. For this jelly roll pattern, Jenny used Bee Cross Stitch Rolie Polie by Lori Holt for Riley Blake. This pretty block comes together like a log cabin with snowballed corners. It's quick, easy, and so fun to make!
- 1 Roll x 2½" Print Strips
- ¼ yd. x Light Print Fabric
- 1 Roll x 1½" Background Strips
- 1¼ yds. x Background Fabric
- ¾ yd. x Border Fabric
- ¾ yd. x Binding Fabric
- 3¾ yds. x Backing Fabric
Featured products Get the Supplies Featured in this Tutorial


Finish your masterpiece and let us give it the finishing touch it deserves.
Subscribe to MSQC on YouTube
Hundreds of FREE tutorials and a new one from Jenny launches every Friday.
video transcript
Hi everybody, it’s Jenny from the Missouri Star Quilt Company. And I’ve got a great project for you today. This is called Stargazer. And let’s take a look at this quilt. I just think it’s beautiful. I think you’re going to be super tickled at how it all goes together because it’s much easier than it seems. So to make this quilt you’re going to need one roll of 2 ½ inch strips and we have used Bee Cross Stitch by Lori Holt for Riley Blake. There’s some light strips in here that we used for the sashing but you’re going to need an additional quarter of a yard to be able to make all of those. For your background fabric you’re going to need one roll of 1 ½ inch strips and some yardage, a half yard and it should match and be the same color. For your border you’re going to need one yard of border fabric and that’s a little four inch border. And for your backing you’re going to need 3 ¾ yards of backing for your quilt.
So this quilt measures 58 by 71. It’s a great size quilt. We’ve used the Cotton Candy quilting pattern on here. You can see our little four inch border and this is our backing right here. It just looks darling. And this quilt was inspired by some antique blocks so let me show you those. So the inspiration for this quilt came from these old quilt blocks that I found years ago in an antique store and I just think they’re just gorgeous. They’re beautiful. Of course they are done the hard way but the workmanship is really fun. I love to see these kind of scrappy blocks because you know they used every piece that they had. They’re all different sizes. You know, everything is different on each block. This one has a cool little star in the middle. You know, I just love how they just weren’t afraid to just go for it and do it. So this is the block that we’re talking about. And I know this is going to surprise you a little bit because when you look at the quilt your eye is drawn to this block. You see this square right here. And you think of this as a sashing when in reality this is the block. This is how it fits in the quilt right here, look at this. See how that is. So this is a great 12 ½ inch block and I love how it worked out. And mine is much easier. Of course it’s a little bigger pieces as well. But I’m going to show you how to make it.
So from your background you’re going to want to cut some 2 ½ inch strips and you’re going to sub cut those into 2 ½ inch squares. Now when I do this I do a lot of chain piecing because it’s the same thing all over again and again. And so I’m going to make a few of these, take a few of these and set them out here. Ok so let me show you how to make this block. The first thing we’re going to do is we are going to select 22 of our strips from our roll. And we’re going to cut all of those into 2 ½ inch squares. Now I have three here. They’re stacked up. That gives me six layers of fabric. As long as you have a nice sharp rotary blade you can do that. And I’m just going to cut off my selvedge edge right here. And I’m going to go ahead and cut 2 ½ inch squares from this. Give me some to work with right here. You’re going to do this to all of your 22 strips. Alright, I’ve got enough to work with. And then what we’re going to do is we’re going to go to our background fabric and we’re also going to cut a 2 ½ inch strip off of that and cut them into 2 ½ inch squares.
Now each of these needs a square to match with it. And this is the beginning of our block. And this block is built a little bit like the log cabin block which I think is really fun. So I’m going to grab, I have another pile over here of more cut squares. And so I’m going to grab some of those as well. And the first thing to start your block, what we’re going to do is we are going to sew, put these right sides together and we’re going to sew corner to corner right on the line. So if you want to iron a line and when I say iron a line, this is what I mean. You’re going to fold it back like this with the wrong sides together. And you’re going to make a line like this. And you’re going to sew right on that line. If you fold it the other way it will make, it will be a hump up and it’s easier to draw in the valley than on top of the mountain. If you want to draw a line you’re going to take and you’re going to put your ruler corner to corner like this and draw the line and sew right on that line. I am actually going to use my diagonal seam tape on here but any of those methods will work, whatever you’re most comfortable with. So line these up exactly. And we’re going to sew four of them because it takes four to make a block. We’re working on four quadrants here. And so what I’m going to do is I’m going to sew right down the middle here on this line, add another. This is what we call chain piecing. And I’m going to add another right here, line it up exactly. And then sew. It doesn’t matter if your white fabric is up or your background fabric is up because it’s going to be the same either way. And then this one. Make sure these are lined up nice on here, just like that.
Alright so now what we’re going to do is we are going to go ahead and cut these apart. And cut off one side of our block like this. So you can do this with your rotary cutter or your scissors. But we’re going to press them open, we’re going to press to the dark side. Just like that. Alright now see right here, see how I cut in? It doesn’t matter if it’s perfectly straight. It’s going to be inside your quilt. It’s not going to matter that it’s not exact because as long as I don’t cut into my stitches I’m good to go. So don’t stress over that. Alright one more here. Open this up, press to the dark side. Alright now what we’re going to do is we’re going to take our little 1 ½ inch strip and we are going to sew on two sides of this. So let’s go ahead and put these over here in a pile. We’re going to take these. So what I mean by two sides is I’m going to take my strip and open it up and I’m going to put all my squares on here like this and just sew down the side, add another square, add another square. And we’re going to do one side to all four of these. Alright so let’s do that. And then we’re going to add another one, making sure that your color is going on the long side of the strip. And I’m making sure mine nest together. Now if I was making this quilt, which I did, I would fill this whole strip with corners, you know, and I would get a lot of them on here.
Alright, so now what I’m going to do is I’m going to clip these off. And honestly if you want to pre cut your little strips into pieces, you can. This cut is obviously going to be 2 ½. And then you have little pieces you can sew on. But I like the chain piecing. So let’s go ahead and press these open. And also make a little nest for yourself at your sewing desk. Make a pressing area that’s close because there’s a lot of pressing in this one. It’s sew, cut, press, sew, cut, press. Alright now we’re going to add this one to the other side. So let me actually show you this before I sit down and get in here. So we’re going to put this one on here like this, so again our color is along the edge. We’re always bordering the color part of our little square. So we’re going to do this like this. And we’re going to sew right down the side. I’m gonna snug that one up. And if they get a tad bit wonky don’t worry about it because we are going to square them up at the end. Alright. So now we’re going to clip these off. Alright. We’re going to press those back. We always just roll them back.
And now what we’re going to do is we’re going to take another square, another color and we’re going to put it right here. And we are going to again, sew diagonally corner to corner. And so we’re going to do that on all four of our blocks as well. Now for the sake of time I would do this normally to all four of these but I’m going to finish one block so I can show you how it’s supposed to look. But you’ll need four for your finished block. So what I’m going to do here now, I’ve sewn this on corner to corner, right here diagonally, I’m going to trim off this piece right here. We’re going to press it back. And we’re going to add our two sides again. So again we’re going to border this side and we’re going to border this side. And we’ll go three rounds on this. So now we’re going to sew right down the side. And I’m going to clip that off like this. And then I’m just going to finger press this back. This is what happens is I get into something, you know, I no longer get up to iron because it’s like, oh my gosh I’ve got to do this. Oh I’ve got to add one more side. So right here, see how it only has one side on it, we need to add both sides. And then again we’re going to snowball that top corner. Alright now I’m going to get up and iron like a good girl. There we go. I’m going to press this open. We’re going to add another square right here. Let’s add an orange one, or kind of gold I guess. We’re going to sew corner to corner and then put two more rounds around it. Alright so we’re trimming this off and we’re pressing it back. And then we’re going to add, we’re going to corner this side and this side. And this is our last round for this block. So you’re going to snowball it three times with three borders. And then we’re going to finger press that back and then put a piece on this side over here. Alright, so then I’m going to press this back now. And I’m going to trim off this little edge right here.
Now because my sewing isn’t perfect, I’m not a perfect sewer, I like to square my blocks up right here and these blocks are going to square to 5 ½. And so what I do is I barely, barely trim these little edges because I don’t want to lose my point but I want these edges to be straight. And when you’re scissor cutting like I am you can get off a little bit and it’s going to matter in the end. So one this side again I’m going to line this up now that I know this side straight, I’m going to line up this little corner right here and I’m just going to straighten it out. So I’m setting my ruler straight across here and then I’m coming this way. So now I know these two sides of my block are in good shape so what I’m going to do is I’m going to set it here in the corner and I’m going to come in and I’m going to trim it at 5 ½. So my ruler is five and I’m going to go over to the half right here. And just trim this. And see it’s very little. But it squares it up. And then I’m going to trim this side as well. So here’s my five and my half. And see this side is a little bit more wonky out here. I don’t really know why it does that but it’s the squaring that then makes it a perfect block. So you are going to need four of these for your block. And I have some made over here. That’s why I had the liberty of stopping making all those other four that I was working on. And here they are right here. Let’s get all the little threads off of them, press them out. Alright so these are going to go together like this. Let me scoot this out of here. And one more. And this is where your sashing is going to come, your star sashing.
So here’s how we make that. You’re going to choose five squares that are the same size, I mean that are the same color. And so I’ve got, let’s see what I’ve got here, make sure I have five of something. One, two, three, one, two, three, four, five, purple wins. Alright, so these are going to be our star for the middle. And it’s a wonky star. So what we’re going to do is we’re using our light strips from our roll. And because there’s only a few of these in the roll, that’s why you needed that extra quarter of a yard of fabric because I just thought it was fun to use the strips that were in the roll. So these sashings are all going to be cut at 5 ½ because we squared our blocks to 5 ½ . So we cut these at 5 ½. We’ve got this strip folded in half and folded. I’m going to cut off the fold and the selvedge at the same time. And come right here. And then I’m going to cut this at 5 ½ and that will give me four pieces for my block. You will need four of these to finish your block. Alright so here’s our one, two, three, four. Every piece gets star legs. And so we’re going to take four of our squares right here, we have four of these and then one square for the middle. Here’s our middle square. Now we’re going to make the wonky legs star for this. And so how we do that, each of our sashing pieces, we’re going to take our 2 ½ inch strip. We’re going to put it at the top. We’re just going to make sure that this corner of the square is over the half. I can see, my half is going to be right here. So you just want it to go beyond that and we’re going to sew down this side. And we’re going to do this to all four strips.
So I’ll take my blocks and my strips over here and we’re just going to sew down the side like this. Then I’m going to add another strip and another block, making sure that the peak of my block is past the center. And they can land anywhere on the side. Those legs can land high or low, wherever you’d like them on the side. I mean you’re not going to get a ton of play because it’s only a 2 ½ inch block but still it’s fun to just have the freedom to make it however you want. Alright so now what we’re going to do is we’re going to clip these apart just like this. And we’re going to press these back, one more here. And then our last guy. You want to make sure that your piece underneath stays nice and flat because that’s going to become your pattern. Alright so now you can see right here, we have this piece right here. And what I’m going to do is I’m going to take my ruler and lay it right along the side and cut it straight off just like this. And then I’m going to cut this little wedge off the top. And then I’m going to take this other piece here and put it here so it crosses over the middle. You know, because it’s on the diagonal now it’s going to give you a chance for an even longer leg. And so we’re going to do that to all four of these. And I’m just going to trim this then straight up the side. That’s my new leg. And that off the top. And then one more here. Now again, for those of you who might have missed it, what I’m going to do is I’m taking this piece I cut off, this triangle and I’m going to lay it right sides together on here, making sure that I cross over this middle section right here. And then I can make this leg as long or as short as I want it. And so it’s just going to go just like that. And I’m going to sew these on. We’ll make this guy a little shorter. Because I’m a rote sewer mine tend to come out almost identical like I had a pattern for them. I don’t know why I do that but that’s just how my brain works. Alright so now I’m going to clip these apart like this and press them back. Now if by some chance, some fluke, your corner piece doesn’t cover the edge of your fabric and it won’t fit into the quarter inch seam you’ll need to take that off and just move it over a little bit. That has not actually ever happened to me so mine seem to work out pretty good. And so then what we have is we have this little piece we need to trim here. You’re using your background piece for your pattern.And we’re just going to trim this right here like this. And then trim this across the top like this. And now you have this awesome little wonky star leg. So we’re going to do that to all four. Trim and trim. I love this little ruler for this. This is just a, it’s so handy to not have something big and cumbersome. Then we are ready to build our sashing.
Alright so we have four of these and we have our center square. So two of these are going to go on either side of our center square that’s the same color. And that’s going to make our center sashing. So we’ll put that together so it’s ready to go. So line up your edges and just sew a quarter of an inch and then we’ll do the same thing on the other side. Alright. So now we’re just going to press this open. And it wants to go to the middle so I’m going to let it go to the middle. Alright we’re going to put this aside. And now what we’re going to do is we’re going to take these two pieces and we are going to put them on either side of these with all of our little geese flying toward the center. And we’ll put two on this side we’ll put two on this one as well. So I’m just going to line this up along the edge. The pieces are 5 ½. We’ve squared our blocks to 5 ½ so they should fit perfectly with any luck. There we go, now this one over here. Alright so this is two of them sewn together. Now we’re going to sew the other two. And again, make sure that your geese are pointing in toward the star legs. This one the same. Alrighty. So now what we’re going to do is we’re going to press these so that the seam goes to the outside because our middle was pressed to the inside. This seam we’re going to press to the outside. We’ll do that to this one too.
Alright so now what we’re ready to do is we’re ready to add our center sashing right here. And see how fun that comes together so quickly. Alright so let’s sew down this side. Alright so I’m going to take a few little anchoring stitches here and then I’m going to come to where my next seam has to line up which is my center. And I’m going to make sure that my seams are nesting and going the opposite direction. And I’ll sew to that point. Then I nest the next two seams. And then I can sew off to the end. And over here we’re going to do the same thing. We’ll put this one on. And we will press this all at once. So I”m going to anchor these edges down, line up your edges and anchor. I did a little backstitch there. You don’t need to do that unless you want to. In quilting we don’t generally backstitch because every seam is enclosed in another seam but it’s a personal preference for sure. Alrighty. So let’s press her open and see how we did. Alright, look how darling that is. And this is the whole quilt, just making those four little blocks, very log cabin style and putting them together.
So up here you can see. You’re going to have four across and five down, that makes 20 blocks. Now we’re ready to set them together. And you can see right here we have this tiny little inch and a half sashing. So you’re going to take your block and you’re going to sew a sashing to it and you’re going to do the whole row. Now your block is 12 ½ so your sashing is going to be 12 ½. And you’re going to sew block, sashing, block, sashing. Then you’re going to make a sashing strip down here. And these sashing pieces are also going to be 12 ½ but you’re going to put, because they’re 1 ½ by 12 ½, you’re going to put a little 1 ½ inch cornerstone in at each corner. So you’ll do 12 ½, 1 ½ cornerstone, 12 ½, 1 ½ cornerstone and this is one strip right there. And you’re going to do this on all the rows. Now because there was so much white in here we really didn’t add an outer sashing. And so we just added that four inch border and we were good to go.
So again the quilt comes out to 58 by 71. And don’t be afraid to use these old blocks for some inspiration. And we hope you enjoyed this tutorial on the Stargazer quilt from the Missouri Star Quilt Company.
Hi everybody, it’s Jenny from the Missouri Star Quilt Company. We hope you enjoyed watching this video. If you aren’t already part of the Missouri Star Quilt Company family be sure to subscribe so you won’t miss a thing. And if you click that bell it will notify you every time a new tutorial comes out. See you next Friday.
...& Progress on Social