


Tranquil Triangles Quilt Tutorial
Jenny Doan
Tranquil Triangles Quilt Tutorial
- 1 pack x 10" Precut Fabric Squares (Layer Cakes) - Print
- 1 pack x 10" Precut Fabric Squares (Layer Cakes) - Background
- ½ yard x Inner Border Quilt Fabric
- 1 yard x Outer Border Quilt Fabric
- ¾ yard x Fabric for Binding
- 4 yards x Quilt Backing Fabric
Featured products Get the Supplies Featured in this Tutorial


Finish your masterpiece and let us give it the finishing touch it deserves.
Subscribe to MSQC on YouTube
Hundreds of FREE tutorials and a new one from Jenny launches every Friday.
video transcript
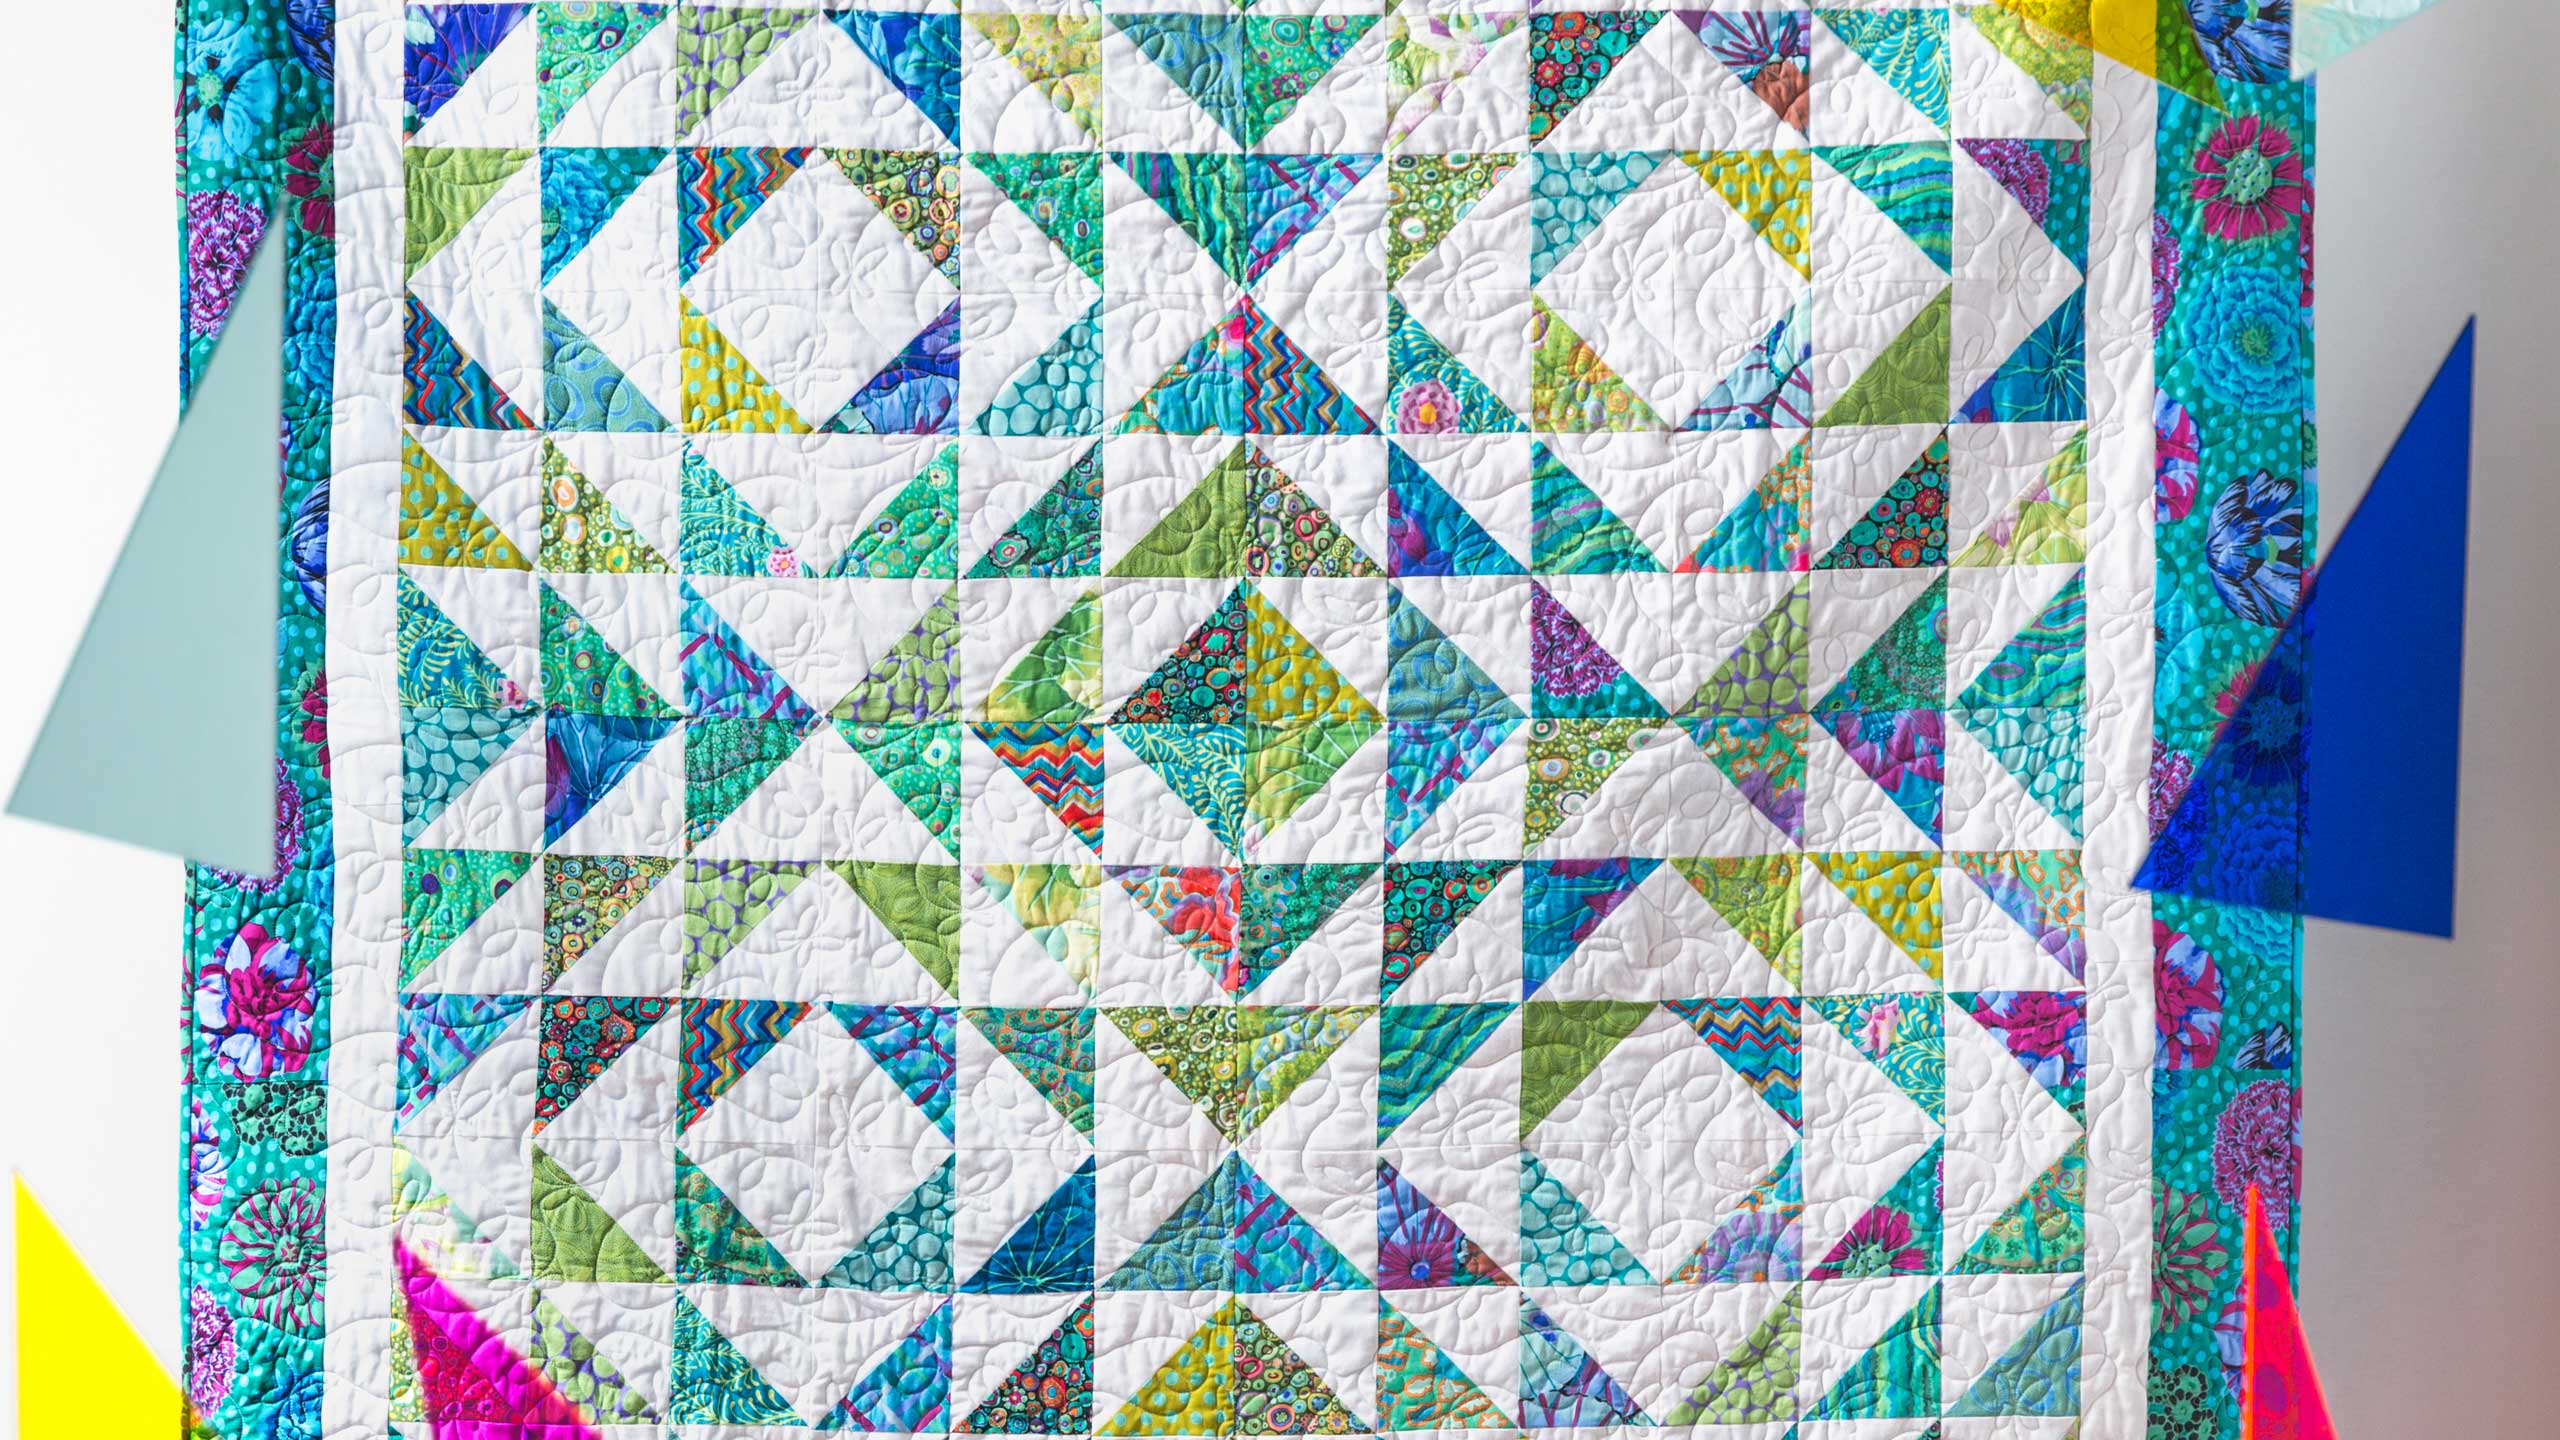
Hi everybody, it’s Jenny from the MSQC. And I’ve got a fun project for you. Now I’ve got a bit of a confession. I am obsessed with half square triangles. I can’t help it. They’re just so versatile and so fun and so cute and so easy. So let’s take a look at this quilt behind me. Isn’t this pretty? This is really just half square triangles and it’s just beautiful. And wait until you see how we did this because it makes it even easier.
So to make this quilt what you’re going to need is 18 ten inch squares. And we have used Cave Classics an island colorway by Kaffe Fassett for Free Spirit. You’re also going to need 18 background squares to put with it. And we’ve used the ten inch squares from Robert Kaufman from Kona fabrics. And, and this is beautiful. You can see in the colors behind me, it’s just a gorgeous line of fabric. Now you’re also going to need a half yard for this inner border and a yard for this outer border. It’s just a five inch border and you’re going to need one yard. Now on the backing, look at this. This is a great place. Kaffe has some great, beautiful, big prints and the back is just the perfect place to showcase these beautiful big florals that he does. It is just beautiful. You’re going to need four yards for that backing. Alright let me show you how to make this because this is just our typical half square triangles that I love. I can’t help it.
And what you’re going to need is one square of color and I’m just going to take this one right here. I’m just going to pull it right out of the middle there. And then one square of background, right here.Now on our background, what we’re going to do is we’re going to draw a line diagonally corner to corner because we want to get eight 4 ½ inch half square triangles. So we’re going to draw a line side to side. And I am using a Frixon pen. And I’m just going to draw a line side to side like this. Now it doesn’t really matter what you use because that’s going to be our cut line. And, and so it’s not going to ever show. You’re not ever going to see it. Alright there we go. Now what we’re going to do is we’re going to lay these right sides together like this. Just like that. Now here’s a little tip. A lot of times you’ll notice with a pre cut that even though they’re ten inches the squares don’t always equal up. Instead of trimming everything down you can just choose one to follow. Choose one, say you’re always going to put your quarter of an inch on the side of the background square or whichever one is most visually easy for you and choose one to follow. Because the peaks are different sizes they measure them differently and so it’s not that they’re, you know, that they can’t measure. It’s just that these peaks kind of do crazy things to our quilter’s brain. Alright so what we’re going to do is we’re going to sew a quarter of an inch on either side of this line right here.
And I have one done here because we’ve done it before. So here’s mine. And you can see hopefully this quarter of an inch on either side. You might even be able to, nope you can’t see it at all on that side. Alright so now what I’m going to do is we’re going to go ahead and cut this up. And we’re going to cut it like our easy eight. So I’m going to lay my ruler on the edge of this square. Because it’s five inches that should put me directly into the center of my block. And it does. And then I’m going to turn my ruler. And I’m going to lay this on the edge of this side and it will put me directly in the center of my block. I love these five inch rulers just for that reason. Now we’re going to lay them corner to corner and cut this on the diagonal. And then we’re going to come over here and cut this on the diagonal. And I’m going to switch hands for that. There we go. Alright. Now what we have to do is we’ve got to press these open. And we’re going to go to the iron for that. . And I’m just going to make sure my iron is nice and hot. And I like to lay them dark color up. And then I’m going to set my seam and just roll them back, just like this. Now you’re going to do this to all 18 squares. And let me just do a few of these. Set and roll. Sometimes I forget to set but you know, it does make it a bit easier. And I’m kind of like a horse to water though, when I get started on something I can hardly wait to see how it’s going to turn out. So you’re going to iron all of yours. And you’re going to do that to all 18 of your squares. And then we’re going to start putting these together.
And we are going to put these together like a nine patch. So this is the block we’re looking for right here. They are all going to go exactly the same direction. Ok? So just all, make sure your triangles point the same direction. And we’re going to put them together. So I’m going to start right here. And I’m going to lay my triangles out. And by a nine patch I mean there are nine squares in this. And I’m going to use one of these ones that I just sewed because you want to mix them up. So there’s row one. And then I’ve got, oops, you’ve got to watch that, all going the same direction. Row two, row three. Now there is something that you need to know. For those of you who make half square triangles this way, you will note that sometimes if your seam isn’t exactly perfect all the way around they are not exactly the same size. So if you want to square those up to make sure they’re all the same size you can do that. I like to square mine to 4 ½. And you can see I’m barely cutting anything off on here. But for some people that is a really important part of this. You know they want them to be just exactly right and honestly it does help with the, I don’t think there’s anything I can trim on that one. It does help with the, with making sure everything lines up perfectly. So you know as we progress on our quilting journey we’re going to do things a little differently than we would ordinarily do things. We get better and better. We work harder and harder. Sewing is just practice. I mean if I sew an hour today, tomorrow I’m an hour better. You know, so it’s just one of those practice things. And it’s not a, you know people say, oh it’s such a talent. You know it’s really a learned skill. It really is. Alright now I’m laying these right sides together making sure they’re going to same direction and I’m going to sew a quarter of an inch down the side. And I’m just going to add my other block on here again lining it up, making sure. You know me I get so turned around with these angles. And I’m just going to line that up right there. There we go, alright. Now let’s go ahead and press these. And I’m going to just kind of gently press them open. And then I can flip it and make sure my seams are going the way I want them to. Okie doke.
Now we’re going to put three of these rows together. And so that’s going to make a big nine patch for us. Oop we can’t have that one there because that’s got a matcher in the middle. There we go, just like that. And so what I’m going to do then is I am going to lay these right sides together and sew right down the side to make this block. Whoops. My thread came out of my needle, but I’ll quickly fix that. There we go. Now what I do is I take a few stitches to hold it and then I match it up at the next seam. So I lay my triangles, my seams together, put my finger on it and hold it and just let the sewing machine take it through. There we go. And then we’ll add the last row. Right, oops, I’m like what happened. I thought I sewed them all wrong. But it’s ok. Whew! Crisis averted. Crisis averted. Alright here we go. And again I just take a few stitches to anchor it and then I put my finger over that seam. I can feel them nesting. That one wanted to fold under so I could feel that with my finger and I’m able to stop and fix that one right up. There we go. Alright, let me trim these threads off of here. And then we’re just going to press this right here. Just press it back. Alrighty. And that’s your block right there.
So then this is the fun part. So then you’re going to get to start putting these together. You’re going to do all your blocks into these. And you’ll have a few left over because they don’t come out evenly because we get eight out of one of these and it takes nine to make one of these. So you’ll have a few extra. And let me just show you when you start putting these together it’s so much fun. So I noticed right away that if I put these, so you know if these are all turned this way of course you can do that if you want. But if you turn this block then you have these little geese that match up. And I started with that. I did a corner, I mean I did a block where they all came together with the color in the middle like this. And let me turn. So it makes this quilt right here. Now these four blocks in and of themselves would make a darling little baby quilt. And so don’t forget, you know, fewer blocks makes a baby quilt. But this quilt behind me is 61 by 61. And I used 18 squares which means I have a whole other pack left. So I made two quilts out of this one pack. And I want to show you because they’re just slightly different in variation.
So this quilt right here, it comes together with the white in the center which means the very center block is going to be all colored. The other one I did is just opposite. So if we’re going to make that block, let me show you this right here real fast. So we’re going to turn these then so the white comes to the center like this. And that’s how this block works right here. So our white comes to the center and it makes this square. And things kind of, kind of go out from there. On the other one, the color is in the center of these blocks which means our very center square is going to be white. Now just so you know, I would not do this. I would not put two colors that are the same together. So I would probably move this up here. Oop, nope that one is the same too. Well anyway I would grab another one from my stack and I would just make it so that they’re just different. Because I wouldn’t want the same ones coming together because I love the scrappy. So let me show you this other quilt now. I have it over here. And this is all out of the one, the one packet of ten inch squares. Now if you’re going to do this you’re going to need to double up your yardage for your border and your binding because we just used a half a yard for the border and a half a yard for the binding. But look how this comes together. I want to show you here. So see how the colors come together right here. And then it makes the geese that go out and then they bonk noses together and then continue on their flights.
So even though these, I’ll get over here so you can see kind of both of them at the same time. These are both the same idea, the same plan but they have a little bit different look. And I just thought it was so fun to play with that I had to try it twice. So you can see how different these are. Even though the square is the same, the layout is just a little bit different. And it just is really fun to play with all the directional things you can do. Now there’s more setting than these to be had. So this is really fun. I’m calling it Tranquil Triangles because really you’re just making this block. The squares all go in the same direction. And you can just put them together. And it’s not a lot of brain work. Not a lot of thinking. But so much design and creativity. And we hope you enjoyed this tutorial from the MSQC.
& Progress on Social