Bear Paw on Point Quilt Tutorial
Jenny Doan
Bear Paw on Point Quilt Tutorial
- 1 roll x 2.5" Strips (Jelly Rolls) - Print
- 2½ yards x Background Fabric (incl. setting triangles)
- 1¼ yards x Quilt Fabric for Border
- ¾ yard x Quilt Fabric for Binding
- 5 yards x Quilt Backing Fabric


Finish your masterpiece and let us give it the finishing touch it deserves.
Subscribe to MSQC on YouTube
Hundreds of FREE tutorials and a new one from Jenny launches every Friday.
video transcript
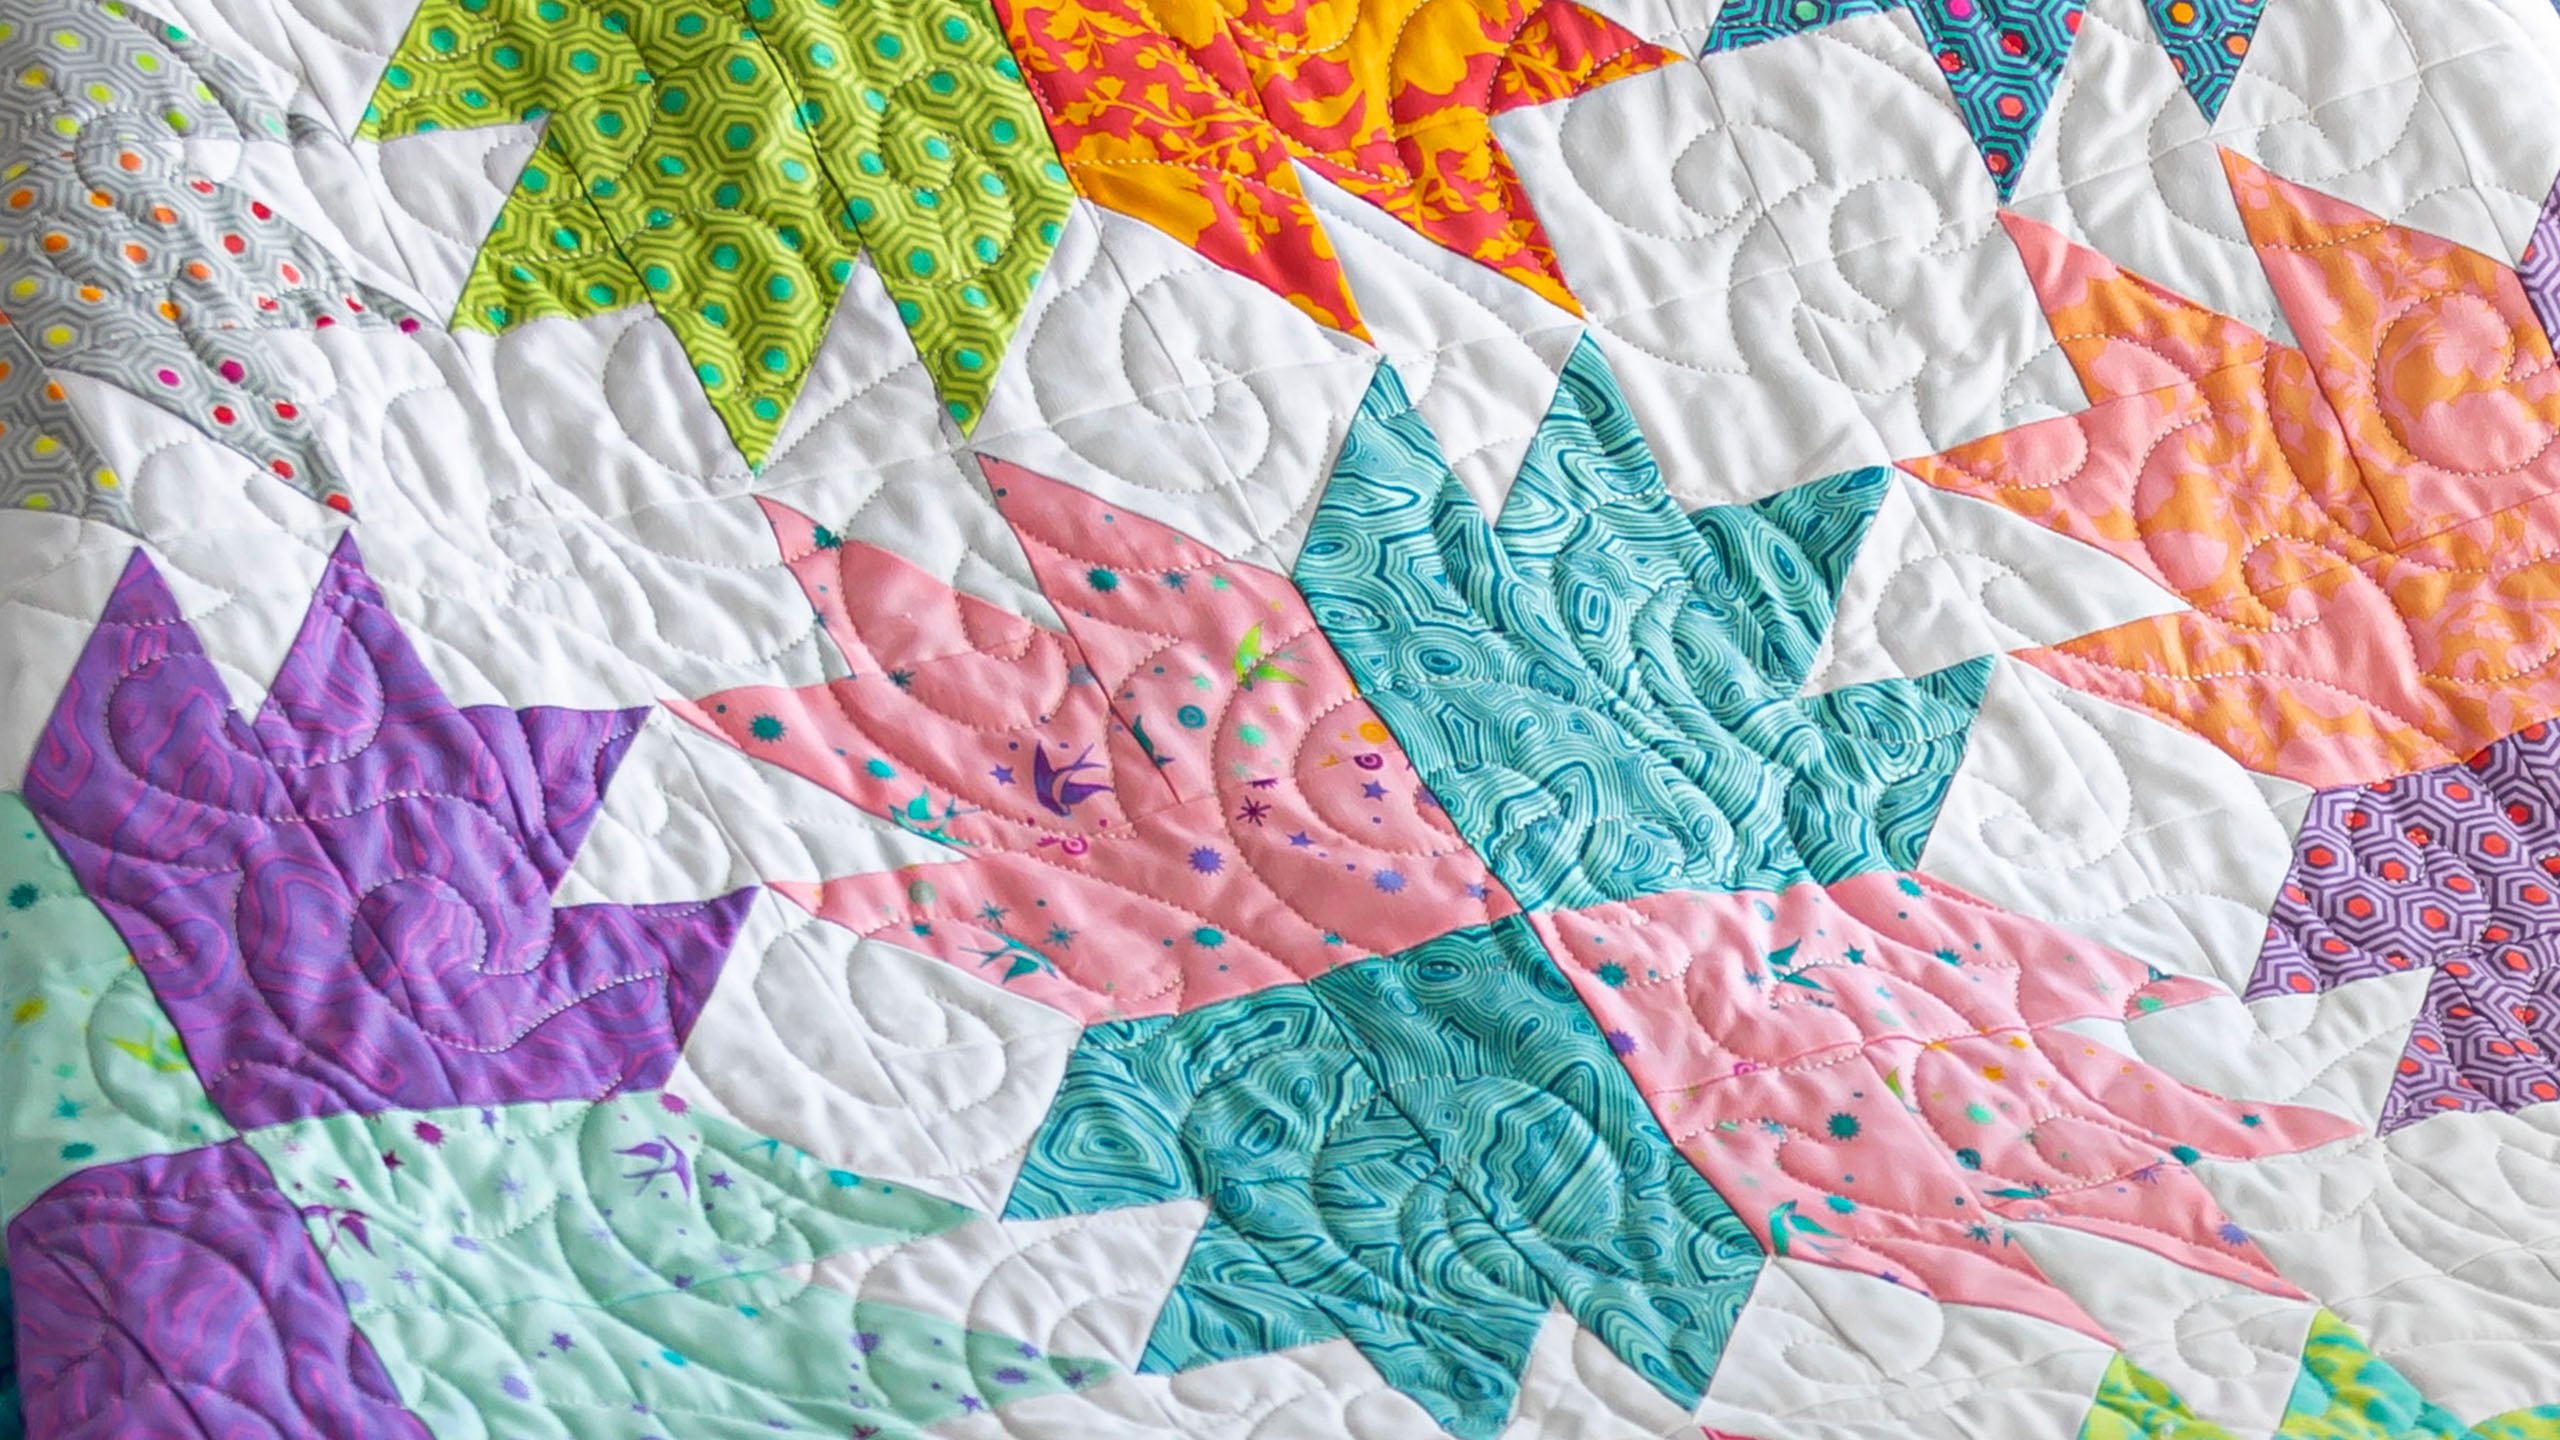
Hi everybody, it’s Jenny from the MSQC. And today we’re talking about my super simple, easy, with not half square triangles bear paw block which I love. It’s a great way to make a bear paw but so much easier than the traditional block. So let’s take a look at this quilt behind me. Isn’t this great? All these bear paw blocks and it’s in this gorgeous, gorgeous colorway. And they are set on point. So what you need to make this quilt is one roll of 2 ½ inch strips. And again we are using Tula Pink’s True Colors for Free Spirit. And you can see, they are just gorgeous. I just love them. We’re also going to need some background so that’s going to take care of all these little squares and these big setting triangles out here. And you’re going to need, for that background, you’re going to need 2 ½ yards. We have just an outer border out here. Because there’s so many setting triangles we didn’t feel the need for that inner framing border. And so our outer border is a six inch border. And for that outer border, you’re going to need 1 ¼ yards. Alright, let’s look at the back. We used the same backing as the border. It’s just a darling print and for that back, you’re going to need five yards on that. So this quilt ends up being 62 by 78 so it’s a great size. And really I think you’re going to love it. If you haven’t seen the way I do bear paw blocks I think you’re in for a big surprise.
Alright so first we’re going to take a strip and let’s just pick one. First we’re just going to take a strip and I’m just going to pick one out of the middle here. This looks so darling. And what I’m going to do is I’m going to cut off my selvedges and you’re going to get two blocks out of each strip. So we’re going to cut this off right here. And then the next cuts we’re going to make, we’re going to make a 2 ½ cut. And so our little 2 ½ inch ruler is really good for these strips. So 2 ½. Then we’re going to make two 4 ½ inch cuts. So that’s a total of four rectangles that are 2 ½ by 4 ½ . And those are going to go here on this little pile. And then this one is a 6 ½ inch rectangle. We’re going to go here just like this. And we have this little piece leftover right here which, don’t throw those away. Those are darling. They can be used in so many things. Alright so now what, the best thing to do when you’re making these is to keep these together in blocks. So you’ve got two 4 ½’s for each block. One 2 ½ and one 6 ½. And so I would just kind of separate them as I cut them like that. So you’ve got your 6 ½ here, your 2 ½ and two 4 ½ for each one. And then this one the same. So just keep those together as you make them.
Now we’re going to need some 2 ½ inch squares and so if you cut a 2 ½ inch strip you’re going to get 16 2 ½ inch squares out of that. And so you can do that. You can also buy the little 2 ½ inch squares already cut which I love. But if you want to cut your squares out of a strip, what I do is I fold it in half and in half again. So I’m cutting four at a time. And it really shortens up your cutting time if you do that. So then I’m just going to trim off my selvedge and my fold right there. And then I’m just going to come along and trim and trim. And your rotary cutter, if you’ve got a good blade on that it should pretty easily handle four pieces. And sometimes what I’ll do is I will line up several strips and then cut a whole row of those little 2 ½ inch squares.
Alright so let me show you how to make this block. So what we’re going to do is we’re going to sew a 2 ½ inch square of print and one is a background color. And we’re going to sew those right together with a quarter of an inch like this. And we’re just going to sew down the side. Alright, now we’re going to press these open. So we’re just going to press this so the seam goes to the dark side. Now because we have pre cut the pieces we’re adding on, this will help you check your quarter inch seam. So we’re going to line these up and see. If your quarter inch is right on these should match pretty good. I can see mine is a little narrow so I’m just going to watch that on the next block. And what I’m going to do is I’m going to go ahead and put this piece right here. So here’s my block. And here’s my two 2 ½ inch squares and my two inch, 2 ½ inch square of background and color. And I’m going to put my 4 ½ on this side right here. So just like that. And we’re going to sew that together a quarter of an inch, quarter inch seam all the way down. I feel like I say that a million times and I probably do but there might be somebody who hasn’t heard it. Alright.
Now what we’re going to do is we’re going to press this and when I make these, if any of you have seen my studio you know I have a little pressing station right next to my sewing machine so I don’t have to ever get up. So what we’re going to do now is we’re going to take two 2 ½ inch background squares and we are going to press a sew line on these like this. And I’m just finger pressing them. And we are going to snowball both of these corners. So we’re going to snowball this one and we’re going to line it up in the corner here and this one here. So it should look like this with your color up in the middle and your first two pieces on and we’re snowballing straight down these two sides. Now it will come over a little bit into the seam but don’t worry about that. Just line it up on the corner of your color. So we’re going there and then I’m just going to come around here and I’m going to sew right on the line, make sure it’s lined up in the corner and sew from corner to corner like that. And then to check to make sure you’ve got this straight you can always fold these back and see if your pieces line up with your corner. And mine is pretty good. And I’m just going to trim these off now. So a quarter of an inch away from my seam. And then I’m going to press this back and now we’re going to add our next round. Alright so we’ve got this all pressed so nice and I’m just going to trim off this little edge right here. My little block came out just a little big. We want to keep it square.
And then we’re ready to add our next pieces. So we’re going to add this 4 ½ inch piece on this side, the 6 ½ inch piece on this side and snowball it again. And that gives us a bear paw. And if that isn’t the easiest bear paw you have ever made, I don’t know what is. So again on this we’re putting the 4 ½ inch piece on the right side. And then I’m just going to finger press this open like this and add my 6 ½ inch strip on the other side like this. And I’m going to make sure, and they’re lining up so nicely. So my quarter of an inch, today is a good day for me to sew because my quarter inches are lining up. Alright now I’m going to press this open right here so it lays nice and flat and then we’re going to go ahead and press a line for our snowballs. Now you can draw the line on these if you want. I’m going to close this before someone catches me. I’m going to press these in half. If you want, you can draw the line. But I am just going to, I’m just going to press a line. And then we’re going to add these to the two corners so right here. And again you line it up in the corner. Let this corner be your guide and line this one up over here in this corner. And we’re going to sew right on that line, not on either side but right on it. The line becomes our pattern. Flip that around. And here is one more. And then I’m going to trim these off, a quarter of an inch from my seam, from my stitch line, about. And then we’re going to press this back. Again I have a little bit of a hangover here so I’m just going to trim this down. Not a real hangover, a fabric hang over.
Alright so here’s our bear paw block. How cute is that? Now you’re going to need two of these for each block and you get two from each strip so we’re good to go. So I have some other ones that are made here already. So as you can see on the block behind me, on the quilt behind me, we did two and two. So two of each one. So we’ve got two purples and two blues on this one. Right here I’m going to have two blues right here and I’m going to have these two grays right here. So then basically what we’re going to do is we are going to sew these together into a four patch. So I’m going to lay this one over here like this and I’m going to lay this one over like this. Now right here where these come together, you want to watch that and make sure that’s pretty close. And they’re not, I mean they can nest if you flip a seam up. Most of my seams are ironed the other way. But if you flip it up it can nest, you can nest that little seam. Do it if you want to. I am just going to go ahead and sew mine down like this. And then bring these over. Make sure this little edge is lined up. Now I’m going to add my other two in right here. And I can sew all the way to where my triangles intersect right here. Now what we’re going to do is we’re going to open these up and these should be in the right position for a block. And they are. So we’re going to go ahead and put those together. And we will sew along here and make sure our little triangle edge is lined up. Then our middle seam is the next point where we want to make sure our seams are nesting. And I’m going to just like that, nest them up together. I can feel with my fingers there’s no room in between. And then I’m going to come down here, sew this one together right here. And then we are ready to see how our block looks. Oh that looks pretty nice. You know I’ve never been confident enough to know that when I open it it’s going to be right. I’m always, like, surprised. I’m like, oh good job. It just always kind of cracks me up. Alright so here is our bear paw block, the whole block.
Now we decided to set these on point. And when you set a block on point you have to have some setting triangles right here. These are your setting triangles along the sides and along the top and bottom. Your corner triangles are out here. And so for these blocks, the way they measure, you are going to need a 13 inch square for your setting triangles. Now the reason we need setting triangles is because this block which we made this way is going to go together on point like this. So we’re going to start like this. So our first block here will be one block with two setting triangles and a corner triangle. So let me show you how this works.
So here is our 13 inch blocks and I have just cut these in half for the setting squares, you need a 13 inch right here, I’ll show you how it looks. 13 inch block. And we are just cutting it once and that makes a setting triangle. And then for our corner triangles you need one block that is 13 ½ because we only have four corners. And then we’re going to cut this diagonally. So this is going to come together like this. It’s going to be cut diagonally both directions and that’s going to make your corner blocks. So this block is 13 ¼ and we’re going to cut it diagonally twice and our setting triangle remember is only 13 and we’re going to cut it once. Alright so let me show you how this goes together. Now this little corner block I’m going to start right here, I’m going to put it up here. And I have some blocks already made so I can show you this layout. So we’re starting with this corner block right here, ok. So we’re going to have two setting triangles and a corner. So we’ve got our corner up there like this. And again on these when I sew these together right here, what I would do is I would fold these in half, finger press a little line and match this up to here and sew that on there so it lines right up and that will give you, you know, just the right amount hanging off the edges. So then this first row is going to go like this. And here’s our setting triangle right here like this. Because we’re coming now across the top of the quilt. Always look for that straight line because you guys who are angley challenged like I am, you’ll know. We’re looking for that straight line. This one over here then is going to come this way and just like that.
Now this is the corner. As we start adding more rows, so I would actually do this one row like this before I added these on. But I’m just showing you how it’s going to lay in here. So then these are going to go in here like this. This is going to go here and another row is going to start here. And another row is going to start here. And we’re just going to keep putting those on together. This is the beginning of your row and this is the beginning of your row. So let’s take a look at this quilt. Now really you’re going to want to lay out all blocks and you’ll lay them out in diagonal rows and you’ll follow the diagram. And it will make perfect sense to you. We’re going to start right from here because I showed you that little corner. And then you’re going to sew one, two, three, four, five, blocks together. And the next row has three and the next row has one. This row has one, two, three, four, five, also and then three and then one. And so as you’re laying them out on the floor, what I do is I lay out all my rows diagonally. And then I come in and I fill up these holes, I call them with my setting triangles because it’s really easy to see how they belong when you go there.
So then you’ll see, as you’re putting them together like this, you’ll see that I want to sew this row together with these three blocks and I’m going to sew a triangle on the top and a triangle on the bottom. Now to be fair when I make a quilt like this, well when I make a normal quilt I can pick the whole thing up and go to my sewing machine and sew it together. When I’m doing a quilt that is set on point, that is in diagonal rows, I literally do two blocks at a time and I take them back to make sure they go right where they’re supposed to go because it’s not an easy thing for my brain. I can do it, yes but it’s not, for my brain, I’m that angley challenged brain, it’s just not easy. So it works for me to lay them all out, make sure my quilt has ended up square with my setting triangles and my little corners and then I can put it together. But the result is so amazing.
So I love that we’ve taken a block like this and just by how we put it together it sets it on point. We tried to put matching paws together so it would give it even more oomph. And I just think this looks amazing, you guys. I think this looks so cool. I think you’ll enjoy this lesson in setting things on point and using setting triangles because really there’s no, there’s no Y seams or anything on this because you’re just sewing this to this. Then you’re going to sew this whole row next to that whole row.
So this is really fun to take an old block that’s a bear paw and we’ve turned it on point and with Tula’s fabric we’ve made it fresh and new. And we hope you enjoyed this tutorial from the MSQC.
& Progress on Social