Double Churn Dash Quilt Tutorial
Jenny Doan
Double Churn Dash Quilt Tutorial
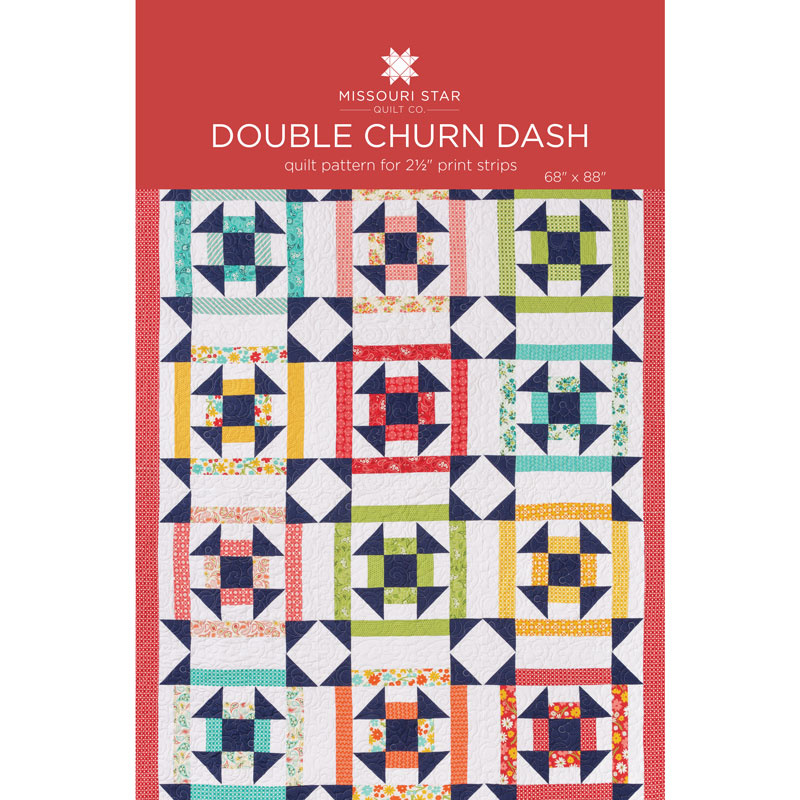
- 1 Roll x 2.5" Strips (Jelly Rolls)
- 1 1/4 Yards x Background Fabric
- 5 1/2 Yards x Backing
- 2 3/4 Yards x Background
- 1 1/4 Yards x Outer Boarder
- 3/4 Yard x Binding
Finish your masterpiece and let us give it the finishing touch it deserves.
Subscribe to MSQC on YouTube
Hundreds of FREE tutorials and a new one from Jenny launches every Friday.
video transcript
Hi everybody, it’s Jenny from the MSQC. And I’ve got a fun project for you today. This is a churn dash in a churn dash. And it makes this great big block. Let’s take a look at the quilt behind me. So here’s our big blocks right here. You can see this is the block right here. And I can hardly wait to show you how to do this because this is really fun. So to make this quilt what you’re going to need is one roll of 2 ½ inch strips. And we’ve used Mama’s Cottage by April Rosenthal for Moda fabrics. And you’re going to need some contrasting fabric for the corner of your churn dash and the center of your block. And that you’re going 1 ¼ yards. Your background which is all the white. You’re actually going to need 2 ¾ yards. Your border is 1 ¼ yards and it’s about a 4 ½ inch border. And for your backing right here, oop let me get this thread. There we go. For your backing you’re going to need 5 ½ yards. And we’ve used regular 45 inch wide and seamed it. So it just makes a really fun backing and looks really great. So this is such a great quilt to make because when you’re done you get these giant big blocks like this. And it goes together really quick. We’ve actually made, there’s three across and four down, so 12 big blocks makes this quilt. And it’s going to be a quilt that’s 68 by 88 so it’s a nice big quilt and pretty easy to do.
So to start with we’re going to start with making our half square triangles for the corners, that’s these blocks right here. And we have them, it takes eight for each block so we’re going to do the easy eight. And that’s right here. So when you do the easy eight what you’re going to do is you’re going to put a colored square, and we’ve chosen this navy, with a white square. Put them right sides together, draw the X with a pen. And then sew on either side of that X on both sides. And I hope you can see that. And then we’re going to cut this four times. And so we’re going to lay our ruler right on the edge because this is our five by 15 ruler. So we’re going to lay that right on the edge and it should intersect right down the center. And I like to cut the sides that don’t have drawn lines first so that I don’t lose where I’m going. Here’s this one. And then we’re going to cut diagonally both directions. So you cut vertically, horizontally and then diagonally both directions. And one more here. And this is going to give you eight and that’s enough to make one block. . Alright, now what we want to do is I’m going to turn all these over to the dark side because we’re going to press these to the dark side.
Anytime you have a fabric that’s a lot darker than, than your background fabric then you’re going to want to press to the dark side so you hide that seam. And golly I have lots of little clingers today. There we go. Alright we’re going to come over here to the ironing board. I’m going to fold these up and put them over there. And we’re just going to press these. I’m going to set my seams. This is a, this is a big setting right here. We set them all, then we can iron. I don’t actually know if it works but it seems like it would. I’m always trying to figure out a quicker way to do something. So I’m just going to iron these back like this. Oop make sure there’s no pleats in your fold. I just had one that looked like it had a little bit of a fold so I fixed it up. And then I have two. There we go. Alright I’m going to do them closer to me now and we’ll be better at that. And one more and we’re done.
Alright now these you want to make sure that these are 4 ½ inches. So we’re going to need to trim those up. I’m using the block lock ruler for that. And we’re just going to set it on one side and trim. We’re going to use this middle. We know we want it 4 ½ and this is a 4 ½ inch ruler. So we line it up on our seam and then we just cut the two sides like that. And it’s very little waste. But we’re going to go ahead and trim up our, square up all our little 4 ½ inch squares. I’m just going to turn this a little bit here.
So we’re done squaring our half square triangles and we have our center square that is also cut to 4 ½ and then we need to put our strip sets together. Now on mine you can tell that I matched up colors. So there isn’t enough in one strip set to cut, you know, eight pieces of each. And so I paired two colors together and of course that’s entirely up to you. You can do whatever you want. But I have a yellow one here that’s already sewn together. And so I’m going to break into my roll and I’m going to get another yellow and maybe I’ll do this one with the lots of orange in it. And we’re going to sew that right down the side. So you have a 2 ½ inch your background strip 2 ½ and your, and your strip from your jelly roll is also 2 ½ . And we’re just going to go over here to the sewing machine and sew those right together. Alright, so we’re putting our fabric together on the edge. We’re lining it up. We’re putting our presser foot right along the edge, sewing a quarter of an inch down and we’re just going to sew and let it go. Alrighty, now we need to press it open. And to do that I’m just going to lay it color side up. Set my seam as I go along and just roll that back. A lot of times I have these already done and ready for you when I film and I just felt like it was time to, to show this again. So here’s our two little strips. And again my seam goes to the dark side.
So once you get your strip all ironed, we’re going to put our two strips together because we’re going to cut them at the same time. So for the first small block our segments are going to be 2 ½, I mean 4 ½ inches long. So we’re going to, I’m just going to stack them like this and you need two of each color for the inner block. So I’m going to trim off these edges right here. And then count over to 4 ½. Now I’m making sure these are lined up, my seam stays nice and straight. One, two, three, four and a half. And we need two from each. And I can show you, we’re going to assemble that first block first. So what we’re going to do with that is we’re going to take this center square that we cut and we’re going to put these around it. So I’ve got this one and this one, top and bottom. These two on the sides like this and then our little churn dash corners come in like this. So what I’m going to do is I’m going to sew this row together and this row together and this center row together and I’ll meet you right back here.
Ok so now I’ve got all these sewn together and we need to go to the ironing board. We need to remember that for all of our seams to nest well, we’re going to nest these two seams in, I mean iron. And we’re going to iron these other two out. Now a couple of things you want to watch when putting this together especially if you’re doing it in rows like this is you want to make sure your color always goes to your center contrasting square and that your half square triangles always go in. You know I did one the other day and it had this one going out and I’m like, something is wrong with this so you know, watch that and make sure they go in. Alright so let’s iron these out. And I’m going to flip this over right here and just iron from the back. And then I’m going to flip it over and make sure it’s nice and flat on the front. So the top and the bottom are going to go to iron to the outside like this. And then flip it over, make sure it’s nice and flat. And then this center guy right here, he’s going to be ironed in. So we’re going to make sure there’s no fold on that line and no fold on this line. And we’re going to flip it over and take a look at it.
Alright so now when we put these together this will nest really nicely because we have the middle seams going in and the bottom and top going out. So we’re going to go to the sewing machine and we’re going to sew these three together and we’re just going to line them up. We’re just going to lock them up next to each other and make sure, you know I always take those few little anchoring stitches and then we go to the next seam and make sure it’s locked up, nested up nice and tight. Let me move these out of the way and make sure you guys can see. There we go. We’re sewing right down the side. Now this is one of those things that now because we squared the blocks it’s going to go together really neatly. You know everything should fit and line up real well. Alright. Alright now let’s press this out because this becomes now the center of our big block. Oop, I’ve got to wait for the legs to go down. Ok.
Now this block should measure, let me see where my ruler is. This block should measure 12 ½ and it does, yay! Alright, our strip sets now have to be 12 ½ on all four sides. So we need to cut two of each color. And again we’re just going to, we have our strip set right here. So the first cut was 4 ½ inches long, the second cut is 12 ½ inches long. And again I’m just going to straighten up this edge because I moved it now, I’ve got to straighten up again. So when you do these you might want to just go ahead and cut all your fours and all your twelves and have your set ready to go. So now I’m going to count, one, two, three, four, five, six, seven, eight, nine, ten, eleven, twelve and a half. We want to make sure that’s right so I’m looking at my numbers. Let me count again, I’m feeling a little nervous about it. Here we go, one, two, three, four, five, six, seven, eight, nine, ten, eleven, twelve and a half. What do they say, measure twice, cut once. Alright so here’s our 12 ½ inch pieces and those should fit. Now for some reason yours doesn’t measure out right, the size you’re looking for is the size of your block. So you can just measure your block. So again we’re going to do the same thing. We’re going to put our top piece on and our bottom piece on like this and then our two side pieces on. And it’s just like three giant rows, just like we did. And then we have our corner pieces are out here like this. Isn’t that fun? So we’re going to go ahead and we’re going to sew this together. I’m going to sew the top row, the bottom row and these two ones to the center big block in the middle and I’ll meet you right back here.
Alrighty, you can see over here that I’ve got my center one put together and I’ve got my two top and bottom rows. Let’s go ahead and press those before we put them together. Alright now what we’re going to do is we’re going to put these right sides together and add them to the top and the bottom of our little rows. Let’s line this up. And not quite lined up, there we go. Now you want to do the same pressing actually that we did on the center rows for this, for the top and bottom rows. And I didn’t actually do that when I pressed it, when I pressed it out. I pressed them all to the out. So because the top and bottom rows are small, I’m going to make those ones turn and come in so that the middle one lays nicer. Sometimes you have to just, you know, go with the flow. Alrighty, here’s this side one. I’m going to line that up. You can cut your little dog ears off if you want. Some of those little things drive people crazy, you know, they’re like, should I cut that off? I’m like, if you want to. I do it if it, if it’s creating bulk in the block then I’ll look at it and I’ll do it. But if it’s ok then I don’t die over it. Alright so here again I’ve pressed this the wrong way but I’m just going to fold it back with my fingers and go along. Then when I press the block it will lay the right way. Alrighty. Now let’s press this open. Oh it looks so fun. So how fun is this? Look at this great big block. I just love these big blocks. The quilt goes together so quick and easy.
So when you’re ready to assemble your block what you’re going to do is you’re going to take your, or assemble your quilt, you’re going to take your big blocks like this and you’re just going to sew them together. You’re just going to take that seam right there and sew them together. And you’re going to do three in the top row. So let’s see, let’s go to the quilt and look at this. So here we go, one, two, three. And see, here’s your seam right here. And you just put your blocks together and sew and it just makes a great quilt. So we have three in a row, four rows down. Again it’s going to make a quilt that is 68 by 88. And it’s just a fun, fun quilt. And we hope you enjoyed this tutorial on the Double Churn Dash quilt from the MSQC.
& Progress on Social