Keyhole Quilt Tutorial
Jenny Doan
Keyhole Quilt Tutorial
- 1 roll x 2.5" Strips (Jelly Rolls) - Print
- 1 yard x Inner Border Fabric
- 1¼ yards x Outer Border Fabric
- ¾ yard x Fabric for Binding
- 4½ yards x Quilt Backing Fabric


Finish your masterpiece and let us give it the finishing touch it deserves.
Subscribe to MSQC on YouTube
Hundreds of FREE tutorials and a new one from Jenny launches every Friday.
video transcript
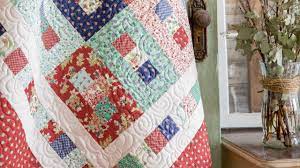
Hi everybody, it’s Jenny from the MSQC. And I’ve got a fun project for you today. If you’ve been waiting for something to do that’s quick and easy with your 2 ½ inch strips, this is the quilt for you. Let’s take a look at this quilt behind me. This is what we commonly call a keyhole block. And it’s made up with centerpieces in here. And everything in this goes together so quick and easy. So to make this quilt what you’re going to need is one roll or 40 strips of 2 ½ inch strip fabric of print. And we have used Katy Jane line for Maycore Fabrics. So the finished size of this quilt ends up being 65 by 73. We have a couple of borders we need to talk about. These two inner borders are 2 ½ inch borders. And you’re going to need a yard of fabric for that. This outer border out here is a nice big border and you’re going to need 1 ¼ yards for that. And the back, let’s look at the back. Look at that pretty, pretty floral print on the back. And you’re going to need 4 ½ yards and that’s going to be put together with vertical seams. So this border here is made up of the leftovers of your block. So let me show you how to make this.
So the first thing I do when I do this quilt is I pick out three strips. And I have three here. And I’m going to cut off my block pieces. Now this is the block we’re talking about. Let me get this one here, this one will show up a little better. This is the block we’re talking about right here and we want to get the outline of the block out of our strip first. All four of these pieces are all 6 ½. So we’re going to cut four 6 ½ inch pieces. Now I have my strips. I’ve laid three strips here and each strip is folded in half. So I”m just going to cut 6 ½ twice. So let me grab my rotary cutter. I’m going to trim off my, my little selvedge edge right here and then I’m going to count over 6 ½. One, two, three, four, five, six, and a half right here and cut that off. And that gives me two pieces for three different blocks. And now I’m going to count six again, one, two, three, four, five, six, my half an inch is at the beginning. And then I”m just going to cut it off here at six. Alright, now I’m going to set these aside for surrounding my block but I need to make that middle piece. And what I’m going to do is I’m going to actually cut all of my strips this way. So go ahead and get all of your strips out of your pack, all of them cut two sets of 6 ½. So four 6 ½ inch bars off each strip. And then when you’re done with those we’re going to sew these three strips together.
So let’s go ahead to the sewing machine and do that. I’m just going to add one on this side and one on the other side and sew a quarter of an inch down. It’s not a very long strip set and so it shouldn’t take too long at all to do that. There we go. And we’re just going to slide down the side here just like this. Whew! I’m a little off over here but I’m still on ok so I want to make sure I’m still, still holding on there. Don’t sweat the small stuff, right, unless it gets really small. Then we’re worried about it. Alright now this one I’m just going to attach to the other side of my, you know what I think I”ll attach it to the other side of the blue. And I’m going to make sure one end of my strips lines up together. So these, I’m actually sewing these strips all the same direction. And they’re short enough they won’t bow, don’t worry about that. Alright. Alrighty. Now what I’m going to do on these is I’m going to bring these over to the ironing board. And I’m going to iron from the top. You want to make sure there’s no pleats in your seam line. Now I’m feeling and making sure that my seams are going to go out like this. And then I’m just going to bring my iron up here and kind of swish it back and forth to make sure there’s no creases or pleats on those seams. If you have creases or pleats it changes the size of your block or your strip set. Alright now I’m going to look at these and make sure my seams are nice and flat and they are.
So once you get all of your little pieces, your three strip pieces sewn together like this you can stack them up three or four. And we’re going to cut those in 2 ½ inch segments. Now the nice part about this little ruler is that it’s 2 ½ and we can just sail along here like this. And you’re going to cut them all up, just like this. Over and over and over. You’re going to stack them in a big pile and you’re going to have sets of three sewn together.
Once you get your sets of three sewn together what we’re going to do then is we’re going to pick a border from our stack of borders. And hopefully it’s going to be different than these. Since I’m dealing with the same strips here it’s going to be the same as this one but I would choose a different strip normally. Alright so what we’ve got here is we have two 6 ½ inch strips. We’re going to sew them to either side. So let’s go to the sewing machine to do that. And just line them up right along that side. And then I’m going to bring this around and sew my piece to the other side like this. So you’re going to do one strip on either side and we’re going to press that open. Again I’m pressing my seams so they go to the outside and, oop let me iron this one down so it’s nice and flat. There we go. Which way the seams go on this block doesn’t really matter because none of the seams actually interconnect with each other but it’s still nice to have a nice flat block. Then we’re going to take our other two pieces that are the same and we’re going to put one across the top and one across the bottom. And that’s going to frame our little keyhole strip and make the block we call the keyhole block. So now we’re going to come over here and sew this one to the bottom and the other one to the top. Here we go. Line them up. And a quarter of an inch right down the side. And then one more over here. Now we’re going to the ironing board and press these open and I’m just going to set those and roll them back. And just like that your block is done. So you’re going to do this with all your strip sets and then we’re going to put them together.
Now there’s a couple of different ways you can set this. You can actually stagger them by starting it with a half block. But the way I did mine was I just lined them up row by row like this. So look how cute these are. You see how darling they are. Oop let’s put a red one in there. Just like that. You’re just going to line them up and you’re going to sew them in a row. We have one, two, three, four, five, six, seven, across and one, two, three, four, five, down. So we used 35 of our blocks for this. Now when you’re ready and you have all your blocks together the first thing you’re going to do is take your background fabric and sew a 2 ½ inch border all the way around it. Then we’re going to take all these little pieces right here and we’re just going to sew them together end to end to end. So let me show you how I did that. You’re going to have a whole stack of these after you sew your strips together. And I have a little strip set right here and I’m just going to cut a couple of pieces off and show you how I did this. So I’m going to lay this on here so I can get a bunch. You know that whole idea of cutting one at a time is a little overwhelming to me so I like to cut several at a time. I’m going to cut these at 2 ½ so I”m going to trim off my selvedge, bring my little 2 ½ inch ruler and then I can just lay it right on the side like this. And again all the rest of your pieces you’re just going to cut them 2 ½ inches, 2 ½ inches, 2 ½ inches. And then you’re just going to start sewing these together to make that long border. So you’re going to sew, put them end to end like this and another one and another one and you’ll mix all yours up and they’ll all be different. And then what I did was I just sewed one right down the side here. And you put it on just like you put a normal border on. I put my sides on first and then my top and bottom. Added another 2 ½ inch border and then finished with my nice big border on the outside.
So very quickly this quilt comes together. It makes a beautiful quilt. Again it measures out at 65 by 73. So a great size quilt. So if you have a roll of strips and you’re not sure what to do with them, this is the quilt for you. So we hope you enjoyed this tutorial on the Keyhole quilt from the MSQC.
& Progress on Social