Linked Up Quilt Tutorial
Jenny Doan
Linked Up Quilt Tutorial
- 1 pack x 5" Precut Squares (Charm Packs) - Print
- 3-1/2 yards x Background Fabric
- 1 yard x Quilt Fabric for Sashing
- 1-1/4 yards x Outer Border Fabric
- 5 yards x Quilt Backing Fabric


Finish your masterpiece and let us give it the finishing touch it deserves.
Subscribe to MSQC on YouTube
Hundreds of FREE tutorials and a new one from Jenny launches every Friday.
video transcript
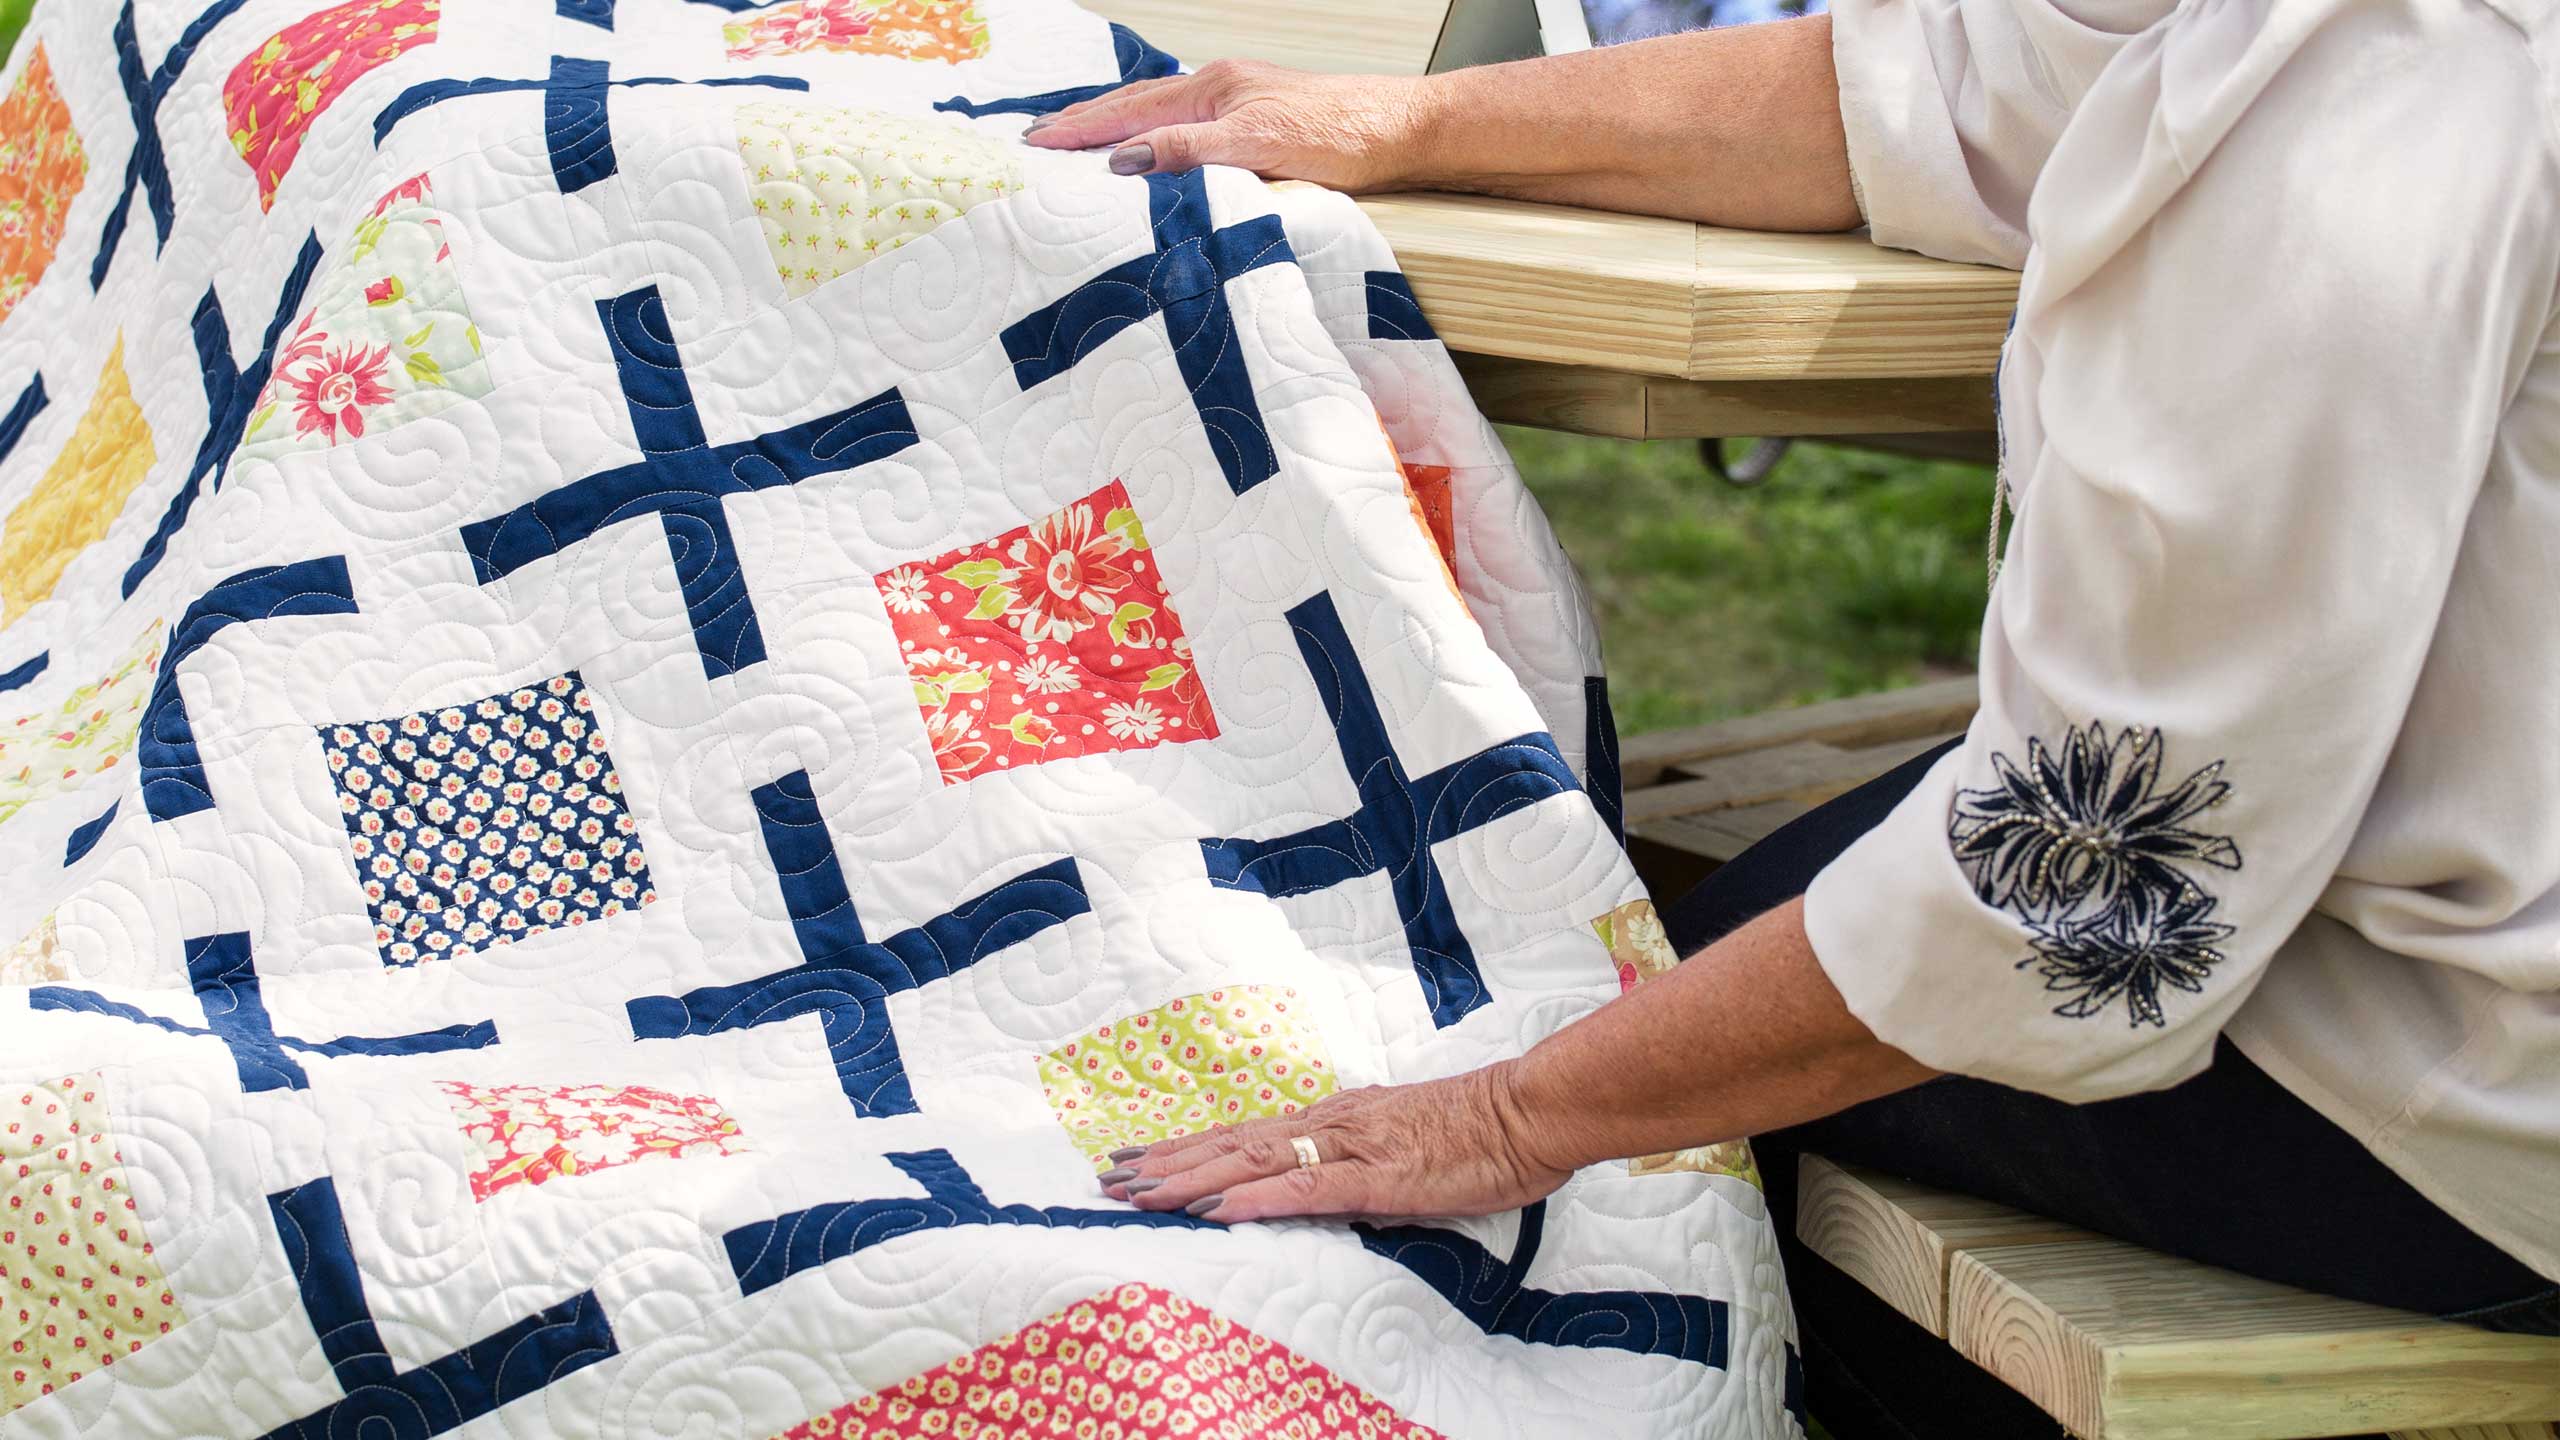
Hi everybody, it’s Jenny from the MSQC. And I’ve got a great project for you today. Let’s take a look at this quilt behind me. We’re calling this Linked Up because it’s just got all these cute links and it’s super easy to make and so much fun. You’re going to love it. So to make this quilt what you’re going to need is one, you heard me right, one charm pack. And we’ve used Coney Island by Joanna Figeroa for Moda. And it’s just a darling line of fabric. You’re going to need for your background fabric here, you’re going to need 3 ½ yards and that’s going to do all of your backgrounds and your first border. Your second outer border here is a yard and a quarter. And we used a five inch border. And for this sashing right here, this dark blue, you’re going to need one yard of that. So that’s everything you need to make this quilt so let me show you how to do it because it’s super easy.
Alright first thing we’re going to do is we’re going to open up our charm packs because we’re going to use those. Oh I forgot to mention also this makes a quilt that’s like 70 by 80 so it’s a pretty big quilt for one charm pack. So that’s pretty cool. So we’re going to open up our charms packs and just get those ready to use because every single one of these charms right here we’re going to border on all four sides with our background fabric. So the first thing you’re going to do is take your background fabric and cut it into 2 ½ inch strips like this. From each 2 ½ inch strip you’re going to make some sub cuts. We’re going to cut two five inch sections because that is the size of our charm. So we’re bordering the two sides of our charm with the two five inch like this. So this is just going to go on either side like that. Once those get on you’ll want to measure, make sure of your seam allowances. For me mine ended up being nine inches. And so I’m pretty sure they ended up nine. Let me measure that to make sure, yep. So I’m just going to cut two fives and two nines out of this piece. I have my nines already cut over here. And actually when I made this, what I did was I took my fives like this. Put them on here, sewed a quarter of an inch down both sides, pressed them open. And then I measured. So let’s go to the sewing machine and we’re just going to sew this down. I can tell you the measurement because I’ve already made it. But we’re just going to go ahead and sew this down. We’re sewing a quarter of an inch on each side. And the reason I say yours could be different is because all of our quarter inches are just a little different. And so you’ll want to measure to be sure. Alright.
Alrighty so I’m going to press this open. And I’m just going to actually roll these back like this. Alright now let’s look and see how we measured up here. So we are pretty close to nine. So now I’m going to take my two nine inch side strips and I’m going to attach those on either side just like that. The goal with anything like this is that you want your blocks to come out the same size. It doesn’t really matter what size they come out. It matters that they’re the same size. So you’ll want to just measure and make sure that, that your blocks are coming out the same size. Alright there’s my one side and now we’re going to sew the other side right here. You know me, I’ve never been a big rule follower. Alright so I’m going to press this open. Alright. I’m going to press this open and I did. And you can see I’ve got a little bit of, a few little edges that are raggedy here. I’m going to come along here and I’m just going to trim those up like this. Make sure we’re nice and straight. In reality it should come out perfect. But for me, well you know. Sometimes. Alright so barely trimming the edges off that. And this is now pretty close to a nine inch block. The bottom line is. You’re going to do this to all your blocks and you want your blocks to be the same size.
Alright so now the trick to this whole quilt is that cool little sashing. So on your 2 ½ inch strip you’re going to need to cut some 2 ½ by 1 ½ inch pieces which I’m going to do right here, just like this. Because we’re going to put a sashing next to every single block. So let’s look at the quilt right here. So here’s our square right here. This is our sashing, just this part right here. So we have to cut two blue pieces and a white piece to go in the middle. So now we’re going to take our, our 2 ½ inch, our pop fabric, you know the link fabric. And we are going to cut that into 1 ½ inch strips. And off of every 1 ½ inch strip we’re going to cut three, two pieces that are 3 ¾ . So I’ve got one, two, three and ¾ here. And then you’re going to do this for each block. The way that this goes together is like this. So we’re going to stitch down this little 1 ½ by 2 ½ inch piece to the 1 ½ by 3 ¾ inch pieces. So let’s go to the sewing machine and do that. These are just tiny little seams. On this, when your seams are this short, you know when you have that little of a distance in between sewing you may want to just backstitch just a little bit. I found when I was doing mine, you know you really only backstitch in clothing sewing because in quilting everything is enclosed in a seam. But I found if I had to, you know, pull mine at all they were coming unstitched a little bit so I just started just putting a little tack in there at the beginning right there. Alright. And I’m going to press these open. Now I’m going to try and press these so that the dark color stays under the dark like this. Now this piece right here, we’re going to add to our square here, just like that. Alright? So I’m going to put this right sides together right here and I’m going to stitch this on just like that. Alrighty. So you’re going to do this to all your squares. You’re going to put that little sashing row on all of your squares and, and then you get to put your rows together, alright?
So let me show you a row here. I’ve got a row over here all ready to go. Here’s our little row. Now there’s only three in my row. Up here we have one, two, three, four, five, six. Remember we’re using a charm so that’s six across by seven down. That makes 42 squares. So we’re looking at 42 five inch squares. And we start with a sash and we end with a sash. Just like on here you start with a sash and you end with a sash. And you’re going to do your whole row like that. Now when you’re ready to put your rows together you have to make another row of sashing to complete the linked look. So what we’re going to do is these little 1 ½ by 2 ½ pieces now have to be centered on your block. You want those centered so our middle pieces. There’s going to be two measurements here. Our middle pieces are eight inches. And you’re going to put eight inches and a 2 ½ and eight and a 2 ½. Your ending pieces are going to be 4 ¾ out here on the end. The basic, the basic thing is you want this to fit. You want those to be centered, ok? So then once you get this done you’re just going to be able to stitch this on like this, stitch it to the other one. Now pay particular attention when you match these rows up, ok? That’s, that is actually really important. I have a little bit of a hard time with that. And so I have to pay attention. A lot of times when I sew these rows together and I want them to line up on the other side of a sash, they get off just a little bit. And that, for this quilt because we’re dealing with such a small place, it’s that’s not going to be good. So pay attention when you put your sashes, that you pin these very well so they line up nice and straight. And that makes your plus signs. So it’s pretty easy to put together. Once you get it done you’re going to add your 2 ½ inch border out here. Then you’re going to add your five inch border on the outside and it’s going to be completely finished. I think I said this in the beginning but it makes a 71 by 80 inch quilt about. And it’s just a great looking quilt, really fun and really easy. And made from one charm pack. So we hope you enjoyed this tutorial on the Linked Up quilt from the MSQC.
& Progress on Social