Calico Star Quilt Tutorial
Jenny Doan
Calico Star Quilt Tutorial
- 1 x Print Layer Cake (10" Quilt Squares)
- 1 x Solid Layer Cake (10" Quilt Squares)
- 1½ yards x Background Quilt fabric (Includes Inner Border)
- 1¾ yards x Outer Border (Includes Cornerstones)
- ¾ yard x Quilt fabric for Binding
- 8¼ yards x Quilt fabric for Backing


Finish your masterpiece and let us give it the finishing touch it deserves.
Subscribe to MSQC on YouTube
Hundreds of FREE tutorials and a new one from Jenny launches every Friday.
video transcript
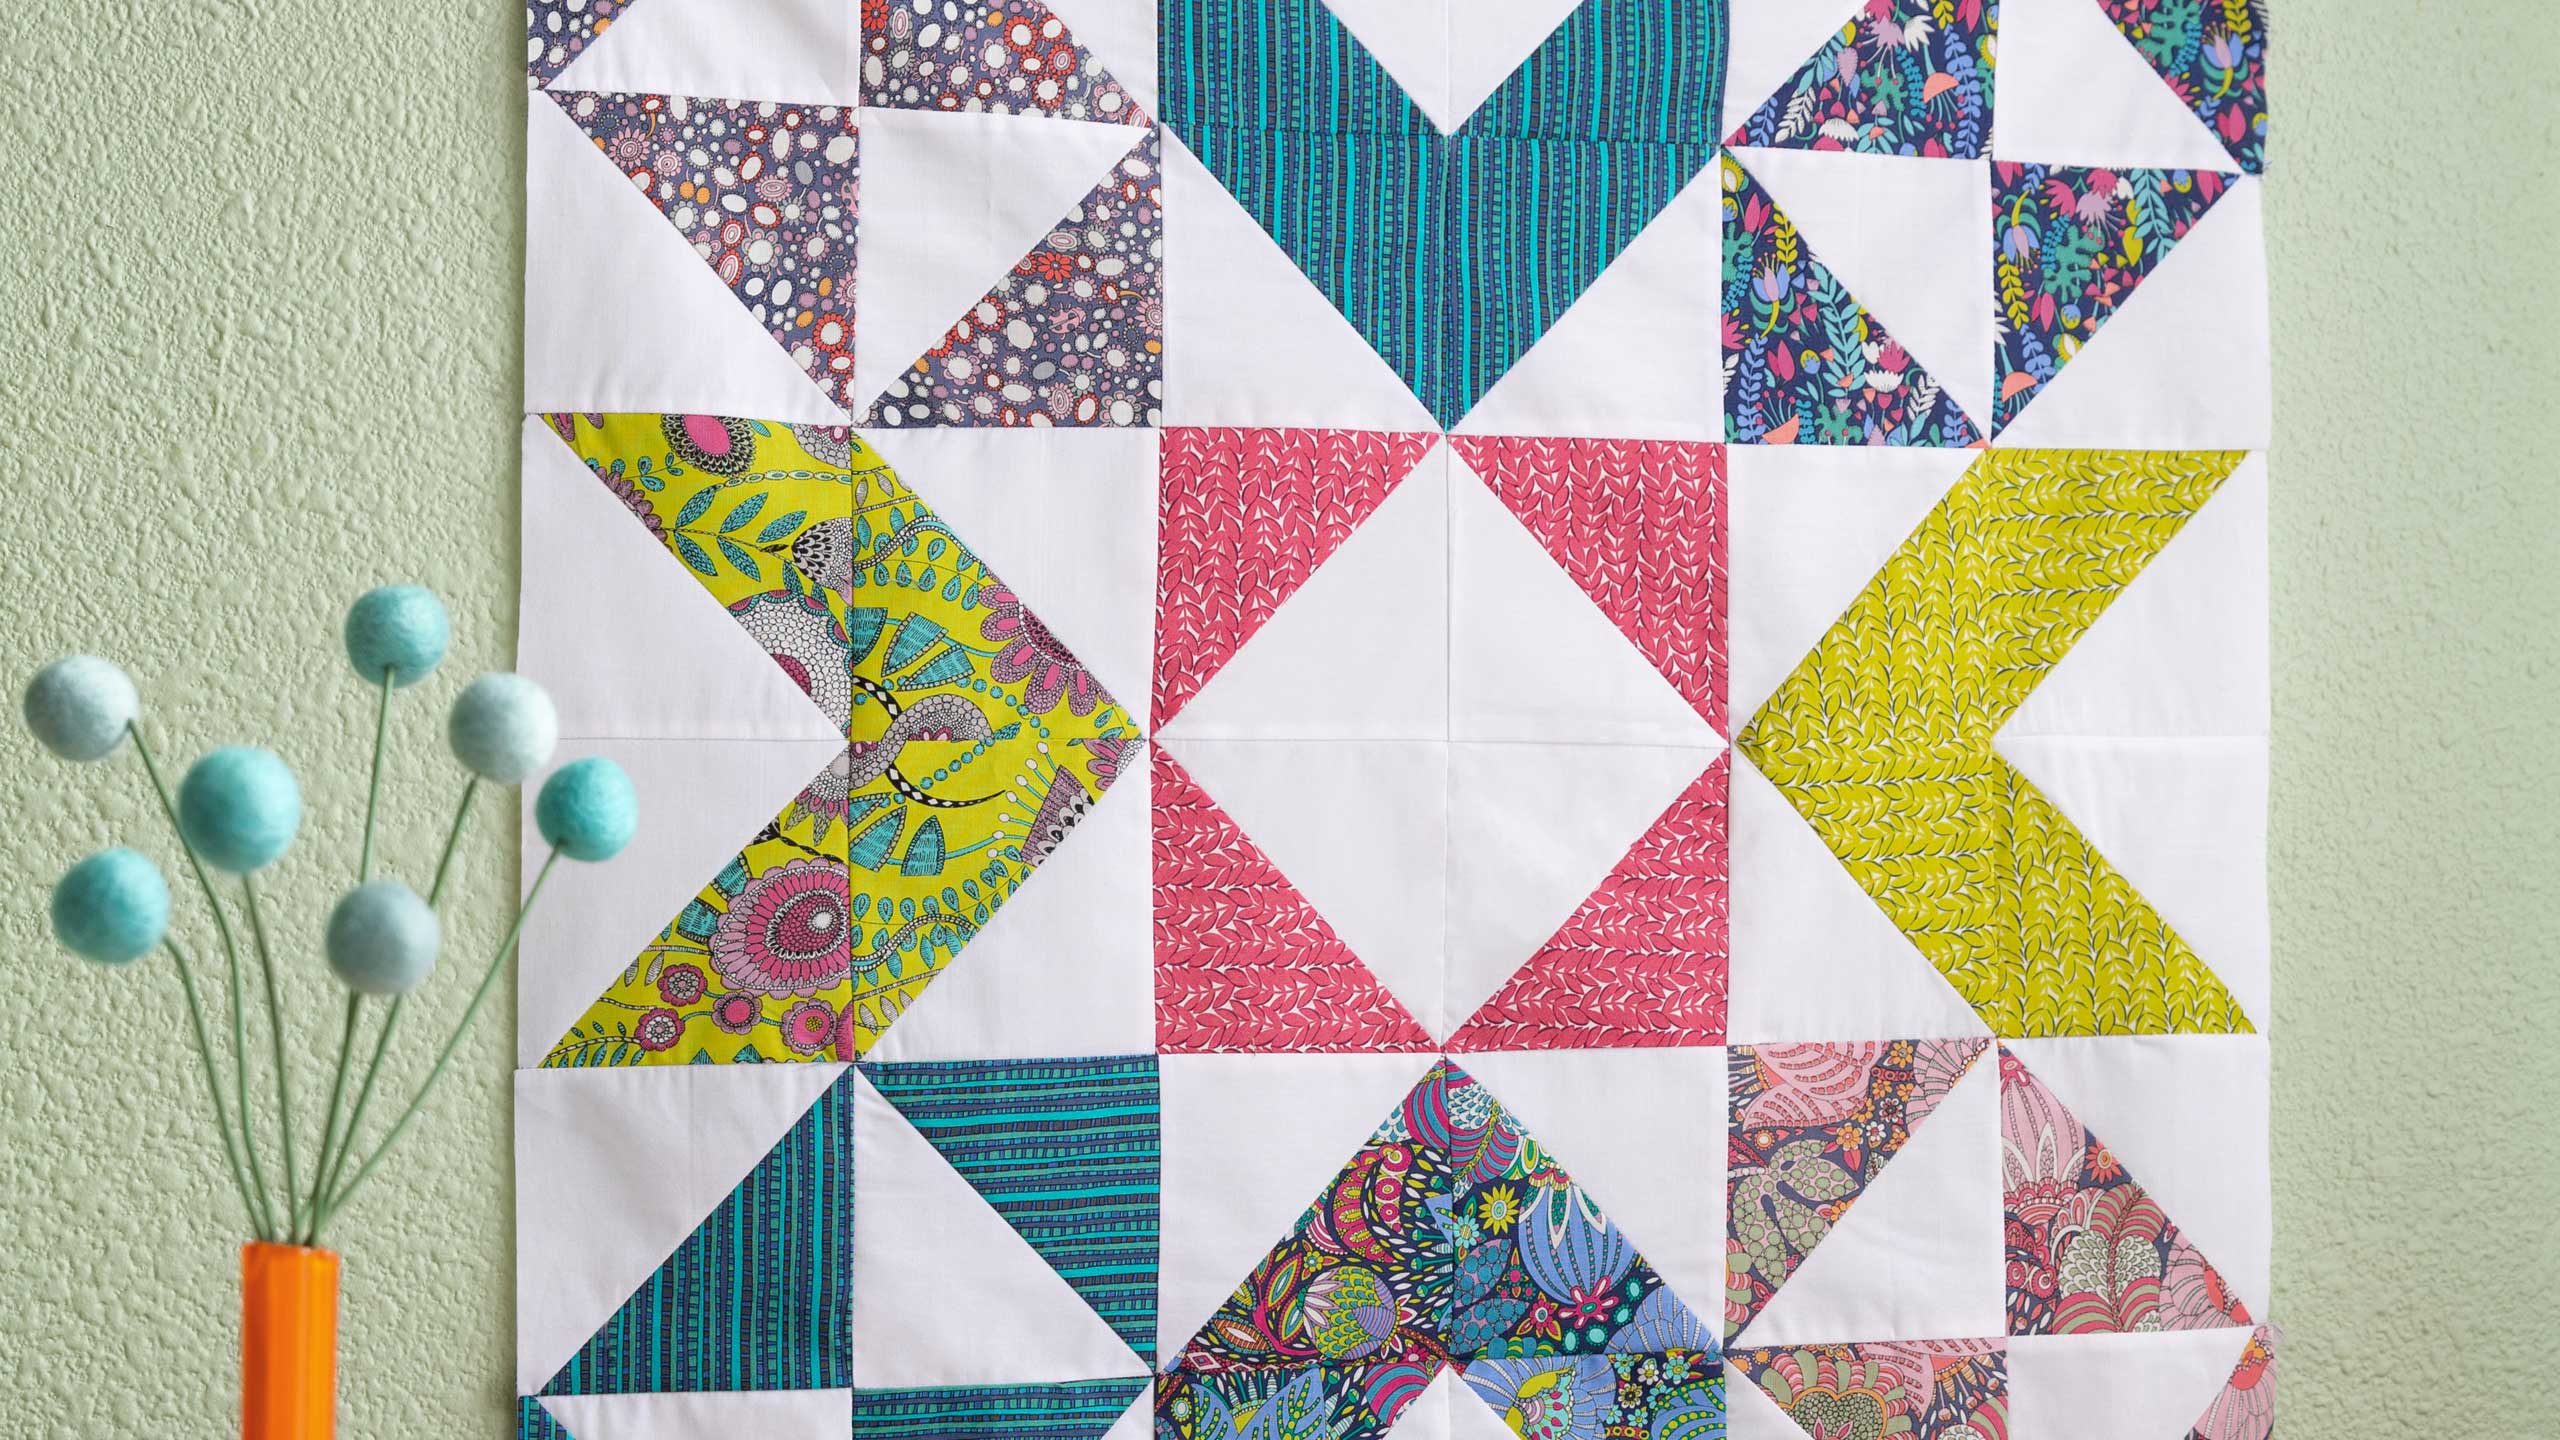
Hi everybody, it’s Jenny from the Missouri Star Quilt Company. And I’ve got a great project for you today. Take a look at this quilt behind me. Isn’t this fun? We’re calling this Calico Star and mostly because of all the different kinds of fabric. Honestly I would have bought most of these fabrics when I was a teenager to make a dress out of. I just think they’re so cool. So to make this quilt what you’re going to need is one packet of ten inch squares. And we have used Fantasy by Sally Kelly for Windham fabrics. You’re also going to need a pack of background squares and an additional yard and a half of yardage. And the yardage takes care of all these sashings and these inner borders. For your outer border out here you’re going to need a yard and ¾ for that. The backing, we used 45 yardage and because of the size of this quilt you’re going to need 8 ¼ yards. Now if you want to you could just use a 108 piece of the backing and get three yards of that. And that will be plenty big enough to back it as well. So this quilt is big. It’s 91 by 91. It’s a great big quilt. The blocks we’re making right here are 24 inches. They are great big blocks. Really, it goes together so fast because basically you’re making nine of these big blocks and we are done. So let me show you how to do this.
Alright, this is a half square triangle quilt. And what we’re going to do is we’re going to take a piece of background right here and we’re going to draw an X. This is a half square triangle quilt so we’re going to do the easy eight which means we’re going to draw an X diagonally corner to corner. So make sure you have a nice long ruler that stretches corner to corner. Draw your X like this. Now I actually think this is a really fun scrappy quilt because you’ll notice that every block, every little block in this block is a different color and it’s not like everything is blending. It’s very scrappy looking which I love. I just love a scrappy quilt. But also I think this would be amazing if it was like three colors where every, you know this whole set of blocks was, these were a color, this was a color, this was a color. I think that would be really fascinating too. I actually think this would be a really fun college quilt. So I’m coming over here to the sewing machine. I’ve drawn my X here and I’m going to sew a quarter of an inch on both sides of this line. So let’s make sure we’re lined up really nice, our right sides are together. So I’m just going to sew a quarter of an inch right down the side of these lines. When I get down here to the end, I’m just going to lift my presser foot and come over and come back down the other side. So no cutting, no taking off. Just lift and turn. Because we’re cutting on our drawn line, I’ve just used a pen, a regular pen to draw that line. You can use whatever you want but for me that was just easy. So now we’re coming down on the other drawn line and it forms a big X. Flip it around, come down the other side.
Alrighty, now we’ve got this sewn, a big X like this and we’re going to cut it. Now there’s lots of ways to make half square triangles. And because this is based on a half square triangle then, you know, any size will work. It will change your block size. My block size is going to end up 4 ½. So we’re going to cut this now. And when you cut a crazy eight block, what you’re going to do is you’re going to lay your ruler right along the outside edge right here. We’re going to cut straight through the middle. We’re going to turn our ruler and put it on the other edge. So we’re cutting horizontally and vertically like this. And then we’re going to cut it also corner to corner on that pen line that we’ve drawn. And if we’re careful and we don’t move our fabric, this is pretty easy. Oop, I just moved my fabric. Wouldn’t you know it? Alright here we go. I can still line those up. And now we have eight of these little half square triangle units. And that’s what they look like, just like that. Now before we press them open we’re going to stack them up like this and I’m going to square these. Use whatever method you like to square your blocks. We’re going to square them to 4 ½. I’m using the clearly perfect slotted trimmer right here. I’m going to trim them at 4 ½ which means I’m going to line my seam line up on their seam line. And I’m just going to hold this on here and I’m going to trim and trim. And that squares up my block. I’m going to just scrape those out of the way and we’re going to do a set of these and I’m going to just plop them over onto the ironing mat because we’re going to press them open as soon as we’re done. Isn’t this an easy way to square half square triangles? Now I actually sew mine and trim mine as I go and then I come over here to my ironing mat and I’m going to just give them all a nice press, set those seams, kind of all at once. Pretty sure it still works the same. I’m going to flip them over and then I’m just going to iron them open. I like to have the dark side on the top so that this seam, when I press this, this seam stays on the dark side. So we’re going to go ahead and do this. It doesn’t matter which way your stripes are going. Don’t worry about any of that. This is a very easy, forgiving pattern. Alright.
So now let’s talk about these blocks because we have this block. Now this is a broken dishes block. It looks very much like an hourglass block but this unit right here is called a broken dishes block. This is a chevron block right here. This is a square in a square and we need all three of those. So you want to cut a bunch of your pieces and then we’re going to start putting the blocks together. So I have some half square triangles here that are already trimmed up and ready to go. I’ll add mine to the stack and we’re going to make some blocks.
The first block we’re going to make is the broken dishes block. And we’re going to make that by putting two blocks in like this, color in and color out like this. And that’s going to get sewn together like a four patch. So we’re going to lay these like this and like this and we are going to go to the sewing machine and sew those down. Now make sure that this nests right here because we’ve ironed to the dark side you can nest these. You can feel with your fingers that there’s no room in between. And we’re going to sew a quarter of an inch right down the side. And just like this. And then I’m going to add my other block right underneath, right in the way I have it sitting and slide it under there and keep going. And I just take a few little stitches to anchor it and then I’m going to match up these two seams right here. And again I can feel with my finger that there’s no room in between. And then we’re going to take these, there’s a little stitch in between, let me trim off these threads, and so I’m going to open them up and make sure they’re going exactly the right way. And they are. I’m going to flip them over like this and sew them together. Again that top seam will nest. So start off nice and slow. Take a few stitches. Then I line up my center seam. Now that center seam matters so take a look at that center seam and make sure that it’s lined up nice and straight. You know there’s a, not all the little places where you put them together matter that much but that little center seam you’re going to see so we want to do that. Now we’re going to press this open. Oh look at that center seam. That’s perfect. Alright. So you’re going to need four of these and so I’ve made a few more over here. We’re just going to stick them on top of each other. I love this fabric. Alright. Then we’ve got this center piece right here.
And this is just four blocks put together where it goes right to the center so. So we’re going to put this red one together because we have all the pieces and it will form a diamond, just like this. So just like that. We’re going to sew it together. And we only need one of these. So again I’m going to sew right down one side. Now on this one because we’re putting our whites together, your seams will lay on top of each other. That’s ok. There we go. One side and then down the other. Come on. Let me clip off these threads. And then we should be able to just open this up and have it work. And it does. So again we’re just going to fold this over, lay those seams on top of each other and match our middle seam. Now the middle seam on this one won’t show because it’s four white fabrics and so your eye will see that as perfect whether it is or not so. Though I lined them up and you know it’s habit. I just do. I don’t really worry too much about that middle seam just because, well it’s just white fabric. And it’s, you know, it’s just going to look like it worked. . Of course mine, let me just brag, it’s perfect. I love it.
Alright now this last block is a chevron block. It’s going to look like this and you’re going to need four blocks to make that. So what we’re going to do is we’re going to take four of our blocks. And two of them we’re going to put color to color, so just like this. It makes a very easy flying geese but we’re going for the whole chevron. The next two down are going to go together white to white. So just like this. So again we’ll fold these over on themselves like this. We’ll go to the sewing machine, start with this one. This one is going to, your seams are going to lay on top of each other. Just remember a needle can go through lots of things so you’re not going to have any trouble with those four layers of fabric. And then we’re just going to start down this side. And then we’re going to add these in right under the needle, right under the foot, under the needle that sounded terrible. Under the presser foot and we’re going to sew down the side of this. And then what we’re going to do is we are going to open them, make sure they still match. I always check. It’s so much better to check than it is to have to pick out. A lot of times we’ll get in a habit of doing something and we like to sew from the bottom to the top or something like that. And then our blocks, if we don’t look they could get a little off. So we just want to make sure that they’re going the right direction. I’m matching up my middle, making sure my edges match and sewing down the other side. Alright. And this is a chevron block. And so I love that, this is one of those blocks where you actually get experience making four different blocks. They’re all half square triangles but each one of these blocks really could be its own quilt. So let me show you how this goes together because this is a great big block and it’s super nice and super easy.
So we’re going to start with our middle right here. Our chevron blocks go all around that center block. So I”m going to put one here, one here, let me see. This one here and this one over here. Just like that. Then our corner blocks are going to go in and our corner blocks, let me look to make sure, yes these go in color to the center. So color to the center here. And then this one can go here. And this one can go here. I have another one over here. This one can go here, right in the center. Color to the center. I’m actually going to swap this one out because I like to, you know when you make these, I like them all to be different. And well these two are the same but we’re just going to have to live with that. It’s far enough away that it doesn’t bother me. So then this becomes a big nine patch block. And so all we’re going to do is we’re going to sew this row. We’re going to sew this row, sew this row and then sew all three of these rows together. So I”m just going to lay these on top of each other and sew the row. And sewing the row is pretty simple. It’s one of those things where, it’s just, you know, you make that row. You line up your seams. I met a lady this last weekend and she presses every seam open. And that is totally up to you. That is personal preference. You know if you want to do that you are so welcome to do that. Alright so these two are together right here. And they’re still right. I’m going to add this girl to the other side and we’re going to sew this down the side.
So now I’ve got all my rows sewn together and I’m going to give those a quick press. And what I’m going to do when I press these is I’m going to make sure that the middle seams are going out, these seams are going in and these seams are going out. So when I lay this on here like this I’m going to push this seam over to the middle. And that will help my seams nest when I put my rows together. I’m going to flip this over and make sure that I have no pleats in here because if you have a pleat or a fold your block is not going to line up very good. So the next row I want to press the seams out so, to make sure they can nest right next to each other. So I’m just going to press these out, flip it over again. Make sure there’s no seams or folds on here. I have a little thread. Oop, I need to clip that thread. And we’ll put this in the middle. The last row, we’re again going to press in the middle. Now do you have to press them in or can you press them out? You can do whatever you want. If anybody looks inside to see which way you pressed they are not your friend. So this is just how I’m doing it. And honestly on the next block I may forget what I did and press them out, in, out, you know. So just make sure that they’re opposites and then they’ll all line up nice together. Alright.
So now what I’m going to do is I’m going to lay this whole row on top of here like this. And what I’m going to do is I’m going to make sure that these line up. And you can put a pin in there if you like. I like to do a few little anchoring stitches here at the beginning. And then I’m going to match at every junction to make sure my rows stay lined up. So let’s go ahead and sew down this one. So here’s a few little stitches. Alright. So now what we want to do is we just want to press our block. So let me scoot this out of the way. We’re going to press these seams right here. When you make big blocks, oh my gosh, your quilt goes together so fast. I love big blocks and I cannot lie. There we go. Here’s this block. Isn’t this a great block?
Now let’s see how this goes in the quilt. So right here, color up, color up and color up, color up. That’s how the block goes in here. Now you’ll notice right here, we have a sashing strip. So the size of this block, this is 2 ½ inches by the sashing strip. So you’re going to sew block, sashing strip, block, sashing strip, block. Then you’re going to put another sashing strip in that is the exact same size as this one. It’s the bottom size of the block but a little cornerstone. And the little cornerstones are 2 ½ inch squares. And we got those out of the border fabric. Just took a little piece. They’re all the same. Cut our little border fabric, 2 ½ inch squares. So we put, you know, sashing strip here. So then you put this one piece, the sashing strip, 2 ½ inch square, sashing strip, 2 ½ inch square, sashing strip. And that takes care of that piece in between. What it does is it just separates the blocks a little bit so that they can stand out and show off their beauty. So this is just a fun quilt. It’s a great way to learn three different blocks. You’ve got your chevron block, your broken dishes block and your diamond block in the center. And we hope you enjoyed this tutorial on the Calico Star from the Missouri Star Quilt Company.
& Progress on Social