Daisy Chain Quilt Tutorial
Jenny Doan
Daisy Chain Quilt Tutorial
- 1 Roll x 2 1/2" Precut Fabric Strips (Jelly Rolls) - Print
- 1 1/2 Yards x Background Fabric
- 1/2 Yard x Quilt Fabric for Binding
- 3 1/4 Yards x Quilt Backing Fabric


Finish your masterpiece and let us give it the finishing touch it deserves.
Subscribe to MSQC on YouTube
Hundreds of FREE tutorials and a new one from Jenny launches every Friday.
video transcript
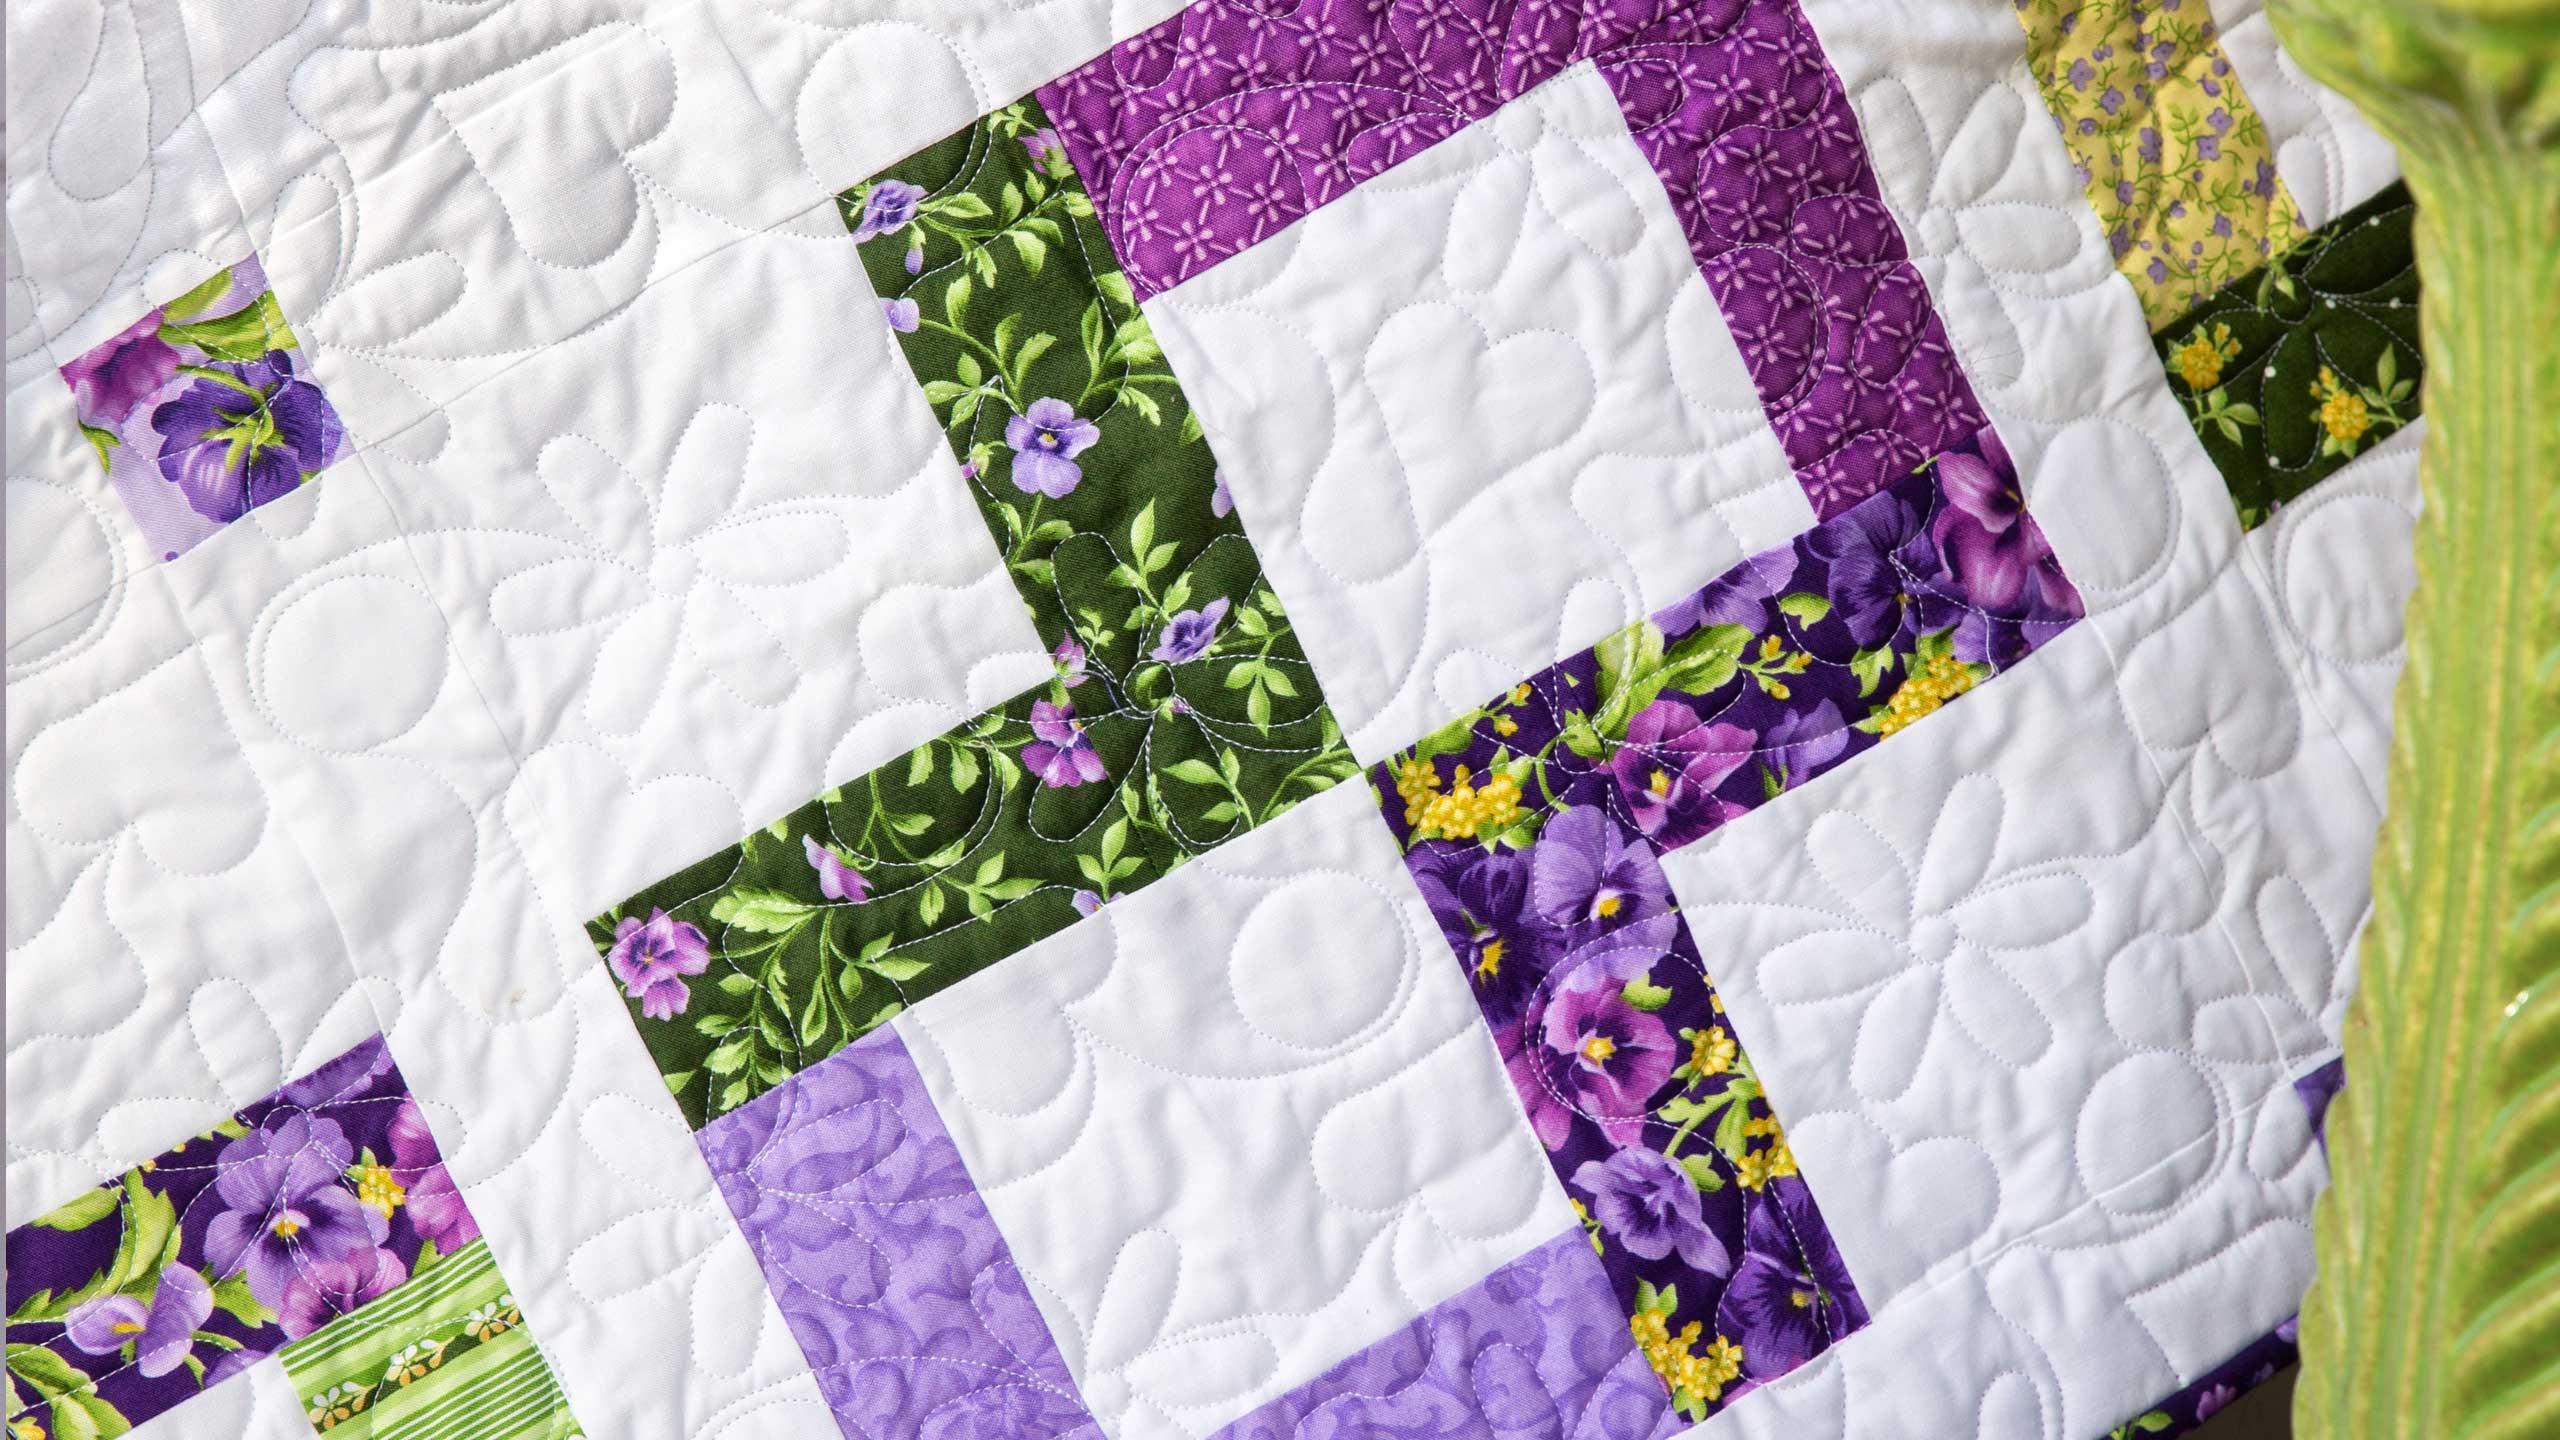
Hi everybody, it’s Jenny from the MSQC. And I’ve got a fun project for you today. As quilters we have the opportunity to make a lot of baby quilts. And I actually really enjoy them. They’re projects that get done pretty quickly. And that’s one of the reasons we came up with our Baby Block issue where we took tutorials that were already out there and then just tweaked them a little bit. And I thought some of them warranted a new tutorial so that’s what we’re going to do today. The quilt in the baby block is called Daisy Chain and it looks like this right here. This is the one that’s in Baby Block. And, and it’s based on an old tutorials that we did called Falling Charms, really cute tutorial, real easy. We took the charm and bordered it on two sides with a solid. Well we’ve done just the opposite with this one. And let’s take a look at it. So here’s our charm. It’s, now the background is in the middle and it’s bordered to two sides with the same strip of fabric. So for this quilt we used Emma’s Garden right here. And it’s by Debbie Bevis for Maywood Studios. And it’s just a great line. And you’re going to need about 18 of those strips. We used a yard and a half of background. And from the background we cut our five inch squares and our 2 ½ inch pieces for the sashing that forms the sashing and the border. Now I would probably use five inch charm squares for those pieces. And that would, and if you do that it will cut down your yardage considerably. So let me show you how to do this because it’s real quick and easy.
You’re going to take your five inch square right here. And we are going to sew fabric to two sides of it. Now the first cut is going to be five inches. And we know that. And the second cut is going to be seven. And in the pattern it gives you all the directions to cut those up. But when I like to do it I sew it this way. So I put my squares on here. And I’m going to sew down. And then I’m going to cut my fabric right there. And that’s kind of how I do it but you, you can, feel free to cut up all the pieces if you want to. It’s just not how I do it. But they want to make it easy. You know one of the things that’s fun for quilters is that we all have different brains and we all do things differently and so, so it’s whatever works best for you. Some people like to get all their cutting done ahead of time. I like to do this and cut mine and then press it open. And I’m going to press to the dark side. So I’m just going to, and when I say press to the dark side some body the other day asked me, what does that mean. And I’m like, it means that the seam of your fabric, that darker fabric is going to hide under the fabric. And it’s not going to be pressed to the white fabric where it could show through.
Alright so now what we’re going to do is we’re going to take this same piece and we’re going to run this other piece down the side right here. Let me show you this, like this. Just run it right down the side a quarter of an inch. And make sure my seam is laying down underneath there, going the right direction. And then I’m just going to trim this off right here. Now again if you want to cut your pieces, this piece is five right here, five inches. The same as the charm. And this side piece right here is seven inches. So that’s the size you’re going to cut. I just kind of sew mine on, you know, strip one after the other. Kind of chain piecing. You do have to make sure your squares are the same size.
Alright now what we’re going to do is we’re going to put these together in a block. So we’re going to make four of these and put them together in a block. Here’s our block right here. And when we put this together we’re going to put two, two squares in like this. Just want to make sure you guys can see this. Two squares in, and then like this. Two squares in and two squares out. So just like this. Alright? So that’s going to go together as a four patch. And I’m thinking right now that I want to swap my purple over here. I want my colors a little bit different. Nope, let’s do purple up here. Oop, two whites in, two squares in. You know I have those mantras. I get angley challenged. Two squares in, two squares out. So now I’ve got green, green, purple, purple and that suits me a little better. So we’ll sew those together. Alrighty. Now there are no seams to line up. There are no seams to line up on those sides so we can just sew them down. And then when we put these two blocks together the only seam that lines up is that center seam. And you want to make sure that one is pretty good. Alright now I’m just going to put these two together since I’m hoping they’re right and they are. So again I’m just going to put this together like this, line up that edge. Start sewing. Make sure my center, my seams are nesting so one seam goes one way, one goes the other. And I can just put my finger on that seam and sew until I get there. Alright now let’s press this open. And let me move these over here a little bit. Oh that center is so nice and clean. It looks good. Good job, Jenny. Sometimes we have to tell ourselves that don’t we. You did so good on that.
Alright here’s our block. Now let’s look at how these go together on the quilt behind me. I’ve got some more here to show you. And so what we’re doing here is we have our blocks. And when a square comes up here, the next one points to it. And so we match them top to bottom. But we’re going to put a sashing strip right in between them. So let me show you how that’s going to work. I’ve got some, I’ve got blocks here. And I’ve got some little squares. Now when you put a sashing strip in between your rows, the one thing you want to watch for is that your sashing strip should be the same length as your rows. So we’re going to have this piece right here. Let me just pile these up over here so you can see. So this strip should be exactly the same length. And see how this one is actually a little bit, a little bit long. I would actually cut that to match. Make sure that your strips match the side of your block. You’re going to sew that down. And you’re going to sew your rows together.
Now again we’re going to put these together so that, we don’t want that one. We want this one. So that our two bordered blocks come together like this. And then the two white blocks will come together out here like this because what we’re making is this secondary block right here. So see how this happens, the secondary block. Let me move my chair. There we go. This secondary block right here, so see how that comes together. That’s the look we’re going for and it appears a couple of times in the quilt. And, and so then we just put these together so the colors are together, sashing strip. And then when you have your rows together you’re going to put a sashing strip in between them. And that’s a long piece that measures the same as your blocks with a 2 ½ inch corner square. So it’s going to look like this. And you’re going to lay that in here just like this. See how that’s going to happen. So it goes together really quick, really easily. And, let me move these up here so make sure you can see them. There we go. So again right over here there will be a sash on this edge. You’re going to start it with a sash and end it with a sash. And then these secondary rows right here are going to be your sashing row that in turn become your border row. So it goes together really quickly and really easily. So we hope you enjoyed this tutorial on the Daisy Chain quilt from the MSQC.
& Progress on Social