Easy Ribbon Quilt Tutorial
Jenny Doan
Easy Ribbon Quilt Tutorial
- 3 Packs x 5" Fabric Squares (Charm Packs)
- 1 Roll x 2.5" Fabric Strips (Jelly Rolls)
- 1 Yard x Outer Border Fabric
- 3/4 Yard x Quilt Fabric for Binding
- 4 Yards x Quilt Backing Fabric


Finish your masterpiece and let us give it the finishing touch it deserves.
Subscribe to MSQC on YouTube
Hundreds of FREE tutorials and a new one from Jenny launches every Friday.
video transcript
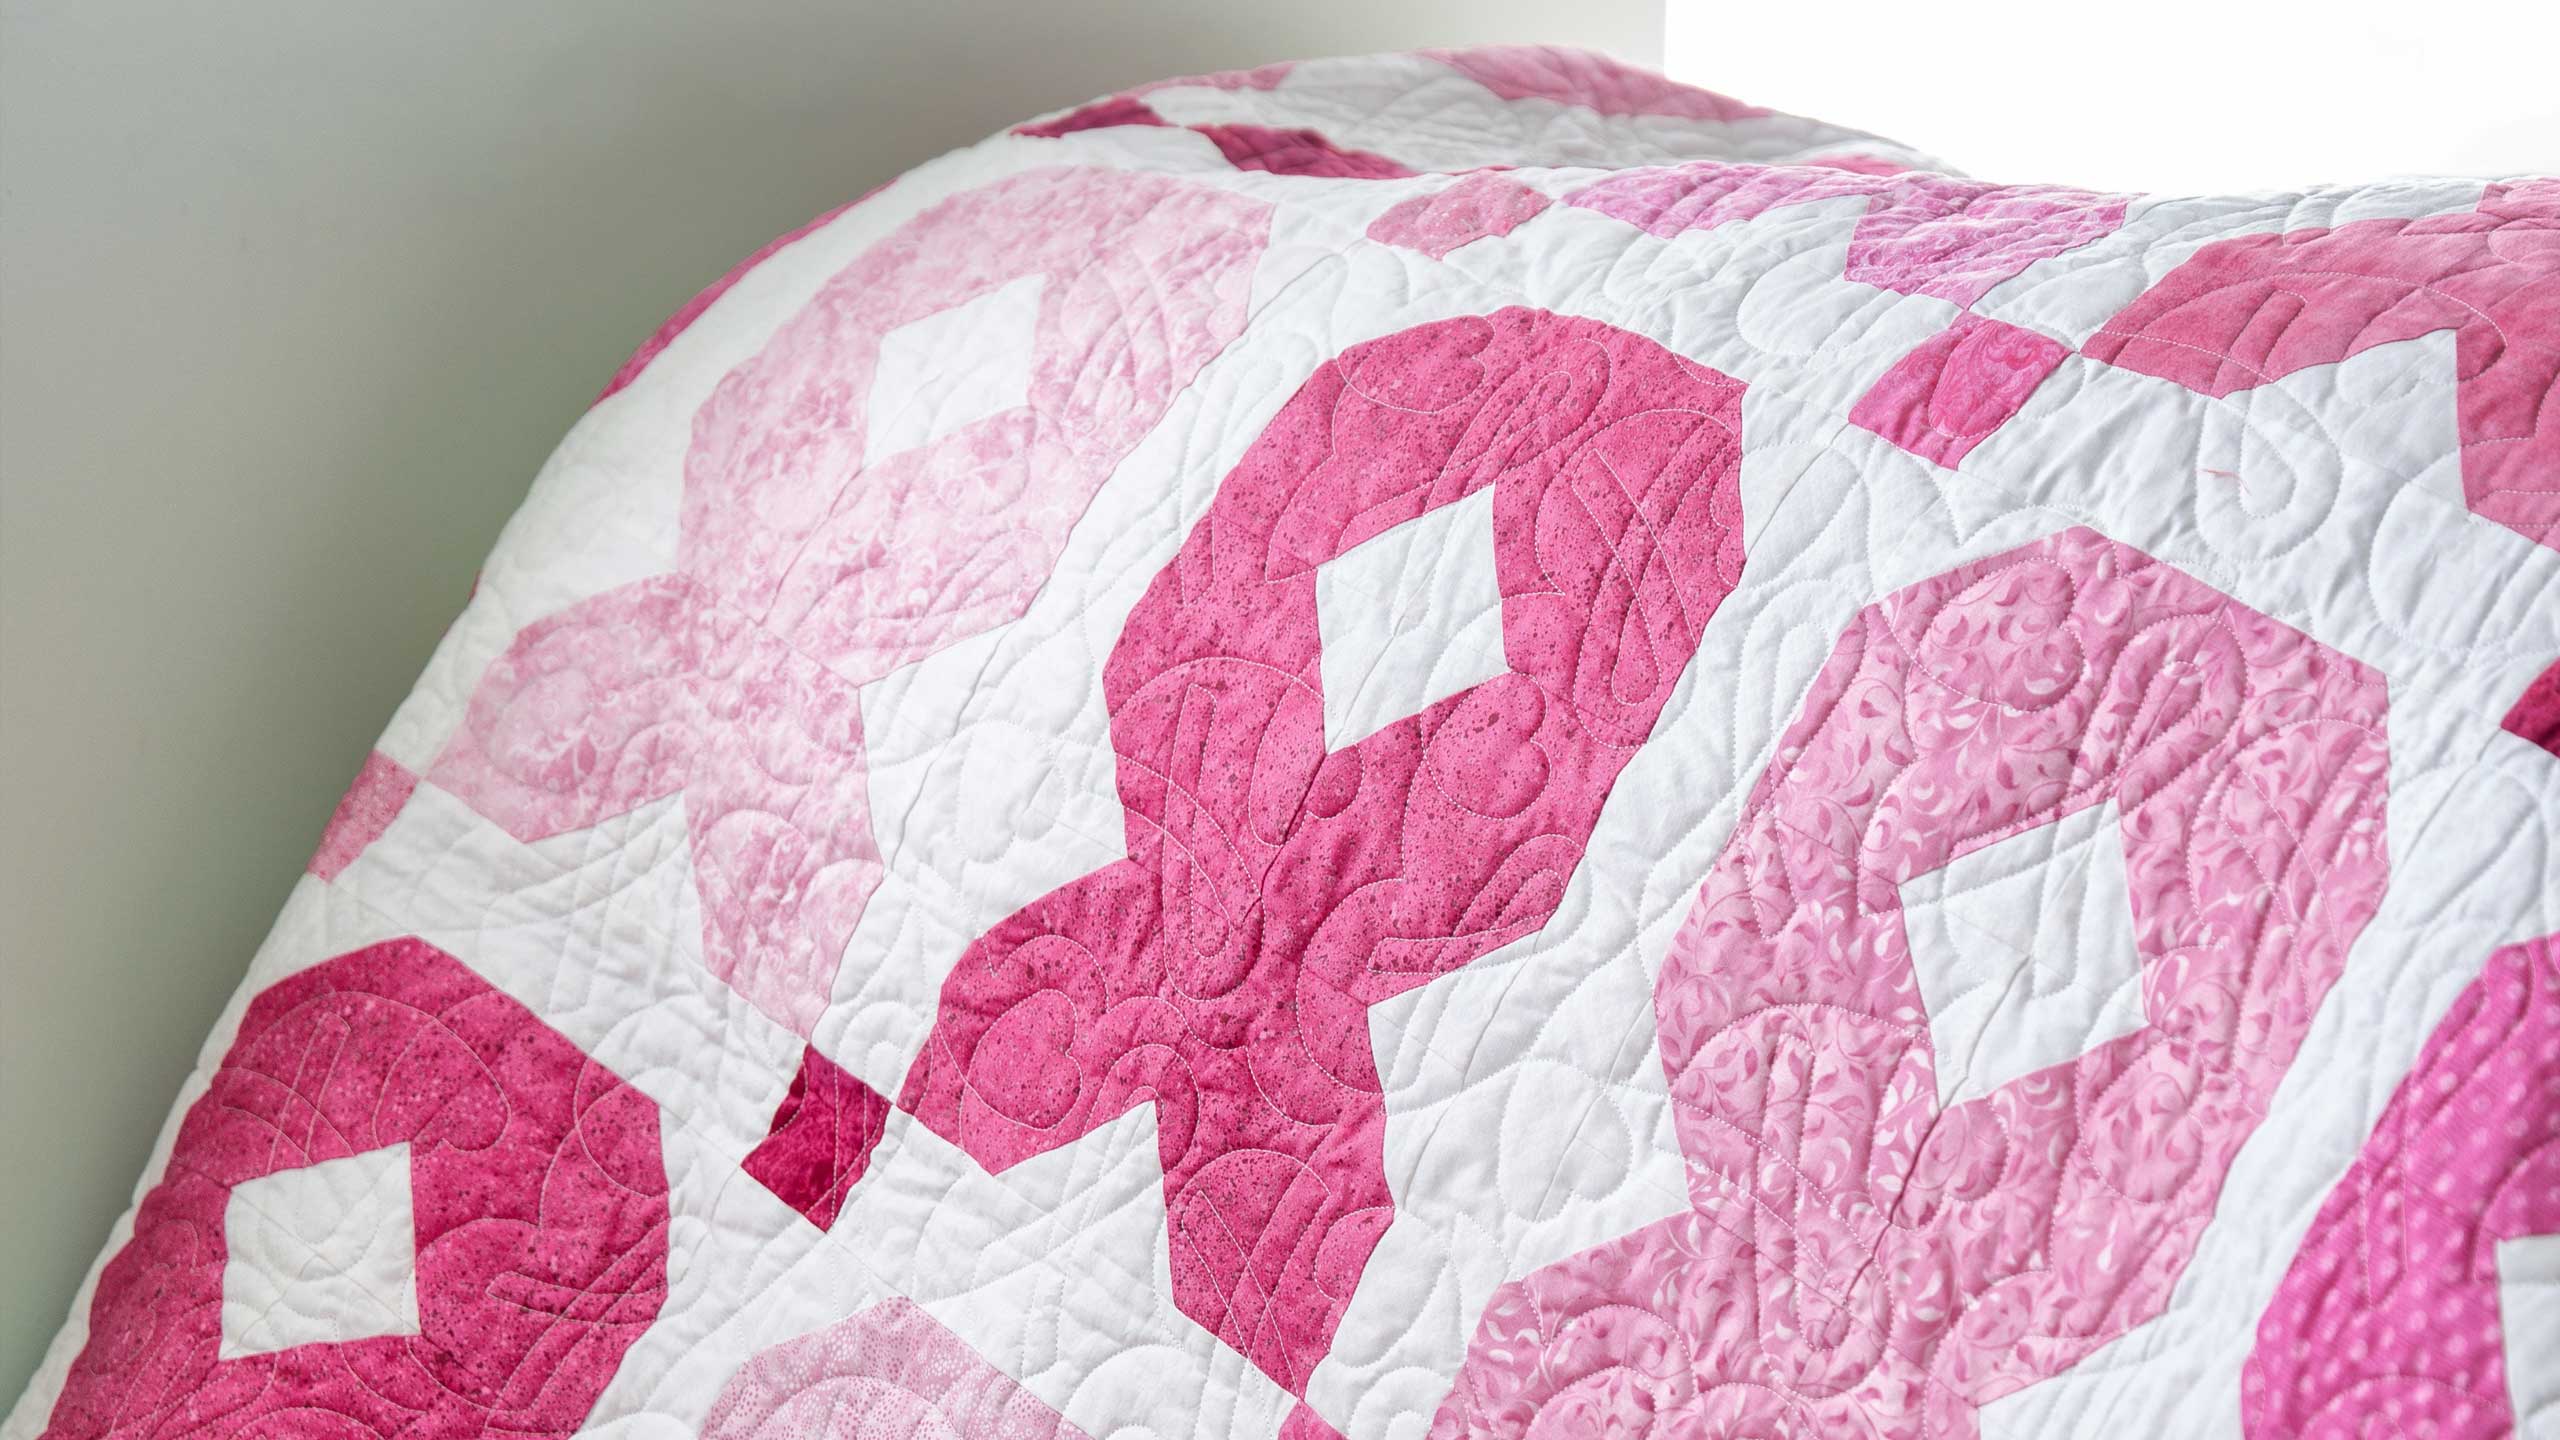
Hi everybody, it’s Jenny from the MSQC. And I’ve got a great project for you today. Let’s take a look at this quilt behind me. Isn’t this something? Now this is our ribbon quilt. And it’s the Easy Ribbon quilt. And I can hardly wait to show you how to do this. So to make this quilt what you’re going to need are three packs of five inch squares. And we have used these Wilmington Essentials. And the line is called Pinking of You. Isn’t that a great name? We also have used 2 ½ inch strips and this is also Wilmington Essentials. And what I love about these is we tend to use a solid for our background. And these are all strips that are tone on tone whites. And they’re all different prints on them and it’s just, I mean it’s really fun to see that, it just gives it a little more pizzazz to your block and so I love that these 2 ½ inch strips come in tone on tone colors. You’re also going to need a little bit of border out here. And this outer border is going to be one yard and it’s a four inch border. And your inner border and all your little squares, all your sashing, everything is all included in this pack of strips. So you’ll have everything you need. We’re offering this as a kit as well for a limited time. So make sure you check that out in the description below. Let me show you how to make this because this is really, really fun.
So this is the block we’re talking about right here. This is our ribbon block and it’s super easy. Let me show you how to do it. So out of your pack we picked six squares that were all the same. They’re identical squares. Now you can scrap yours up if you want. We happen, in our three packs we happened to have two of each so we were able to put six together. And then what we’re going to do is we’re going to snowball two of the corners. So the math on this is halves. I’m using a 5 ½ inch square. My corner square is going to be 2 ½ right here. And you’re going to want to draw a line side to side or iron it. I’m actually going to finger press it here and also this, whenever you have a tone on tone fabric sometimes it’s hard to see what is the right side. Actually in the end it’s not going to matter which side is the right side. But an easy way to do that is if you put it on a dark fabric like this right away you can see which side is bright and dull. And that really helps. I often lay it on my leg to make sure I have it going the right way. So what we’re going to do, we have a little line that goes side to side. And I’m going to do that to four of these because I have the rest done for you already. And we’re going to put these on so again I’m finger pressing a line. And I should do that the other way. So whenever you finger press or you iron your line, make sure that you are sewing in the ditch. It’s way easier to sew in the ditch where it goes down than it is on top of the mountain. And to do that what you want to do is you want to make sure that your right side is on the bottom and you’re folding it together or matching your corners and putting it together like this. And then you’ll always sew on that inverted part if you put your right sides to the bottom. And I’m just making sure that one’s right. It’s hard to see the other side on that one. Now these don’t have to match. You can mix them up because it’s just going to give it more texture.
But what we’re going to do now is we’re going to go to the sewing machine and we’re going to sew directly on these folded creases. If it’s hard for you to see that you can draw the line. It works either way. But we’re going to go along here and just sew right on that crease. So line up your presser foot and sew from corner to corner. And then I’m just going to cut my thread and turn this around and sew the other side. And we’re going to do that to this block as well. And you’re going to go ahead and do this to six blocks. There we go and one more side. Alright now what we want to do is we want to trim off these edges right here. And I’m going to use my little ruler and just lay it on my stitch line. Trim that off, come around here and trim this off. The same with this square. And again you’re going to do this to six squares. And then we’re going to press these open. I’m going to lay these back here. We’re just going to press these open. And I’m just rolling them back. And then we get to put our block together and this is just so easy. You’re just going to love this.
So what we’re going to do is we’re going to put two of these together. We’re going to match white to white, color to color on all four. And we’re going to make essentially our O block because this block is the same block that we use in X’s and O’s. And then this block out here is going to come out like this. And that forms the ribbon block. Can you believe it? Can you believe how easy that is? It’s so cool. So let’s sew this together. I’m going to put all of these together just like this. Lay them right sides on top of each other. And then I’m going to sew them right to the sewing machine, keep all those attached as I go along. So I’m chain piecing these together and that will make it easy to put the whole thing together in the end. So here’s our top row and then here’s our second row. Make sure they stay nice and lined up. And then here’s our third row. You’ll notice I haven’t worried too much about how those little corners match up. They should come together pretty easily. So now we’re going to look at it and make sure that they’re all in the right places. And they are so we’re going to fold this one back on here and sew this row together. And what you want to look for on this one is you want that center seam to nest. So you’ll notice I haven’t ironed anything yet. So we want, it’s easy to make one seam go one way and one seam go the other. And that’s nesting a seam. So we’ll come there and just make sure you line up the rest of your block out here. And then we have this top row to sew on over here as well. And I’m just going to fold that down. And again I’m going to make this nest, or this middle seam nest. You can feel it with your fingers when it’s laying nice and flat. Alrighty. Now we just have to iron. We didn’t even have to cut that block apart. That’s how easy this is. Alright so over here I’m going to look on the back and make sure, so this center seam right here, because I nested and I didn’t iron before, sometimes one could be going one way and one could be going the other. That’s not a problem. If that were the case I would just clip one and let it lay down. But it is going right so we’re just going to go ahead and iron this, make it lay nice and flat. Give it a shot of steam. And here’s our block. Isn’t that great? So easy and quick.
Now let’s look at how these are set together in our quilt. So right here you can see in between each ribbon we’ve put a sash. So this sashing is actually the length of the block. So whatever length your block ends up, this is the size of the sashing. And then we’ve put a sashing row in between them with a cornerstone. For me a cornerstone always helps line up those squares without any problem. So let’s look at how this is going to go together. So I”m going to put my block over here in the corner. And I have some more made over here. So I’m going to bring this here. And here, oh here’s my little strips that go in between. So to sew this sashing on you’re just going to lay it right on here, sew down the side, iron it open and then you’ll add this block to the other side. So let’s just add a few of those right here so you get a look at how this is going to go together. And then we’re going to add our sashing in between the rows. So on this one you’ll notice there are five across but only four down. Because our block is longer than it is wide we put, we put more across than we do down. And that happens sometimes when we’re making quilts. So then this sashing row that goes in between, see how I’ve sewn the sashing which is the width of the bottom of your block with a cornerstone. Sashing, cornerstone, sashing, cornerstone, all along just like that. And then you’ll add your next row down here which will also already be sashed. So you’re going to sash your rows together first and then you’ll set in your row sashing strip. So let’s take a look at this.
Once we get our rows done, our five in a row and four rows down we’re going to add a little 2 ½ inch border on the outside. And these strips also include that first little border so you don’t have to add any extra fabric for that. And then we’ll have our little outer border. The backing on our quilt is just a piece that comes with the, with the kit and I don’t know if you can see this. You guys might want to zoom in on this. But we’ve actually quilted this with a tiny little ribbon, the ribbon block quilting pattern which is really sweet. It’s got little ribbons and hearts on it. And it just makes it really, really sweet. So anyway, this is an easy way to make a ribbon quilt. Of course you can make it any color. There are loads of colors for ribbon quilts out there. Ours happens to be in pink. And we hope you enjoyed this tutorial on the Easy Ribbon Quilt from the MSQC.
& Progress on Social