Elephant and Donkey Quilt Tutorial
Jenny Doan
Elephant and Donkey Quilt Tutorial
- 3 Packs x 5" Squares (Charm Packs)
- 3/4 Yard x Inner Boarder
- 3/4 Yard x Binding
- 3 Packs x 5" Squares (Charm Packs)
- 1 Yard x Outer Boarder
- 5 Yards x Backing
Finish your masterpiece and let us give it the finishing touch it deserves.
Subscribe to MSQC on YouTube
Hundreds of FREE tutorials and a new one from Jenny launches every Friday.
video transcript
Hi everybody, it’s Jenny from the MSQC. And I’ve got a fun project for you today. Take a look at this quilt behind me. Isn’t this great? This is Ararat the Elephant. And Ararat came to live at the Kansas City Swope Park Zoo in the, in early 1930’s. And it wasn’t long before one of the quilting ladies wanted to make a quilt that featured Ararat. Well when the quilt was featured in the Kansas City Star then the republicans loved it so much they hung it on their convention center. And of course then the democrats cried out for a donkey. So there was an elephant and the very next month there was a donkey featured as well. And so I want to show you how to make them because they are just so fun. They’re pixelated quilts so you know they’re super, super easy.
So to make this quilt what you’re going to need is three packages of five inch squares. And we have used Grunge Basics by Basic Gray for Moda. You’re also going to need some background squares. These are all just squares because again it’s pixelated and, and you’re going to need two packages of five inch background squares. You’re going to need a half a yard for this little tiny border here. And then out here our big border is not very big. It’s just a little four inch border and you’re going to need ¾ of a yard for that. It just makes a really fun quilt. Now the only block you really need to know on this quilt is the half square triangle because the half square triangle block is what forms the shape of this elephant. And it makes his trunk and on the original pattern I think there was even a tusk and, I mean you can see his little toes. And so you’re going to want to watch your color placement because the little toes we made them all the same color so they would stand out. He also has this blanket “saddle” type of thing on him that, I mean it’s just really, really fun how they did it.
So let me show you how to do the half square triangle that we did on this. What you’re going to do is you’re going to lay out your colors and you’re going to decide which ones you want to be half square triangles. Then what we’re going to do is we are going to take this five inch square and we are, I’m going to press a line, a sewing line. You can draw the line if you want or press the line. We’re then going to lay it on the, right sides together, excuse me, on our, on our colored square. And we’re going to sew directly on the line. So let’s go to the sewing machine and do that. So we’re here. And I’m lining up my needle with the line and I’m just going to sew right down there. When you actually draw the line and sew on the line it keeps your square the same size. So this square isn’t going to, isn’t going to go down to 4 ½. It’s going to remain a five inch square. And because this part that we’re going to cut off is so big I’m going to sew another line about a half inch over so that I can save those for another project. I hate that waste so I’m just going to pull that over and we’re going to save that for another project. So I’m going to trim this off right here right in between. And you can see, I said move it over a half an inch but mine isn’t quite a half an inch. What you just need to make sure is that you have enough fabric on either side so that you have room to cut it in between like this. Alright now this is going to go in a baggie with other half square triangles that I’m going to use somewhere, sometime for something amazing. So now we have this one right here. And we’re just going to press it open, keep our seam to the dark side. So set your seam. And you know I talk a lot about setting the seams. And every once in a while somebody will say now why do you do that? It relaxes the thread so that it just lays back easier, that’s all. It’s not 100% necessary, it just relaxes the thread.
So once you get your half square triangle all press and you’re ready to go, this is really a pixelated quilt and pixelated just means squares. They’re just all five inch squares. Your half square triangles are five inches, everything is five inches. Your background squares are even five inches. So you’re just going to start laying them out. You’re going to want to follow a diagram and we have this diagram here so you could pause it and make sure you look at that. You could also look at the quilt behind me and see how it is. And I mean it just goes together quickly and fun. And it’s such a fun, happy quilt.
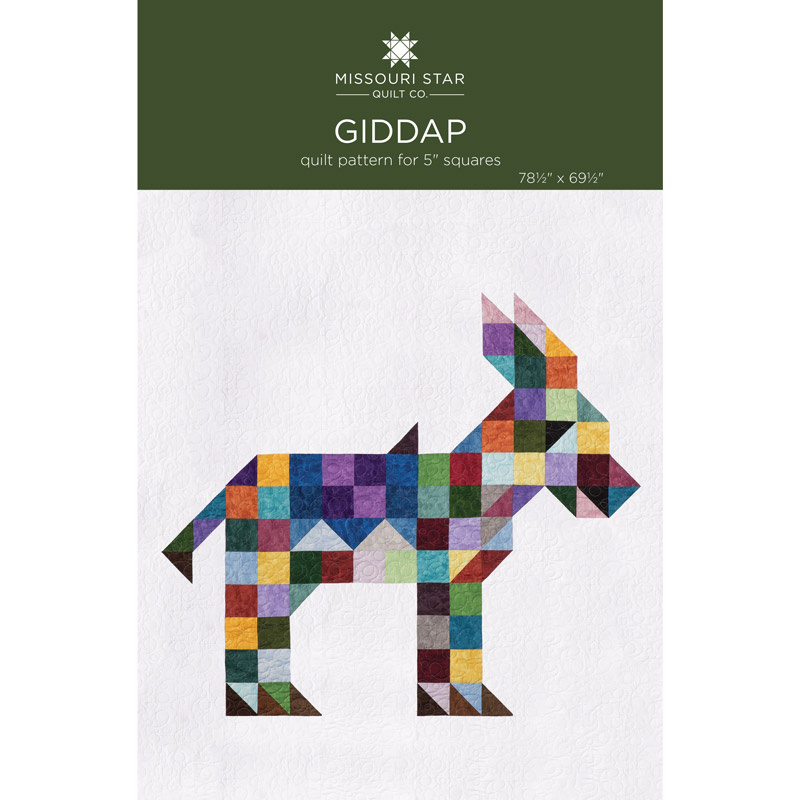
Now we normally just have one quilt for you. But today because of the story you heard about the donkey. His name is Giddap and so we have the donkey quilt for you as well. So now we have Giddap. Take a look at Giddap. Isn’t he adorable? He’s just so cute. A cute little donkey. Now to make Giddap you’re going to need three packs of five inch squares. And we have used the Toscana Chips from Northcot to make Giddap. You’ll need three of those. You’ll need three background ones as well. Giddap has a little bit more top space up here so he requires a few more background squares. And you’re going to need ¾ of a yard of this inner border and a yard for this outer border. The outer border is a little four inch border. So they’re basically the same. And you’re actually going to make them the same way. Again he’s pixelated. It’s lots of squares and a few half square triangles and you know how to do those. And look he’s got, they just make a shape, a little saddle horn. He’s got his little ears right there. I mean he’s just so cute.
So whether you choose to make Giddap or Ararat or even both have fun with these. And we hope you enjoyed this tutorial from the MSQC.
& Progress on Social