Man Sewing: Eagle over Alaska Quilt Tutorial
Man Sewing: Eagle over Alaska Quilt Tutorial
- 1 Kit x Eagle Over Alaska
- 1 x Pattern
- 3 1/2 yds x Fusible Web
- 1 x 18mm Rotary Cutter
Finish your masterpiece and let us give it the finishing touch it deserves.
Subscribe to MSQC on YouTube
Hundreds of FREE tutorials and a new one from Jenny launches every Friday.
video transcript
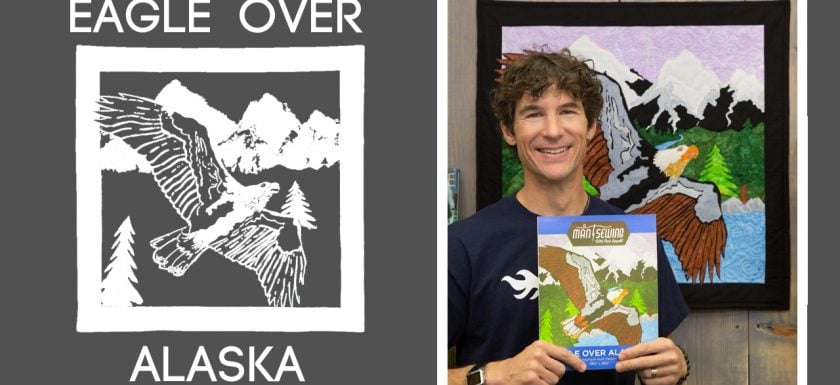
Rob demonstrates how to make a fantastic raw edge applique quilt using Robert Kaufman Batiks, Heat N Bond Feather Lite Fusible Web, and the Eagle Over Alaska Pattern.
I was so lucky to be standing on the upper deck of this cruise ship in Sitka, Alaska when this bald eagle flew right over the top of me and I had my camera with me. So of course I got very inspired and I love making my raw edge applique landscape quilts. So today this is what we’re doing, An Eagle Over Alaska.
So a lot of times when you’re dealing with an applique pattern there’s two approaches. One is do it all on your own. Or second is purchase the pattern from the artist. Now we’ve got a little free printable down in the link below and that’s also where you can get all these great fabrics from Robert Kaufman. It’s all of their batiks. And we even have kits now. So I’m going to walk you through the pattern as it’s written. And we’re doing it in a couple of different steps. So let’s get ourselves started.
Now the very first thing you’re going to need to do is if you’re using our printed pattern is all of our shapes are already been printed and they’ve been transposed. That means they’ve been reversed. And all you have to do is use your favorite fusible web. Put it on top and trace all the shapes and make sure you’re writing the numbers down as well. Now I am strongly recommending Heat N Bond featherlight because it’s such a lightweight bond. We’re going to be building these in layers. And we want the layers to hold together but we want to be able to machine quilt them later on. So that Heat N Bond featherlight is my absolute favorite. And the pattern pieces will work nicely on that for you. Now the first thing we’re going to do is we’re going to focus on the eagle and then we’re going to build the background. So check this out.
The eagle is going to be part of the key to the layout of the background. So we need to build our eagle silhouette. Just the silhouette first. So what I’ve done here is I’ve actually started to pre-peel the fabric away from the paper so you can see the shininess of the glue in there. And I’m sliding just a little bit of it between the wings and the tail piece. And I’ve done the same up here for the head. And what we’re going to do with that is we’re going to get them together just nicely and we’re going to hit just these parts with the iron and we’re going to leave the paper on so that we can fly the eagle around on our quilt for all of the layout. So let’s get that pressed together.
So it just takes about two to three seconds with a hot, dry iron for my Heat N Bond featherlight. So I just want to bond those together like that. And like I said I’ve left the paper on so that I can move my eagle around as I’m doing all my layout. So now what we like to do, and I’m going to point this out real quick. I have a nice piece of batting or a couple of layers of batting on my table. So I can build my entire quilt right here. So now we’re going to drop our background fabric down. And this is going to represent our water. And it is a 24 inch square which is 24 by 24. And if this fabric you’re using has any kind of motion to it you want to make sure that the water is appropriate direction for our layout. And I’m going to start working at the top. And I have all of my pieces traced and cut out with the fusible web on the back. So let me show you. And I always label the piece with its color and its number so that I know which one I’m working on. We’ve got a fantastic little layout map that comes with the pattern so we’re just going to follow it.
But the first piece we need to do it our sky. Because our sky is going to frame in where our mountains go. So we’re starting by dropping in our sky fabric right on the top edge. And I have set the pattern pieces to go just slightly past so we can trim in case we don’t cut perfectly. And our borders, when we put our borders on they’re going to capture everything along the edge. So our 24 inch square has pieces built into it. And I’m going to show you slowly the first few pieces and then we’re going to jump into caffeinated mode and show you how to put all the rest and then that’s just following the map. So the next piece that’s coming in is the snowcaps along the mountains. And one of the tricks is you can see that it’s just going to line up and the pieces are all created with roughly an ⅛ of an inch to quarter inch overlap. And I want to point out here right where I’m working, this area is where that wing is going to travel through. And this part right in here gets completely covered up so it doesn’t have to be all that accurate. So this is going to fit in here like this. And from this point on I actually leave the eagle in as I start to layout the next two pieces. So I’ve got a big green background piece that’s going to fit in over here. And you can see how that’s going to help me change the angle of the eagle. And this is why having the paper on the background is so important. So let’s get this one ready. And then we’ll do the green on the other side. And then we can start building all the little key character pieces, all the detail pieces in for us. Let me get this paper peeled. Now some of you have struggled so this is a great time to show a trick. You can always take a straight pin and you can use it to score. So I’m just kind of dragging it across the back of my paper there. And then that will fold like our wonderful old stickers. So that can really make it easy if you’re struggling. You don’t want to peel too much at the edge of the paper because you’ll kind of start to damage the edge of the fabric. So that’s why I stopped there. Ok so my green piece coming in here like this. Ok and we’re going to have one more on the other side. I often just roll the corner as you just saw to grab that piece like that. And this is going to come up here and it’s going to mount in like this. And so you can start to see where that body of the eagle, and the silhouette of the eagle is going to be. And this is going to come together. And we have the opportunity if we were to need to make any adjustments as we go. And of course we’re not ironing anything down until it’s all perfect. So let’s jump into caffeinated mode and get the rest of these pieces laid out for you. So we’re doing all of the background, then we stop. We put on the borders and then we come back and we’ll finish out the eagle.
Voila, just like that. Now you can see the background went down and I tried to kind of put it in order so that it made sense using greens of the trees and the blacks of the mountains and the gray highlights and whatnot. Quick reminder, all the paper is off all of the pieces except for the eagle. So the eagle itself, let me pull the side up, has the paper still on it. And what I’m doing real quick is I’m looking around, especially around the edges of where the eagle touches because I want to make sure I don’t have any of that blue background popping through in areas that I won’t be able to cover it up. Let’s say maybe you didn’t trace a line perfectly or you didn’t cut it perfectly and you’ve got a little spot that’s showing up, before we press it down let’s use some of our scraps that’s still fusible web and we can put little hiding spots of color anywhere that any of the blue might show through. So as an example, let’s say this eagle had moved and I had a big chunk of blue showing through right here, I can grab some black or I can grab some white and I could fill in that area before I iron everything down. The pieces are made very accurately so you shouldn’t have a problem but if you do that’s the solution. So I’m just going to go ahead and look one last second and make sure that everything is golden. I’m going to now slowly and carefully lift the eagle up because we don’t even want to iron on top of the paper because we’ll start to overcook the glue.
Now as everything is seeded here, I’m going to use my iron, dry and hot as can be. And I’m going to set it down for about two to three seconds and then I’m going to lift it up. And I’m going to start capturing this whole corner. If I’m concerned that anything has shifted up in this area then I’ll put the eagle back down and check my adjustments as I go. As I’m walking through here maybe you can see some of the fabric that might be hanging off of the edge but that’s ok because I know it’s hanging off the edge of the background and we’re going to trim that before we put our borders on. And after this is all pressed in place we’re going to get these borders on and then we’ll build the eagle for us.
Ok once we have everything pressed down and I made sure that everything was cool and secure, we’re going to go ahead and trim our project down so I just need a little mat here. And I’m literally going to use the edge of the fabric as my guideline because I cut a really nice square to begin with. And I’m trueing this up because I’m going to put my borders on now before I put my eagle on. So you can see I’m just using the blue fabric as my edge there. And I’m going to go ahead and trim off the excess of the applique as I go around. Now if you’re still working on top of your foam mat that you’ve created or your batting, it’s going to take a little bit extra push down because there’s a little bit of softness underneath there. So just make sure you get a good clean accurate straight cut. And then our borders we’re going to put on, I”m using the black fabric, also the batik. And we’re going to use 2 ½ inch strips all the way around. So I prepared four of those. And I’m stitching them on with a quarter inch seam allowance and we have to get those borders on first so that we can get our eagle to fly off the edge of the borders. And I’m going to show you that here in just a second.
Ok now you can see I’ve gotten the borders on, these are the 2 ½ inch borders. And I’ve pressed them all open and trimmed them all down so the quilt is really coming along nicely. It is now time to drop our eagle back on. But now we need to peel the paper off. And when we do peel the paper off of the eagle we need to be careful because we have these three areas where these all came together where the head and the tail meet into the body. Let’s slowly get this paper off. And now we’re going to anchor all of this down in the same spot. So when you’re using stuff like this Heat N Bond featherlight you really only want to iron it once. So when we focus on the ironing of the eagle itself we’re going to try to focus our heat just on the wings. We’re going to try not to let the iron move over onto the landscape so that we don’t start to release that. And if you get a little bit of paper stuck in between the two unions it’s not too big of a deal. But I was fortunate to get it all out of there. Pick that up later.
Now put in the body of the eagle back in. We’re going to line this up exactly where we want it so that down the road we are ready to press. And this would be another time to check and make sure if you had any blue showing through we could sneak a little repair fabrics down underneath the blue. But now we have our eagle overlapping the borders. Now one of the things that I did when I created the eagle is I made two different head pieces. I said that totally wrong. I made two exactly the same head pieces. And the reason I did that is a lot of times when you’re using a white fabric as an applique, I’m so excited, I just want to go so fast, that what happens is you get the bleed through of the fabric below. So I’ve created a second white head that you can drop right on top to give that intensity for the bald eagle. From here on we’re going to start to lay in the big highlights of the wings like you see here, build the body and then I’ll put in all the brown pieces. I’m going to peel the paper off as I go but we’re going to jump back into stop motion mode so you can see each piece. I want to point out real quick when we get into the brown feather highlights, they lay into the little hills and valleys that are formed between the bright parts of the wing and the base of the wing. And they roughly have about an ⅛ of an inch distance between them and they’re numbered sequentially. So we’re going to start building and the numbers will be in order to make it easy, easy to put the pieces together. Ok here we go. We’re going caffeinated mode.
Ok it was that easy wasn’t it. Now it’s all pressed down. I want to point out I often use these fun little bent tip tweezers to manipulate each of my small pieces. And the key is I can’t stress this enough make sure that everything is exactly where you want it before you hit it with that hot dry iron. And don’t slide the iron. It’s only up and down so none of your pieces get shifted and it will turn out perfectly for you. Now if you’ll follow me to the quilt behind you can see the free motion machine quilting. And I used a polyester thread. I like the poly neon because it’s strong. It handles the fusible web really nicely. But also if you look some fun swirls and swoops in my sky and in the water. I quilted the trees as if trees. And the only real rule to any of this is we do need to free motion machine quilt around the edge of all of our applique pieces. And I’ve got some really cool new videos that are called Skills and Drills of free motion quilting that show you how to do a lot of those motifs. So I am so excited that you are jazzed with me about my Eagle over Alaska. It’s always fun to be able to take something that we’ve photographed ourselves and convert it into a quilt. I also have, I know lots of videos out there, I have a video for you that will show you how to do just that, take a photo, convert it into an applique pattern like this. So I hope you’re loving these kind of content and information. And I’ve got to get back outside so I can get some more awesome shots while you’re playing with your quilts here at Man Sewing.
& Progress on Social