Spring Rain Quilt Tutorial
Jenny Doan
Spring Rain Quilt Tutorial
- 1 pack x 10" Precut Quilt Squares (Layer Cakes)
- 3 yards x Background Fabric
- 1-1/2 yards x Outer Border Fabric
- 1-1/4 yards x Contrasting Fabric
- 7-1/2 yards x Backing Fabric


Finish your masterpiece and let us give it the finishing touch it deserves.
Subscribe to MSQC on YouTube
Hundreds of FREE tutorials and a new one from Jenny launches every Friday.
video transcript
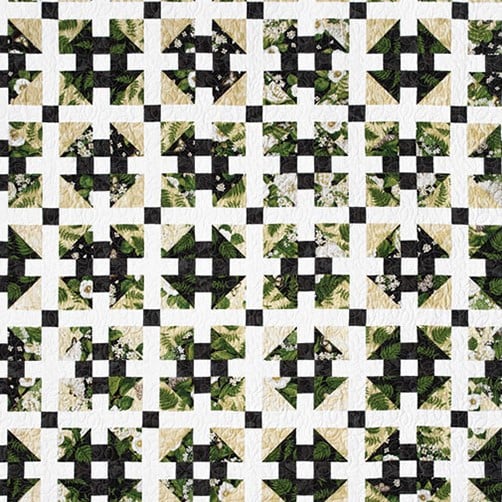
Jenny demonstrates how to make Spring Rain, a sort of faux churn dash quilting pattern. This "faux churn dash" design requires 10 inch squares of precut fabric / layer cakes. (We used Charlotte by Deborah Edwards for Northcott.) Learn the quick and easy way to make half square triangles, sash quilt blocks, sew with strip sets, and add cornerstones to your sashing.
Hi everybody, it’s Jenny from the MSQC. And I’ve got a fun project for you today. Let’s take a look at this quilt behind me. So this is kind of a faux churn dash right here. It’s got this cool sashing that makes the whole block come together. We’re calling this quilt Spring Rain because it’s just kind of soft and springy looking with its, with its soft colors. And we just really love it. So to make this quilt what you’re going to need is one packet of ten inch squares. And we have used Charlotte by Debra Edwards for Northcott. And it’s just a great line. You’re also going to need three yards of a background fabric and that’s going to include your sashings. Now those are all cut into 2 ½ inch strips so you could use a roll of 2 ½ inch strips as well. You’re also going to need 1 ¼ yards of your contrasting color. That’s our coral right here, this little pop of color, 1 ¼ yards of that. And for this outside border you’re going to need 1 ½ yards for that four inch border out there. Great little quilt. Makes a quilt that is 82 by 94. A good sized quilt.
So this quilt is made using half square triangles. And for this what we are going to do is we are going to do the quick eight. And so we’ve taken our two ten inch squares. And you’re going to use lights and darks from the same pack. So go through your pack and separate them in lights and darks. And you can see I have a light and a dark here. And we’re going to put those right sides together and we’re going to draw the line from corner to corner. So you can see I’ve got that on here. We’re going to take our pen and draw the line from corner to corner on both sides. Then what we’re going to do is we’re going to stitch a quarter of an inch on either side of this line on both sides. So let’s go to the sewing machine and do that.
Alright so what I’m doing here is I’m just going to put my presser foot along the edge of the line. And I’m going to sew down this one side, just like this. Make sure your squares stay lined up. When we get to the end here we’re just going to flip it around and go down the other side with our presser foot again lined up on that line that we’ve drawn with our pen. And honestly you can use a pen or a pencil for this. This is going to be the seam line where it’s cut so you’ll never ever see that. Ok so we’ve done one side now we need to do the other. So we’re going to come back over here and we’re going to do the same thing where we put our presser foot down on the line and sew on either side. And there we go to the end. Now we’ll flip it around. Line up our presser foot and sew down that last side. Alrighty.
So now what we’re going to do is we’re going to take this right here. And it’s a little easier for you to see the lines on this side. See how it shows up on the dark green with the, where we’ve sewn on either side of that line. Then what we’re going to do is we are going to cut this diagonally both directions and horizontally and vertically. So since I have my, my horizontal, I mean my diagonal lines drawn, I’m going to go ahead and use, and cut this in half horizontally and vertically first. And so with my ruler here, this is my five inch ruler, it’s going to lay right along the edge and it should intersect right here in the center. This should also be at five inches. So we’re going to go ahead and make that cut. We’re going to take our ruler and we’re going to put it sideways here. Line it up with the edge of our fabric and come straight down the middle. Without moving our fabric we’re going to now put our ruler on the diagonal lines like this. And then one more over here. And just that quick we now have eight half square triangles. So each one of these blocks is going to make two blocks in the quilt because you use four of these half square triangles in the quilt. So let’s press these open. So we’re going over here to the ironing board. And I’ve laid my dark on top. Going to set my seams and roll them back. Alright so we’re just going to iron these out. These should measure out at four and a half. If you need to square them, go ahead. But hopefully they’ll be really close. Alright so once you’ve got these all done, you’re going to separate these. These are going to become two blocks. And four of them will go in one block and four of them will go in another.
So now we need to make some strip sets. And you can see right here we’ve got a full strip set and then these shorter strip sets. So we’re going to make two strip sets. Our first one is going to be a 2 ½ inch strip of our contrasting color and a 2 ½ of our background. We’re going to sew these together. And you’re going to make six of these, six of these sets. And then each, each little piece we’re going to cut into 2 ½ inch increments. So we’ve got, we’ve got this going here. And we’re just going to cut 2 ½ which is going to give us pieces like this. Alright come on open up. There we go. It’s going to give us little pieces like this. It’s easier to cut them before you iron them. And that’s just a little tip. And so then you’re going to iron them open and you’re going to get a whole bunch of these. As a matter of fact I believe you’re going to get 84. So we want 84 of those. Six strip sets of those. Now you’re going to take two of your two’s and you’re going to put a white one in the center and make this big strip set. So, so here’s your twos, your pop color and your background, your pop color and your background. And we are adding a strip set right in the middle. Now when you do that, I mean, I mean it’s just going to go together really easily. Again you’re just putting them right sides together and you’re sewing a quarter of an inch. And you’re going to do that to each one of these. And you’re going to have a strip set that has five in it. So now what we’re going to do is we are also going to cut these into 2 ½ inch strips. So we’re going to go ahead. We’re going to line this up really nice here. And we’re going to trim off all these selvedges so we don’t have any uneven fabric here. So we’re just going to trim that off. That gets us a nice clean starting edge. And we’re going to come in 2 ½ like this and we’re going to make our cuts.
So let me show you how this is going to go together because this is a really fun quilt to put together. You see the block happening really fast. Alright I’ve got some 2 ½ inch pieces here and a couple of these strips. So we’re going to take this block right here. Our four half square triangles and we are going to put them so our dark color goes toward the middle. Now that’s personal preference. You know you can do whatever you want with that. And then these are going to get a strip sewn in between. Well actually let’s do it on the side here. Let’s do these on the side. And then this one piece is going to go straight across like that. So that’s how the finished block is going to look. And it just comes together really cute. So let’s go over to the sewing machine and let’s sew these pieces to these pieces. And then we’ll add that center block so you can see how the whole thing comes together.
Alright so what I’ve got here, again I’ve got my two pieces and I’m putting my pieces together so that the color comes to the bottom part of these half square triangles. That might be a little confusing. But I’m going to put my color on the bottom part, on the dark part of the half square triangle and then we’re just going to sew a quarter of an inch down the side. And then when you add the other piece you want to watch and make sure it’s going exactly the same direction. So, so they line up and they should mirror each other. And you’ll notice I didn’t have to trim my blocks. You want to make sure yours are 4 ½. It will make it a lot easier for you. Alright so now we’re going to line this up the same way. Make sure our color goes toward the center and then sew these on either side. And add the other side here. Alright I always lay them out before just to make sure because I get it turned around so easy. You’ve got to make sure it’s right. We’d rather check than pick, right? We don’t want to have to pick those out. Alright so now we have our top and bottom strip here like this. And we’re going to add our center piece right here. And so I’m going to lay this on here. And the only thing you want to match up is right here where it comes together in the center. You want to make sure that these blocks smack right up next to each other and line up nice and snug so that you have a nice tight seam in there. And, and it just stays right on. So we’re going to go ahead. I’m lining this up on the edge, sewing a quarter of an inch down the side. And I’m watching, I’m getting ready for my center seams so I can feel with my fingers that there’s no space in between. And I go from one side to the other. And just hold onto that. And then I’m ready to sew on the other side of that block. Now make sure that all your darks are going to the center like this. That makes the block. I have, I can’t even tell you how many times I’ve put those on backwards and gone, Oh I should have looked at that. But oh well. Alright we’re going to make these snug up and fit up here. You are welcome to pin these together and get them all lined up so that yours match perfectly and you can start and just sew down. I’m not much of a pinner. I just like to get it together and do it. So now we’re going to look and check. And mine is together pretty good.
So let’s take this over to the ironing board and press it nice and flat. I like to press from the top and make sure that all my, all of my seams are flat, no tucks in there. And then I’m going to flip that over and I can make the seams go the way that I want to. Now on a block like this it is possible that you could get a seam that is twisted. You know it goes one way at the top and another way at the bottom. If that happens to you, don’t die over it. Just clip it. Let it lay down. I mean we’re not, nobody’s going to look inside and see this quilt. So just clip it and let it lay down. And it will be fine. Just don’t clip clear through all the threads or then you’ll have a whole nother set of problems. Alright so this is how we make our block. And here’s our nice little block right here. I mean it just comes together so cute. And you can see this is how it fits in the quilt right here. And then we just have to do the sashings.
So the sashings are made from the same fabrics of our background fabric. And you’re going to cut those the length of your block and you’re going to put a sash in between every square. So I have some squares here already done. And again you’re just going to put those together like that with the sash in between every square this way. And that’s going to be your row. So here’s your row right up here. There are six blocks in a row. Everyone has a little sash, ok? So then it’s time to put your, it’s time to put your long sashing row on in between there. And that one you’re going to make by taking the same size sashing piece but adding your little 2 ½ inch squares to it. And it’s going to lay in here just like this. And that you’re going to do your whole middle of your quilt. You’re also going to do it for your first border. See up here on the top where it’s just this same sashing strip and a cornerstone, and a sashing strip and a cornerstone. And that’s how it all goes together. You’re going to border the whole thing that way. Then you’re going to add your last 4 ½ inch border. And you’re just going to get a great quilt that looks like this.
Now this is one of those quilts that when you use different colors the difference is going to be striking. Some of these colors don’t have a whole lot of contrast to them. And you can see on the ones that have that great contrast, it just like pops off of there. So it will be fun to see all the different things that you guys do with this quilt and all the different color choices. So we hope you enjoyed this tutorial on the Spring Rain quilt from the MSQC.
& Progress on Social