Courthouse Steps Quilt Tutorial
Jenny Doan
Courthouse Steps Quilt Tutorial
- 1 Pack x 2.5" Strips (Jelly Rolls) - Print
- 1 Pack x 2.5" Strips (Jelly Rolls) - Background
- 3/4 Yard x Quilt fabric for Inner Border
- 1 1/2 Yards x Quilt Fabric for Outer Border
- 3/4 Yard x Quilt Fabric for Binding


Finish your masterpiece and let us give it the finishing touch it deserves.
Subscribe to MSQC on YouTube
Hundreds of FREE tutorials and a new one from Jenny launches every Friday.
video transcript
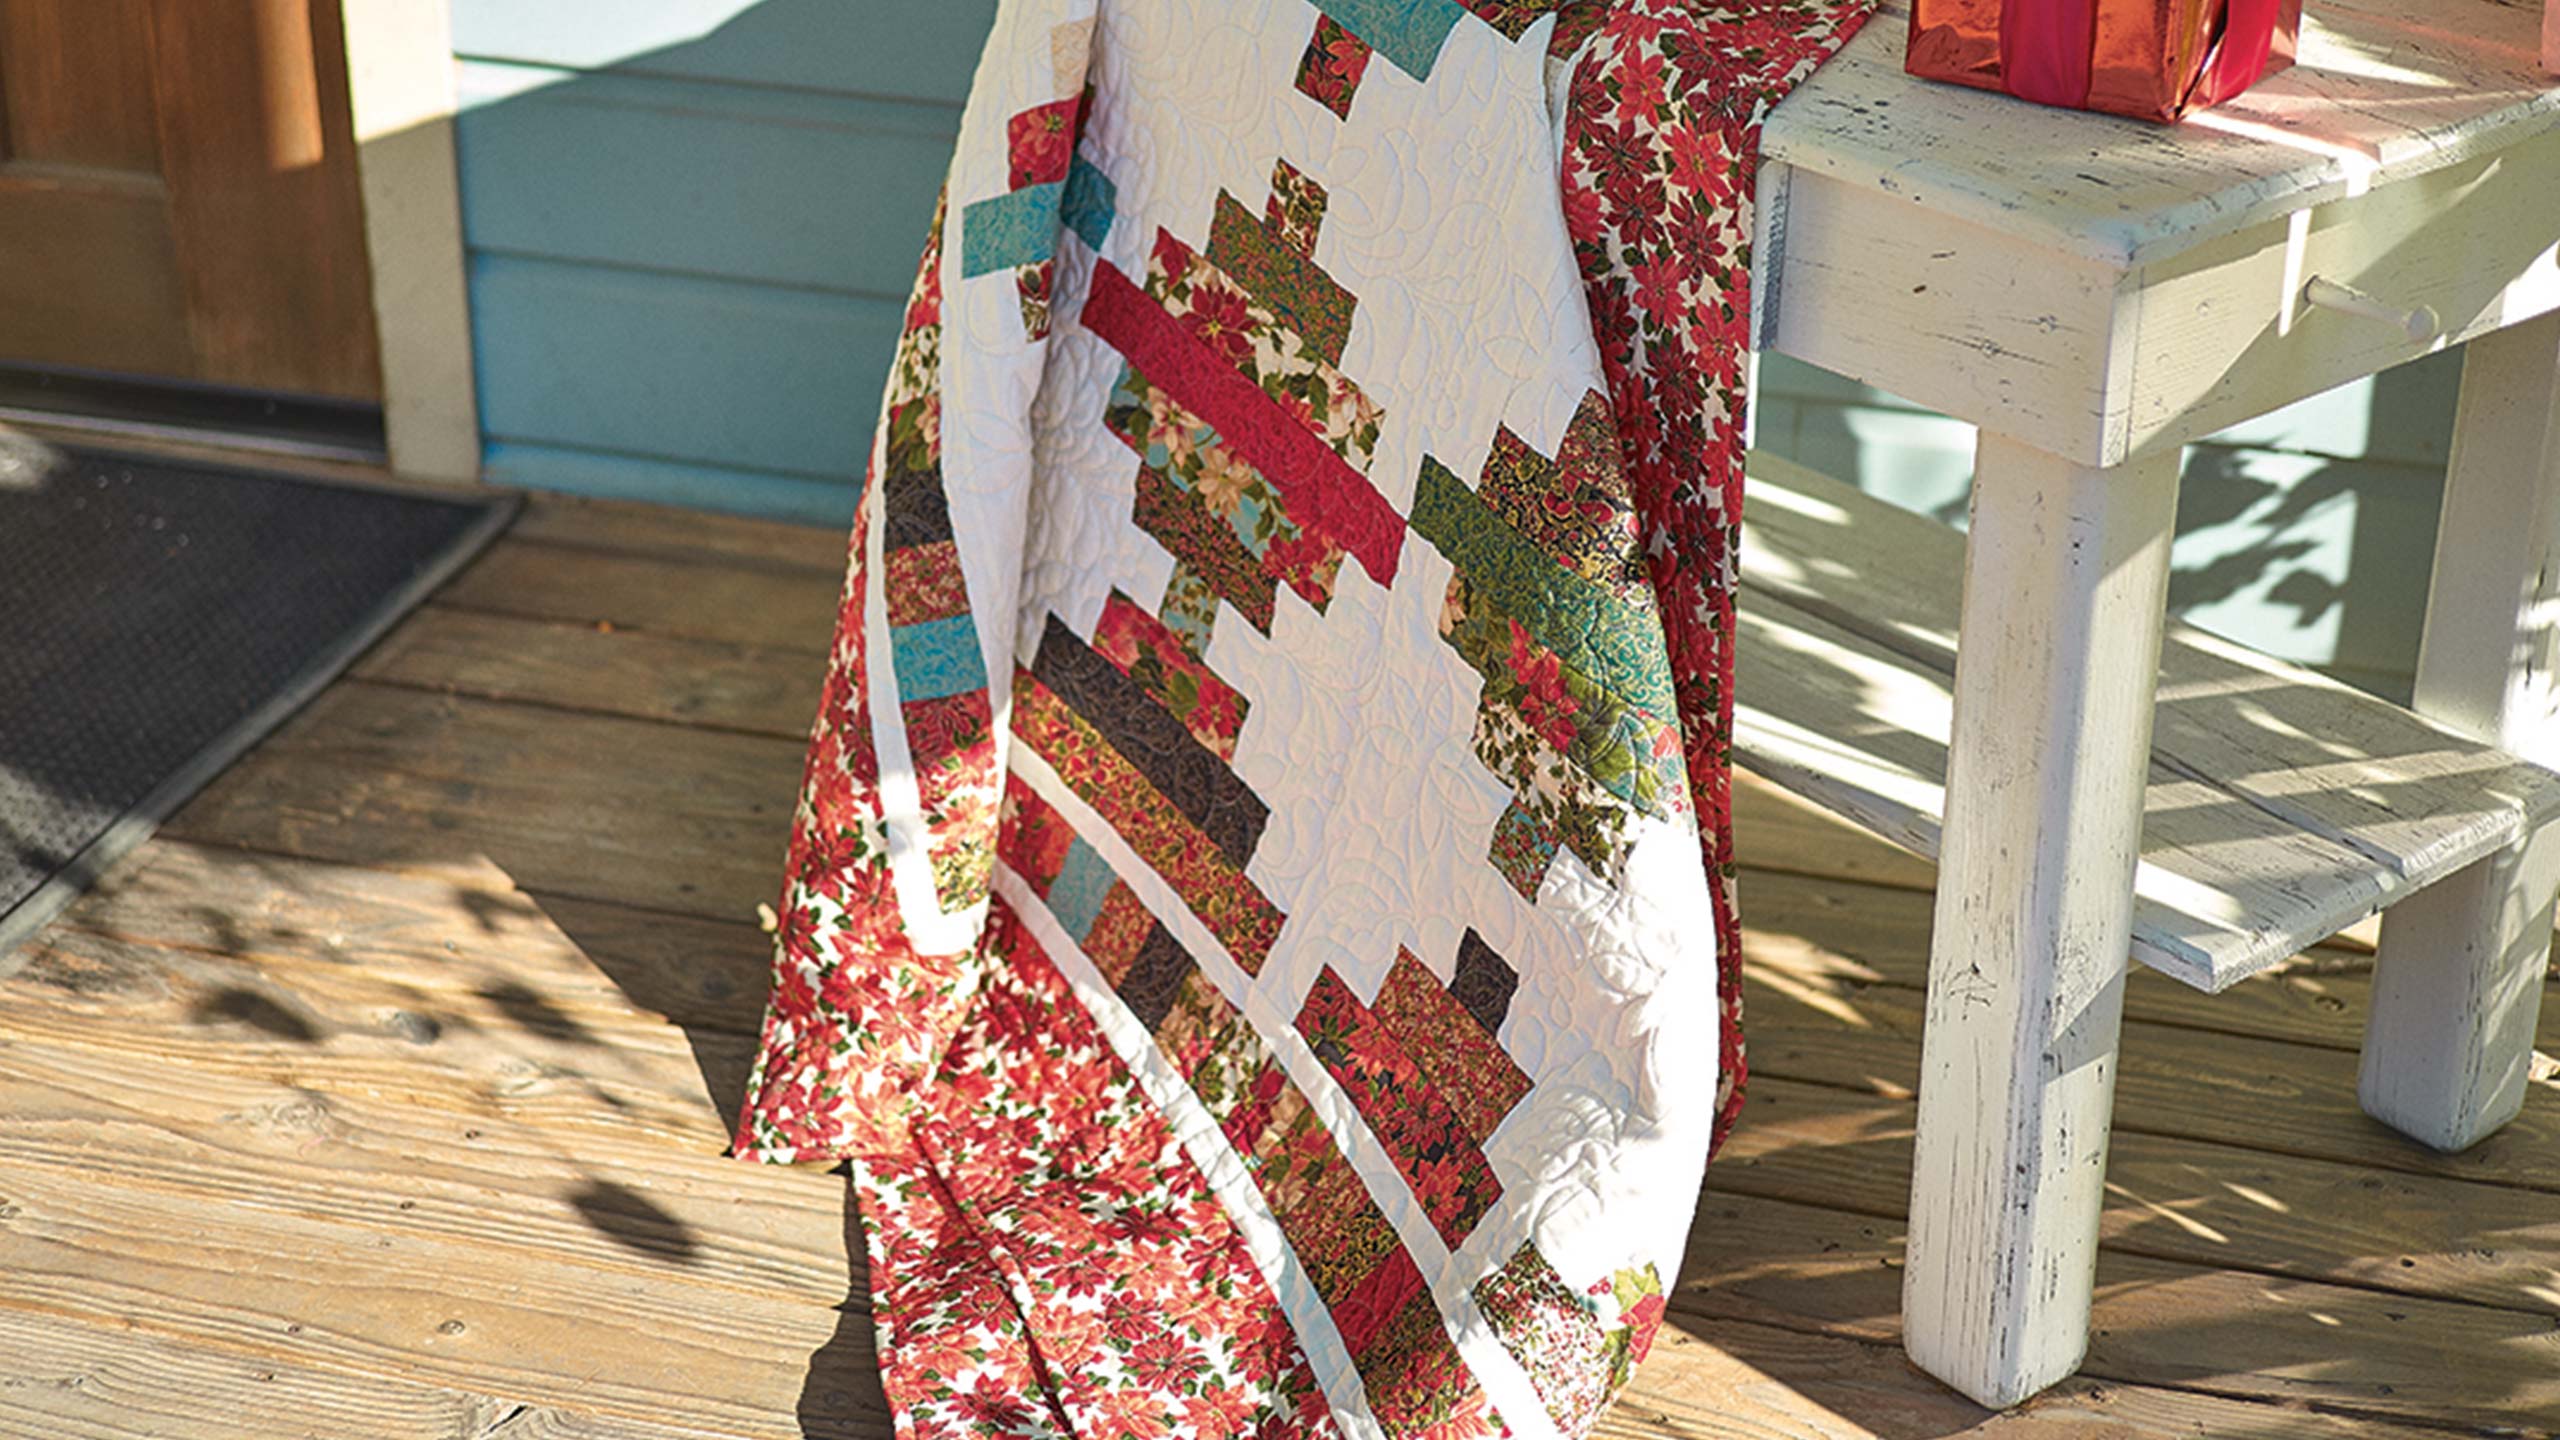
Jenny demonstrates an easy way to make a beautiful Courthouse Steps quilt using 2.5 inch strips of precut fabric (jelly rolls). We used Welcome Home 2.5" Strips by Jennifer Bosworth for Maywood Studio. This pattern is similar to the log cabin and is framed with a pieced inner border.
Hi everybody it’s Jenny from the MSQC. And I am here today with Posey Havens our first Golden Star winner. And she is going to help me introduce this quilt behind us.
Posey: This is the Courthouse Steps. Don’t you just love it?
Jenny: I do love it. It’s so fun to have you here, Posey.
Posey: It’s so fun to be here.
Jenny: Oh my gosh. This has been so much fun so all of us. Join us for the tutorial.
Hi everybody. It’s Jenny from the MSQC. And I’ve got a great project for you today. This quilt, we’re calling Courthouse Steps. It’s based on an old block by the same name: Courthouse Steps. And I just love it. Let’s take a look at this quilt. So you see how these blocks step up like this. This is obviously why it’s called Courthouse Steps. And I just, I just think it’s a really great pattern. It’s one of those ones that is like the Log Cabin only a little bit different. And so it’s just easy to put together. So to make this quilt what you’re going to need is one packet of 2 ½ inch strips of print. And one, one roll of 2 ½ inch strips of plain for your background. Because we’re going to use both of these in making these. This quilt is actually 76 by 76 so it makes a pretty good size quilt. Out here we’ve got some borders and I’ll hit on those right toward the end. But for now let me show you how to make this block because this is really fun. And actually it’s two blocks.
So the first block right here you can see has a little print of color in the middle. And you’re going to make eight of those. The second right here has a little print of white in the center. Or your background color. And so they’re just a little bit different blocks. And you’re going to make eight of each of those. So I’m going to show you how to do that. So to start with we need to make our little center piece right here which is 2 ½ inch squares, two of background and one of color. And so let’s go ahead and do that. I’m going to cut two of these. And I’m just going to cut off my little selvedge edge right here. And then I’m just going to come in with my ruler. I love these rulers because they’re already 2 ½ . And I’m going to cut two of those. And then I’m going to cut the center piece, just one 2 ½ inch square. There we go. And then we’re going to go over to the sewing machine and I’m going to sew these, we’re going to sew these together just like this. You know one on each side, quarter of an inch. Fold them right sides together.
Alright so now I’m just going to lay this background square on top of my other one. And we are going to sew a quarter of an inch on that side. And then a quarter of an inch over on this side as well. And for me, this is, this is, this is, I like, I like to call this setting up the block. This is what sets up the block for me. So that I can, I can begin with the fun part. Because the fun is in the fact that now you get to pick what goes around it. So I’m ironing this. I’m ironing my seams into the middle making sure they lay in. Although it doesn’t matter on this because we don’t match up any seams. So then you’ve got this little piece like this. And you can see mine is a little bit wonky but that’s alright because it’s going to fit right into the seam. Because what we’re going to do next if you take a look at this block right here, what we’re going to do next is we’re going to add these colors onto here.
And so when you start with a color in the center the next two pieces you add are just going to be random strips. Now I literally, I just open up my roll and I just, I have a big pile of them by the end. Because I just literally start picking up strips and attaching them to it. So what I’m going to do here is I’m going to take this and I’m just going to attach it. I’m not going to cut it any size. If you want exact size that will be included in the pattern. But I actually do it like this where I take my piece and I just sew it down the side like this. Alright, so I just sewed a quarter of an inch right down the side. And then I’m going to come back over here to the ironing board. Now actually when I make this quilt, one of the things that I do is I put, I have a little ironing pad that I put right next to my sewing machine because that’s what, we’re going to be spending a lot of our time ironing. So once you’ve ironed that piece on I come over with my little ruler and I just lay it along the edge right here and I trim it off. So rather than cutting all the pieces ahead of time, I just trim as I go.
So now we’re ready to add this piece to this side. And we’ll go over to the sewing machine and do that. And there we go. And we’re going to iron this one open as well. Set my seam. When you set your seam it just really just relaxes that thread. Alright now I’m going to trim this side off too. It keeps my block nice and square. And I’m going to just trim up this one because I had a little bit of edge out there. Now we’ve added the colors now we’re going to add the two whites.
So let’s come back over here with one of these. And I’m going to go ahead and trim my selvedge edge off because I have a little trick about this one I’d like to show you. This one, whenever you have a, two stripes that go this way then your next rows go on this side, ok? The opposite side. So you’re running your strips going opposite directions. And so I’m going to take this one over here to the sewing machine just like this. And sew it a quarter of an inch across the side there. And then before I cut it, because we’re using the exact same fabric, I can come back over here and take this end and put it on the other side. But I forgot to cut my selvedge end off of this. You really don’t want your selvedge ends in your block because you’ll see those little holes. So see now I have this big long piece here but because I have another end I can just actually put that on the other side like this. And that’s just, you know, if that doesn’t work for you that’s really ok. But it’s just a little trick that I use to, to save me from getting up and down. I don’t know maybe I need to get up and down a little more. You know what I’m saying. But anyway this, this kind of works for me. So now I’m going to take this right here and I can run my little ruler right across there and trim both of those off. And when you do that it is way easier to trim before you iron. So then you’re going to press these open. And you just iron them to the outside. And then you’re ready again to add two more colored strips on either side. And you’re going to rifle through and make sure they’re different.
So on this one right here I’ll put this pretty blue and then I’ll probably bring in something over here like this. So you can cut those two and pull them over. So I’m going to go to the sewing machine and I’m going to add these. And then I’m going to add one more piece of white on either side and this block is going to be pretty close to finished. So here we go again, colors on this side. And I have both my colors with me so it enables me to just flip this around when I’m done and, and do the other side right then. Alright so now we’re going to pull this out of here and again I’m going to lay this over here. I’m going to use my block as my straight edge. And now I’m going to go press this open. Again we can set the seam and just roll it back. Just like that. Look how close we are. We have to add another set of whites. Again we’re going to add them to the side like this. And I believe we’ll have enough we can use this same strip. So we’ll add this one right here. Alrighty. Now we’re going to trim these off. And if it starts getting a little close for you like this you can totally just do one piece at a time. Alright we’re going to press this back. And I’m just going to set these seams. Setting the seams just relaxes the thread a little bit. Alright so you see how the block gets kind of oblongy, then you know you need to add one more strip. So I’m going to add one over here. And one, let’s see, let’s do a something different and fun. How about these little roses? This is pretty. So one over here. And when we add these last two strips our block is going to be finished. Now obviously you can see these blocks can be any size you want. We, we’ve stopped ours at this height so here’s our first block. And you’re going to make eight of these.
So once you get your two sets of blocks done and you have one set of eight that has, starts with a print in the center. And one set of eight that starts with a background in the center, you’re ready to put them together. And basically we’re just putting them together. Just like this. When you put them together the whites to the whites like this, the background colors together, this makes a block. And when you come in with the next row you’re going to stagger them. And you’re going to see that your color makes a block as well. And so, just like this. Can you see how that’s coming together? Let’s look at it on the quilt. So here’s our block right here. And you can see where we put it together, where we sewed the second seam together and the seam together. And when they come together down here, they come together so these make that stair step unit and this also makes that stair step unit.
Now when I got to the end of my quilt, when I got all finished with my blocks, I had some pieces leftover. And you guys know I, I have to find a use for those. I can’t waste those. And so what I did was a took all my little pieces and I started sewing them together. And I sewed them together in twos and twos and just like this. And I trimmed them up to three inches. And I just sewed long strips of them together like this. I just kept putting them on, putting them on, putting them on, until I had a long, long piece of them. And then what I did first was right here on the edge I did a 1 ½ inch tiny border for this first little tiny border. And the second little 1 ½ inch tiny border you’re going to need about ¾ of a yard of fabric. This right out here is made from all the leftover pieces of our strip. And again I just sewed a long piece. Trimmed it up so it was three inches. So a little three inch border here. And then this outer border out here is a, is a, looks like a six inch border. Let me check to make sure. Get my paper here. Yes it is, six inches. I was pretty good, huh? So six inch wide. You’re going to need a yard and a half of fabric for that outer border. And again it’s going to make a quilt that is 76 by 76. So this is a really fun project . I love when we can do projects based on old blocks. And I hope you enjoyed this tutorial on the Courthouse Steps quilt from the MSQC.
& Progress on Social