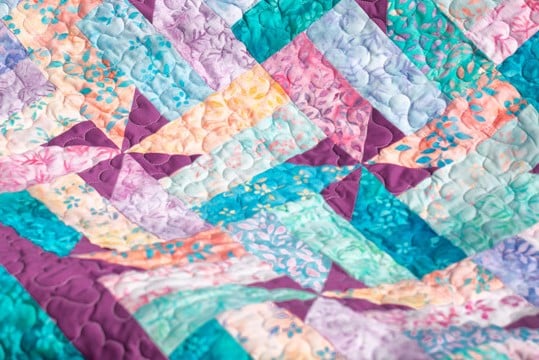
Spring Twist Quilt Tutorial
Jenny Doan
Spring Twist Quilt Tutorial
- 1 roll x 2.5" Strips (Jelly Rolls) - Print
- 1-1/4 yards x Complementary Quilt Fabric (incl. inner border)
- 1/-1/4 yards x Outer Border Fabric
- 3/4 yards x Fabric for Binding
- 4-1/4 yards x Quilt Backing Fabric


Finish your masterpiece and let us give it the finishing touch it deserves.
Subscribe to MSQC on YouTube
Hundreds of FREE tutorials and a new one from Jenny launches every Friday.
video transcript
Hi everybody, it’s Jenny from the MSQC. And I’ve got a fun project for you today. Take a look at this quilt behind me. Isn’t this sweet? This is just a great project. We went through a little bit to get here so let me tell you about it. I was actually out to dinner with my friend Lynn Hagemeier from Kansas Troubles and I said to her, I need a really good jelly roll idea. And she said, well have you done that thing where you put the corners on the things and it makes that pinwheel. And I’m like, no I haven’t. So this comes to you because of that conversation with my good friend, Lynn. So to make this quilt what you’re going to need is one roll of 2 ½ inch strips. And we’ve just used this beautiful roll. It’s Artisan Batiks Serendipity Three by Lund Studios for Robert Kaufman Fabrics. You’re also going to need 1 ¼ yards of your accent fabric or your pop fabric. And that’s this fabric right here. And we’ve used it in all the pinwheels and in this first border. For the outer border, what you’re going to need is also a yard and a quarter. And it makes this nice big wide six inch border out here. Let me get this string. There we go. Alright. Now we’re good to go. Anyway, it’s pretty easy to make and it’s a lot of fun. Now one of the things I want to tell you to start off with is we probably changed this color three times. You know we’d make a block, we’d look at it. It just didn’t pop. So whatever fabric you use, make sure that you use a fabric that’s going to stand out and pop because this pinwheel is the wow factor of the quilt. So let me show you how to do this.
What we’re going to do is we’re going to take 36 strips. You’re going to pick some strips right off of here, 36 of them. And we’re going to go ahead and open this up and take a look at these strips. So what you’re going to do with these is they, you’re going to choose 36, then they’re all going to be cut in 6 ½ inch strips. Now what I kind of did when I made my blocks was I picked two more prominent colors like this and maybe this. And then I picked a lighter color for the center like this. So I kind of kept mine in, you know, little groupings that I wanted to put them together in blocks. But basically you can cut the whole thing and then just, you know, make it from there and pick and randomly choose them. I just kind of had a little plan when I started and I thought I’d share that with you. Alright so what we’re going to do is we’re going to go ahead and cut these all up into 6 ½ inch strips. So the first thing I want to do is I want to cut my, make sure you can see this, I’ve got all this stuff all over the place. Let me move this down here. I’m going to cut my selvedge edges off. And that’s generally about a half an inch, like that. You probably want to take a look and make sure you’ve got all those little pieces. Now on batiks there aren’t really selvedge edges that show that much so I don’t worry about it too much. But if you use regular fabric make sure you check.
Alright so then what I’m going to do is I’m going to cut 6 ½ inches. And with my ruler here, what I like to do is I like to just lay it on here sideways. And when I get to the 6 ½ line I can just cut those chunks like this and move that out of the way and then slide my ruler up here. 6 ½ just like this. And you’re going to cut all 36 of your strips just like that. Ok you also need to cut your background fabric. There’s my strip. And you’re also going to need to cut that background fabric. And eventually what want to get to is these 2 ½ inch squares and so again I just cut 2 ½ inch strips and sub cut those into 2 ½ inch squares and then we’re ready to go.
So normally when we make a quilt like this we’re going to sew all of our strips together and make strip sets. And this one just doesn’t work that way. We’ve got to put a little snowball. But our snowball has to go the opposite direction so it needs to be put on some of these strips. Now for our snowballs we’re going to cut 2 ½ inch strips, nine of them and sub cut them into 2 ½ inch squares. Now the cool thing about this block is that all the snowballs get to go on exactly the same way. So what you’re going to do is you’re just going to select three different strips from your 6 ½ inch pile. And you’re going to choose one for the middle and then your snowballs go on the other two. And the snowballs, even though they’re opposite, they go on the same direction. So I’m going to iron a little line right here. And you can finger press it or iron it. And we’re just going to match up these little corners and iron that line. You can also draw the line. It works. And then when you put these on like this, they’re going to go exactly the same direction so let me show you that because it’s a little bit of an illusion. So we’re going to put this up like this. So here let me show you. So this one is going to go this way and this one is going to go this way. So the main bulk of our snowball is against the seam. So what we’re going to do though when you turn these you see that they’re exactly the same. So when we go to snowball ours you’re just going to snowball, you can just chain piece them and go through one after the other, after the other and do it. And put with these blocks.
So let’s take these to the sewing machine. And what I’m going to do is I’m just going to set these, my little squares, match them up at the top. And then I’m going to sew right on the line and there we go. And this one, remember they all go the same direction. Now one of the things you want to watch is that because all your blocks are going to go the same direction you need to make sure that you put them together all the same way. Because if you do it backwards they won’t match up. So these all have to be sewn on exactly the same way. Alright let’s trim this edge off right here. And just like this. And just like this. Then we’re going to press those back. There we go. Alright. Now what I want to do, because I already have some made I want to make sure that they’re going the same direction so I’m going to put this one on here like this and this one on here like that. So this way our blocks, see here’s my other blocks that I made to finish this off. They’re going to all match up. And when you put four of these together like this, watch this. Look how cool. You just rotate them like you’d rotate a fence rail and then it’s going to form that little pinwheel right in the center. So it’s a really cool way to do it. So let’s sew these three together so we can finish up our block. Now remember that this, you know, the most, the biggest part of your accent fabric goes into the seam. That’s a way I had to remember it just because the, you know, on the other ones it’s, you know, if it was the opposite way we could snowball it but it’s not. Alright there’s one side. Now we’re going to attach that other side to finish our block. Again I’m putting my large part of the fabric next to the seam. Alrighty. Now let’s press this open. Isn’t this just the cutest little block?
So now let’s see how it works. Look at that. Fits just perfectly and it makes the pinwheel that we wanted. So how you’re going to put this quilt together is you’re going to do it in rows. And what you’re going to do is you’re going to lay one block with your fabric going horizontally, one block vertically, one block horizontally like this and one block vertically, just like that. And then when you start adding your second rows in down here, this block you’re going to make sure that this is horizontal, this one has got to be vertical. It’s going to come together and it’s going to make that pinwheel just like that. So let’s look at the quilt how it comes together. So this is just so sweet. It is eight blocks across, all the way across, nine rows. And what we did was, again just vertical, horizontal, vertical, horizontal. The fun this is once you get this block done where your pinwheel comes in the center, all your corners are set up for the next pinwheel, that secondary pinwheel. And it’s just darling. For the back, I think I forgot to tell you, you’re going to need 4 ½ yards. Isn’t that a pretty backing? For your binding you’re going to need ¾ of a yard of binding. And if I ever forget to tell you any of that information it’s always just in the description below. So we hope you enjoyed this tutorial on our Spring Twist quilt from the MSQC.
& Progress on Social