


Hopscotch Quilt Tutorial
Jenny Doan
Hopscotch Quilt Tutorial
- 1 roll x 2.5" Strips (Jelly Rolls)
- 1 junior roll x 2.5" Strips (Jelly Rolls) Background Strips - Includes Inner Border
- 1¼ yards x Quilt Fabric for Outer Border
- ¾ yard x Quilt Fabric for Binding
- 4 yards x Quilt Backing Fabric
Featured products Get the Supplies Featured in this Tutorial


Finish your masterpiece and let us give it the finishing touch it deserves.
Subscribe to MSQC on YouTube
Hundreds of FREE tutorials and a new one from Jenny launches every Friday.
video transcript
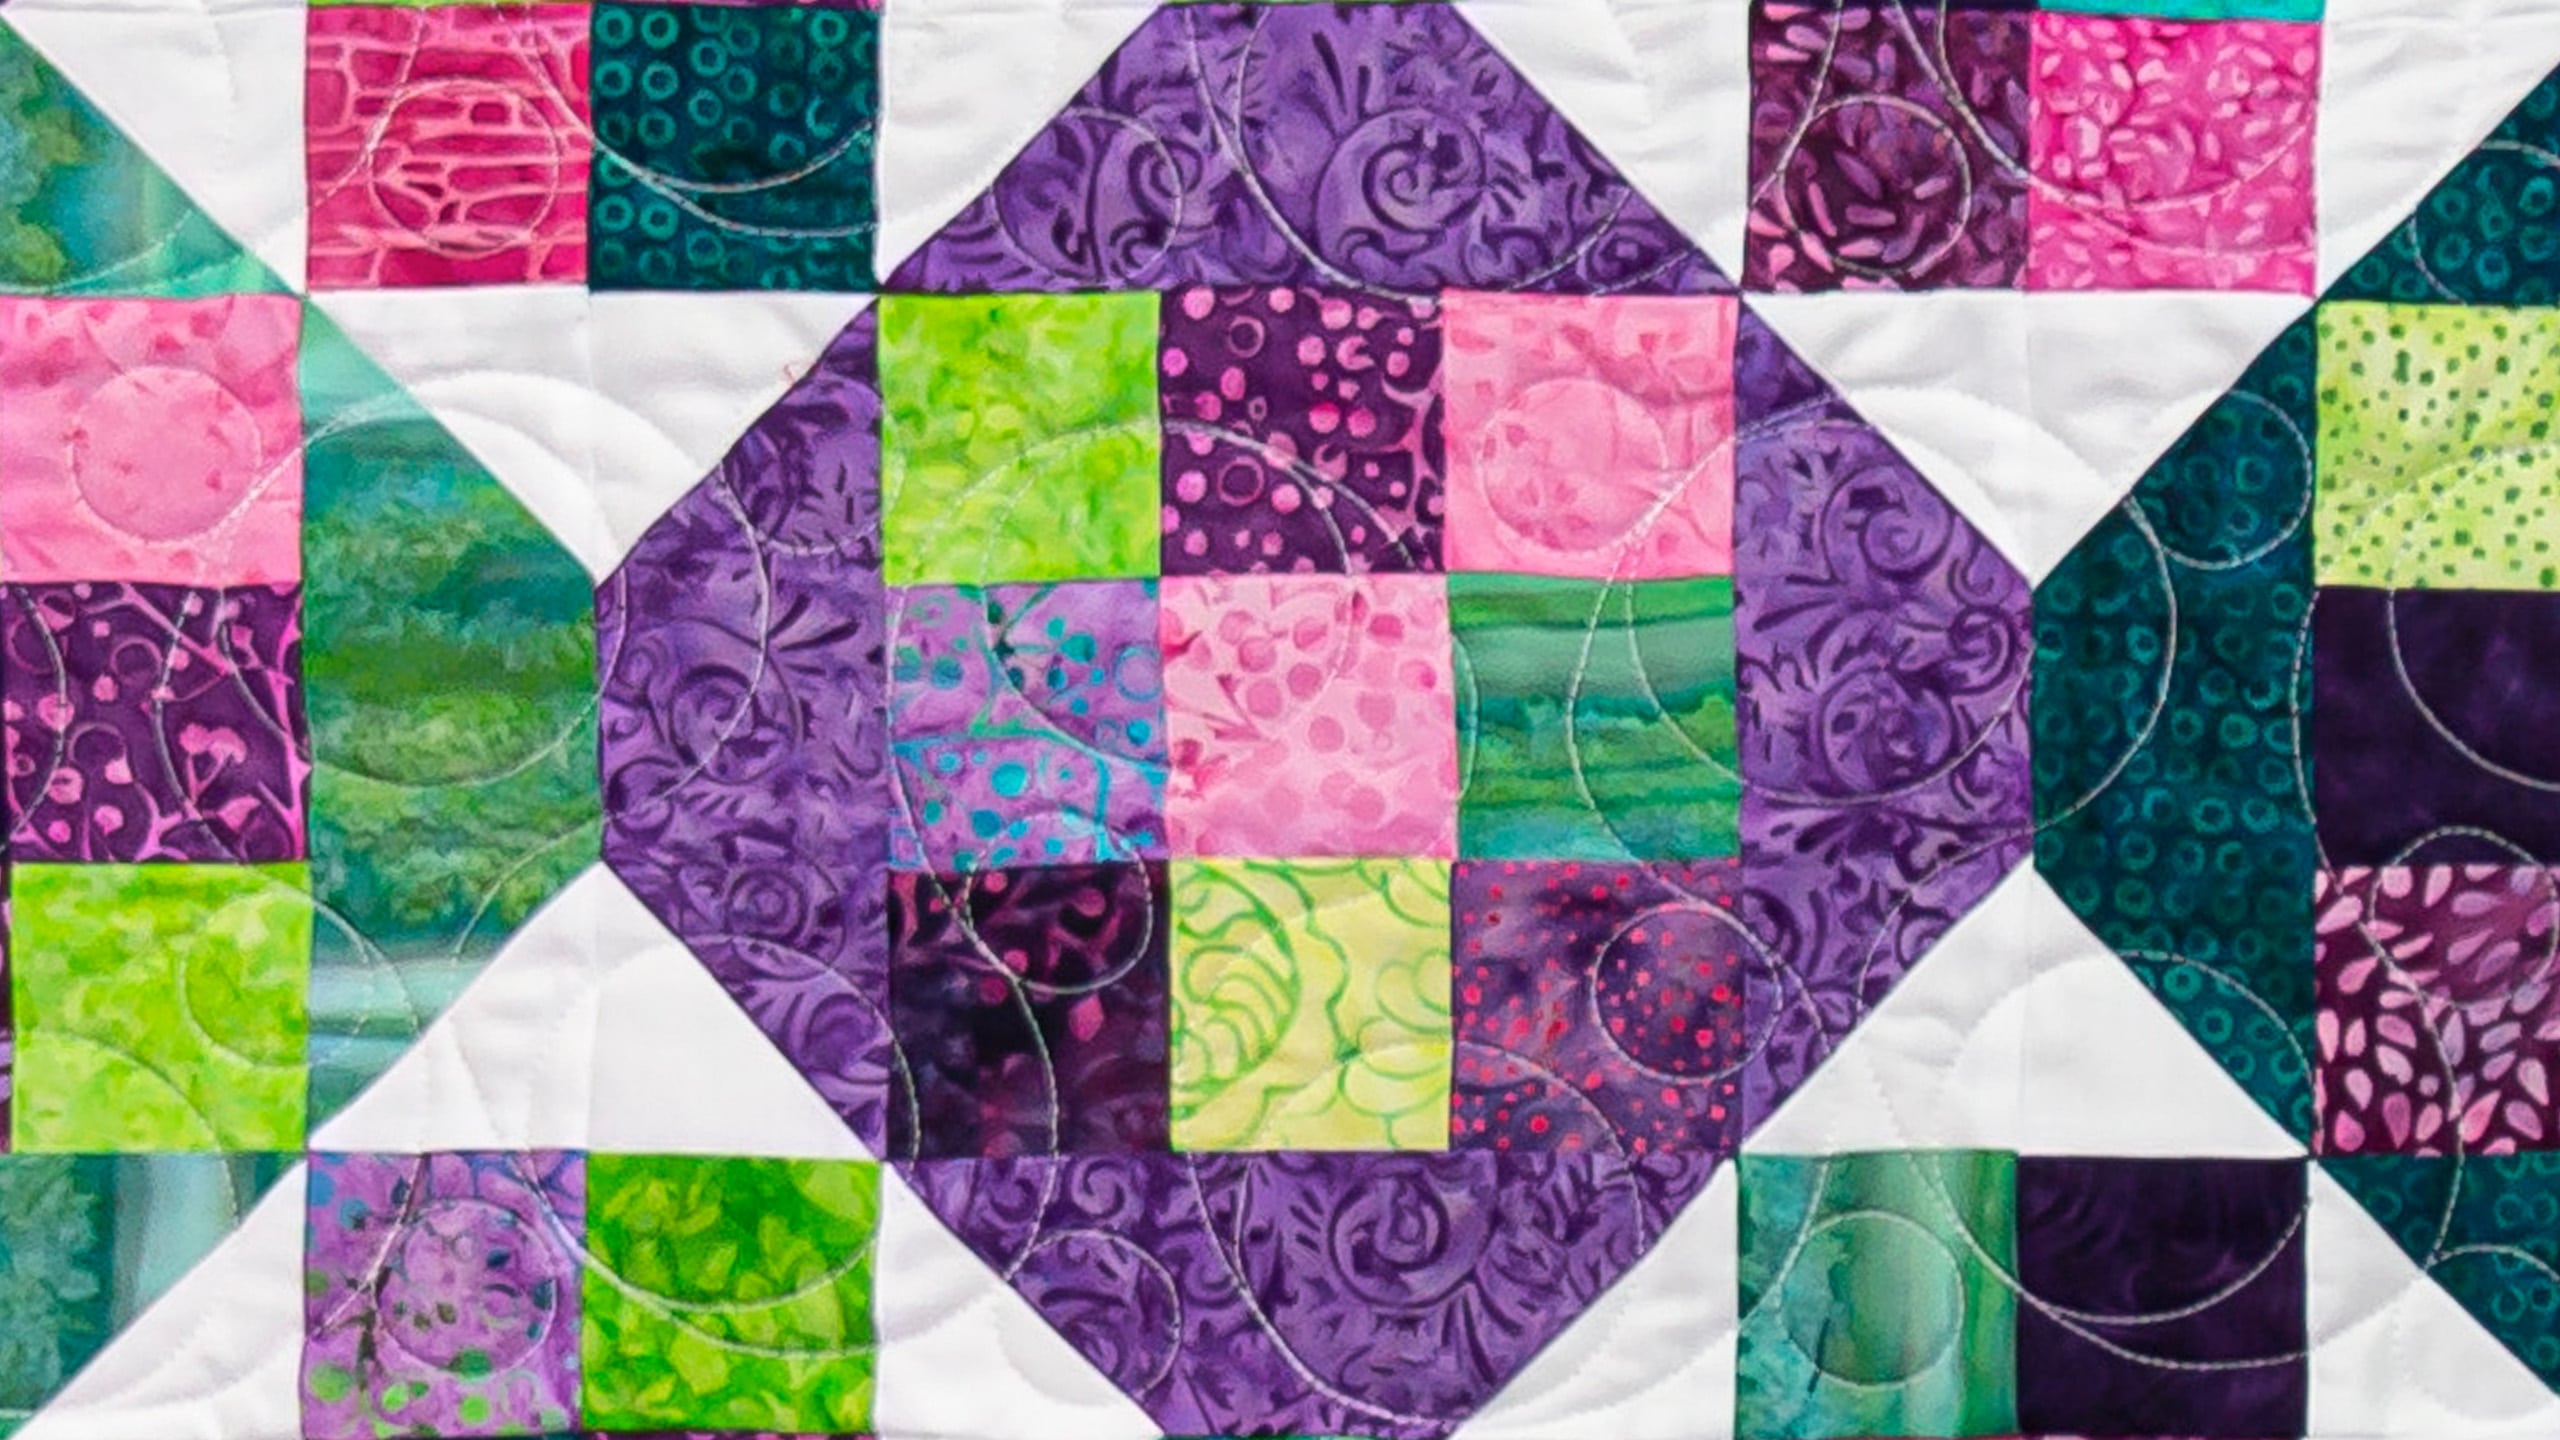
Hi everybody, it’s Jenny from the MSQC. And I’ve got a great project for you today. Look at this quilt. Isn’t this gorgeous? It’s a darling little quilt. It’s based on a nine patch. And it borders, the secondary block becomes a four patch. And it’s just so cute. We’re calling it Hopscotch. So to make this quilt what you’re going to need is one roll of 2 ½ inch strips, that’s 40 2 ½ inch strips. And we have used Petal Party Batiks by Kathy Engle for Island Batiks. And it’s just such a vibrant line. You’re going to need some background fabric. That’s going to be these pieces here and this first inner border. I used 20 2 ½ inch strips. If you use yardage you can get a yard and a half and that will be plenty of yardage for that. For your outer border, this is a nice six inch border. You’re going to need a yard and let me make sure, a yard and a quarter for that. Your backing back here, look at this backing. It’s just so vibrant and pretty. The backing is four yards. And so it makes a nice quilt, it’s 65 by 65. So let me show you how to do this.
Now the trick for me, in this quilt, was in the cutting. So when I cut it what I did was I took my strips, and because you’re going to need to make, you’re going to make a nine patch. Then you’re going to make like a border that’s all the same color and that has to be out of the same fabric. So I had to make sure that I got all of those pieces out of my strips. So what I did was I laid my strips out. And I generally cut them in half, folded in half so this is a whole strip, folded in half. And I’m going to cut them two at a time. Now on these wonderful batiks you rarely get, you rarely get a selvedge edge. But I like to trim it off. I think we’re just in the habit of doing that and I just like to trim it off. You don’t have to but you can if you need to. Like me, I needed to. Alright, so you’re going to cut two sets of 2 ½ inch squares. So you’re going to need four squares. And since mine are folded I’m getting two at a time. So there’s one and here’s two. And then you’re going to need two sets of 6 ½ inch rectangles. So 2 ½ by 6 ½. And you can see I’ve laid my ruler on here long-wise. I like to do that when I’m making that kind of a cut. I feel like it’s really accurate. 6 ½ there we go. So you’re going to do this to 25 of your strips. And you’re going to want to keep these together in piles so go ahead and separate your two and put your greens in one and your purples in one because you want these to be together in piles. These are your border around your nine patch. These little squares are all going to go in a mixed pile because you’re going to want to scrap those up.
Now let’s talk about making this nine patch. With the rest of your strips what you’re going to do is you’re going to sew them together in groups of three. You can see that I have this sewn together in groups of three, a quarter of an inch right down. We’re going to sew them together. And we’re going to cut these into 2 ½ inch segments. So I’m going to go ahead and straighten up this edge right here. It’s interesting to me that fabrics some all different lengths. You know I feel like they’re not all on the same machine, you know, to make them but they do, they come different lengths. And so sometimes you have one sticking out like this. And you just want to make sure you’ve trimmed these all straight. So I’m going to start here and trim that off. Straighten up my line. And then I’m going to come over here and I’m just going to cut these into 2 ½ inches. And this is where this ruler comes in so handy because you really just lay it on the edge. You can use your seam lines here on the mark lines on the ruler to make sure you’re still square and you’re just going to cut and you’re going to cut your whole strip into these. Cut them over and over and over until you’ve finished the whole strip. And all these are going to go in a fun big pile and you’re going to mix them all up to make your nine patches. Alright, so you’ll do that to your whole strip. I’m going to stop there because I have a little pile of mixed ones here. And we need to just mix these up.
So now we’re going to make our nine patch so we’re going to choose three different segments like this and this. And see I have, so I have the same two fabrics that happen to be on here. It’s ok with me, they’re on opposite sides. If it was on this way I would switch it. So just look, make sure they’re aesthetically pleasing to you and you like the way they look.
So what we’re going to do then is we’re going to lay these together and we’re going to sew a quarter of an inch down the side. And we’re going to match up at these little seams all the way along as we go along. So I”m coming here. Sew a quarter of an inch. Nest your seams. And I actually find for some reason, maybe it’s the texture of the batik, it seems to, it seems to like stay a little straighter for me or something. I’m not exactly sure what I’m saying there but maybe if you’re like me and you’ve sewn on a lot of fabric, some fabric has more give than others. And this fabric just seems to have good staying power. Alright, make sure that they’re nesting. Alright there’s our little nine patch. So now what I’m going to do is I’m just going to press this nice and flat. I like to press from the top to make sure that there’s no folds or creases. And then I’m going to turn it on the back and make sure it lays nice and flat. Now we’re going to choose a border to go around ours.
And what I like to do is choose a border that I don’t see in a lot of fabrics which I’m going to have a little trouble with here because I have, some of these are already done. But I’ll choose this green one because there is still a green one here. And our border is going to go around like this. But before we put that border on we want to snowball all the corners of these. So what I’m going to do is I’m going to take my little 2 ½ inch squares. And I got those from my strip, I took my strip right here, cut it into 2 ½ inch squares. And you’ll get 16 out of a strip I believe. And draw the line if you want. You can also iron the line. And then we’re going to sew these on both sides of our side pieces, our border pieces. Now on these border pieces what you want to look at is you want your lines on your block to go out this way, alright? So this is the direction we’re shooting for like this. So we’re going to do that on all four of these. And I’m just going to chain piece one side through and flip it around and chain piece the other side through. Alright, here’s this. And I know that one fell off. I’ll grab him and put him on the next. And always make sure they’re going from out to in. I mean from in to out. Now where’s my other, oh there’s my other piece over there. I’m like, wait, I need four of these. Alright, one more. There we go. Alright so now what I’m going to do is I’m going to flip these right around and I’m going to sew them right down the other side. So I’m going to lay my block on here like this so that the line goes in toward the middle, remember they both have to be pointing out. You’re making like a little house roof. And then we’re going to sew these together. And so I’m going to finish sewing these together and I will just meet you right back here.
Alright so now I’ve got all these sewn together. We’re going to clip them apart and trim off these sides. So right here, we’re going to lay all of our pieces out like this. Make sure they’re all going the right direction. And they’re all making a little roof. And then we’re just going to trim off these sides and press them open. Be careful you don’t cut into your other one. I just barely cut into that other one but I’ll be able to catch that in the seam. But I’m telling you that so you don’t make the same mistake. Alright, last one here. Ok. So now these are all waste. And we’re going to press these back right here. And I”m just going to roll these white sides back like this. Oop. And this is my last one. And now we’re going to put them around the block.
Now for two of these sides right here, we can sew these right to it. Just like this. For these two sides we’re going to need something in our corners and that’s where these other little 2 ½ inch blocks come in. So I’m going to put some blocks over here in my corners on this one so I know which ones are going to go where. And I think we’re ok with just about anything in these corners. I like to mix them up so they’re scrappy. So these two right here I’m going to sew to my nine patch. And I can see when I ironed this one it didn’t lay back very nicely. I”m going to have to refix that. Alright, oops. Grab that. Alright now let’s press these open. So that looks good. And two sides of our block are done. Now on these two, we want to sew our little corners onto our border piece. And I like to do that, again, by chain piecing so I’m going to lay this corner on the edge right here and sew down. Put my next piece in there with my next corner like this, sew along. Then I’m going to flip these around and sew the other sides. And I just hope that I get the corners on the right corners. Actually it doesn’t matter. They’re so scrappy, it’s not going to matter. Alright now we’re going to press these, trim them open, you know, cut them apart. And we’re going to press these. And one more. And then we can put these on the top and bottom like this. Ya that’s going to look great. Alright so over here now on this first 2 ½ inch square it’s going to nest up with our 2 ½ inch rectangle strip so make sure that nests in there. That’s one of those check points right there. Perfect, sew along and then this is your next check point is on the other side where again the 2 ½ inch square comes together. It helps keep things nice and lined up. Alright, here’s this one. And this one I’m going to lay that seam that way. You really want your seams to be going different directions when you put together these kind of rows because you don’t want all that bulk on one way. So you’ll see how these, like even though I ironed them out right here, I’m going to now iron them in so that they lay nice and flat. I had to turn them so that all my seams didn’t end up in one side because then you have bulk right there and it, I mean it’s ok but this will lay nice and flat if you do it that way.
Alright so here’s our little block. And that was pretty painless. It’s pretty fun, quick and easy. And we’re going to put them together and I’ll show you how that happens. I have some blocks made over here and I love when a secondary block appears. And this one is going to appear in the form of a four patch which you’re going to see right here. This four patch right here that is in a square in a square like that. Do you see how that happens right here? So when we laid this out we did five across, one, two, three, four, five, and five down. We make 25 blocks and that’s how many blocks you’re going to get out of one roll of 2 ½ inch strips. I like to know how much you’re going to get of a pre cut. This is the size you’re going to get. Now if you want that to be bigger, pre cuts are so simple because you just buy an additional roll and it doubles the size. So that makes it really, really simple and easy to do. And we hope you enjoyed this tutorial on the Hopscotch quilt from the MSQC.
& Progress on Social