


Snowball Star Quilt Tutorial
Jenny Doan
Snowball Star Quilt Tutorial
- 1 pack x 2.5" Precut Fabric Strips (Jelly Rolls) - Print
- 1½ yards x Background Fabric (incl. Inner Border)
- 1¼ yards x Quilt Fabric for Outer Border
- ¾ yards x Quilt Fabric for Binding
- 4 yards x Quilt Backing Fabric
Featured products Get the Supplies Featured in this Tutorial


Finish your masterpiece and let us give it the finishing touch it deserves.
Subscribe to MSQC on YouTube
Hundreds of FREE tutorials and a new one from Jenny launches every Friday.
video transcript
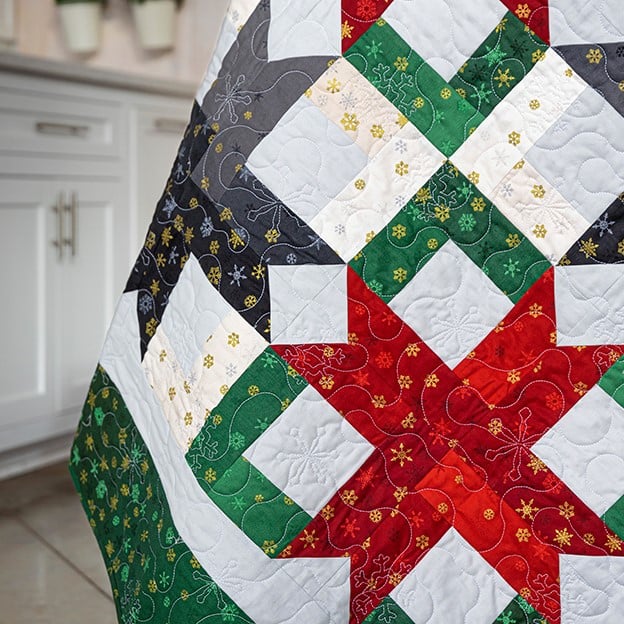
Hi everybody, it’s Jenny from the MSQC. And sometimes you have a fabric that dictates the pattern that you want to do. And this fabric that we’re using only has one, two, three, four colors in it. And so it’s interesting to look at what happens when you do that. So let’s take a look at this quilt behind me. Isn’t this gorgeous? And it’s the layout, the way we built these blocks that makes it special. So we’re calling this Snowball Star and you’ll see why in just a few minutes. So to make this quilt you’re going to need one roll of 2 ½ inch strips and we have used this beautiful Ombre Snowflake Metallic by McCower from UK. You’re also going to need some background fabric. That’s these little inner colors right here and we’ve used this light gray, also the outer border. And to get all of that out of it you’re going to need 1 ½ yards. Your outer border is a six inch border and it’s 1 ¼ yards. Your background back here, look how pretty this is. Oh and look at the quilting on this one. This is a meandering snowflake. And you can see they have several different little snowflakes. They meander. It’s just really a pretty quilting pattern. Anyway for that backing you’re going to need four yards.
So let me show you how to make this. Now because we’re dealing with strips and because this roll particularly only has really four colorways, we separated them into the grays and the whites and the reds and the greens. And so our blocks were made, all the blocks are made completely the same way. But we went ahead and separated those colors and made our snowball stars just with those. And this is what makes this quilt so stunning behind me. So to make this quilt we’re going to start with the center square. And this is a four inch square. And basically you’re going to cut a four inch strip and sub cut that into four inch squares and this is our center. For our side pieces, and if you’re dividing your colors you need to make sure that this is being built like it’s a log cabin block. So you want to have your shorter pieces always on one side and your longer pieces always on one side depending upon the color you choose. So our greens were shorter so we’re going to cut with a strip, a four inch piece and a six inch piece and it will go around like this. Now when you cut with a strip it’s always easiest to me, and you can see the ombre on these if I show you them. So see how this goes from dark to light. Isn’t that cool? I love how ombre looks. And so just out of one single strip you’re going to get all different shades and all different colors. So I’m going to, if I, when I cut these what I’m going to do is cut off my little selvedge edge like this and just trim that off. And then I’m going to cut my four inch pieces. And I’ve got them sandwiched together, you know. I’ve left the strip folded and so I’m just going to come over here and I’m just going to cut these four inches and I get two of them and then six inches and then I will get two of those as well. Just like this. And then you can just stack them up in stacks and you know, make them all day long. Actually it won’t even take you all day long.
Alright so first thing I’m going to do is on this side I’m going to sew my four inch piece to the middle square. And we’re going to sew a quarter of an inch right down the side here. And just like that. And I’m going to finger press this open and I’m going to attach my six inch piece to the other side. So that’s four and six on those measurements. 4 ½ or four by 2 ½ and six by 2 ½. And then I’m going to press these now because I’ve got one whole side finished. And then we’re ready to add the other side. Now the other side measurements, this is also going to be a six inch piece. And you can see right here that this piece of my red comes more from the middle of the strip. See how it’s lighter. So the six inch piece is going to go over here and we have an eight inch piece of the red that we’ve cut over here like this. And so let’s go ahead and sew those together. And so it’s really kind of built a little bit like a log cabin where you have, you start with a smaller piece and just kind of work your way around that block. Alright. And then I’m going to add this other one over here on this side. This actually, pre cutting your strips will help you keep your block square as well. Alright so now I’m going to press these down. And I’m going to let those seams go to the outside just like this pressing from the top.
And you can see my seams are all going from the outside like that. And then what we’re going to do is where the colors come together, right here and right here, we’re going to take a 2 ½ inch gray square and we’re going to snowball that corner. By snowballing what I mean is I’m going to put a corner on there and I’m going to sew corner to corner. So it’s going to give the appearance of a kind of a rounded edge. And that’s why we call that snowballing. And so right here. So you can draw the line corner to corner or you can use the diagonal tape which I have on my machine and I just love because I start right here at this one right here, at this corner. And then I make sure that this point, where this point comes right here that it’s right lining up on this red line. That’s the very center, that’s where my needle is and I’m going to sew straight across. And I just let that, keep that point on that line and it will exactly sew right in the middle of that block. So make sure it’s lined up on your corner and then start right on that corner, take a few stitches and then line it up right on that red line. And that will save you from having to draw the line as well. Alright now I’m going to trim these off. And I’m just going to kind of put about a quarter of an inch from that sew line like this. And then I’m going to press these back.
And then what we’re going to do now is you’re going to make four of these and it’s going to make the block. So I have some more over here already made and I’m going to show you how this is going to go together. So what we’re going to do is we’re going to put our solid pieces to the center like this. And we’ve got this way and we’ve got this way. And that makes our block. It’s just that easy. So it’s like a four patch. I’m going to take these and sew them together. And isn’t that fun that that one little square when you put four of them together it makes something so cool. Alright let me sew these together as well. Alright keep them lined up. The only thing you want to match together on these is where these two little snowballs come together. You want to keep those pretty close. Alright now we’re going to sew right across the center of this. Put these right sides together and we’ll match up this middle seam is what we’ll match up. And we’ll also match up our snowballs. So lay this on here so that your snowballs line up. And I like to just take a little stitch, make sure those are matching up there. And then I’m going to stop and then I’m going to set my, feel my center seam so that it nests really tight. And once I get across that center seam, I’ll come back here to snowball and sew right off the end. Alright let’s press this and take a look at what we’ve got. This is a super easy way to make a star. It also has a bloom look to it. So don’t be afraid to have some fun with it and change up your colors, change up your settings. But it makes a really cool star. And with this colorway it’s very fun.
So here’s our block. Now let’s take a look at the quilt. What we did was we put this one here. And then we put a black one right next to it which makes them kind of pop on and off of the quilt. So we’ve got one, two, three, and one, two, three, four. And so on here we’ve got one, two, three, four, five, six, of the black and beige ones. And then we’ve got one, two, three, four, five, six, of the red and green ones. And so when you put those together just like this it just makes that, it just makes such a great pattern and it’s so fun.
So sometimes it’s the fabric that tells you what the design is going to be. But don’t be afraid to try this in other colors as well. So we hope you enjoyed this tutorial on the Snowball Star from the MSQC.
We hope you enjoyed watching this video. If you’re not already part of the Missouri Star quilt family you can hit the subscribe button below so you won’t miss a thing. And if you click that bell it will notify you every time a new tutorial comes out. See you next Friday.
& Progress on Social