Disappearing Pinwheel Arrow Quilt Tutorial
Jenny Doan
Disappearing Pinwheel Arrow Quilt Tutorial
- 1 Pack x 10" Precut Fabric Squares (Layer Cakes) - Print
- 1 Pack x 10" Precut Fabric Squares (Layer Cakes) - Solid
- 3/4 Yard x Quilt Fabric for Inner Border
- 1 3/4 Yard x Quilt Fabric for Outer Border
- 7 1/2 Yards x Quilt Backing Fabric


Finish your masterpiece and let us give it the finishing touch it deserves.
Subscribe to MSQC on YouTube
Hundreds of FREE tutorials and a new one from Jenny launches every Friday.
video transcript
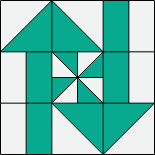
Hi everybody, it’s Jenny from the MSQC. And I’ve got a great project for you today. I know you’ve heard me say a dozen times that there are zillions of ways to set the disappearing Pinwheel. Well this is just another way. This is the Disappearing Pinwheel Arrows. So I want to show you. Let’s look at this quilt behind me. Isn’t this fun? I love this quilt. I love the layout. And the fabric is perfect for it. So to make this quilt what you’re going to need is two packs of ten inch squares. That’s 42 in each. You’re going to need one pack of solid and one pack of print. Now our print pack is called High Adventure and it’s by Dani for Riley Blake. And it’s just so cute. It’s got all these little arrows and checks and camping things. I mean it’s just a great line of fabric. I really really like it. Alright you’re also going to need about ¾ of a yard for this inner border out here. And we put a nice big border on this outside one. It’s six inches. And you’re going to need a yard and ¾ for that. Now you may not be able to see that from here. It looks kind of like dots but it’s actually slices of wood. You can see the little rings, the little cut out of them. It’s just really, really cute. So we’re going to talk about making a disappearing pinwheel. And I know you’ve seen me do that before. But we’re going to take you through that again because it’s a new setting. So what we’re going to do first is we’re going to take our ten inch square print and we’re going to pair it with a ten inch square of solid. Just like this. We are going to sew a quarter of an inch all the way around the outside edge. Now right here I have one that’s done. You can see maybe better on this side, nope not too much better. It’s hard to see. When that thread matches, it’s hard to see. So right here you can see maybe that we’ve sewn a quarter of an inch all the way around the outside edge. Once you do that we’re going to cut it diagonally both directions. Let me scoot this over here so I can have cutting room, have elbow room right there. Alright here we go. We’re going to cut this way and we’re going to cut this way. Line it up corner to corner. And make that cut. Now if your quarter of an inch is the same on all four sides and your cutting is accurate these blocks will end up the same size. So one of the things about that that’s really important to note is that is that really it’s not the quarter of an inch that has to be exact. It is, it is, what’s important is that that seam is the same on all four sides. So if your quarter of an inch is bigger or smaller, what matters is that it’s the same on all four sides. So consistency is more important than perfection. Now what I’m doing here is I’ve set these seams and I’m rolling them back. I’m pressing my seam to the dark side of the fabric, just like that. And one more. And then we’re going to put these together as a pinwheel. So what we’re going to do is, and I have a mantra for this because I’m angley challenged so I always get it wrong. I’ll end up turning it like three times before I get it right. So I have this mantra that goes, light, dark, light, dark, light, dark, light, dark, all seams to the center. And so then I make it work. I know it’s a pinwheel. Alright so now what we’re going to do is we’re going to sew this together which means we’re going to put these together. And you should be matching a white piece with a printed piece. And we’re going to sew these on both, both of these on this side a quarter of an inch. So we’re going to come over here. And we’re going to, I’m just going to move my needle over a little bit. Alright so I’m just going to sew a quarter of an inch down here. And I’m going to make my, line up my edges and make sure that my edges line up along the bottom as well. Because this is, because these are cut diagonally there’s a little bit of bias so you are able to have a little bit of play. And you can match your blocks up perfectly. Alright. Now that we have our two sides sewn together we are going to come back and sew them together top and bottom like this. So we put them together and make sure again they still look like a pinwheel. We are going to put these together right here. We’ll make one seam go forward and one seam go back and we’ll make them nest up in the middle here so that this part lines up. This is important to line up. Now here’s a little tip right here. See where your thread crosses like you have thread that goes this way and thread that goes this way. When you’re sewing a seam on this side, as long as you stay at the point or on that side of that seam you’ll never lose your point. So just watch that right there and make sure that you’re at this criss cross right there or on the seam side and you won’t lose your point. So that’s a little tip because some people get crazy about those points out there. Alright. We are going to sew this down. And I am lining up my two middles making sure they match, making sure one seam goes one way and one seam goes the other. And then I’m going to continue down the other side. And I hold my two end pieces so that they line up right together as well. Now all these right here, all these little dog ears right here you can clip those off if you want to. You know, I know for a fact that the quilt machine can go through fingers so it can go through lots of fabric as well. So we’re going to take it over here and iron this open. Alrighty. Nice and flat. I like to iron from the top so that I know that all my seams are open and pressed flat just like that. Now, now comes the magic. Now what you’re going to do is you’re going to measure your block. And however big your block is you’re going to divide that by three because we’re going to turn this block into a nine patch. So my block is 12 ¾ . I’m going to divide that by three, that means that every block should be 4 ¼. Now if I came in from this, from this outside edge I could cut from my outside edge 4 ¼ on all four sides and it would work. But for me I want to cut from the center. And so I have to divide that measurement in half. So now we’re at 2 ⅛ . And what I’m going to do is I’m going to line my ruler up 2 ⅛ just like right down this center seam right here and I’m going to make a cut. Just like that. 2 ⅛. There we go. Now this is a good time if you had a rotating mat. I forgot to put mine up here so I’m going to rotate my fabric and line it back up. And you’re going to make this 2 ⅛ cut on all four sides of this fold. Just like this. One more turn. Everything starts getting a little crazy when you don’t have a rotating mat. I’m telling you if, if this mat wasn’t so big I would just pick it up and turn it. You can easily have your own rotating mat by just picking up your mat. But it is, not only is it big, it is taped down. So it’s not going anywhere. But I’m almost done here. I’ve got one more turn. Make sure everything stays lined up. And I’m only cutting on this side. So here I am at 2 ⅛ inches on the center seam. Alright. Now we have this block all matched up right there. And it looks like a pinwheel still but all these blocks can move independently. So there’s some fun things we’re going to do when them. On this one right here on the side right here, we’re going to take these two bar blocks. And we’re going to line these up so they do this. And we’re going to line our bar blocks over here so they do this. Then we’re going to take these arrow blocks that are still there and we are going to put one here, we’re going to move one over and put one there. And move this over and put one here like this. And that makes our arrows. Is that not the cutest thing? It’s so easy. And then you’re just going to sew this row together and this row together and this row together. So it’s just like sewing a nine patch together. You’re just going to sew row by row and then sew your three rows together. . And it’s going to give you a block that looks just like this. Now out of your whole pack you’re going to get 42 of these. And, and they’re super easy because all we’re doing is sewing them together in big rows. So let’s look at the quilt behind me again. We have one, two, three, four, five, six. Six across, seven rows. And you’re going to want to lay these out because you’re going to want to mix up your colors. Make sure all your darks aren’t in one place. And we put one row of arrows, this one going up and down, this one going sideways, up and down, sideways, up and down, sideways. We just rotated them. So when you’re ready to put them together your blocks should be square and you’re going to put them this way. Just sew them together and match up your little seams right there and just sew six in a row, seven rows. Now this makes a pretty good size quilt. It makes an 81 by 92 inch quilt. So that is a pretty good size quilt. Anyway I just love this. I love when I find a new, a new design like this. There’s a lot of times when we’ll have a retreat and we’ll be working on projects and I’ll be teaching this and somebody will say, hey what about this. And I’m like, AHHH it’s perfect. Now we can do a new tutorial. So we hope you enjoyed this tutorial on the Disappearing Pinwheel Arrows from the MSQC.
...& Progress on Social