Finish Line Quilt Tutorial
Jenny Doan
Finish Line Quilt Tutorial
- 1 Roll x 2.5" Light Gray Precut Fabric Strips (Jelly Rolls)
- 1 Roll x 1.5" White Precut Fabric Strips (Honey Buns)
- 1 1/2 Packs x 5" Squares (Charm Packs)
- 3/4 Yard x Dark Grey Quilt Fabric (inc. border)
- 3/4 Yard x Quilt Fabric for Binding
- 3 1/2 Yards x Quilt Backing Fabric
- 1 Pack x Small Orange Peel Template for 5" Squares
- 1 Pack x Missouri Star Mini Orange Peel Template for 2.5" Squares
- 2 1/4 Yards x Lightweight Fusible Web


Finish your masterpiece and let us give it the finishing touch it deserves.
Subscribe to MSQC on YouTube
Hundreds of FREE tutorials and a new one from Jenny launches every Friday.
video transcript
Jenny: Hi everybody, it’s Jenny from the MSQC. And I’m here today with my husband, Ron. And we have a fun project to show you. This quilt behind me actually stemmed and was inspired by a quilt that Ron made. So we’re going to show you his quilt first. And this is it right here. Now every place we go, when I go traveling we always go to fabric shops. And Ron buys fabrics. And it’s always motorcycle or car related. Something like that. And he bought this motorcycle fabric and he wanted to kind of iron them on like so that they were coming up the front of the quilt. And he decided that he was going to a double jelly roll race. So this is a 2 ½ inch strip and this is a 1 ½ inch strip. So what he did was he sewed all of his red strips together with a black square in between them. And then he sewed all of the white strips together with a black square in between them. Then he sewed those two together and then he did the jelly roll race with that. And so we got the whole thing done and going. And it finished about this much too long. Like it was like a runway quilt, like it went really long. And so we just cut that piece off to use for something else. And then he actually ironed these onto fusible Heat N Bond. And, and then he just placed them on here. Ironed them on. And then we just single stitched all the way around every single one. And I say we, but mostly this was him. As a matter of fact I tried to cut one of those out. If you recall we were sitting up watching television and we were cutting out motorcycles. And I said, let me help you. And I”m cutting them out and I handed it to Ron, and Ron goes, why don’t you just let me cut these out. You know, and I’m like, I’m like what is the matter with my motorcycle. And he’s like, Jenny wheels aren’t square. So you know he did his own cutting out, and he did that. And actually the quilting pattern he chose as well which is kind of fun. I don’t know if you can see that up close but it’s actual, let them focus in on that. It’s actual, see this guy is on a motorcycle, right here, here’s the wheel and you can see the whole, the whole motorcycle motif that he’s got going on here. And he loves it.
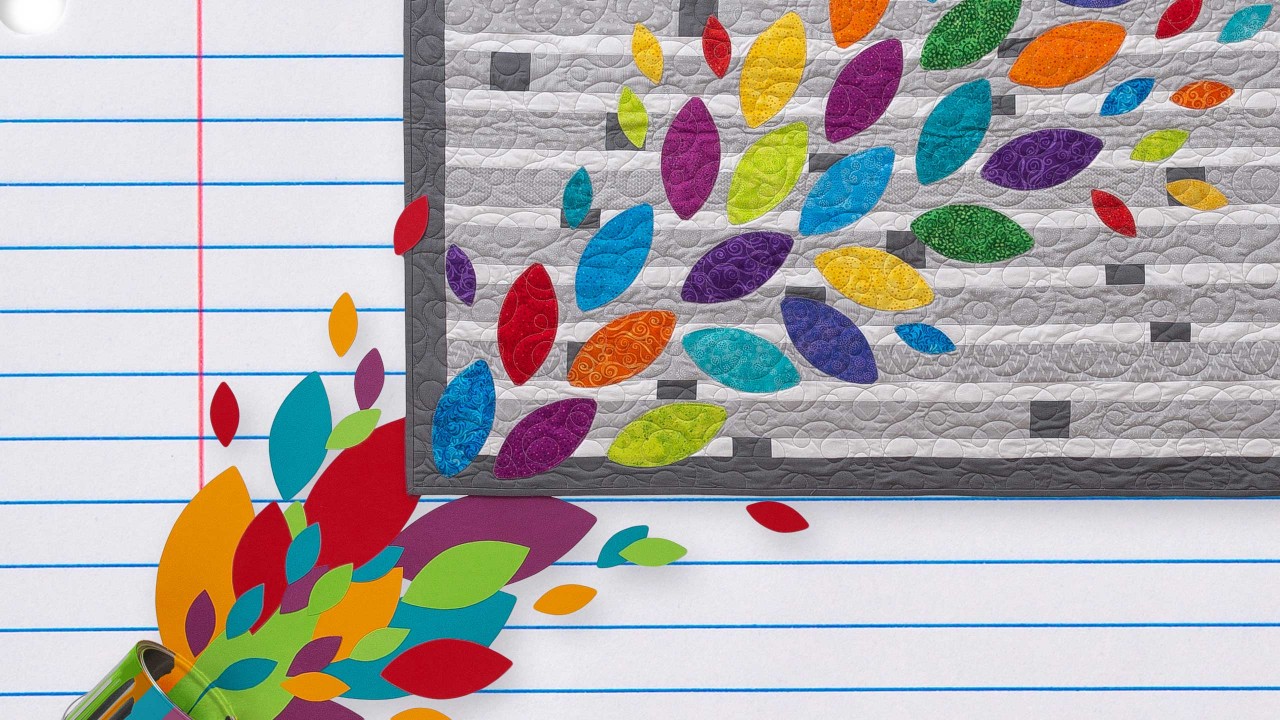
So originally what we wanted to do was remake this quilt for you and show you how to do it. And this is our quilt back here. Thanks, Ron. Thanks for your help, honey. This is our quilt back here. And we looked for some fabric that we could cut out and you know put little things on there. Nothing actually, nothing was floating my boat. And all of a sudden I’m like we have these cool shaped templates. We could do a lighter background and then do the colorful templates on it. And so that’s what we did.
So to make this quilt what you’re going to need is one packet of 2 ½ inch strips. And we have used Silver Linings Essentials by Wilmington. And they’re just gorgeous. You can see they’re all different but they’re all just tone on tones and they’re just really really pretty. It makes a great background color. You’re also going to need a roll of 1 ½ inch strips for your second one. You’re also going to need your pop color. And we’ve chosen this gray color. And you’re going to need ¾ of a yard for that. And that’s going to include your little border out here. So we used our square, our pop color, brought it out into the border and binding as well. The binding is ¾ of a yard on that. So you’re also going to need a little bit of Heat N Bond which we have here. And you’re going to need a pop color. And we’ve used this Wilmington Essentials and it’s just all different colors of that. And you can use anything you want. You can motorcycles, you could use flowers, you could, you know depending upon who this quilt is for, you could really personalize it. So we also used our templates. And these are our orange peel templates. And I just think this flash of fun color. I mean I don’t know you can’t really see it down here too much but we started with the big ones on the bottom and then just ran them right up the side right here. And so it just, we added the small and the large ones to it so that it would just, you know it had lots of texture and lots of movement to it. And I just think it looks really fun. Now when we made Ron’s we did it the jelly roll race style. We thought it would be easier to write a pattern and to teach that a little bit different way. Plus you wouldn’t end up with having to cut off part of your quilt because his did come out really long. I always call those runway quilts.
So to make this quilt we decided to build it row by row. And what we did was we took our 2 ½ inch strip like this and for each 2 ½ inch strip you’re going to need a 2 ½ inch gray square. And so you’re going to cut, take your gray yardage and cut 2 ½ inch strips. And you’re going to cut 24 of these gray squares. And then you’re going to cut 24 of the 1 ½ by 2 ½ inch strips as well because those are going to go in our white strip which is coming next. So what we did is we took our long strip, trimmed our selvedges off and sewed a gray square to it like this. And then we just sewed it a quarter of an inch right down the side. And what we’re going to do here is I’m going to line these up. And we’re just going to sew it right down the side. Now to get it the length we wanted we need to add another 6 ½ inch strip. So it can be any one of your strips here. And so you’re just going to take some of those strips and you’re going to cut them into 6 ½ pieces because you’re going to need one piece for each row that we do. Alright. Now we’re going to do the same thing with the white strip like this. So here’s our white strip. And we’re going to trim our selvedge ends off like that. Just trim that off. And then we have already cut these little pieces right here. And so this is now 2 ½ by 1 ½ and we’re going to attach this to the end of this. And add a six inch piece along to the end of this as well. So I’m going to put this little strip in here and sew a quarter of an inch right down the side and then I’m going to add my six inch piece on the end. Now the reason we added this little six inch piece on the end is because we wanted to get it to, we were trying to match Ron’s quilt and we wanted to make it that wide. And we also wanted you to be able to rotate these. So just like this you see if we did this they’re all going to end up the same. So what we ended up doing was looping these, sewing these together like this and just making a whole loop out of it. Let me make sure these are lined up. Alright. So now we have a loop. And then what we did was we just cut it wherever we wanted to so that it would stagger back and forth. So let me show you how we did that. So just anywhere along your strip that we want to you’re going to make a cut. And now this is going to still be the exact same length as this one but it’s going to be staggered. These squares are going to end up in different places. Let’s look at the quilt for a little reference. So see how these are just kind of all over the place here. It’s just wherever you cut them. And then you’re just going to start sewing your rows together.
Now I have a piece over here that’s done, that has those on it. It’s just a small piece. But you’ll be able to see here. And so this is what I’m talking about. So as you start sewing them together you’re going to get this great quilt with all these different colors of grays with the white ones sewn in between. And they’re going to be staggered all over because you’ve sewn them together as a loop and then just trimmed them where you wanted. At the end of the day you’re going to trim up these sides so they all match and they go. Now for our added on color pop. What we did was we took our templates which are our orange peel templates right here. We used the big one for, the large orange peel template. We also used the small orange peel template. At first we just started with the large one and then we just felt like it needed some more movement. And, and this little mini one right here, you can get a whole bunch of those out of a charm pack. And for the big one you can just get one here in the middle. I have quite a few little ones here in my pile. So I’m going to go ahead and trim, cut some of the big charm pack ones. To do that you’re going to need some Heat N Bond. And I’ll show you how I attach my Heat N Bond because I just actually laid my charms right over it like this. So I’ve got my Heat N Bond out here. And I decided on the colors I wanted. And so I’m just going to lay them right next to each other so that I don’t get any, no adhesive will stick to my iron we’re hoping. And so we’ll just go like this do four of them for now. . And I’m just going to kind of overlap them a little bit. Oop we don’t want another yellow. Let’s see how about a green. The green will be beautiful. Alright so now we’re just going to touch these, iron them on. And I’m being very careful not to get on that sticky part. That is not fun to clean an iron. Alright.
Alright so now what I’m going to do is I’m going to make this go so much faster because I’m going to cut this. Let me move some of this stuff out of the way. I get so much stuff up around me here. And you’ve got to be able to see this. So what I’m going to do is I’m going to go ahead and cut this back into fourths. I can probably actually fold it once I trim it. So I’m going to trim this off. And normally I would just do this with charms. I would just cut the whole thing with charms and, and we would have lots and lots of these. So I’m just going to fold this like this and then I’m going to fold it like this. And then I’m going to lay my template on here like this. Now there’s a couple of things you can do. You can either cut this with your rotary cutter or you can trace around it and cut it with scissors. We also have an awesome Sizzix die that you could use and just run them through the Sizzix machine. All of our templates are also made into dies. And just like this. Alright, let me trim off this little end right here. They all moved before I could trim it. Alright, there we go. Now if you want to leave those whole and pointy, you can do that as well too.
So then let me tell you how we did this because this was actually really fun. Natalie helped with this. And she’s really good at seeing how things go together. And so this was actually hanging on my design wall so that we could actually step back and take a look at it because you’ve got to get, you know you don’t want too many of the same color in an area. You don’t want, you know, you just want it mixed up and you want it fun. So we actually just pinned these on and we started from the bottom like this and just kind of went out and made them up. You know fanned them out like this. Then we started adding in these little ones over here. And I can see this would actually, oop, see now you don’t want two oranges right there. We have so many pretty colors to choose from. You know we want to go ahead and put some others on. And you just, you just, it’s play by ear. You know it’s just fun. It’s just trying things out and seeing what works and how did it go. Ours is almost all large down at the bottom down here. And then it comes and swoops up like this and it just has a little bit of a curve. And the curve we did with these small ones so that it gives it this real kind of wind blown look, almost like leaves which makes me think this would be a really pretty fall quilt with leaves.
So it’s just easy. We then actually we took the pins out, we pinned everything on the board. Took the pins out. Took the paper off the back which is super easy. You just roll it and it comes back. And when you see this shiny side on your fabric you know that the glue is on there. And then Natalie re-placed it on there. And she got the iron and touched it right away with the iron and ironed it right while it was on our wall. So you have to make sure you have an iron proof wall if you can do that. Ours is, it has flannel on it so it works really well. But she actually just ironed it while it was still on the wall so that we knew it would all work. We then went and did a tiny little button stitch all the way around these. You could do a little zig zag. Ron did a straight stitch around his. But it’s just such a great idea because it’s, we’ve combined two different strips. We still have the squares popping in between. Because of the different sizes it gives it more dimension and texture. Then we added these fun colors to it and it just really makes a fun quilt. So I hope you’ll try this. I hope you have some fun. I’d love to see all the different things that you make and put on it. And we hope you enjoy this tutorial on the Finish Line quilt from the MSQC.
& Progress on Social