


Hearts and Gizzards Quilt Tutorial
Jenny Doan
Hearts and Gizzards Quilt Tutorial
Never judge a quilt by its name—even if that name is Swamp Angel, Corn and Beans, or Oklahoma Boomer.
Because if wack-a-doo names scare you off, you will miss gems like this week’s new quilt: Hearts and Gizzards. (Yep, Hearts...and Gizzards.)
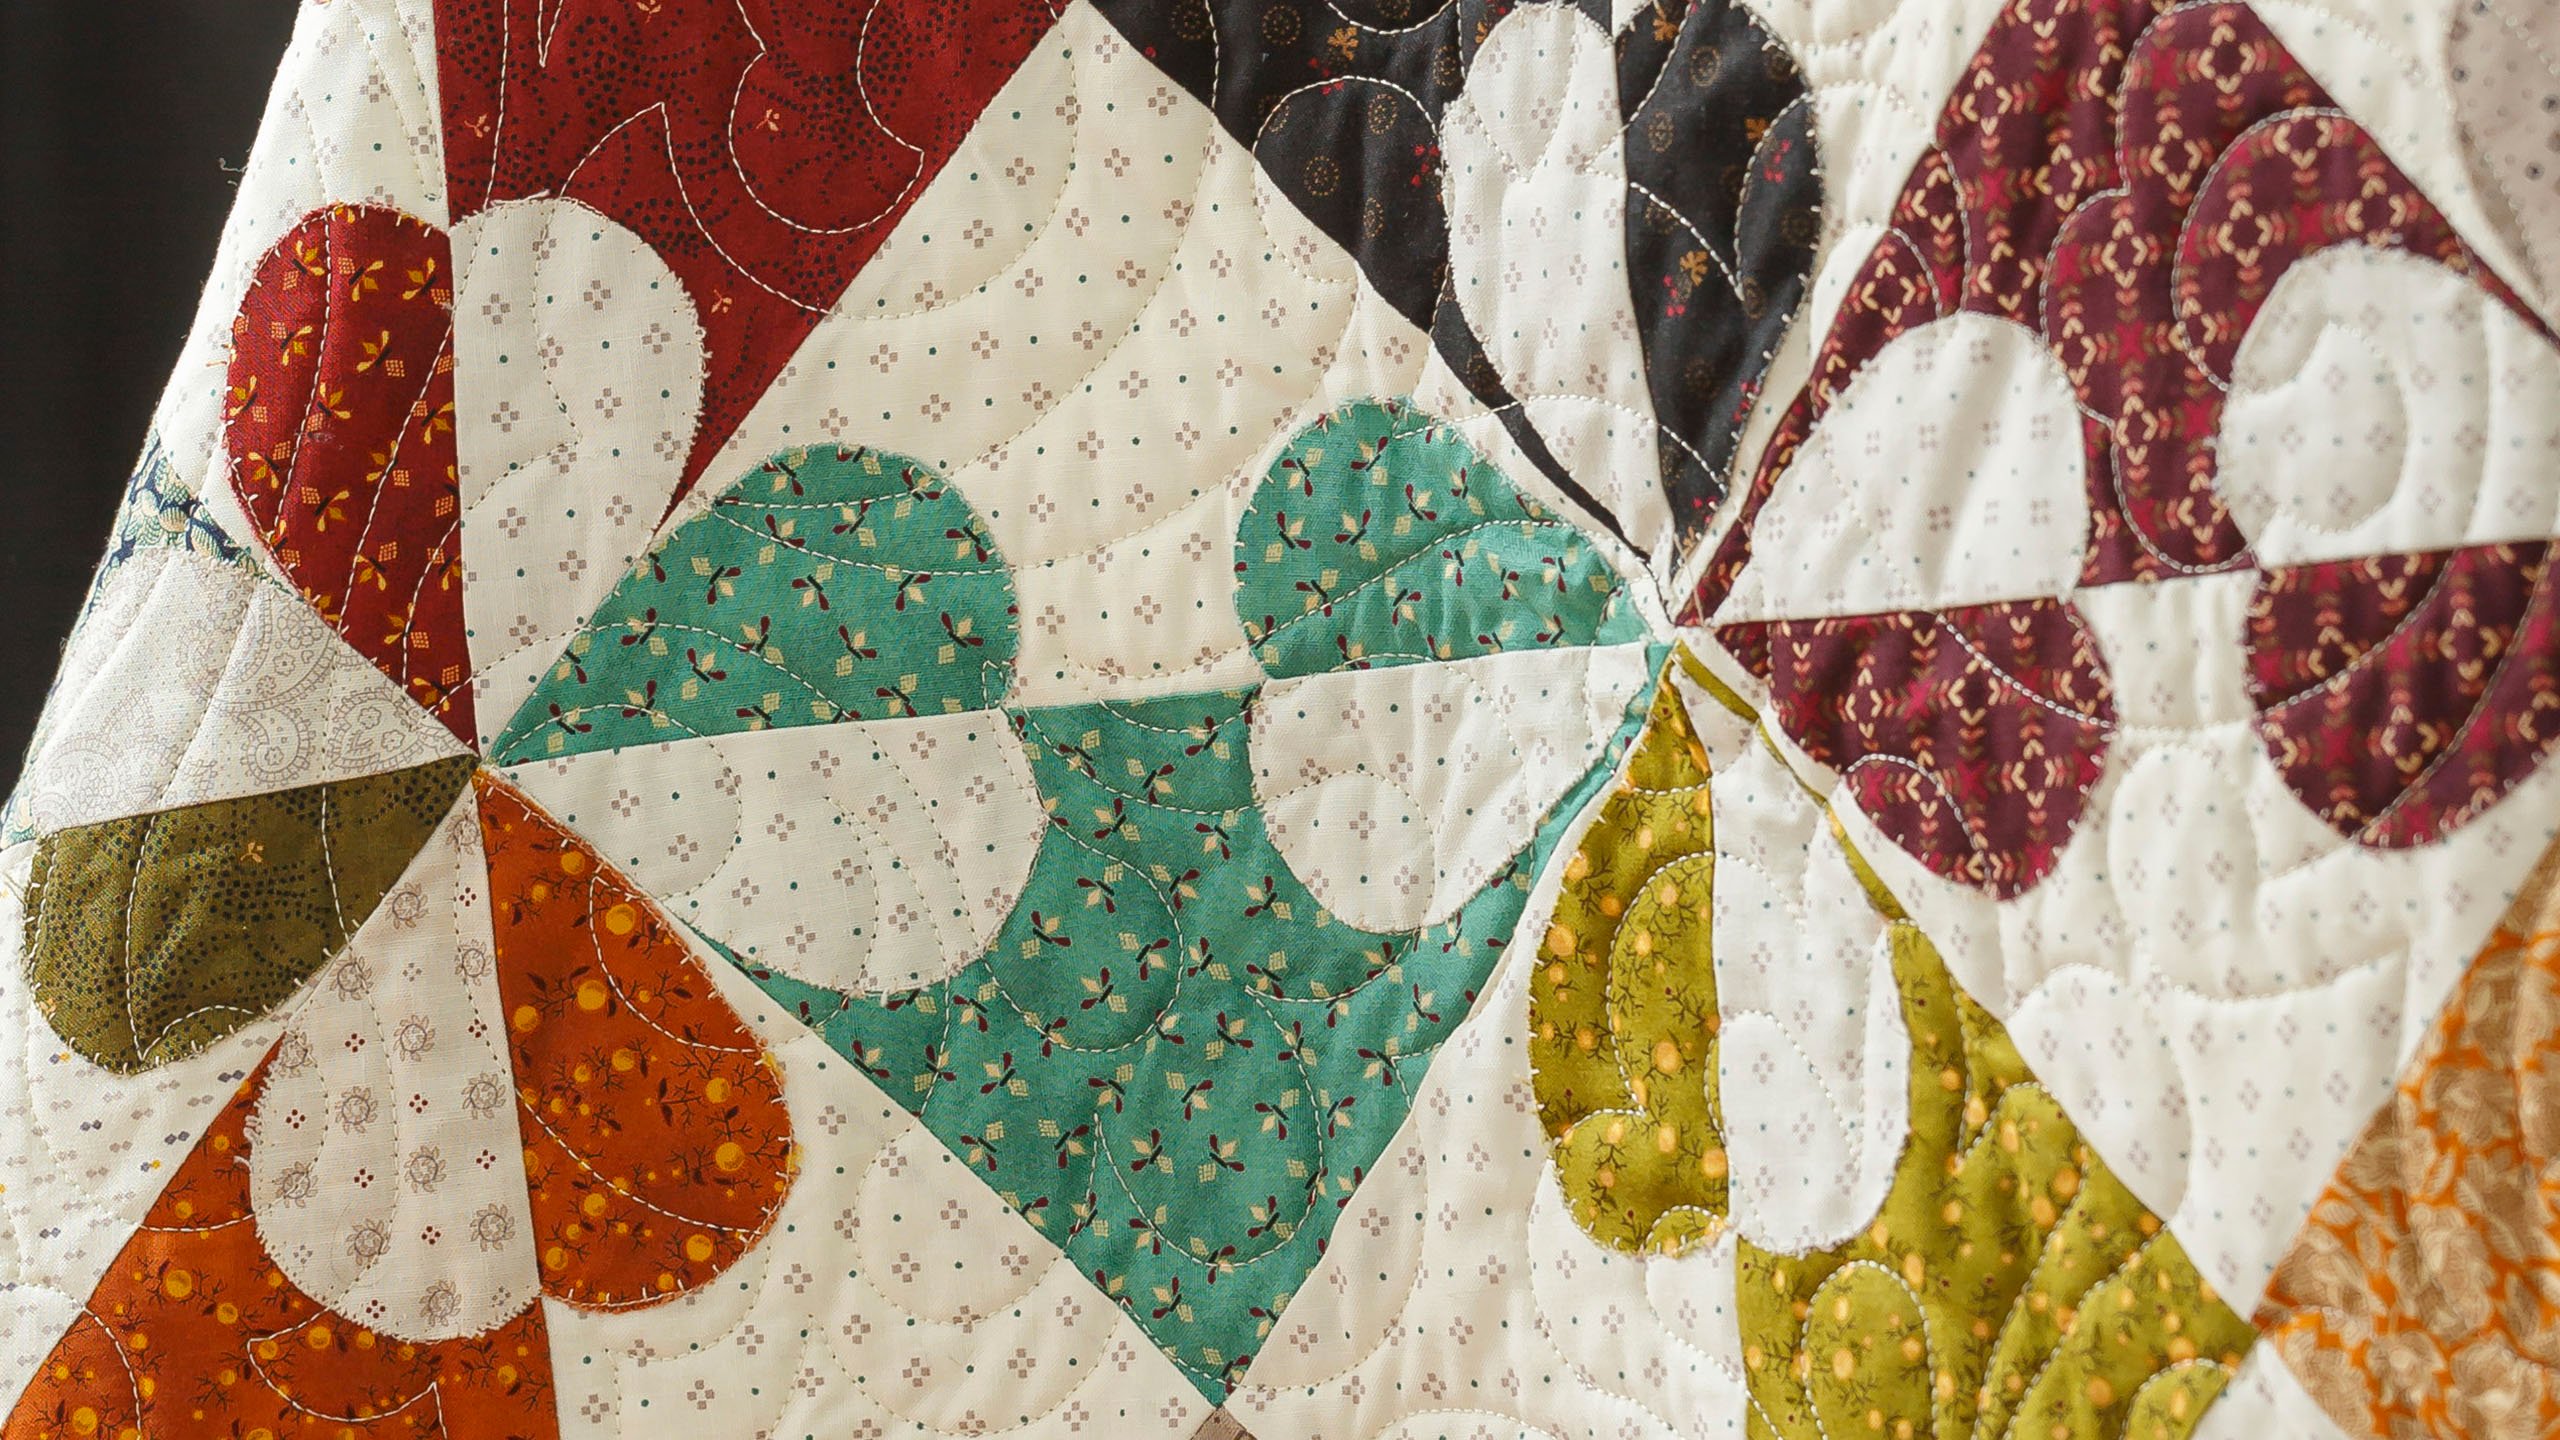
Hearts and Gizzards is a gorgeous, old-fashioned layer cake pattern composed of pretty hearts that form flowers (or gizzards?). It’s dainty. It’s feminine. And its name is absolutely weird!
- 1 Pack x 10" Precut Fabric Squares (Layer Cakes) - Print
- 1.25 Yards x Quilt Fabric for Outer Border
- 4.75 Yards x Vertical Seams or 2½ yds. of 108" Wide Fabric for Backing
- 2.75 Yards x Coordinating Light Print - includes Inner Border
- .75 Yards x Quilt Fabric for Binding
- 1 Pack x Missouri Star Half Heart Template
Featured products Get the Supplies Featured in this Tutorial


Finish your masterpiece and let us give it the finishing touch it deserves.
Subscribe to MSQC on YouTube
Hundreds of FREE tutorials and a new one from Jenny launches every Friday.
video transcript
Hi everybody, it’s Jenny from the MSQC. Today I’m going to show you how to make an old classic and it’s Hearts and Gizzards. Now I’ve always loved this quilt but I never could really find out, I get the heart part. I didn’t get the gizzard part. So I did some research and you what, there just isn’t very much available out there. So I still don’t really know why it was called Hearts and Gizzards but it is definitely an old block and I’m going to show you a way to make it new and exciting. So to make this quilt you’re going to need one packet of ten inch squares. And we have used this beautiful line. You can see these fabrics behind me, they’re gorgeous. And it’s by Kim Deal and it’s called Gratitude and Grace and it’s for Henry Glass. You’re going to need some background fabric. Now I wanted to use a fabric that was in the line so I actually pulled out the other lights and I used this fabric and for this you’re going to need 2 ¾ yards of a coordinating fabric. You can use a white or whatever you want and it will work as a square but I just love these little shirtings. And they’re just cute little fabric so I want to use it. So that amount also includes your first border here and your second outer border, you’re going to need 1 ¼ yards. And this is a nice big six inch border. Your backing, look at that beautiful backing right there. And the quilt pattern we’ve used is called Variety. And when you look at a quilt pattern you want to make sure that it fits the quilt so it’s whether it’s whimsical or it’s elegant and Variety is a pretty elegant pattern. And I think it just looks really beautiful with this fabric. So the backing you’re going to need 4 ¾ yards. So you’re also going to need the heart template to make this quilt because we’re using our little half heart from Missouri Star.
And what you’re going to do when you go through your pack is this pack happens to have two of a lot of colors. And it takes two if you want to match up your half square triangle with your hearts. Now there were some that didn’t have matches and so I just picked fabrics that were like them and it really doesn’t matter in the end because you can’t really tell when you look behind me which ones I did that with. But it definitely takes two of each, two of color and two of white to make this. So what we’re going to do is we’re going to take one background square and one color square and we’re going to set those aside. Now our other square, we’re going to cut our hearts out of. And you need eight of those. And there’s a couple of ways you can do this. And I like to fold mine in fourths like this so that I’m getting hearts that are going both directions. I want them to go both directions. And so this is in fourths so I’m only cutting through four layers at a time. And I’m going to put my heart template here. And honestly if you want to fussy cut this and be careful you can probably get more hearts out of it than I am but I need eight for a block. So you can use the edge if you folded it perfectly but I have not. So I’m just going to come in a little bit and I’m going to make the cut. So I have a little smaller rotary cutter here and it is an 18 millimeter rotary cutter so it’s a little smaller, a little easier to go around the curves. And so what I’m doing is I’m just going to go around this curve and make sure my template stays the same or doesn’t slide, I mean. So if you have trouble getting around that curve just turn it so you can get a little better shoulder pressure on that and those will come right off. And I’ve got a little hanging up right here, just a little bit. And we’ve got these. Now we have to do it again. If it’s easier for you you can trace it with a pencil and cut them out with a scissor. You know, do whatever works easiest for you. I’m going to just keep cutting these out with my little rotary cutter here. And I like to kind of cut these off the edge and kind of get rid of this fabric, see what I have left to do. Make sure your rotary blade is really sharp. That may be a little bit of trouble with mine because I did just make a quilt with this, you know. So just make sure it’s nice and sharp and you can just cut through those. So you’re going to stack up your colors and you’re going to also cut eight of a background color as well.
Now what we’re going to do, and this is really fun and I love that I was able to figure this out to make this really easy. So we are going to take and we’re going to pair our hearts. So pull them apart and pair them right sides together like this. Now when you do this, what you want to do is you want to make sure the hearts matched up. As hard as I tried to cut them exactly to the template, sometimes they didn’t exactly match up. These amazingly look perfect. And so what we’re going to do is we’re going to set these color to the background but right sides together, ½ inch from the bottom of this square and we’re going to put a pin in there. And I like to use the flat head pins because they lay flat. And we’re going to do this on all four corners, we’re going to put two of each of these. So just put your pairs together. And what I kind of do is lay mine out so that I can just kind of stack them up because, I don’t know why, it goes together a little faster, maybe. And so we want to match this one right sides together like that. Alright so now I’ve got all my hearts lined up right sides together. I’m again going to look at them, make sure they match. And then I know that the color is going next to my background and it’s going to line up, the straight side is going to line up along the edge with ½ inch on the bottom. Now you’ll notice I’m not measuring this. I’ve done a few of them. But you might want to take your ruler and you can just set it in the corner like this and make sure that you’re at a ½ inch. Also remember to use your flat head pins on this because these actually really, really help because we are going to add the other piece to this and sew it and it will help to sew it. Now you also want to put, watch where you put your pins. I’m putting them kind of, I should put them kind of vertical with the hearts like this, knowing that I’m not going to hit when I sew around here because they are going to be sewn on. So let’s turn this side and do it again. Match up your heart, make sure your hearts go together. And ½ inch from the bottom like this and we’re going to put a pin in there. Alright so we’re just going to keep putting these around and again remember the colored fabric goes next to the background fabric. Alright we have a few more here.
So then we’re going to put a pin right in here. And we want to make sure that everything looks good and then we want to take and put our colored fabric that matches our heart that is next to the background on top of it. So take a look around. You want to make sure that no pins because we’re going to sew all the way around this. We’re also going to cut it diagonally both directions and you want to make sure there are no pins in the way of that. So put it on here like this, line it up. And then I actually flip it over because I kind of want to see where my pins are to make sure that I’m not losing them. Now this little heart wants to creep out here so I’m going to just tuck him back in and make sure he is tucked in there and I’ll catch him when I go around.
Alright so now what we’re going to do is we’re going to sew a quarter of an inch all the way around. So just make sure that you’re catching the hearts. Stay in there little heart. And this one. This one is trying to peek out as well. Get him in there. There we go. Alright now what we’re going to do is we are going to, we’ve sewn all the way around. We’re going to take our, I’m going to move these over here so that I don’t accidentally cut on one. But this is where the flat pins matter because now we’re using our ruler, it’s laying over the pins. And if we had the little ball pins in there our ruler wouldn’t lay flat. So now it lays nice and flat. We can lay this on here like this. And we’re just going to make two cuts. Keep your fabric together and then just make the cut. Now if you end up in one of your corners with a little pleat like this just remember that’s not going to matter because we’re going to cut right through that. Alright now what we’re going to do is we’re going to open these up and we’re going to take all of our pins out of all four. And remove our pins. One more here. And the last one.
Alright so now what we’re going to do is we’re going to go to the ironing board and we are going to press these. And we’re going to press to the dark side like this. So we’re going to put our dark fabric, our printed fabric on the top, set the seam and roll this back. Grab that. Roll that back. And then what you want to do is open up your heart and press your heart open. They should be right sides together and they should just fit perfectly because you’ve lined them up. We haven’t had to use any adhesive or anything and they just look perfect. There’s that one and this one. And it’s so fun to see how quick this comes together when you do it this way. One more here. And one, press that down. I almost started opening my hearts before I pressed it down. I get in a hurry.
And then we’re going to square these and we’re going to square them to 6 ½. So now we have four squares and we’re going to square to 6 ½. And so I’m going to put my little ruler on here, and you’ll see there’s very little. Now if you happen to have an end like this. So see how this end appears to be a little shorter than this end, you might want to make your cut off of this end. So when I put my ruler on here I’m going to slide right into this corner and I’m going to trim the top. Now when you put these together you’ll find that that doesn’t matter too much. I mean, you don’t notice if one is a little different size than the other. You don’t really notice it at all. But, you know, that’s one of those things that as I started doing I was like, huh, this one is a little closer, even though I measured it. Alright so there’s one. Oop, there’s one. And I’m going to do this one next. I already did that side. There we go, nice and matched up. And these generally don’t, you know, they’re not ever too far off and you waste very little fabric doing this way. But it is always nice to just square them up and have it done. And this is a 6 ½ inch ruler so you’re squaring right to the outside edge and it makes it super easy. Alright.
So now obviously you’re going to have to stitch these down. So you take them to your sewing machine and you can choose any stitch you want to sew them down. I used a little bit of a, you know, this little applique stitch on here and I just, I chose a color that kind of matched my background. And you can see I just stitched around and around here, flipped my heart and stitched the other side. And so, you know, just go ahead and do that on all of your blocks. Then you’re ready to put them together. And when I put mine together I wanted to mix them up. And so what I did was I’m going to put, and you definitely want to sew these down before you put them in the block. It’s much easier to maneuver a little block, whether you straight stitch it, zig zag or do a fancy stitch on it, it’s much easier to maneuver a little block than it is when they all four get together.
So then what we are going to do is we are going to put this together in a pinwheel pattern. And so we have our one, our color comes up and you sew to the background color. And this is going to be the pinwheel pattern, how it comes together like this and this. And then one, oh let’s use this one over here, this green. Oop, white, white, nope. There we go. And so you just make a four patch like that. So I’m going to sew these together. And you’re going to get four of every block from your, you know, from when you cut your blocks out, you’ll get four pinwheels that are the same. And I just mixed mine all up. I just scrapped them all up. And when you make one of these you need to make sure that you make them all going the same direction. It’s very easy if you, like I make one and then sit it there and I line up all the rest of mine with that because otherwise you’ll have pinwheels going this way and you’ll have pinwheels going that way and it won’t give you the pattern look that you’re looking for. And so my pinwheels, I hope are going the same way. I’m pretty sure they are. But I have been known to do that before. Alright so start a little bit and give yourself, match up the center seam. And there is quite a little bulk in that center seam but if you’re machine quilting these it doesn’t have any trouble at all, as you can see by the one behind me. The machine will quilt right over those.
Alright so then we’re going to iron these out. We just did our regular quarter inch seam and pressed them and you get a block that looks like this. So then you just start putting them together and it makes the cool secondary pattern, you know, so you get, no matter where you go you’re going to get this flower that appears in the corner like this. You know, you get that flower that appears at every corner it’s going to happen. So here we are. Let’s take a look at this. So this right here, we have one, two, three, four blocks by one, two, three, four, five, blocks. And we’ve scrapped these up and it just looks great. I love the quilt. I love the fabric.
But traditionally this quilt, if you look up Hearts and Gizzards, traditionally it is made in two colors. Almost every quilt I saw was made in two colors. So because Valentine’s Day is coming and because this is a heart, I did a little secondary project here. Look how cute this is. This is the Hearts and Gizzards. I just did four blocks. I snugged them right up next to each other, quilted them. It gives you that nice flower, heart flower in the center, a little 1 ½ inch border in the inside, a three inch border on the outside. And it just makes the cutest little thing. And this is traditionally, this is how they did the Hearts and Gizzards was with two fabrics. So however you want to do them, whether it’s scrappy or it’s two color, you’re going to have a great time making this Hearts and Gizzards quilt. And we hope you enjoyed this tutorial from the MSQC.
We hope you enjoyed watching this video. If you’re not already part of the Missouri Star quilt family you can hit the subscribe button below so you won’t miss a thing. And if you click that bell it will notify you every time a new tutorial comes out. See you next Friday.
& Progress on Social