Scallop City Quilt Tutorial
Jenny Doan
Scallop City Quilt Tutorial
- 1 roll x 2.5" Strips (Jelly Rolls)
- 1-1/4 yards x Background Fabric - Incl. Inner Border
- 1 yard x Outer Border Fabric
- 3/4 yard x Fabric for Binding
- 3-1/2 yards x Backing Fabric


Finish your masterpiece and let us give it the finishing touch it deserves.
Subscribe to MSQC on YouTube
Hundreds of FREE tutorials and a new one from Jenny launches every Friday.
video transcript
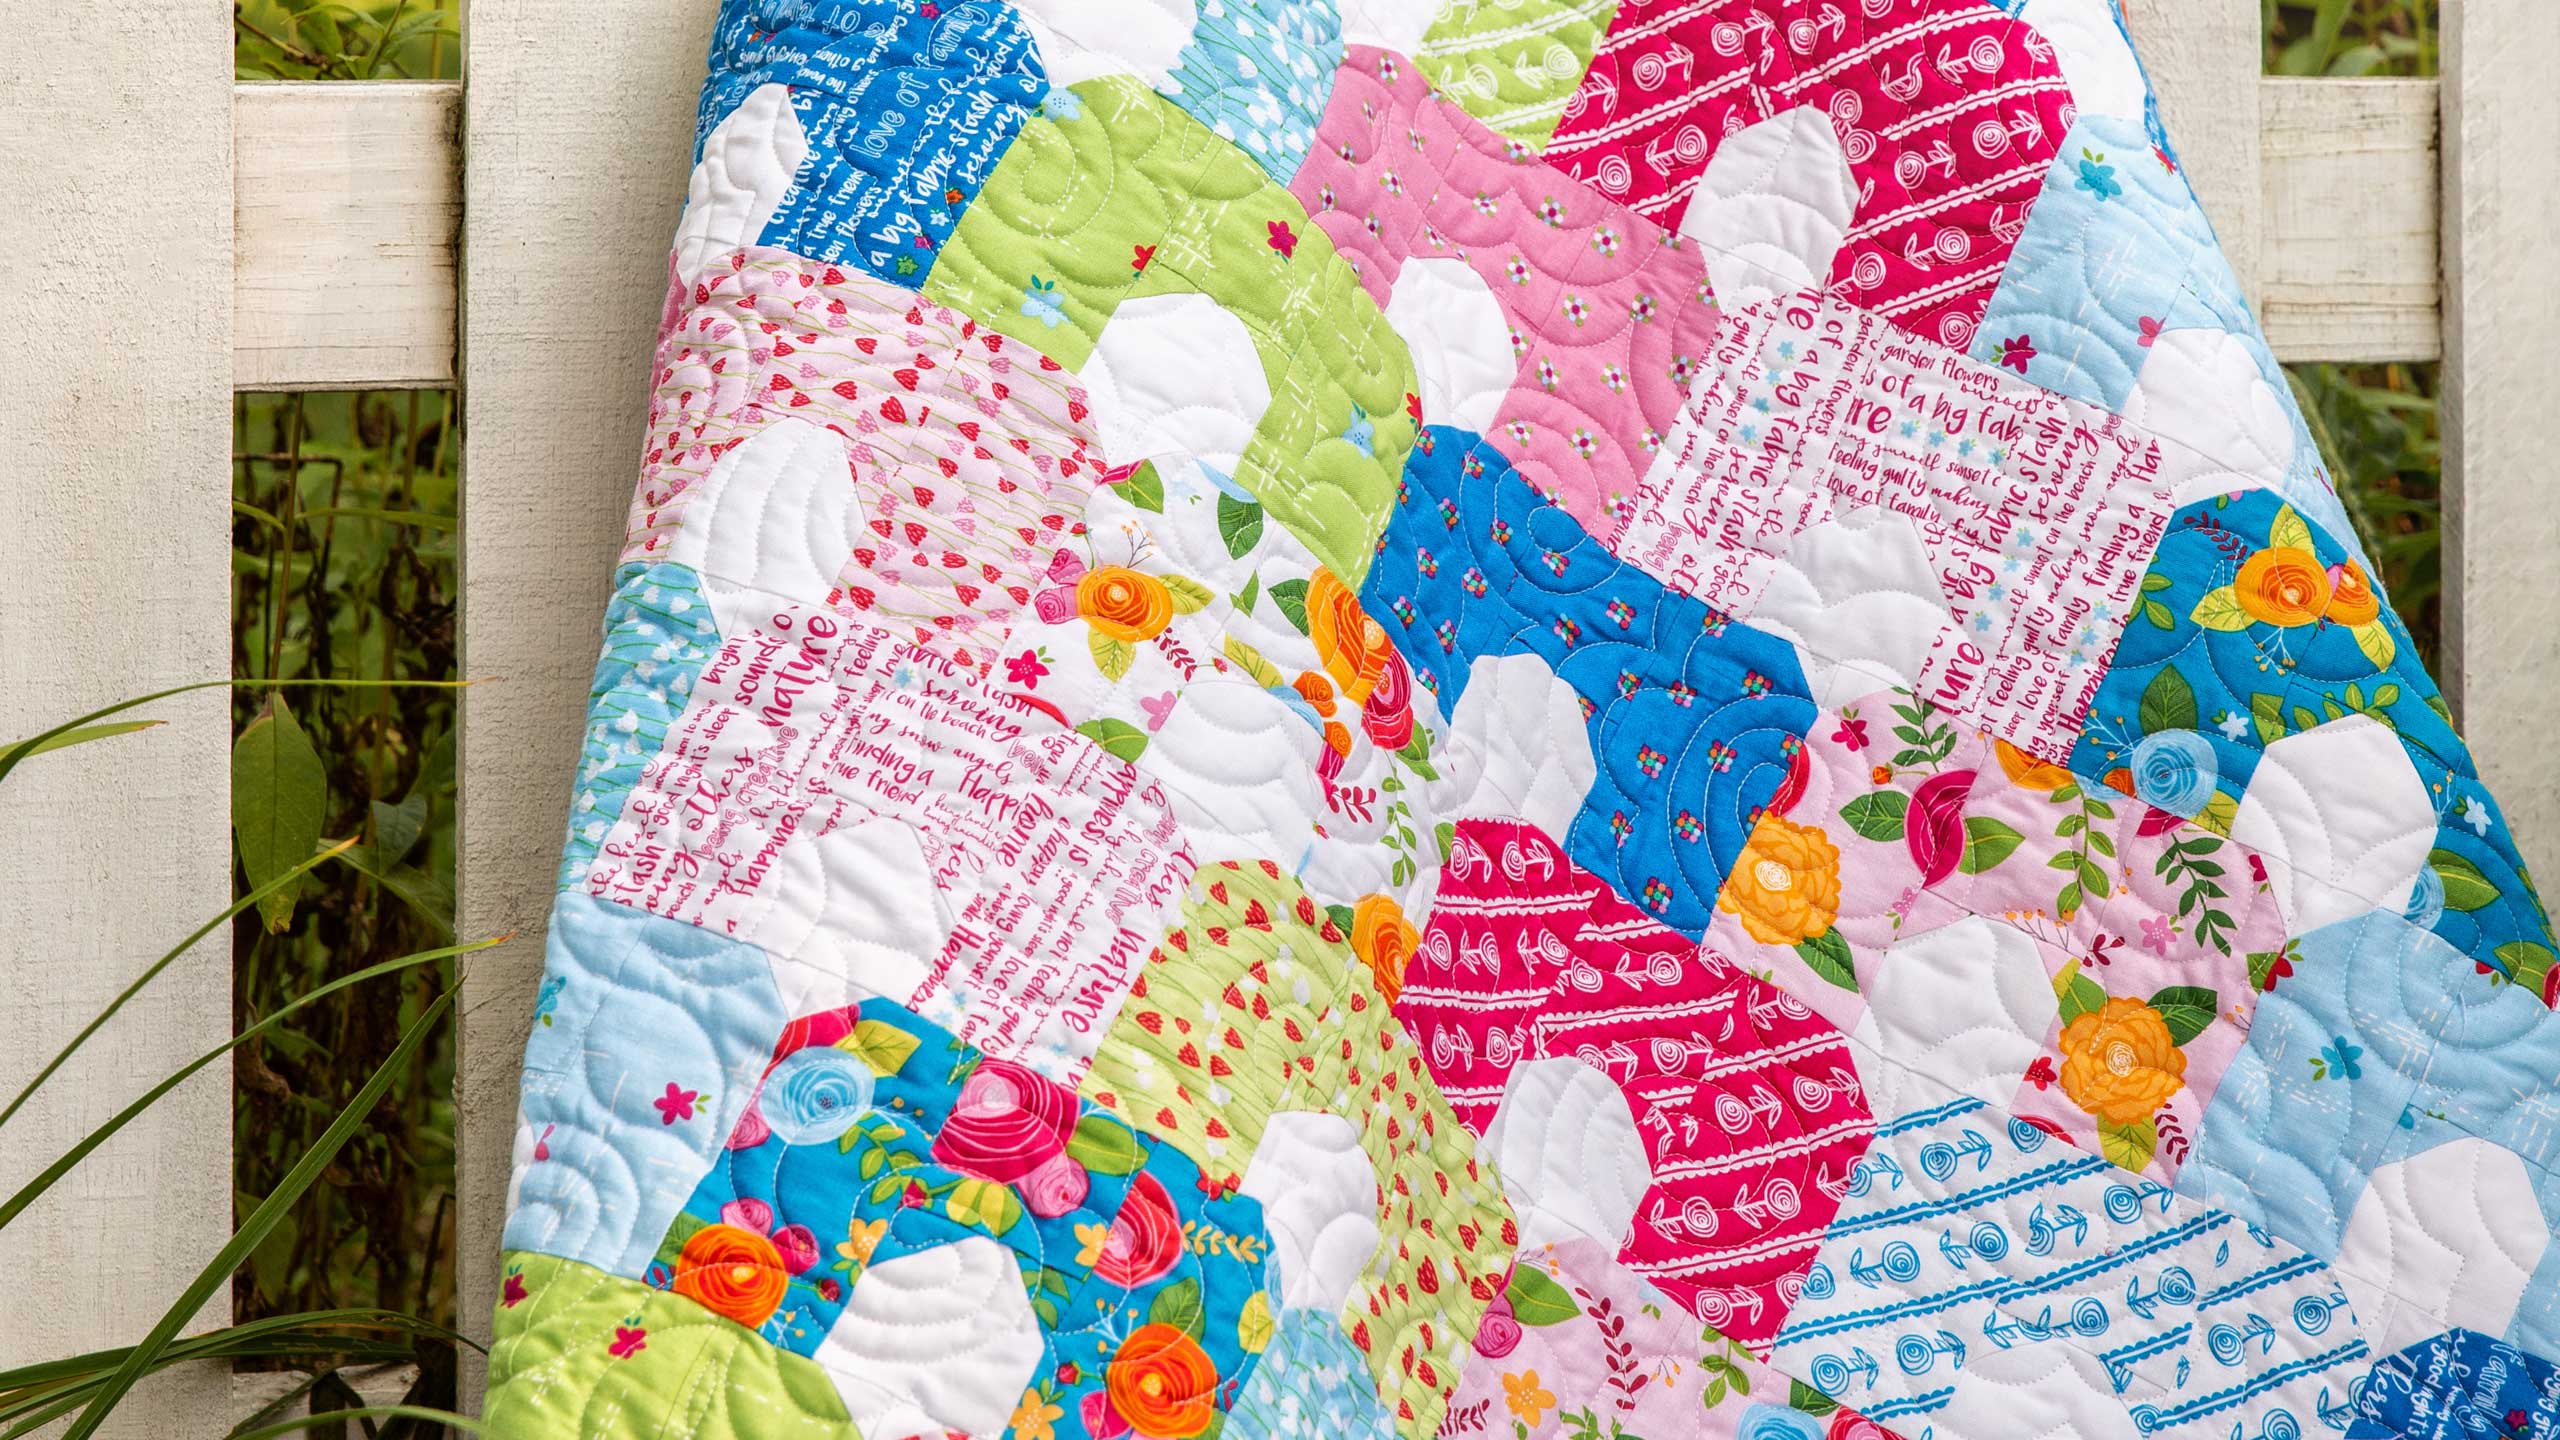
Hi everybody, it’s Jenny from the MSQC. And I’ve got a fun project for you today. I love the look of a clamshell quilt. And so I wanted to see if I could mimic that a little bit with a strip. And this is what we did. So take a look at this quilt right here. Isn’t this great? It’s still got that curved look. But it’s got a little doorway so they look like little houses. So we’re calling Scallop City. So to make this quilt what you’re going to need is one roll of 2 ½ inch strips. And we have used Simply Happy by Doddie Lee Paulson for Riley Blake. Isn’t that a pretty line? You’re also going to need some background fabric. For, your background fabric is going to be 1 ¼ yards. And that’s going to take care of all these little pieces plus the inner border. Your outer border is a nice big 5 ½ inch border. And you’re going to need one yard for that. So not too much fabric. It makes a cute little quilt. Look at this darling back. The back you’re going to need 3 ½ yards of this backing. And you are going to have some leftover on that.
So to make this quilt what we need to do is make these little house blocks. This is what we’re talking about. And so really for these little blocks, you know they look like they’re a lot of work but most of the work is in the cutting. So we’re going to choose a strip here and make us a little house. And I think I’m going to go with, oh let’s go with this green. This is a cute little green color right here. And we need to cut some pieces of our green. And we need to cut some pieces of our white. So this first one right here, I’m going to trim my little selvedge edges off like this. And then I’m going to cut two 4 ½ inch strips, that’s going to make the walls of my house. And then I need one little 2 ½ inch strip. Just one so you saw I separated my strip out there for the doorway. So then what we need to do is we need to make these two little corners right here that are just on the top of our little square. And it gives it that rounded look. And so that is a 1 ¼ inch strip. And how I came up with that was I wanted to all use the same strip. And 2 ½ in half is 1 ¼. So I wanted to make sure I got both little squares out of that 1 ¼ strip. So this is what you need out of your pattern fabric, your printed fabric to make each little house. For the white, the background fabric, what you’re going to need is you’re going to need a 2 ½ inch square for your doorway. And again I’m just going to take a strip here trim off my selvedge edge and cut me a 2 ½ inch. I love that I can just lay these rulers right along the edge and they cut. Then we’re also going to need because right here in the top corners we again add that 1 ¼ inch squares. So we’re going to cut a 1 ¼ inch strip like this. And then we’re going to cut that in half again so that it gives us our two little squares just like that. And this is what you need for your, the second part of your block to finish up your little block.
Alright so let’s talk about how we put this together. The first thing we’re going to do is we’re going to sew our little green corners on the top of our little white 2 ½ inch square like this. Now this is a pretty short distance from here to here so you can eyeball that. But if you’re not comfortable then go ahead and draw the line. I’m going to eyeball it. And I’m going to lay both of mine on top just like this. You see how they fit exactly on that square. And I’m going to sew here up to here and then down to here so that I get both of them done just, you know, just like that. I don’t have to stop and come back and put another one. And so I get both of them done like that. So we’re going to start here. Make sure they’re lined up and squared to your corners of your little strip. And then we’re going to start here from the bottom edge, sew up to the middle. Now one word of caution when you’re dealing with little pieces, it is important to be more careful and to be more exact. So we’re going straight up here to the top. So again if you need to draw that line, go ahead and draw the line. Now my other square has slipped a little bit so I’m just going to pull that and straighten it up and come down the other side. There we go.
Alright so now what I’m going to do is I’m going to fold these back like this and make sure that they line up with the corners. Now this one over here is pretty good. This one has a little bit of play in it. But I’m not going to worry about that because I know that play is still going to hit in the quarter of an inch seam so if that bothers you you can take it out and do it over. I just know that I’m going to, this is not going to show once I take my seam. So I’m going to go ahead and trim off these edges which means to say, you know, finished is better than perfect. And I’m ok with that. But everybody is at a different level and a different place so. Just make sure that you, you know, if it’s going to bother your conscience you don’t want to worry about it. Alright so then I’m going to iron this back just like that. Give it a little press. And then what I’m going to do now is I am going to attach this square to my green square. So my green square should match up, this is what will help you get everything in that seam. This is also a 2 ½ inch square and it should help you match up so when I put this on here I’m going to choose to follow this green edge because I know it’s straight. And then all my imperfections will be caught in that seam. So we’re going to go ahead and sew a quarter of an inch just like that. Sew them together. So this is what it looks like when you’re done. See that looks great. So we’re going to go ahead and iron this. And now we get to put the walls on right here. We’re going to put one on this side and one on this side, just like that. And go to the sewing machine and do that. So you see how quickly this is coming together. This is really a fun little block. And then I’m just going to open this up right here and put this piece on the other one. On the other side I mean. There we go. Alright. Now we’re going to press this open and then we’re going to add our little corners to the top edge of our little block. So now we have our two little white corners come into play right here. We’re going to put those on here like this. And again you can draw the line or fold the line. Since I didn’t do so good the first time I’m going to press a little line on there. Actually I did pretty good. Just got one, one of them was off a little bit. There we go. Alright so now what I’m going to do is I’m just going to sew right on those edges. And I’m going to set that down there because it’s probably going to fall off somewhere. And these are little and I would hate to not be able to find it. Alright now the other side is over here. Just corner to corner. I love how sewing a straight seam can give you the curved visual. There we go. A little more. There we go. That’s always been a fun thing to me about quilting. When you look at it, you’re like, oh those curve, oh those aren’t curves. You know, you go look at it really close and you’re like huh, that really works. Alright so now I’ve got these off and I’m going to press it back. So this is pretty forgiving block. You know it just, it looks like you did a lot of little detail. By the way if I ever have any video that you think looks really hard, you probably should go watch it because there’s probably some little trick. And when we can see it it makes it so much easier.
Alright now we’re ready to put our quilt together in rows. So let’s look at the quilt behind us. So you can see this is a full row of little scalloped houses. This one starts and ends with a spacer bar. That gives it the staggered look. So then this house we can set it up under here. And didn’t want to put a half a house. We just wanted to put a little spacer bar in there. So let me show you how this is going to work. When you put your rows together you’re just literally going to butt up your houses next to each other. And you’re going to sew the seam. We can do that real quick. You’re going to do this with, this one is one, two, three, four, five, six, seven, houses. This one is six. One, two, three, four, five, six. So you’re, every other row you’re going to have six and or you know, six and seven. So I’m going to sew these together just a quarter of an inch like this. And I have some rows done over here so that will, that will just help you with, help you see what I’m doing here. Alright so I’m just going to press this. See how they just come together so easy. I didn’t pay a lot to that juncture. But you do want that to meet up. So let’s look at my rows here.
So here’s a row that has one, two, three, four, five, six, seven. This is going to be our top row. Our next row is going to have six right here. And you can see I’ve put, so the spacer block is the same height as our block. That’s 4 ½ and it’s 3 ½ inches wide. And we’re going to lay that in here just like that. And see how it just makes them stagger. It goes together so cute. So you’re going to have one, two, three, four, five, six, seven, rows that are seven. And one, two, three, four, five, six, rows that are six. So that’s pretty easy to remember. It’s going to make a quilt that is about 56 by 66. So that’s a fun size. And I mean it’s just a fun little quilt. It has the look of the cute little clamshell quilt. And we hope you enjoyed this tutorial on Scallop City from the MSQC.
& Progress on Social