


Big T Origami Quilt Tutorial
Jenny Doan
Big T Origami Quilt Tutorial
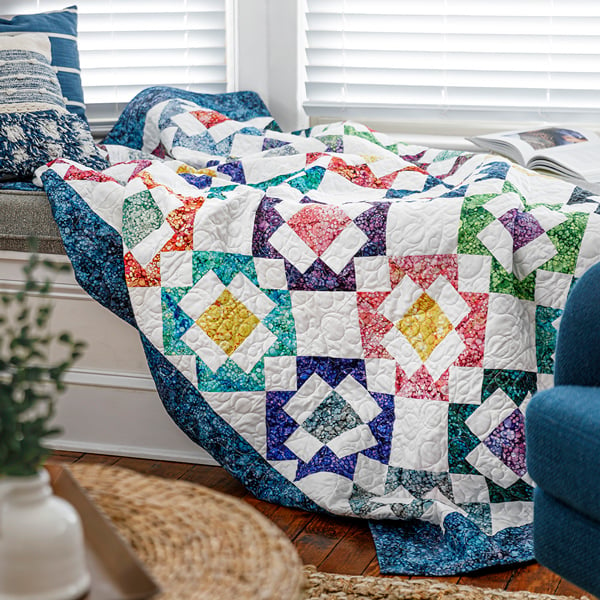
Jenny demonstrates how to make a favorite antique quilt pattern using 10 inch squares of precut fabric. For this project, she used the digitally printed "Bliss" collection by Northcott Fabrics.
The Big T quilt block comes together quickly with flying geese and half square triangles. Jenny shares the secret to perfectly sharp flying geese points, and she uses her trusty squaring tool and bias seam tape to keep things tidy.
- 1 Pack x 10" Print Squares
- 3¼ yds. x Background Fabric
- 1¼ yd. x Border Fabric
- ¾ yd. x Binding Fabric
- 5¼ yds. x Backing Fabric - Vertical Seam(s)
- or 2¾ yds. x 108" Wide Backing
Featured products Get the Supplies Featured in this Tutorial


Finish your masterpiece and let us give it the finishing touch it deserves.
Subscribe to MSQC on YouTube
Hundreds of FREE tutorials and a new one from Jenny launches every Friday.
video transcript
Hi everybody, it’s Jenny from the Missouri Star Quilt Company. And I’ve got a fun project for you today. Take a look at this quilt behind me. Isn’t this gorgeous? First of all, a fabric can make a pattern and this fabric is beautiful. But I love this. This is an old antique block called the Big T. And to me it just looks like origami when you get it all together. So we’re calling it the Big T Origami block. And I can hardly wait to show you how to make it. So to make this quilt you’re going to need one packet of ten inch squares. And we have used Bliss by Northcott Fabrics. You’re also going to need 3 ¼ yards of background fabric. For your border, you’re going to need 1 ¼ yards of border fabric. And for your backing you’re going to need 5 ¼ yards of a 45 inch wide or 2 ¾ yards of a 108. This makes a quilt that is 71 by 83.
So this is a super easy block. You’re going to be amazed at how quickly it goes together. And the first thing we’re going to do is we are going to take 30 squares out of our layer cake and choose them. Those are the blocks here. We’ve got five across by six down. So we’ve got 30 blocks. And then the other ten are going to be our centers, our middles. So you want to kind of mix those up as well so you have some different things to choose from. So once you separate your squares, 30 and ten, then you’re going to go to the 30 pile and that’s what we’re going to start by making our block out of.
So what we’re going to do is we’re going to cut two five inch squares out of this. And so we’re going to lay our ruler right along the edge and we’re going to cut two fives right here. And then we’re going to turn this and we’re going to cut this this way. And you will need, each one of these layer cakes makes a full block. So set these up here. Now with this piece we’re going to cut it into two 2 ½ inch strips like this. And we’re going to stack those. And we’re going to cut these into eight 2 ½ inch squares. And so we’ve got here, two and then, let’s see here, four. Six and eight. So keep those together, that makes a block. Out of your center squares, let’s find something fun here. Oh let’s see, how about blue? So out of your center squares, those blocks are going to be cut at 4 ½. So what I’m going to do is I’m just going to take this right here and line it up on the 4 ½ inch line. And I’m going to cut this 4 ½ this way. And then I’m going to cut the next strip 4 ½ as well. And that will leave me with a little strip that is just perfect for my crumb bin. And then I’m going to layer these and I’m going to cut them at 4 ½ as well. So make sure your edges are lined up. And then come in 4 ½ and do one more 4 ½ right over here. Set that aside. And these are going to be the centers of four of your blocks. So you’ll need one for this quilt right here. Let me get one and add it to my pile. There we go. Alright. So this is going to make our block. Now we need some background fabric. You’re going to cut two squares for each block, you’re going to need two five inch squares. And you are going to need eight 2 ½ by 4 ½ inch rectangles. So I have a little pile of those cut right here.
Alright so the first thing we’re going to do is we’re going to make our corner blocks out here which are half square triangles. Here’s our corner block right here. It’s a half square triangle. Alright so the first thing we’re going to do is we’re going to draw a line side to side on these. And I’m just going to use a pen to do that and then one more here. And this will give us the four corner half square triangles so we’re going to take our two five inch squares. We’re going to put our background on top like this. And we’re going to sew on both sides of that on both blocks. So let’s go to the sewing machine and do that. So just line up your presser foot right along that line and sew down and add another one right here. And then we’ll flip both of these around and do the other side. Alrighty. So then what I’m going to do is I’m going to make this cut right down the middle of these. I cut them apart. And then I’m going to go ahead and trim right down the center of these. I’m going to lay these over on the ironing board because we are going to press them open. Alright so we’ll go here. And we’re going to press to the dark side which means our darker fabric is on the top and we’re just going to roll that back. So I’m going to flip that over, make sure that my dark fabric is on the top. And we can set our seams. I always forget so there we go. One more. And here’s our last one. Now we want to square these to 4 ½. No matter how perfect we try to be, we always need to square a little bit. And so what I do, if I’m using the bloc loc ruler, you can use any squaring tool you want and the clearly perfect slotted trimmer will work. I’m using the bloc loc right now. And so what I’m going to do is I’m just going to make sure that, if you press to the dark side this line right here will snug up on that seam and your bloc loc won’t move from there. And so you’re just going to line this up with your words on the background side. And then I’m just going trim this and then flip it around and trim the other sides, make sure I’m still lined up. And then that will go there. And we’re just going to do that to all four of these. Ok. See there’s not much I’m trimming off. But it’s still important to get them just right. Alright now here’s our last one right here. Lock it up on that seam, slide it down to the bottom, trim, trim, turn, make sure it’s still lined up in your corner, trim, trim. There we go. Alright. So we’ve got these four done and we’re ready with that part of our block.
Now we’re going to take our 2 ½ by 4 ½ inch rectangles and we are going to make a flying geese out of just one side. So we’re going to take four of these, so it’s right here, you can see. This is our flying geese block right here. And so we’re going to make four of those for our block. And so we’re going to count out four of these like this, one, two, and three, four, and we’re going to do our flying geese. Now what I’m going to do is I’m going to take this little block right here and I’m going to use my bias seam tape that has the line on it for sewing and I’m going to add this to the corner just like this. And I’m going to sew corner to corner on one side of all of my geese. And so I’m going to do those all at once. So we’ll start here. We’ve got right sides together. We’re sewing directly diagonally on that corner from one side to the other. And we’re going to do that to four of these. There’s two more pieces. We have this one. Sew down right on the line. If you draw the line on these to sew on you just sew right on the line. Alright now what we’re going to do is we’re going to clip these apart and press them back. And I’m just going to scissor cut them. You know I’m a little old school. I like to use my scissors a lot. You can do a rotary cutter if you want, whatever it is you like. And if you want to save these tiny triangles you can sew on the other side and save them but I am not saving them. Alright so then we’re going to press this back like this. And all of our sides are done on this one and we’re going to add our square to the opposite corner now to finish off our flying geese. So now we have these. And what we’re going to do is we’re going to put our corner right here, right sides together. Lean it up, make sure it crosses over, it should. And then sew directly diagonally on that corner. So let’s do this. Line it up on that center seam and we’ll just bring these over here. One of the things I love about this fabric is that this fabric, even though it was cut from the same square, it looks very different than the other fabric which I think just adds so much texture and movement to this quilt. Ok, we’ve got one more here. Oops, we’ve got two. Have any of you ever sewn two blocks together? I truly have. I’m always like, why does this one feel so thick? And then you notice you have two blocks sewn to it. And you’re missing your other one. Alright. So let’s trim these off. Get that straight on there. One more and we will press these back. And then our little flying geese units are done.
And then, to finish off this block because we want it to end up at 4 ½, what we’re going to do is we are going to sew this to a 4 ½ by 2 ½ inch rectangle. And the block, actually we sew it to the tops of all of these blocks. So right here, this is what I’m calling the top right here. And so we’re going to put this piece on here like this. And we’re going to sew a quarter of an inch right across the top. Now if you don’t want to lose your point, what you want to do is look at where these threads cross right here. And as long as you stay at this point or on this side of that seam you won’t lose your point. So that’s a great little tip. And we are going to do this to all four of ours. So I’m just going to kind of stack them up here and get them ready to go. And then that will make our in between blocks for this fun block. And you can sew it, if you sew it with your flying geese on top you’ll be able to see where that cross is, where those threads cross. And one more. There we go. And now we’ll just clip these apart. And now we’re going to press them open. And for this one my light fabric is going to be on the top. When you have a lot of seams like this coming together it generally wants to lay one way. You could iron it the other way but it would be a little bit more work. So I’m just going to let this lay back like this. And my seam will be on the light side but that’s ok with me for this block. Because sometimes seams just want to go where they want to go. And you can see my points look pretty good. You know, I caught them. I made sure I was looking for that little spot. That one is a little tiny bit short but nobody has ever given a quilt back to me because the points weren’t perfect, right?
Alright so now let’s lay this out. We have everything we need now to make our block. So let me show you how to do that. We’re going to take our center block right here that we cut. It’s a 4 ½ inch block. One of the things that’s fun about a block like this is that all of a sudden you realize that this is a 4 ½ inch square and it could be anything. You know, it could be a four patch, you could fussy cut a picture and put it in there. I mean anything that’s 4 ½ will go in there. Alright so then on these, on all of our blocks this white fabric goes toward the middle. So our white goes toward the middle like this on all four sides. And then we’re going to slide in our corners right here. And just like that we get this really cool block that looks like origami. So I’m going to go ahead and sew this top row together and they should all be squared to 4 ½. You know if you’re worried at all about these blocks, for you. Like my seam tends to get a little short sometimes. So if you’re worried about it, just put a ruler on there and square it up. And then everything will match perfectly. Mine is matching ok so I’m alright with that. And then I want to remember how this goes because I think I’m going to sew it on here wrong. There we go. Right in there like that.
So I’m going to sew this whole first row. So I’m going to grab my other block and put it over here and put it in. The reason I sew these in rows like this is because I can get turned around a little bit if I’m not watching so I’m trying to be careful. Make sure everything lines up. And there’s our first row right here. Now the second row is just these two pieces in the center. And we are just going to make sure that the whites are what we sew to the center, our background fabric. And then I’m going to open this up and flip it over and sew the white on this one. And then we’re ready for the bottom row. And I’ll just lay it over here on my table. I know this one is going to go this way. Once you sew a few of these you’ll get used to how they go together and then you’ll just be able to sit and sew them and make sure they all start working for you. But in the beginning when you’re making that first block, pay a lot of attention to what you’re doing because it’s going to matter. Alright so then this is our outer block. So now I’m just going to sew this seam to this one. And on this one I want to remember that I want my center seam to go inside. So I’m going to lay this here and I’m going to sew down a bit. And because I haven’t ironed it I can make it go whatever I want. But I like my center seam to fold in and my outer seam to fold out. So they are going to lock right here together. And then this one also. Center seam in and you may have to coax that. And the outer seam out. And because you have those little places to line them up, it will stay nice and square. Alright so our center seam is going to be in again. Remind yourself, that’s a little mantra. And that just helps you remember. And of course you can iron them so they’re already all laying down if you want to. Alright so then I go this way and sew across. And here is our cute finished block. How cute is that? Let’s press it.
I just love how this comes together. It’s quick and easy and really fun and I’ve made it several times. I’m making one in Christmas colors. But look how beautiful this is. Also I made one here that’s in solids. Look how fun this is. And just remember that if you change up the background you’re going to change up your whole quilt. So let’s take a look at how I put this together. I’ve got one, two, three, four, five, and I literally just sewed my blocks together in a row of five. By one, two, three, four, five, six, down. This is a nice big six inch border out here. Here’s our backing. It’s that beautiful purple. And because of all the bubbles on it I did it with Circle Meander. And I think that pattern went very well with it. And whenever you’re quilting anything like this edge to edge, if you want your quilting to be the star then you choose a thread that is going to pop. If you want your quilting to step back and let the block be the star then you’re going to choose something that blends in with your background. And so that’s what we’ve done. We’ve chosen white thread and it blends in with the background. And it just makes a gorgeous quilt. The quilt is 71 by 83. And I love being able to bring back some of these antique blocks. So this is the Big T block. And we’re calling it the Big T Origami. And we hope you enjoyed this tutorial from the Missouri Star Quilt Company.
Hi everybody, it’s Jenny from the Missouri Star Quilt Company. We hope you enjoyed watching this video. If you aren’t already part of the Missouri Star Quilt Company family be sure to subscribe so you won’t miss a thing. And if you click that bell it will notify you every time a new tutorial comes out. See you next Friday.
& Progress on Social