Big Wonky Stars Quilt Tutorial
Jenny Doan
Big Wonky Stars Quilt Tutorial
- 1 pack x 10" Squares
- 1 yard x Solid Fabric
- ½ yard x Binding Fabric
- 3¾ yards x Backing Fabric
Finish your masterpiece and let us give it the finishing touch it deserves.
Subscribe to MSQC on YouTube
Hundreds of FREE tutorials and a new one from Jenny launches every Friday.
video transcript
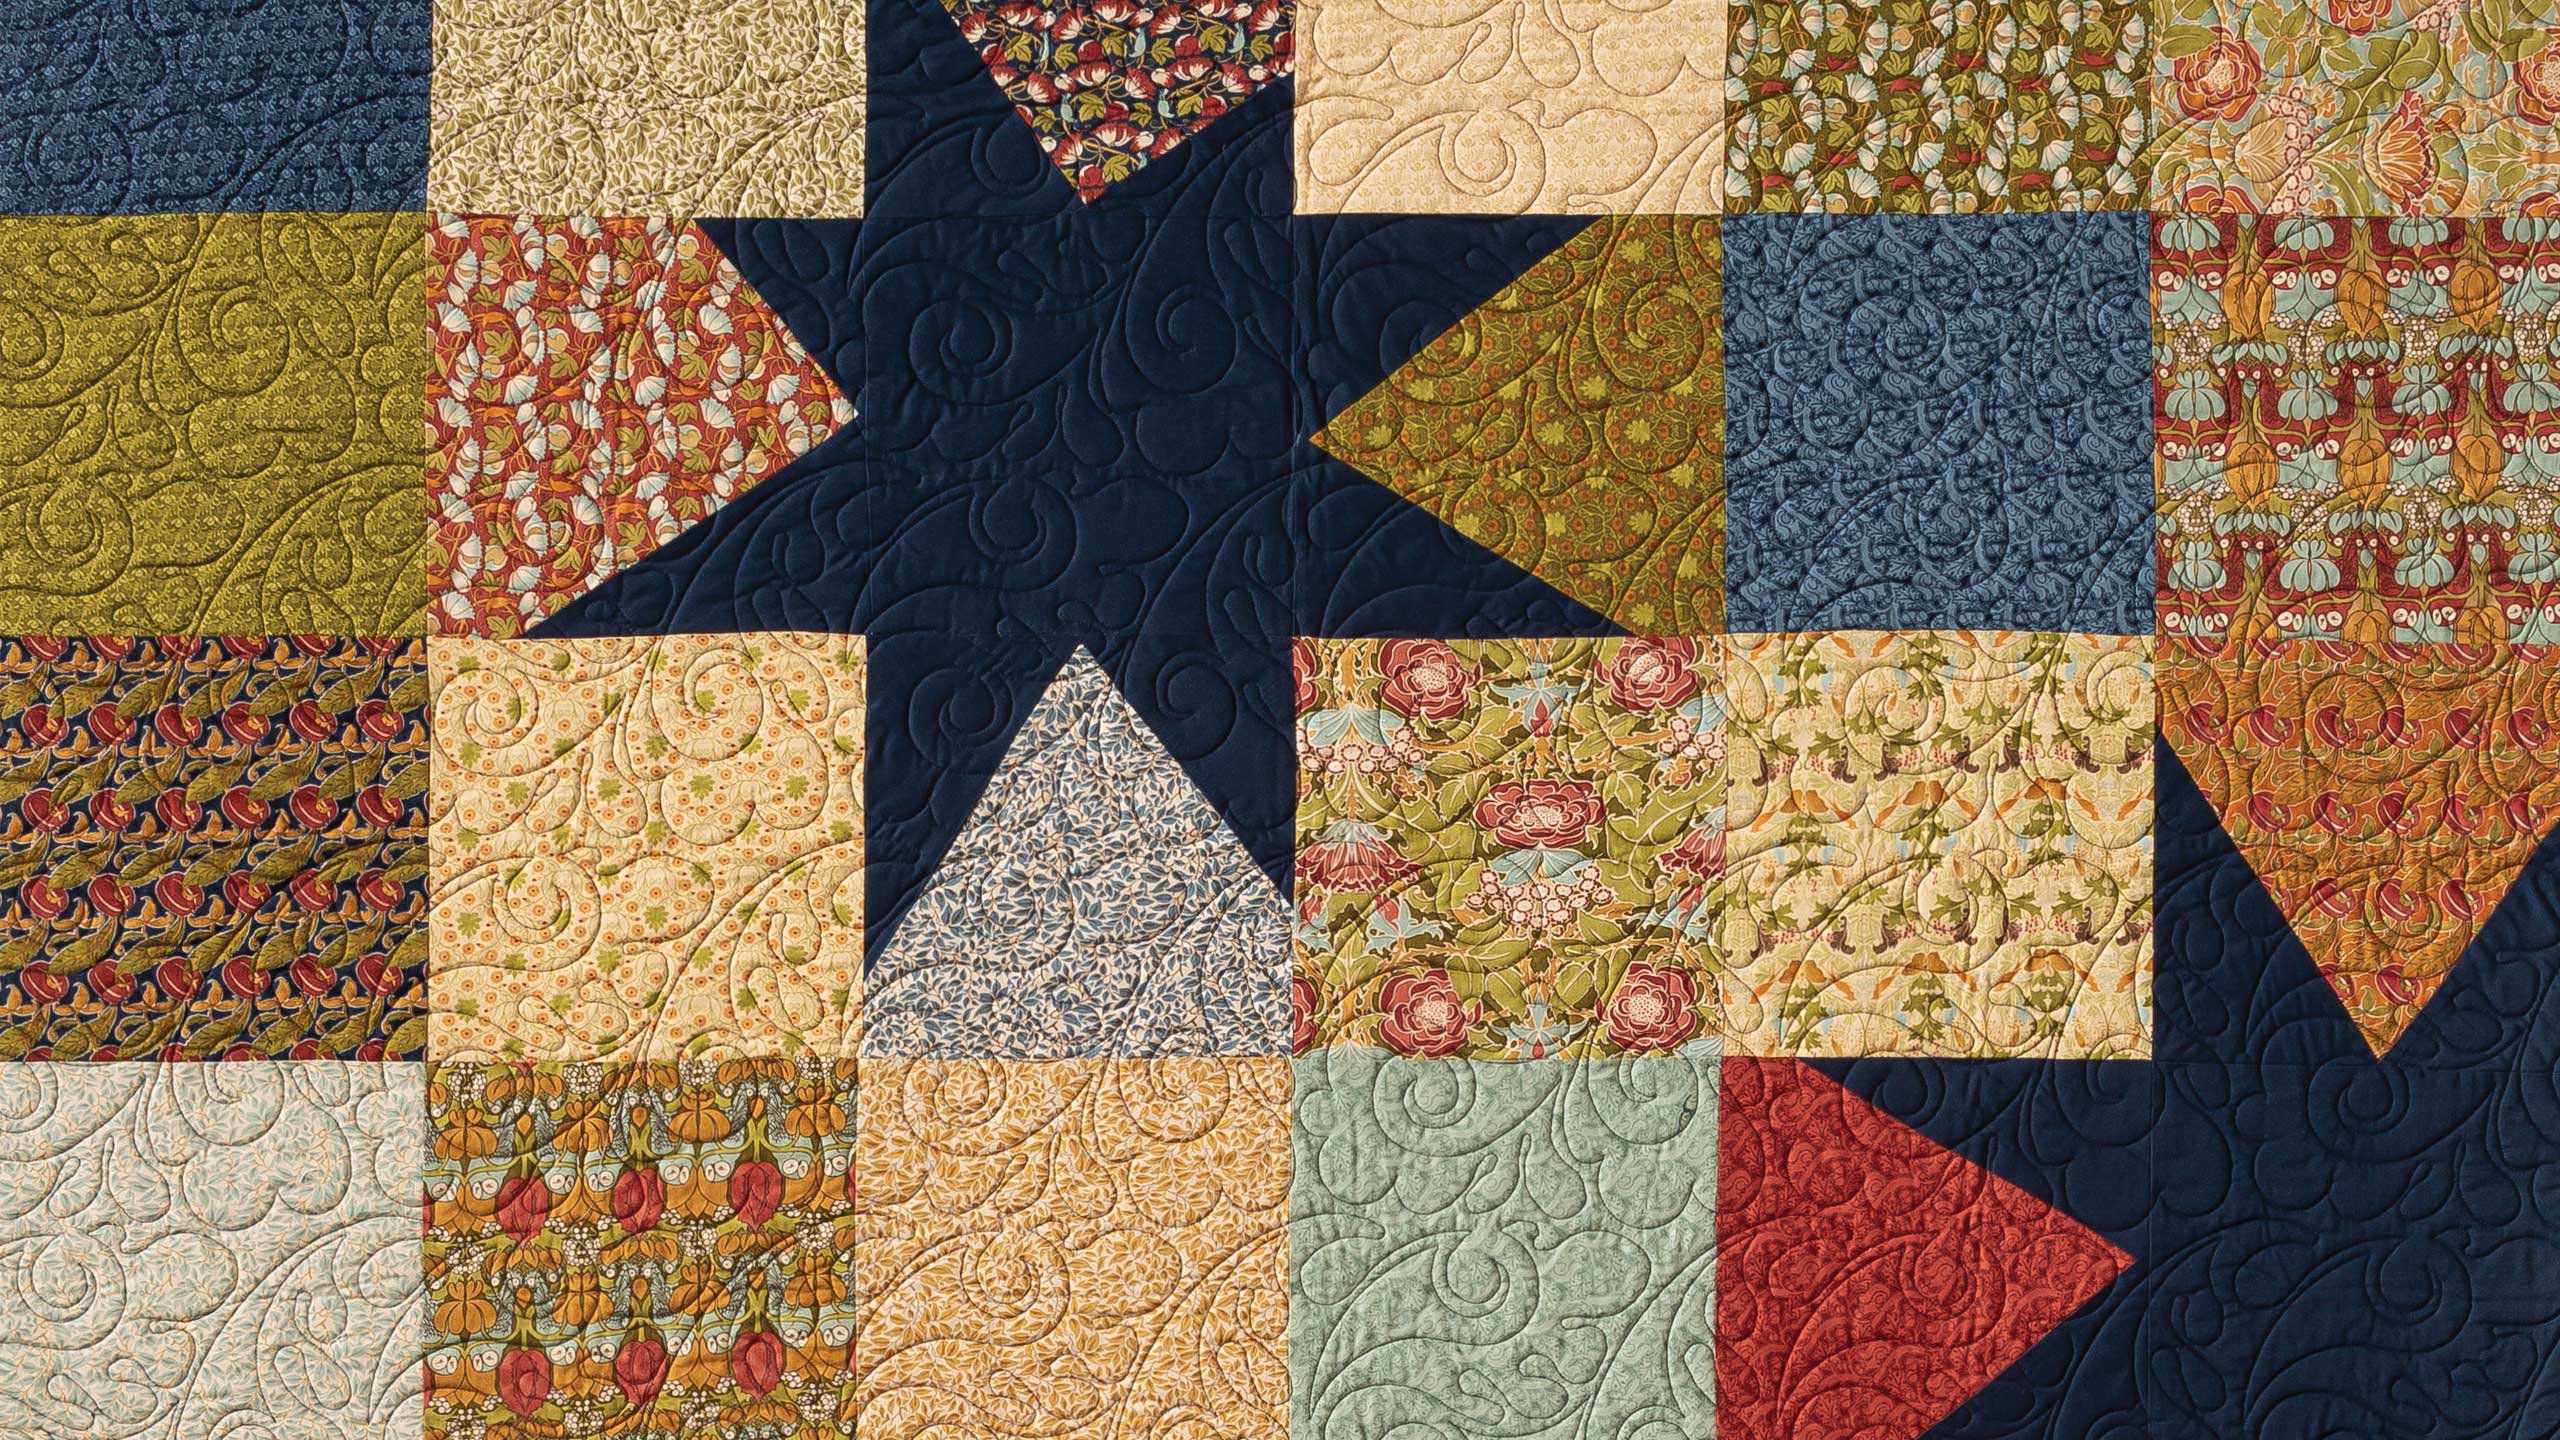
Hi everybody, it’s Jenny from the MSQC. And I’ve got a great project for you today.. So this quilt was featured in Block Magazine a while ago. And it’s already a stand alone pattern. But we never actually made the tutorial for it. So we’re going to do that for you today. So to make this quilt, what you’re going to need is one packet of ten inch squares. And we have use Voy C by V&A Archives for Moda. And V&A stands for Victoria and Albert. And they do reproduction fabric. And you can see this fabric is just beautiful. It’s rich colors, really pretty. Also you’re going to need a yard of an accent fabric for your stars. We’ve used this navy. We didn’t put a border on it. We wanted to show it just plain so you’ll need ¾ of a yard for your little binding. And then for your back you’re going to need 3 ¾ yards for the back. And we have put this beautiful print on the back. So I can’t wait to show you how to make this because it’s super easy. But again it’s one of those that looks like you worked really hard.
So basically what you’re going to do is you’re going to take your whole packet of squares and you’re going to lay them out, six by seven. So six in a row, seven rows. Alright. So we’ve got here, see our squares, one, two, three, four, five, six. Now it literally all you’re doing is sewing ten inch seams together so this goes together very quickly. But what you want to do once you get your layout done is you want to pick out the areas where you want your big giant wonky stars. So like we pulled that block off of here and put a navy blue center in there. And then we know that all these blocks around it, we’re going to have to add the legs to. Now you can see where ours are. And we have a diagram for that in the pattern. But honestly you can put your stars anywhere you want. So let me show you how we make the legs on the stars so that you can, you can do that and we can show you that.
I have one made here. And it looks, it looks fairly the same. But these are meant to be wonky. They’re meant to be different. So let me show you. Let me just show you how we did that. So basically you’re going to take your ten inch square and you’re going to take the squares that are around the star that needs legs on it. So this center square you’re going to need legs on all four sides of that star. So let’s make some legs on this star and let me show you how that’s done. So basically you’re going to take your ten inch square like this and you’re going to lay it on your square like this. And you just want to make sure that it crosses over the middle. So you can actually fold your square in half and make a little crease so you can see exactly where the middle is. And then you’re going to lay this square on here so it goes over the middle. You want that to go past the middle. And we’re just going to sew that down. So let’s do that. Just line your, line your presser foot up with the edge of your square. And we’ve gone down the side. And so then we’re just going to press this over right here. And I’m just going to pull this back. Oop let me straighten that out. There we go. I’m just going to pull this back like this. And the square is what makes our pattern. So we’re using the square. We’re going to turn it over and oop we want to make sure that’s ironed flat like this. Alright. So the square becomes your pattern.
And so what we’re going to do is we’re going to cut this off right here like this. And then I’m going to cut this off right here, this little piece. So once you get your block all squared up you have an extra leg over here. You can cut that off if you want to. I didn’t worry about it. And then we’re ready to add the other leg. So what we’re going to do is I’m going to find my straight edge and I’m going to make sure again it crosses over the middle. I’m going to give myself, you know, a good wide berth here so that I don’t have to worry about losing that point. And then I’m going to kind of look over here where this leg is and I”m either going to make it longer or shorter because I want them to look a little wonky. So I think I’ll go, I think maybe I’ll go shorter on this one. And you’re just going to bring this over to your sewing machine and then sew that down. Just like this. Presser foot on the edge of the line. And then we’re going to just press this back again like this. Our square is still our pattern. So then we just lay our ruler on the edge here and cut off these edges like this and then one more. Just like that. So that makes your star legs. And aren’t they fun? They’re just cute and wonky. And I have some more here and we’ll show you how those go together so that you can see how to do this.
Alright so here’s, here’s our blue center and then here’s going to be our square that’s around it like this. And they’ll go on all four sides just like this. And then you just keep it in that layout and you start sewing your rows together. And you can see here I have a row sewn together. It’s all my, all my squares. And then the one piece of this star piece over here on this side right here. And so it looks a little funny as you’re putting it together but then when you get it all together those stars appear. And it really makes a fun quilt. This also makes a quick quilt. Just so you know a layer cake quilt like this is what we generally start our little 4-H ers when they come to take class with us. And they can literally get this whole quilt together in a few hours and they’ve never sewn before because basically you’re just sewing big ten inch seams. So it goes together real quick. And this is just a little fun twist on it. So we hope you enjoyed this tutorial on the Wonky Star quilt from the MSQC.
& Progress on Social