Cute Camper Quilt Tutorial
Jenny Doan
Cute Camper Quilt Tutorial
- 1 Pack x 10" Precut Fabric Squares (Layer Cakes)
- 1 Pack x 10" Precut Fabric Squares (Layer Cakes) - Background
- 1/4 Yard x Black Quilt Fabric
- 1/4 Yard x Grey Quilt Fabric
- 3/4 Yard x Quilt Fabric for Sashing and Inner Border
- 1 1/4 Yards x Quilt Fabric for Outer Border
- 3/4 Yard x Quilt Fabric for Binding
- 3 1/2 Yards x Quilt Backing Fabric


Finish your masterpiece and let us give it the finishing touch it deserves.
Subscribe to MSQC on YouTube
Hundreds of FREE tutorials and a new one from Jenny launches every Friday.
video transcript
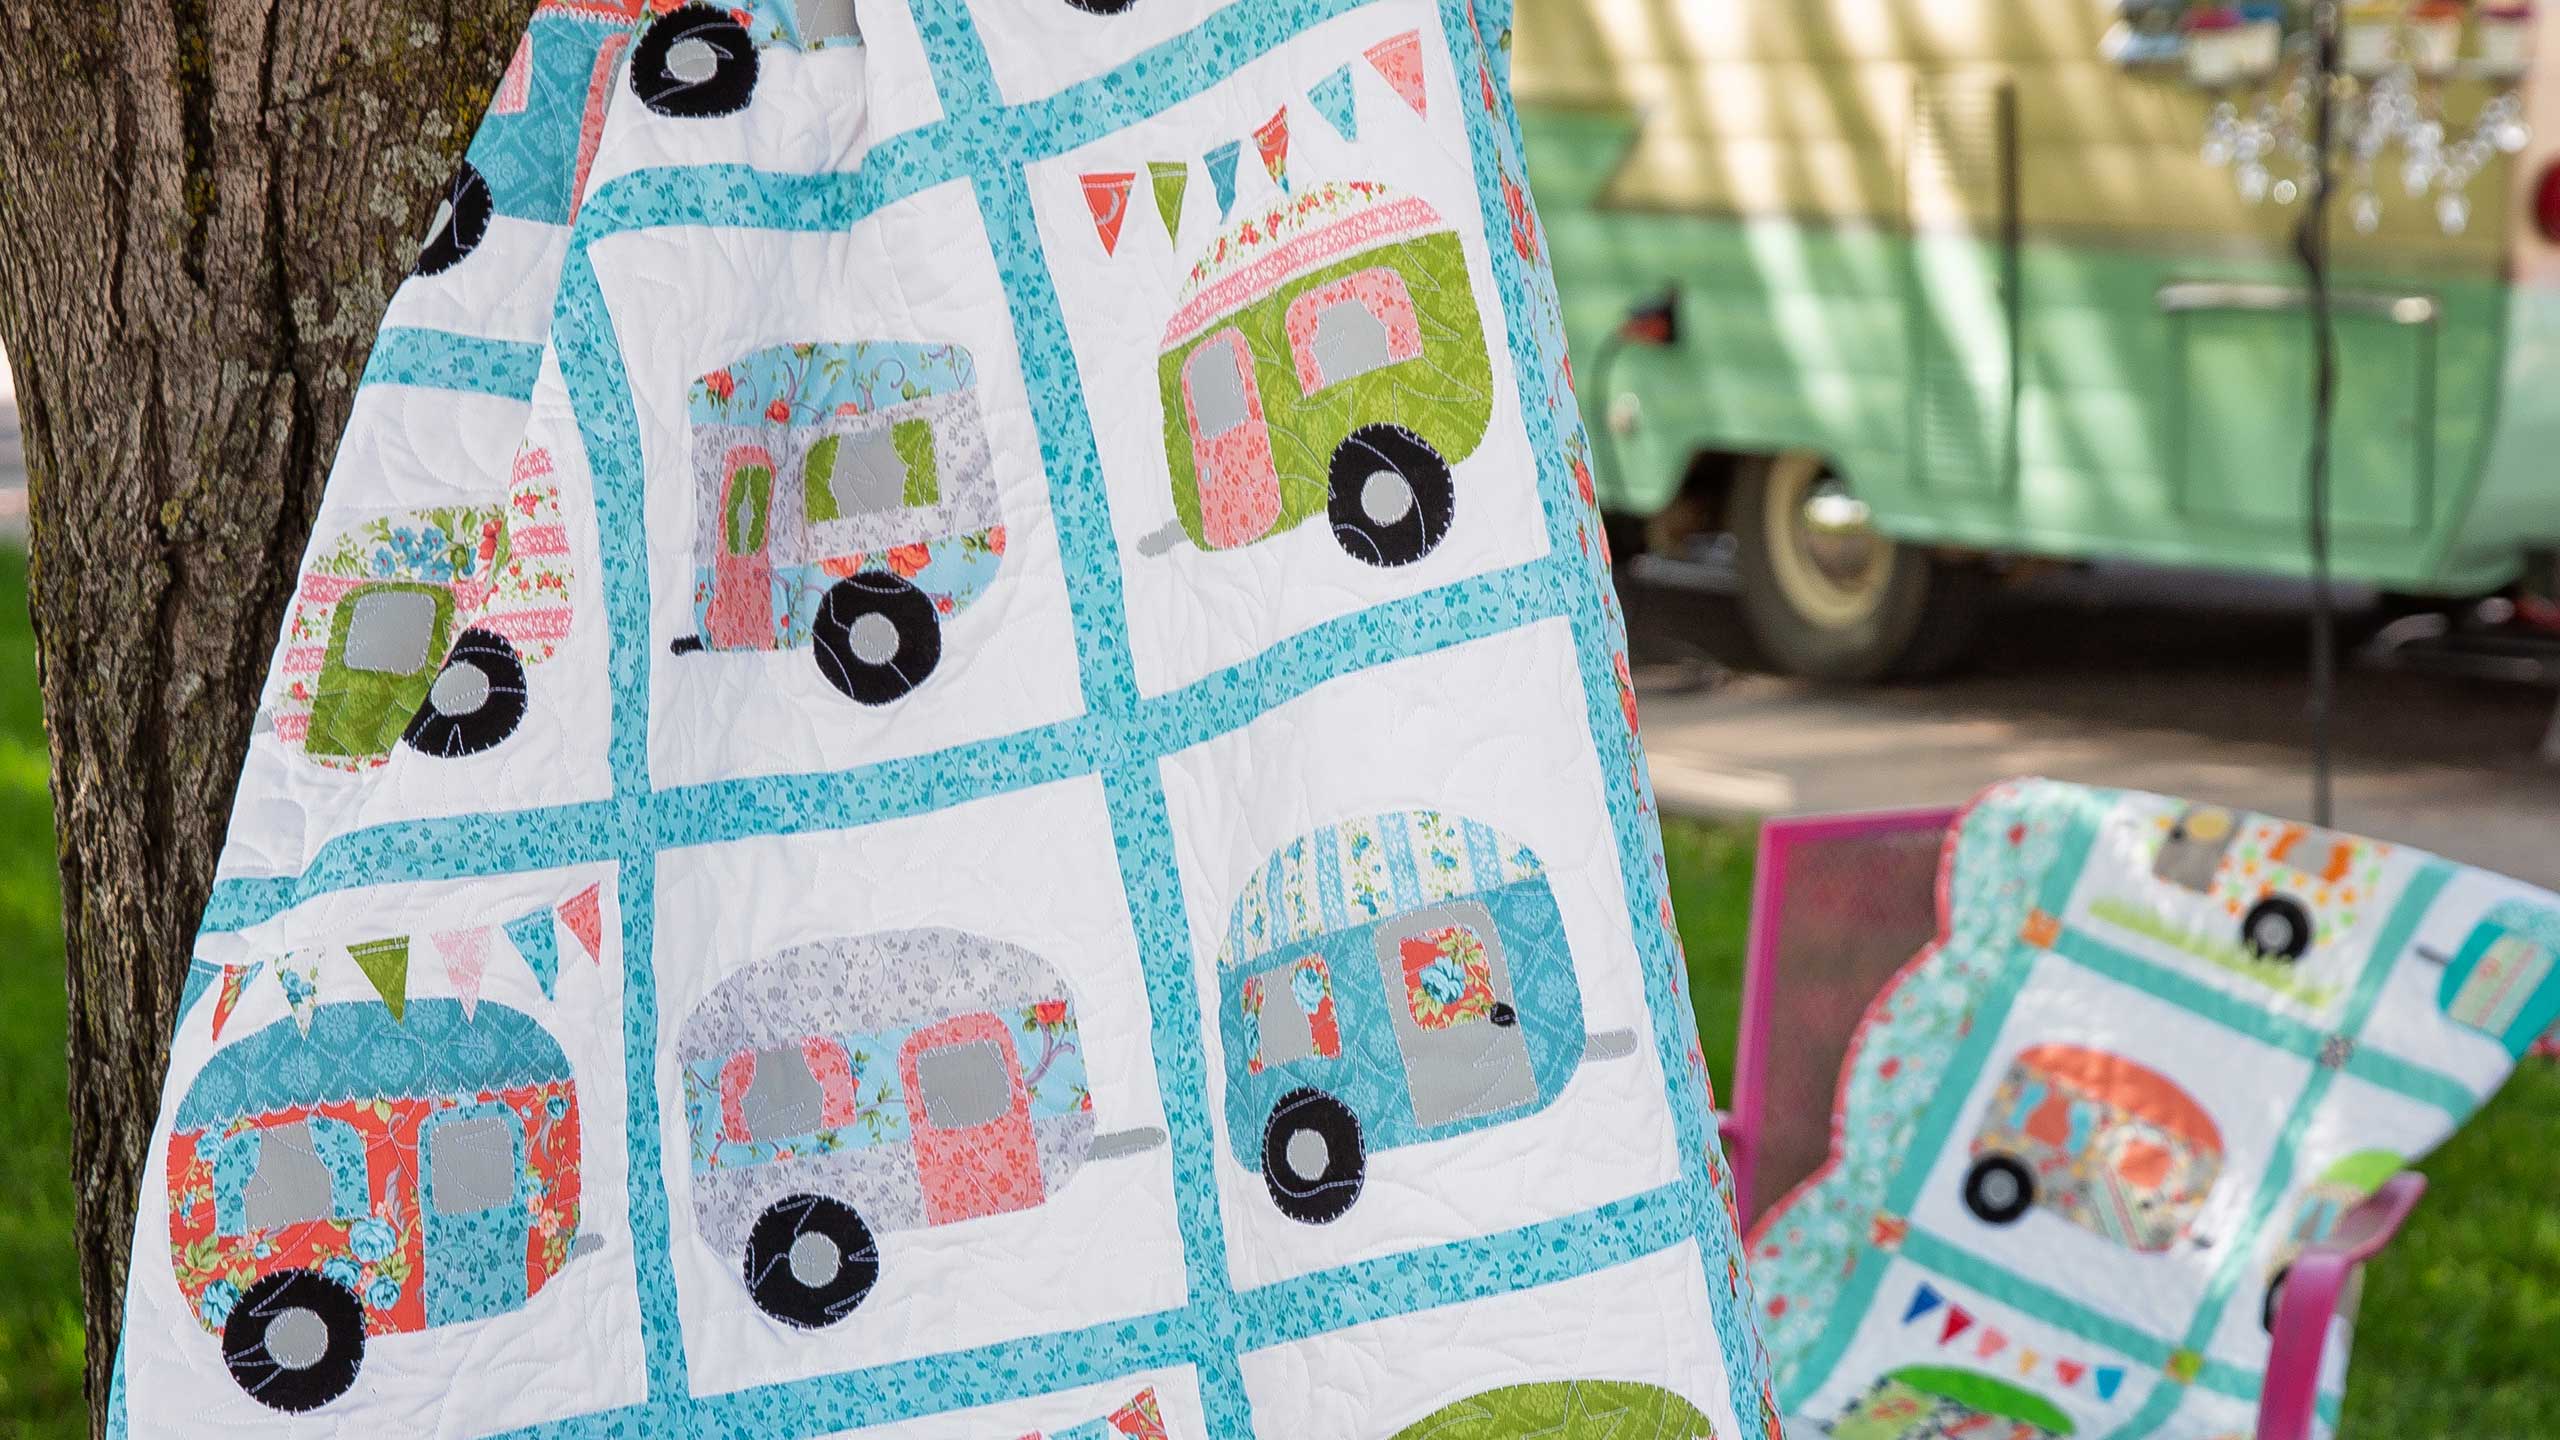
Hi everybody, it’s Jenny from the MSQC. And in the summertime at Missouri Star we have a retreat that is especially for Glampers. It’s these cute little campers that they’ve fixed up and they’re awesome. And so I actually made this little nine patch Glamper quilt to teach them a little class at their retreat. And, and Natalie liked it so much that we thought, let’s make a whole big quilt of it and show you how to do that for a tutorial. Also I want to point out this little pillow. I just took one little camper and put it on the pillow. But look who’s in the window. You can have so much fun with your fabric when you do these because all of this, this little quilt, this pillow, this is all just scraps of mine. So it’s just fun to take those scraps and put things together and make these cute campers. So to make this quilt what you’re going to need is one packet of ten inch squares. And we have used Cassandra by Robert Kaufman. And I mean it’s just really fun fabric. And obviously we didn’t use them all so when you look at the quilt behind me you can see that there’s four campers across and five campers down. And so as you’re cutting out and mixing up parts we probably used about 20 of those. You’re going to need the same amount of background squares as you want campers for so I have 20. So I’m going to need 20 ten inch squares. You’re going to need some sashing. We cut 1 ½ strips and our sashing goes in between all of these so you’re going to need about ¾ of a yard for that. Our outer border out here is 1 ¼ yards and this is a nice big six inch border out here. And we put this nice blue from the line on the back. I don’t know if you can see it, you can see it every once in a while, but see our quilting print on this is stars and little pine trees that meander around. And I just thought that was fun because we’re camping, right? Alright so our backing is about 3 ½ yards with horizontal seams. You’re also going to need some Heat N Bond light. So this is our Heat N Bond right here. And to make the big quilt you’re going to need about 4 ½ yards. So in addition to your fabric you’re also going to need some gray for your windows and your tow bar and some black for your wheels. I think the pattern calls for ¼ yards but I had some extra strips and they fit perfect on the strips so you can use those as well. Alright so let’s talk about how we do this.
So the first thing you’re going to want to do is you’re going to download this pattern. Now this is a free PDF. And it has the, it has the trailer on one and it has all the parts on the other. And you’re going to want to download these. Now when I started tracing them I knew I wanted 20 trailers so I literally traced 20 trailers, 20 wheels, 20 windows. I did all in so I had all my tracing done ahead of time. Now these lines are kind of bolded so you can see underneath and I don’t know if you can see through on our top cam here but you can see these lines really well through here. So basically what we’re going to do is we’re going to trace these, let me grab my pen, like this. We’re just going to trace them on like this. It doesn’t matter if they’re perfect. None of that matters. And here’s the bottom part of our little trailer. And then here’s the top part. Now when you go to cut these out I’m just going to trace one. I’ve got to stay right on that line. It took me three times to get the line. What you’re going to want to do is you don’t want to do your nice cutting right now. You’re just going to rough cut this out like this. And don’t cut it fancy yet. And then you’re going to go ahead and choose the fabric you want for the bottom of your trailer. And you’re going to iron it onto the back. Now when you draw on this, the Heat N Bond has two sides. This side is the shiny side, that’s the glue side. So you want to make sure that’s laying down and that you’re tracing on the paper side. You’re just going to lay this on here like this. And you’re going to iron it on. It doesn’t take very long at all. The actual directions are on the Heat N Bond. I think it’s, I don’t know, maybe five seconds or something. And now is when you cut out really pretty. And I did, I used my scissors for all of these. And I just cut them out. And you want to cut them out nice. I know I was showing some gals how to do this and they were cutting their Heat N Bond out just perfect. And I’m like, no, no, no, you don’t have to do that. Just rough cut it. Iron it on and then cut it nice one time. Alright.
So once you get all your pieces traced off and you can see here when you look at this, this is the door, these are two windows. These are our curtains. This is the center for your wheel right here. And then you’ve got these little pennants. Now on some of ours we have pennants. I didn’t want to put pennants on all of them so I put one trailer in each row has pennants. So this one has some pennants and this one and this one and this one. And I just mixed them up because I thought it just added a really fun look to it. I actually have one of these little Glampers and I have pennants hanging on mine. Alright so here’s what we’re going to do. We’re going to take our trailer bottom and you’re going to just kind of fold this back and I kind of roll it with my fingernail to like release it from the, from the fabric. And then peel it off. And then the fabric should be shiny on the back. That’s the glue. You’re going to center it up on here. Now if this is one that you’re going to add pennants to, you want to just keep it a little lower so you have room at the top but most of mine I centered up like this. So I have one here that’s all kind of cut out and ready to go. And I’m going to show you how I do this. So I put it on about this high and then I lay my top on that I’ve chosen. And on my door, I have my door right here and I actually already ironed a little window on it so. Now the fun part about this, if you look at the little trailers behind me we’ve taken some liberty with how we did them. So you can see we have little tiny curtains for the little window and we have big curtains. On this one I cut my window a curtain color so I didn’t have, I didn’t do the little curtains on it. And this one I put the curtains on. So this is where the creative part really comes in and it’s really fun. So there’s my window over there. Now whatever part the, wherever the window is your wheel goes below that. So I have traced my wheel and cut it out. And I’ve even sewn on that little middle part right there. And I lay this just above. And then we need the tongue of the trailer, right here the hitch. And we’re going to roll this back and I’m going to stick this under here like this. Now my husband pulls the trailer and he said to me some of those hitches are too high. So he thinks they should be low like this one right here. But I just don’t think it matters that much.
So once you get all your pieces together like this you’re going to bring this over to your ironing mat. And let me move this so you can see what I’m doing here. And then we’re just going to do the same thing like we did when we ironed the Heat N Bond on we’re just going to, we are just going to iron this on like this. Alright so now I’m just going to press this on and make sure my little piece is lined up nice and straight. And I just hold the iron right there for a few seconds. And move it and hold it again. And I just want to make sure that it’s stuck really good on there. And then I’m actually going to blanket stitch all the way around it so you know it doesn’t, it’s not going to go anywhere. I just want to make sure it’s on there nice and well, well adhered to my square. Alright so then you’re going to take this over to your sewing machine and we’re going to blanket stitch all the way around it. Now you can use actually any applique stitch you want, a tiny zig zag would be cute, you can straight stitch these. But I want to point out some of my campers back here because you know we all have these sewing machines that have lots of stitches on them but we only use a couple for our piecing. But this is where those other stitches come into play. And so, like this one right here has a little scallop you can see. This one, look at this one I did that fancy stitch right across the top. This one right here is another one. This one has the little tiny stars on it. And it was so fun as I did each one of these blocks to just add a little bit of different touch to put different, to use different fabrics, use different colors. So I have a blanket stitch on my machine here and it is 3 ½ by 2 ½. And basically what I do is I start next to this wheel right here and I just sew around so, and it just reaches in and grabs that little trailer fabric. And we’re just going to sew around like this, come up around the top. And as you do a few of these, you know, I was pretty slow at first but as I got to the end I got pretty fast at this. And you’re just going to do all your parts and pieces and hold them down. Alright so what I’m going to do here. I’ve been all the way around the trailer. So what I’m going to do now, I’m actually going to go around the wheel and I’m going to go around the wheel in the same thread that I have on. If you want to change it to black thread you can do that so it doesn’t show. But I have to tell you, on my wheels up here that look like this one right here that you can’t see the stitches on, it looks like I used black thread, I did not. You know what I used, a sharpie marker. I just colored in those little tiny threads all the way around which you can do on all your wheels so they don’t show. That’s how it is on my little three patch quilt. And so that’s a nice little trick that makes it really easy because you can just color in those stitches on those. And then you don’t have to change your thread. So I guess that tells you I’m kind of a lazy sewer. Alright let me keep going around here. Alright so let me show you what I’m talking about here. So see my wheels right here, if I don’t want those white threads to show, you can just go along and touch those threads like this. And it just colors them dark and you no longer have white threads around your wheels. I think this is pretty ingenious if I do say so myself. Isn’t that fun? Just quick like that. And because my sharpie marker is permanent, it’s not going to go anywhere. You can wash it. Whatever you want to do. And because we’re covering it up it doesn’t have to be perfect. Alright so save your perfection for the straight sides because this is the smallest little circle place, this little one right here. Alright, so look at that.
So now what I’m going to do is I’m going to go back to the sewing machine and I’m going to finish doing all of these little pieces and then I’ll meet your right back here. Alrighty. We’re all done here and look how cute that is.. All our little pieces. We’re going to clip our threads. So cute. Now the only thing left to do is this row right across the top here. And I can do a regular blanket stitch on there which I’ve done on some or you can find a fancy stitch and I think we’ll go with, let’s see, let’s go with 41 which is a little, kind of a floral thing. Something fun, right? There we go. And then I’m just going to sew straight across the top. I’m going to put my, my presser foot in between the two pieces as they come together. And then we’re just going to let the machine do its work. Alrighty. Now let’s see what this looks like. Oh my gosh, how cute is that? Look at that little stitch right there. That is so sweet. I love that. So these are just so fun. They’re so much of an ability for creative, fun and play with these blocks. And then basically what we’re going to do to finish our quilt is we’re going to cut our 1 ½ inch strips that we’ve cut into ten inch pieces and we’ll just put one in between every single block like this. We’ll do our little sashing pieces. One in between every block right here. And then we’ll put a long one in here, in between. And so you’ll have to match up row to row but with an inch and a half strip it isn’t hard. So then you’ll just put them together and you actually have a little outer border out here, add your last border and you’re good to go.
The fun thing about these is in my little camper I bet I have three of these that are pillows like the pillow I showed you. And I probably have one single one hanging on the wall. They’re just fun. They’re just great fun to make. And this is one of those quilts that you’re going to really enjoy making. So we hope you enjoyed this tutorial on the Cute Camper quilt from the MSQC.
& Progress on Social