


Flower Chain Quilt Tutorial
Jenny Doan
Flower Chain Quilt Tutorial
- 3 packs x 5" Precut Fabric Squares (Charm Packs) - Print
- 1¼ yards x Accent Fabric
- 4½ yards x Background Quilt Fabric
- 1¼ yards x Quilt Fabric for Border
- ¾ yd. x Quilt Fabric for Binding
- 5¼ yards x Quilt Backing Fabric
Featured products Get the Supplies Featured in this Tutorial


Finish your masterpiece and let us give it the finishing touch it deserves.
Subscribe to MSQC on YouTube
Hundreds of FREE tutorials and a new one from Jenny launches every Friday.
video transcript
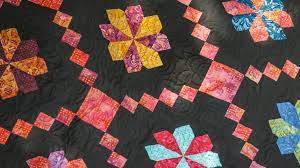
Hi everybody, it’s Jenny from the Missouri Star Quilt Company. And I just think today’s quilt is amazing. Take a look at this quilt. Isn’t this beautiful? Now this block right here is our Irish Change block. And I love the idea that we can use this and put this with another block. So these are the two blocks you’re going to learn how to make today. And it just makes a really fun quilt. So to make this quilt you’re going to need three packages of five inch squares. And we have used Poetic License by Bellanonna Designs for Island Batik. You’re going to need some accent fabric. You’re going to need 1 ¼ yards of accent fabric. And this is also the fabric that we used on the back. And for the backing you’re going to need 5 ¼ yards of vertical seam or 2 ¾ yards of a 108 wide piece. You’re going to need some background fabric. And you’re going to need 4 ½ yards of that because there’s quite a bit of background fabric on here. And for your border you’re going to need 1 ¼ yards and that was a nice five inch border. Some tools that will make, making this quilt helpful are the clearly perfect slotted trimmer A. And you’re also going to need a ten inch square template from the Missouri Star Quilt Company.
So I originally came up with this Irish Change block because I wanted to match it to a layer cake square because sometimes we have fabric we just don’t want to cut and so the Irish Change made a great tutorial on how to use just straight layer cakes with this and it looks gorgeous. Super easy to make all with strip sets. The other block we’re going to talk about is this little flower block right here. And this little flower block is so sweet and so easy to make. And I can’t wait to show you how to do that as well. We’re calling this Flower Chain, you know, I kind of threw everybody when I named this one Irish Change instead of Irish Chain because it was just a little change up on that. And so now we’re back to Flower Chain because that sounded better than obviously than Flower Change.
Alright so the first block we’re going to talk about is the Irish Change block and there is a whole tutorial on this where you can go watch that as well if I skip over something too fast or you don’t get it. But this is all strip sets. So the first one is this middle block right here. And you’re going to take a four inch strip of fabric and you’re going to sew two two inch strips of fabric on either side. And you are going to cut this four inches because our center is four inches. So we’re going to go right along this edge right here and we are going to cut this. And this becomes the center and the first two pieces of our Irish Change block. Alright so the next one is a four inch center of background fabric. And then two strips of the accent fabric. And let me trim this edge off so it’s nice and clean right here. And you’re going to cut two of these and all your surrounding strips, you know, from this moment on are two inches. So we’re going to cut this one two like this and two just like this. And so these then are going to go to the sides like this. And it’s going to get sewn together and make the first round of this. Now the next round is made with a seven inch middle and again two inches on the outside. And that’s going to make that. And then you’re also going to need a plain piece. So I have this one right here put together. So the first thing you’re going to do is when you get this one sewn together right here, you’re going to add two seven inch strips. Your block should measure seven inches. So we’re going to add two seven inch strips on either side, just like this. And then our strip set, this big strip set is seven in the middle and two and two on either side. Again the strip set is the same. We’re going to cut those always at two. Everything is cut at two inches. And then this will go on the top and the bottom like this. And it just makes this great little Irish Change block. And it equals ten inches. It should come out ten inches. When I finish my block I always like to take our ten inch ruler and lay it on there and make sure that it is indeed ten inches all the way around, you know, not actually just squaring it up but more kind of checking myself. And so if there’s any little slivers that need to be cut off then you can do that then.
So then you’re going to finish your Irish Change block and you are going to make 28 of those. There’s 28 in the quilt and that sounds easy enough, right? And now we are onto the little flower block. Now I know this looks like a little bit of work but let me show you how easy this is. You’re going to need four charms for this block and two of them are going to have to match. So you’re going to do two that are dark and two that are light. You want a little contrast in this one. So we’ve got two like this. Take one from each pile, put them right sides together right on top of each other and sew all the way around the outside edge. Now I have one here that’s already done. And so I’ve sewn, you can see right here I’ve sewn all the way around the outside edge of this. And then what we’re going to do is we’re just going to cut this side to side and make four half square triangles out of this. And so cut it diagonally corner to corner just like this. And you’re going to want to square those to 2 ½. So you can use any squaring tool that you like, I am using the clearly perfect slotted trimmer. And I’m just going to put this on here, make my line match up with theirs. And I’m going to trim off the excess on this so that I can have four 2 ½ inch half square triangles. And I am sliding this all over to one side and able to just make one cut while doing it. Alright there’s that one, and one more. So these are all 2 ½ like this. And then we’re going to press these open right here. Now we like to press to the dark side so we’re going to put our darker fabric on top and we’re going to lift this up and we’re just going to peel it back like that. So we’re going to do this on all four of these, just like this. And here’s one more. Oh I was trying so hard not to lick my fingers and I did it anyway. I’ve been working on that you guys. I have been working on that finger licking thing. Alright, here we go.
Now this part right here, we are going to put these together as a pinwheel which means, here’s my mantra: light, dark, light, dark, light, dark, light, dark, all seams to the center. So you’re going to do this and you’re going to make sure that your seams go to the center and that all your pinwheels are going the same direction. So I’ve got light, dark, light, dark, light, dark, light, dark, and all my seams go to the center. So we’re going to put these together in a pinwheel. We’re going to sew these two together a quarter of an inch like this. And I’m going to add these underneath just like this. And then we have our middle seam here. We’re going to open it up, make sure it’s still right. And it is. Put these right on top of each other and sew across. Now I do a little anchoring stitch and then I’m going to come back here and I’m going to make sure that my seams line up perfectly, nest together so nicely. Alrighty. Now we’re going to press this open. And this is the center of our little flower. And this just makes a perfect little center for our flower. So now remember we had four charm packs that were the same. Two we sewed around, cut diagonally both directions to make this pinwheel. Then there’s two left here. And for those two what we’re going to do is we’re just stack them and we are going to cut them vertically and horizontally both directions so that we can get four 2 ½ inch squares. So we’re cutting this way and we’re cutting this way. Just like that. And these become the petals. So it takes two for each side. And I have my matching ones to this one over here. And you’re going to have, you’re going to have this piece here like this. And you’re going to have this piece here. And that’s going to make the petal. Now to round off those tops so that we make the petal parts we’re using 1 ¾ squares. So what we’re going to do to make this look like a flower petal is we are going to snowball both sides of the top of our 2 ½ inch square. So we are going to put a 1 ¾ inch square on here and sew diagonally and then add one more to the other side. So we’re going to go here. And we are just going to sew straight across this. I’m using my diagonal seam tape as a guide. And I’m going to sew across this one. And oh look at, it looks like it slipped a little bit. And so that means I’m going to take that one off of there. I’m not going to leave that like that because it should line up right in the corner. And so let’s just go ahead and take that off real quick. And since I’ve used white thread you can see all of my boo-boos which is why we all make them, right? So I’m just going to pop this one off of here. Now I’m going to line it up in that corner better. Make sure it’s right in the corner. So that is important that it’s in the corner because we want this to stay the shape of a, you know, we want it to stay the size of a 2 ½ inch square. So again I’m sewing across. And this one is perfect, or good enough. And I’m just going to trim that off and I’m going to press that back. So we’ll just fold that back like this. And then I’m going to pick these little white threads out of here that I’ve left in here from my seam picking. Alright so now what I’m going to do is I’m going to take another one of these 1 ¾ inch squares and put it on this side, lining it up in the corner and sew straight across here. So we’re snowballing both sides of our little flower petal and trim that off. And then we can press that back.
Alright so now I also need to do it to this one right here. And then the rest of them I’ve already done so then I can just show you how to put it together. But let’s go ahead and finish this one up. So one square in the corner, line it up. I guess I don’t need my rotary cutter in my hand. Isn’t it funny how we do those things sometimes? Just have a hold of that thing, can’t let go of it to save our lives. Alright, here we go, sewing across side to side. Diagonally on the corner. And I am just going to trim this and finger press it. I’m living on the wild side now. And then I’m just going to add this other corner over here. Just like this. I can’t wait to show you how this comes together because it’s just so dang cute. Alright, now we’re trimming again. And then we’re going to head to the ironing board and iron this back. Alright so you do this to all of your 2 ½ inch squares of one color and all of the other color.
Then we’re ready to assemble our little flower. And you’re going to match up the colors. So we’re going to put this maroon dot and maroon dot and the yellow with the yellow. So we’re going to do here like this. We’re going to do here and here and here. And then we’re going to add in our, just like that. Look at that cute little flower. Is that not the cutest thing you’ve ever seen? And so then we have four little squares that go in the corners. So we’re going to put those in over here, one, two, three and four. So once you get your flower all laid out we’re ready to put it together. So I’m going to start with this top row right here. And I’m going to sew my two black squares to these and sew these two together. And that will make the top row. And when you get in a groove of sewing these together, one of the things that I started doing was sewing all my two petals together. But there was a moment where I actually sewed the wrong petal to the wrong side and of course I had to rip again. But once you figure those things out you can sail through this. Alright so here is our top row right here. And then I’m going to go ahead and sew this bottom row right here. And I’m sewing my corners onto the petal, making sure that they’re on the right side. And then I’m going to put these together. And I’m just going to lay them here and check them. So they’re the red with the red and the dot with the dot. So I’ll sew these two together like this. And these are our top and bottom rows right here. And so then what we’re going to do is I’m going to sew these two together and I’m going to sew these two together and I’m going to remember what side they’re on so that I can attach them to this middle section. And so I’m just going to go right down the side right here. And then this one too. And then we’re going to check to make sure we’re still in the right place and we are and we are. So now we’re going to sew these two to the middle. And again, take that little anchoring stitch and then stop and make sure that your little seam in the middle matches up because these petals are different colors and you want them to match right up. So the same over here, this one, yep. A little anchoring stitch. And then we’re just going to make sure those middle seams nest well. And then I’m going to give these a little press and the top and bottom row as well. And then we’re going to put our whole block together. And I am just pressing from the top because I just want to make sure the tops are flat when I’m ready to put them together. And then I will worry about my inside seams after I’m done.
Alright so now we’re going to put these top and bottom rows together. And I’m going to make sure these seams nest up. So now at every junction you’re making sure that your seams nest up and it keeps your block pretty square. Alright there’s that one in the center and this one on the edge. And because I haven’t really pressed my seam any direction yet I can make it go the way I want it to. So here’s this one and it is lining up. A little bit more. Alright so now I’m going to press this. Now ordinarily because there’s black on this I would sew it with black thread. I would use a black bobbin. I would use black thread. I wanted you to be able to see where I was sewing and so that’s what we did. Now what we’re going to do, because this isn’t quite ten and I wanted it, I wanted the block to really feel like it had its own presence. We are going to put a little border all the way around this.
So the border that we’re putting around this one is a 1 ½ inch border. And it’s just going to give it a little bit of a framing so that it really stands out. And so I’m going to go ahead and sew this 1 ½ inch border to all four sides. And whenever you’re sewing on a border like this you want to make sure that you’re sewing, the piece you’re adding is on the top of your block. And so we’re going to sew this side over here. And I did it, when you border a quilt, you sew it side to side, top and bottom. Actually that’s not a real rule, it’s just the way I do it. You can do it however you want to do it. But that’s just how I do it. And then we’re going to push these back. And I’m going to add it to the other side. And I’m just going to finger press these and then I’ll go over and iron them for real. You can iron, I mean please it’s up to you entirely on whether or not you iron in between. So I don’t know if you noticed but my seams along my edges of my flower block were not completely perfect, you know, they didn’t line up exactly perfectly. But this little border will hide all that. And so it just, it’s very forgiving. Alrighty. So let’s press this open now, nice and flat. You know if you feel like using a little steam or you know, best press, it will make it nice and flat. It will just be beautiful. Look how pretty that is. Now what I want to do is I want to square this up so that it’s just exactly the same size. And look how little. I mean it’s just tiny, we’re shaving pieces off. But what that’s going to do for our quilt is when we start putting those two blocks together, they are just go together perfectly, absolutely perfectly. So one of the things I do when I’m cutting is I check to make sure that these center lines line up on the petals. And then we’re just going to cut off this little tiny bit along the edges, just shave those edges just a little bit there. And this would be a great place if you have a rotating mat to do that. I forgot to have mine up here but that’s alright. Again make sure your lines are lined up. And then we’re just trimming this side and trimming this side. Just like that. And these are the sweetest little blocks and then what you’re going to do is these are going to fit perfectly to this one because you’ve squared them both, you know, using this ten inch ruler which is so handy.
So you’re going to make 28 of these as well. So let’s go back to the quilt for a minute. So you can see this first row right here we’ve started with a flower and there’s one, two, three, four, and every other block is the Irish Change block and so one, two, three. Then the next row you’ll notice we start with the change block. And so it’s change, flower, change, flower, change, flower like that. And you’ll end up making 56 blocks and it just chains through the whole quilt. It looks gorgeous. We’ve got this great little five inch border out here. And the back, we used the same fabric in here as we used for the back. The quilting pattern is called Curly, Twirly Flowers. It’s one of my favorite. I love how it just swirls. Anytime I have anything that’s kind of square and blocky I tend to go for something that is kind of round and I love that pattern. So it makes a quilt that is 75 by 85. So it’s a nice size quilt. We’re calling it Flower Chain and we hope you enjoyed this tutorial from the Missouri Star Quilt Company.
We hope you enjoyed watching this video. If you’re not already part of the Missouri Star quilt family you can hit the subscribe button below so you won’t miss a thing. And if you click that bell it will notify you every time a new tutorial comes out. See you next Friday.
& Progress on Social