


Jewel Heart Quilt Tutorial
Jenny Doan
Jewel Heart Quilt Tutorial
Featured products Get the Supplies Featured in this Tutorial


Finish your masterpiece and let us give it the finishing touch it deserves.
Subscribe to MSQC on YouTube
Hundreds of FREE tutorials and a new one from Jenny launches every Friday.
video transcript
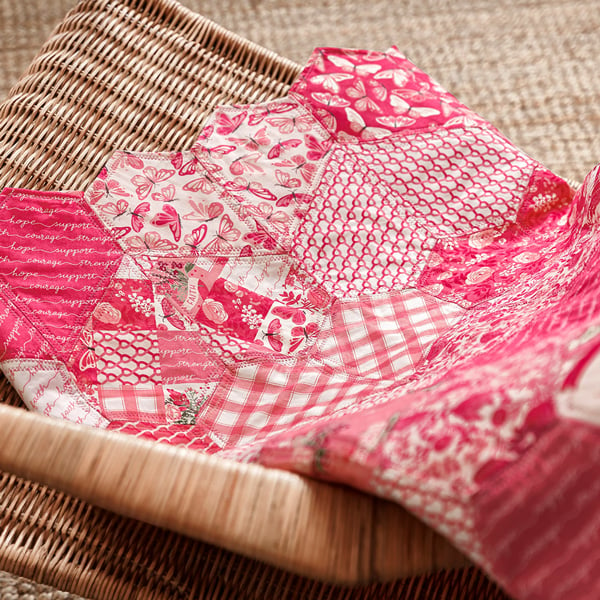
Hi everybody, it’s Jenny from the Missouri Star Quilt Company. And I’ve got a sweet project for you today. Take a look at this quilt behind me. Isn’t this sweet? These little hearts that come together to form this. And it’s all quilt as you go. Now I’ve done several of these quilt as you go projects. And they just make great take along projects and they just make quick and easy projects. You can do them by sewing them on the machine. You can also do them by hand. To make the Jewel Heart quilt you’re going to need 17 fat quarters and we have used Hope and Bloom by Kathryn Linneus for Riley Blake. You’re also going to need a 2 ½ inch jewel template, a quilt as you go template. You’re going to need some batting and we have this pre cut 2 ½ inch jewel batting shapes. Some other things that will be helpful are needles. And I love the John James size nine. If you’re like me you might need a needle threader, some thread, a glue pen, some pins and a good pair of scissors.
So you’re going to need to have some fat quarters for this. And the reason we chose fat quarters was because of the shape of our template. These are Daisy and Grace templates and she does such a great job with these templates. And when you get them, they’ll look like this and you’re going to want to peel the paper off right here like this. And then you’ll be able to see through them so that you can position your fabric anywhere you’d like it to be. So I’m also going to peel the paper off of here. Now one of the things at Missouri Star that we like to do when we come out and share one of Nicole’s templates with you is we like to create the batting for the project because a lot of the time is taken up with the cutting of the batting. And so that just makes it go a lot faster for you and so much easier. So we have these templates and you can obviously, you can cut the batting out yourself. You can cut it out of your scraps but this just makes it easier. It’s this jewel batting. It ends up looking like this. You’re going to use that when you make these because it just gives them a little bit of oomph. So on the quilt behind me when it’s the size it is and it makes a great lap quilt, but this is one packet of batting. That’s how much it takes to make. Now if you want to make it bigger, it’s totally up to you. But I wanted to show how much to make with a packet. So we’re going to start with fat quarters and that’s because it’s way less waste with a fat quarter. Now if you want to use a layer cake you’ll need two of each color because you can only get one of these out of a layer cake..
So let’s come over here and take our fat quarter and I’m just going to press it so that it lays nice and flat when I cut it. And then I’ll show you how these all work and how these all go together. Alright. So what we’re going to do, now let me move some of these out of the way. I have lots of little things to show you here, is I’m going to fold this in half. So I’m going to get two when I cut. And the first thing you’re going to do is you’re going to cut your outside edge like this. I would line my long edge up with the straight edge of the fabric. The less cutting we have to do the better. And so we’re going to cut all around this, like this, this, over here, around here. And then I’m going to cut this little bottom piece right here. And then I have enough cut here for the backs of two hearts. So they’re going to go like this. Then what we’re going to do is we’re going to leave this on top of this. We’re going to pop a piece of our batting in here. And then we’re going to take our small template. And with the small template you will cut out your smaller jewel shapes. Now you wouldn’t think that the jewel shape is going to make a heart. And so I love those, those are those little surprise things that happen. So just like here I’ve cut this little jewel shape of the butterfly and the butterfly is going to lay exactly on top of this batting. And then we’re going to lift this up and make sure that this is centered right on here. I think mine scooted just a bit. And then what we’re going to do is we are going to fold this in so that it meets the fabric and then fold it in one more time so that it lays over the top of the fabric. And then you can hand sew them or you can machine sew them. Now I want you to look at some of these. These are ones and they kept the fabric inside and outside the same. So this is a fun time to frame up your heart or you can leave it the same. So you don’t ever have that line in the middle that separates the two pieces. So see this is zig zagged and they’ve zig zagged all the way around it. . A great place to use your decorative stitches, any little stitches. I even have a little stitch on one of my machines that is a little heart. So that would be sweet to do on the edge as well. The backing is just one solid piece of fabric. The front, it has the little insert inside. And I have some over here that I did by hand. To me this is one of those projects, I love to have a project to take and go. And this is a project that I felt like lended itself well to taking and going. You know, maybe some times we’re waiting for somebody to get out of treatment or we’re in treatment and we have extra time and we want to do something. Needle, thread, a little scissors and a couple of these pieces and you’ve got something to do while you’re waiting. And if you’re like me you’re not going stir crazy. So I think this makes a great little project.
So I have a couple started here. And I want to show you because it’s easy to see how we’re going to hand sew them. It’s easy to see how you can machine stitch these down. But if you’re going to hand sew it, it’s good to have a few little helping things to help you along the way. So I have one side done here. And I’m going to do the other side for you. So again we’re going to use this as our guide, lay it right on top of the back piece just like this. Make sure it’s right on there. There we go. It’s all the sides, perfectly to the edges. Then we’re going to lay in our batting like this. And then we’re going to put our little butterflies on top. And this all sits in the center of the template. It’s just a great way to line everything up. And then what I’m going to do is I’m going to grab some pins. And I’m using these pins because you can iron over them and they don’t melt. And so I’m going to put one of these pins right in the back right here just like this. All the way through all the layers, then I can lift my template off. And then I’m ready to go. . So we’re going to start by just folding one time, this little point on the bottom. And then we’re going to take this to our ironing board because this is really where it’s the easiest to do. And so what I like to do is I like to fold this little end under one time right here. And then I’m going to start by folding this. And I’m going to use my iron to kind of go around and you’re just going to fold it until it meets the fabric like this. Then we’re going to turn it and you’re going to fold it until it meets the fabric again like this. And one more time over here. You’re going to do this all the way around. And this really is the easiest way. Now if you were out and about doing this you can actually finger press it. When I do this and take it out and about, I actually get them all ready to hand sew so I have a little baggie of things that are already folded, pinned and ready to go. So I’m going to take this and come around here like this.
Now what I like to do, this is kind of overkill because we are going to pin it but I like to put a bit of glue. And I like to do it just on this edge right here so that when I am putting my fabric on there it’s going to just lay down and stick on there like this. And I can stick my pin in it and it really won’t go anywhere. And so I’m going to hold it up here and I’m going to touch it with the iron. And now I have just folded that over the edge and touched it with the iron and I’m going to grab one of these pins and I’m going to put it in this side. Now if I were just going to sew this together I wouldn’t even need the pin because I’ve kind of tacked it down with glue and so we wouldn’t even need that. So again, over here I’m just going to that and let me get my little glue. And this is a great place right here on this point because the points can be a little bit intimidating. And so I’m just going to come up here on this side right here. And this glue will dry clear so you don’t have to worry about it even though it looks blue, it will dry clear. Alright. So then what I’m going to do is this is folded up once, I’m going to fold it up twice. And there’s several ways you can do this point. I like my point to cross over and touch on either side. And so I’m just going to come and iron this to this point. I’m going to stick a pin in here just like this. Alright now we’re up here at the top, and I’m going to come here and fold down and again my glue is in there. If your glue dries before you get to it, don’t be afraid to add a little more. So this is going to be pinned as well. And then right here I’m going to pin this side and I’m going to put a pin in there. And then I will press that down just like that. And then I’m going to fold my top down. Now there’s lots of ways you can do this, you know, most of the time I tend to go all the way around it but this time it seemed right to fold my top down and just, you know, kind of cap it off. It makes a perfect little 45 when you do that. And I’m going to put a pin in here. And now because these pins have silicone heads I can literally just take this, give it a nice steam and a nice press to make everything lay down nice and flat.
And then if I were going to take these to sew I would just put it in my baggie like this and then I’d have my needle and thread. So let me pull a chair up here so I can show you how I sew these together. I like to use a little John James needle and I use a nine. The larger the number the smaller the needle. This is a great needle for me. Since, you know, my eyes aren’t so great anymore I love this needle threader. And you can use, you know, obviously you can do whatever you want. The needle threader only really works with oval eye needles. That’s really important because people get this and they’re like it’s not working for me. But what you’re going to do is you’re going to put the needle right here in this little slot. I’m going to lay my thread across here. And I’m going to push that lever and it actually pushes the thread through the eye. And so this saves me loads of time threading because otherwise I can’t, I mean, we’ve all been threading needles for a long time. But I can no longer see the hole. I know there’s one there. I just can’t see it anymore. So now what we’re going to do is we’re going to get this ready to sew. And we’re ready to stitch down our heart. You usually start anywhere on here. And I like to unfold it a little bit and pull my needle up through the fold, stick it through the fold of the fabric like this and then my knot will hide on the inside like that. I’m going to fold it back down and then I’m just going to go ahead and sew up this side. So wherever your thread comes out that’s where you go back in. So we’re going to make sure that this just slides through there. So right here my thread is coming out and I’m going back in. I’m sliding between the two fabrics and I’m going to take another stitch. It’s just like binding a quilt. This is the same stitch we use for binding. You’re going to go in right there and come out in the fold. And so it’s really kind of a hidden stitch as long as you keep it right on the edge of that fold. And you want the fabric to match. Now this fabric is called salmon and so it’s a great color for this fat quarter pack. That thread off of there. You know, it’s just a great little color for this fat quarter pack to do, to use with it. It blends perfectly. And when you are doing something like this you always want to have thread that blends with what you’re sewing on not what you’re sewing to. So you’re going to want to match your binding and you’re going to want to match your little back square of this one. And we are just going to sail across this. It just goes so nicely and quickly. Now I am also aware that there are many different types of cancers and many different colors that represent them. We are doing this for breast cancer awareness. But whatever cancer you have, I mean, this would be an easy quilt to make in whatever, you know, in whatever color you want it. You can honor your loved ones or you know, if you have a friend or yourself or whatever you want to do with this, you know, it’s whatever, I mean, it’s just such an awful thing that it’s affected us so intensely closely as it has. I mean, for me this is a way to work through some of that grief and some of that waiting time. Alright I’m up here at the top. I’m just going to catch this little one, do an extra stitch where these come together. And we’re going to go back to this side. I’m going to take my pins out as I come to them. Alright. So now I’m down here to the bottom and I’m just going to sew right down the edge of this to the little tip right here.
And then what I’m going to do is I’m going to grab my other piece that I finished. And it’s right here. And you want to look at how they go together because as careful as we are sometimes, you know, the pieces might be better on one side than the other. So just take a look at how they fit. And I feel like this side actually might be a little bit better side. And so what I’m going to do is I’m going to lay these right sides together like this. And then I’m just going to bring my thread right through here, it’s right here on this end right here. And I’m just going to bring it right up inside that fold right there and just pull it through. And then I can start down the side of these, sewing these together. And so these are going to be the same type of stitch, I’m just sewing it from the back. So I’m just going to use a ladder stitch on these. I’m just going to go in here and then come up the other side. And then I’ll come across and come up this side. And you want to keep these fairly close because these are what’s going to hold your hearts together. And so don’t make these too far apart. So we’re going across and over. And you’re just going to go right up this back seam like this. Alrighty so here we are at the end. We’re going to use a nice little knotting stitch here. And I’m just going to come around here and put my thread, just make a little knot. I’ve got a loop out there. I’m just going to go through that loop a couple of times, cinch it up. And then you can actually slide your thread back in through here so there’s no tension right at the knot and then you can just clip it back here and it will stay hidden. So then you get this cute little heart right here.
Let’s press it. Take our pins out. And it just looks darling. I mean, they’re just as cute as they can be. And then when you put them together you’re going to have one row like this where it’s all right side up hearts like this. And then the next row they are going to go upside down like this. And so you’ll put them together as many wide as you like. So you’ll have one row where they’re up, one row where they’re down. Just go ahead and make it as big as you want it. Know that this is one packet of batting. YOu’ll probably get a lot more out of your fat quarters than that. But this makes one packet. Great lap size quilt and take along project. It is just a, this fabric is just really sweet little fabric. It’s very encouraging. It’s words on it which to me words have power and so these words on this fabric say words like strength, hope, support, encourage and courage. And please know that Missouri Star loves you and supports you in what you’re going through. And we hope you enjoyed this tutorial on the quilt as you go Jewel Heart from the Missouri Star Quilt Company.
We hope you enjoyed watching this video. If you’re not already part of the Missouri Star quilt family you can hit the subscribe button below so you won’t miss a thing. And if you click that bell it will notify you every time a new tutorial comes out. See you next Friday.
& Progress on Social