Kindred Pinwheels Quilt Tutorial
Jenny Doan
Kindred Pinwheels Quilt Tutorial
- 1 pack x 10" Precut Fabric Squares (Layer Cakes)
- 4 yards x Background Fabric
- 2-1/2 yards x Quilt Fabric for Sashing - Print
- 1/2 yard x Quilt Fabric for Cornerstones
- 1-3/4 yards x Outer Border Fabric
- 8-1/2 yards x Quilt Backing Fabric


Finish your masterpiece and let us give it the finishing touch it deserves.
Subscribe to MSQC on YouTube
Hundreds of FREE tutorials and a new one from Jenny launches every Friday.
video transcript
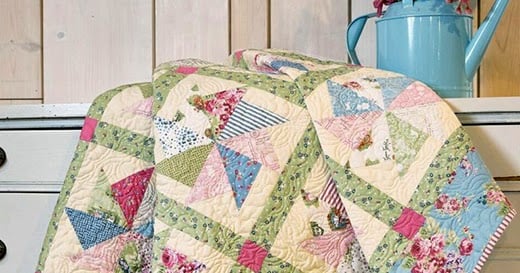
Hi everybody, it’s Jenny from the MSQC. And I’ve got a fun project for you today. We’re calling this Kindred Pinwheels. And the reason is this makes a cool pinwheel block but the kindred comes from the fabric that we’re using. Now this fabric has a lot of history to it. It’s Anne of Green Gables fabric and I have three daughters. And they grew up loving Anne of Green Gables. And so this fabric has just this kind of nostalgic feel to it. And I just really enjoyed making the quilt.
So to make this quilt what you’re going to need is one packet of ten inch squares. And we’re actually going to sub cut these down into five inch squares. So if you want to get four packs of five inch squares you can make this quilt as well. You’re also going to need four yards of background fabric and that’s going to take care of all these pieces around here. You’re going to need sashing fabric and you’re going to need 2 ½ yards of a print for your sashing fabric. And your little cornerstones right here, this is a ½ a yard of a solid and we used that cute pink. And then for the border you’re going to need a yard and ¾. And this is a 5 ½ inch border out here and just frames it all up. I want you to notice the binding on this. The binding, you’re going to need a yard for your binding. And we’ve used this really cute little stripe that’s part of the line. And it just makes the whole, you know I love, I love a stripe on the binding because to me it just kind of frames it all up. I think that’s really cute.
Alright so let me show you how to make this block because even though it has a bit of a complicated look to it, it is very simple. So first we’re going to take our ten inch squares right here. And I have this, I’m using my rotating mat today which is always really handy to have. And it’s a Martelli mat and I just love it. Anyway I’m going to take my ruler and I’m going to cut these into four five inch squares. So I’m just going to use that and turn it, put that on here like this and turn it. Now you can stack several of these up because you’re going to be doing the same thing to all your ten inch squares. So now you have four five inch squares just like that. And then what we’re going to do is we’re going to cut these diagonally from corner to corner. And so I’m going to do this and this. And then I’m going to turn them over here and cut them diagonally as well. Alright, there’s that one and this one.. Now I would cut your whole pack and because we want to mix these up. We want to be, we want to be able to draw from all different colors. You’ll see our blocks, they’re made of lots of different colors of fabrics and so, that’s a real scrappy look. I mean you could arrange it so you could do them all one color but I wanted to do it scrappy so that’s how we did it.
Now for the background you’re going to need to cut five inch strips and 2 ½ inch strips. So out of your five inch strips you’re going to need five inch squares, just like the front. So I have this five inch strip right here. Let me put this on here nice and straight so you can see it. I have this five inch strip right here. And I’m going to go ahead and cut my selvedge off. And cut me a five inch square because you need the exact same size triangle, these triangles out here, you need the exact same size of your background for that. So I’m going to do the same thing. I’m going to take my five inch square and cut it side to side. And these are now the exact same size as our print square. From the 2 ½ inch strip, and I’m going to put this over here so I can cut off my selvedge again, you’re going to need seven inch strips. So 2 ½ by seven. And you’re going to need four of those for each block. So let me line this up on here. And I’m going to count over, one, two, three, four, five, six, seven just like that. Alright so now that we have all of our pieces together we can put our block together.
So now we’re going to make the block. So you’re going to choose one of your pieces of print and one of your pieces of solid. And you’re going to match your triangles just like this. And you’re going to sew those together right down that side. Alright so let’s go to the sewing machine and do that. We’re doing a quarter of an inch and we’re going to press this open. And let’s press to the dark side. We’re going to set our seam. Alright. So now for the other half of the block you’re going to take another piece, another triangle and your 2 ½ by seven inch strip. And you’re going to sew it onto here just like this. So we’re going to lay this on this side of the triangle. And this is, you know, one of the short sides here. And we’re going to sew a quarter of an inch right down the side. Now I only sewed as far as this because it doesn’t go all the way down. So I only sewed just a little beyond that. And then we’re going to go ahead and press this open. And then we need to trim off this edge. So we’re going to lay our ruler on here, let our triangle be our guide and then just trim this off just like that. Then we’re going to sew these two together just like this. Isn’t that cool? So there’s no lines to match up. We’re just going to, we’re just going to match up our two colored edges right here and sew right down the side. There we go. Now we’re going to press this open. Now all of these blocks do have to be squared. You know sometimes, sometimes if you want to make the pretty stuff you’ve just really got to square your block.
So when you’re ready to square your block, you’re going to square it to six inches. I”m using a block lock ruler and this one happens to be 6 ½ so I’m going to have to mentally, make a mental note to ignore the half on this. I like the block lock because it has this little shaved edge under here and it will wedge itself on that seam line so it doesn’t move too much. So what I’m going to do is I’m just going to slide this a little bit on here so that I get a nice side to trim with. And I’m just going to trim this off over here. And trim both sides. And then I’m going to pull those away and then I’m going to slide my ruler so that I lose my half an inch. So see here my half an inch is sticking over. And then I”m going to square up this other side as well. Just like that. And then once you get both sides trimmed up you have this perfect little block like this. And you’re, this is the one fourth of the quadrant that makes this block. So I have my other ones done over here. And we’re going to put them together just like this. Well let’s not put green to green. And here we go, there we go. Pink to green is better. And see how this all comes together just like this. And then what we’re going to do is we’re going to sew this together like a four patch. So let’s go ahead and do that.
And I’m just going to lay these right on top of each other and carefully move them to the sewing machine so I know exactly where I’m sewing and I don’t lose my spot. And so we’re going to sew here at a quarter of an inch right down the side. And you can make your center, make your little center lines nest up so the one seam is going one way and one seam is going the other. And then these I’m going to slide right in after them. When you do that without cutting the thread, that’s called chain piecing. I’m going to make sure these line up real nice here. Alright now we’re going to sew these two together. And we actually shouldn’t even have to clip that thread. We can just open them up like this, yep. Just like that. Fold it right over on itself and then sew these together. So we’re going to line up the outside edge. Take a few anchoring stitches, then I’m going to line up my center seam. None of the other seams have to line up with anything, just that little center. And then make them fit. It’s not wanting to go over that part, there we go. Alrighty. So now we’re going to press this open. Ooh! That’s pretty in the center. So we’re going to press this open just like this. Everything is kind of sliding around on me today. Oop, there we go. Flip it over. I like to press from the top and then I flip it over and make those seams go the way they want. Give them a shot of steam. I do love a steam iron, I have to say. Alright. And then you get this perfect little block just like this.
Now we have to talk about laying them out. So let’s go look at the quilt behind me. We have one, two, three, four, five, six blocks across here. And we are going to sash in between. What that means is whatever size your block ends up, which is should be like eleven and something, something like that. You’re going to actually cut your sashing to that size right here like this. And you’re going to attach it to the edge of your block in between the whole row. So I have one here with the sashing already sewn on. Let me move this out of the way. I’ve got one here with the sashing sewn on. And you’re just going to match those up block to block just like that. See how that is going to work. So then when you’re ready to do the next line of sashing in you’re going to go ahead and put your cornerstones in. You’re going to sew your cornerstone to your sashing strip just like this. And attach those together. And that will go in as one long strip, all the way across here just like that. One big long strip. And so it’s just going to make a darling quilt.
So this is a really fun block to make. I’m glad we figured out an easy way to do it. It’s going to make a really big quilt. The quilt is 91 by 104. That is a big quilt. And so if you want to back this you’re going to need about 8 ½ yards of backing. And we have used, we have used this awesome Anne of Green Gables fabric. You can see it has all the little scenes on it and the words. What a great, fun quilt. And we hope you enjoyed this tutorial on the Kindred Pinwheels from the MSQC.
& Progress on Social