Star Patch Quilt Tutorial
Jenny Doan
Star Patch Quilt Tutorial
- 1 roll x 2.5" Strips (Jelly Rolls) - Print
- 1½ yards x Complementary Quilt Fabric
- 4½ yards x Background Fabric
- ¾ yard x Fabric for Binding
- 7 yards x Quilt Backing Fabric


Finish your masterpiece and let us give it the finishing touch it deserves.
Subscribe to MSQC on YouTube
Hundreds of FREE tutorials and a new one from Jenny launches every Friday.
video transcript
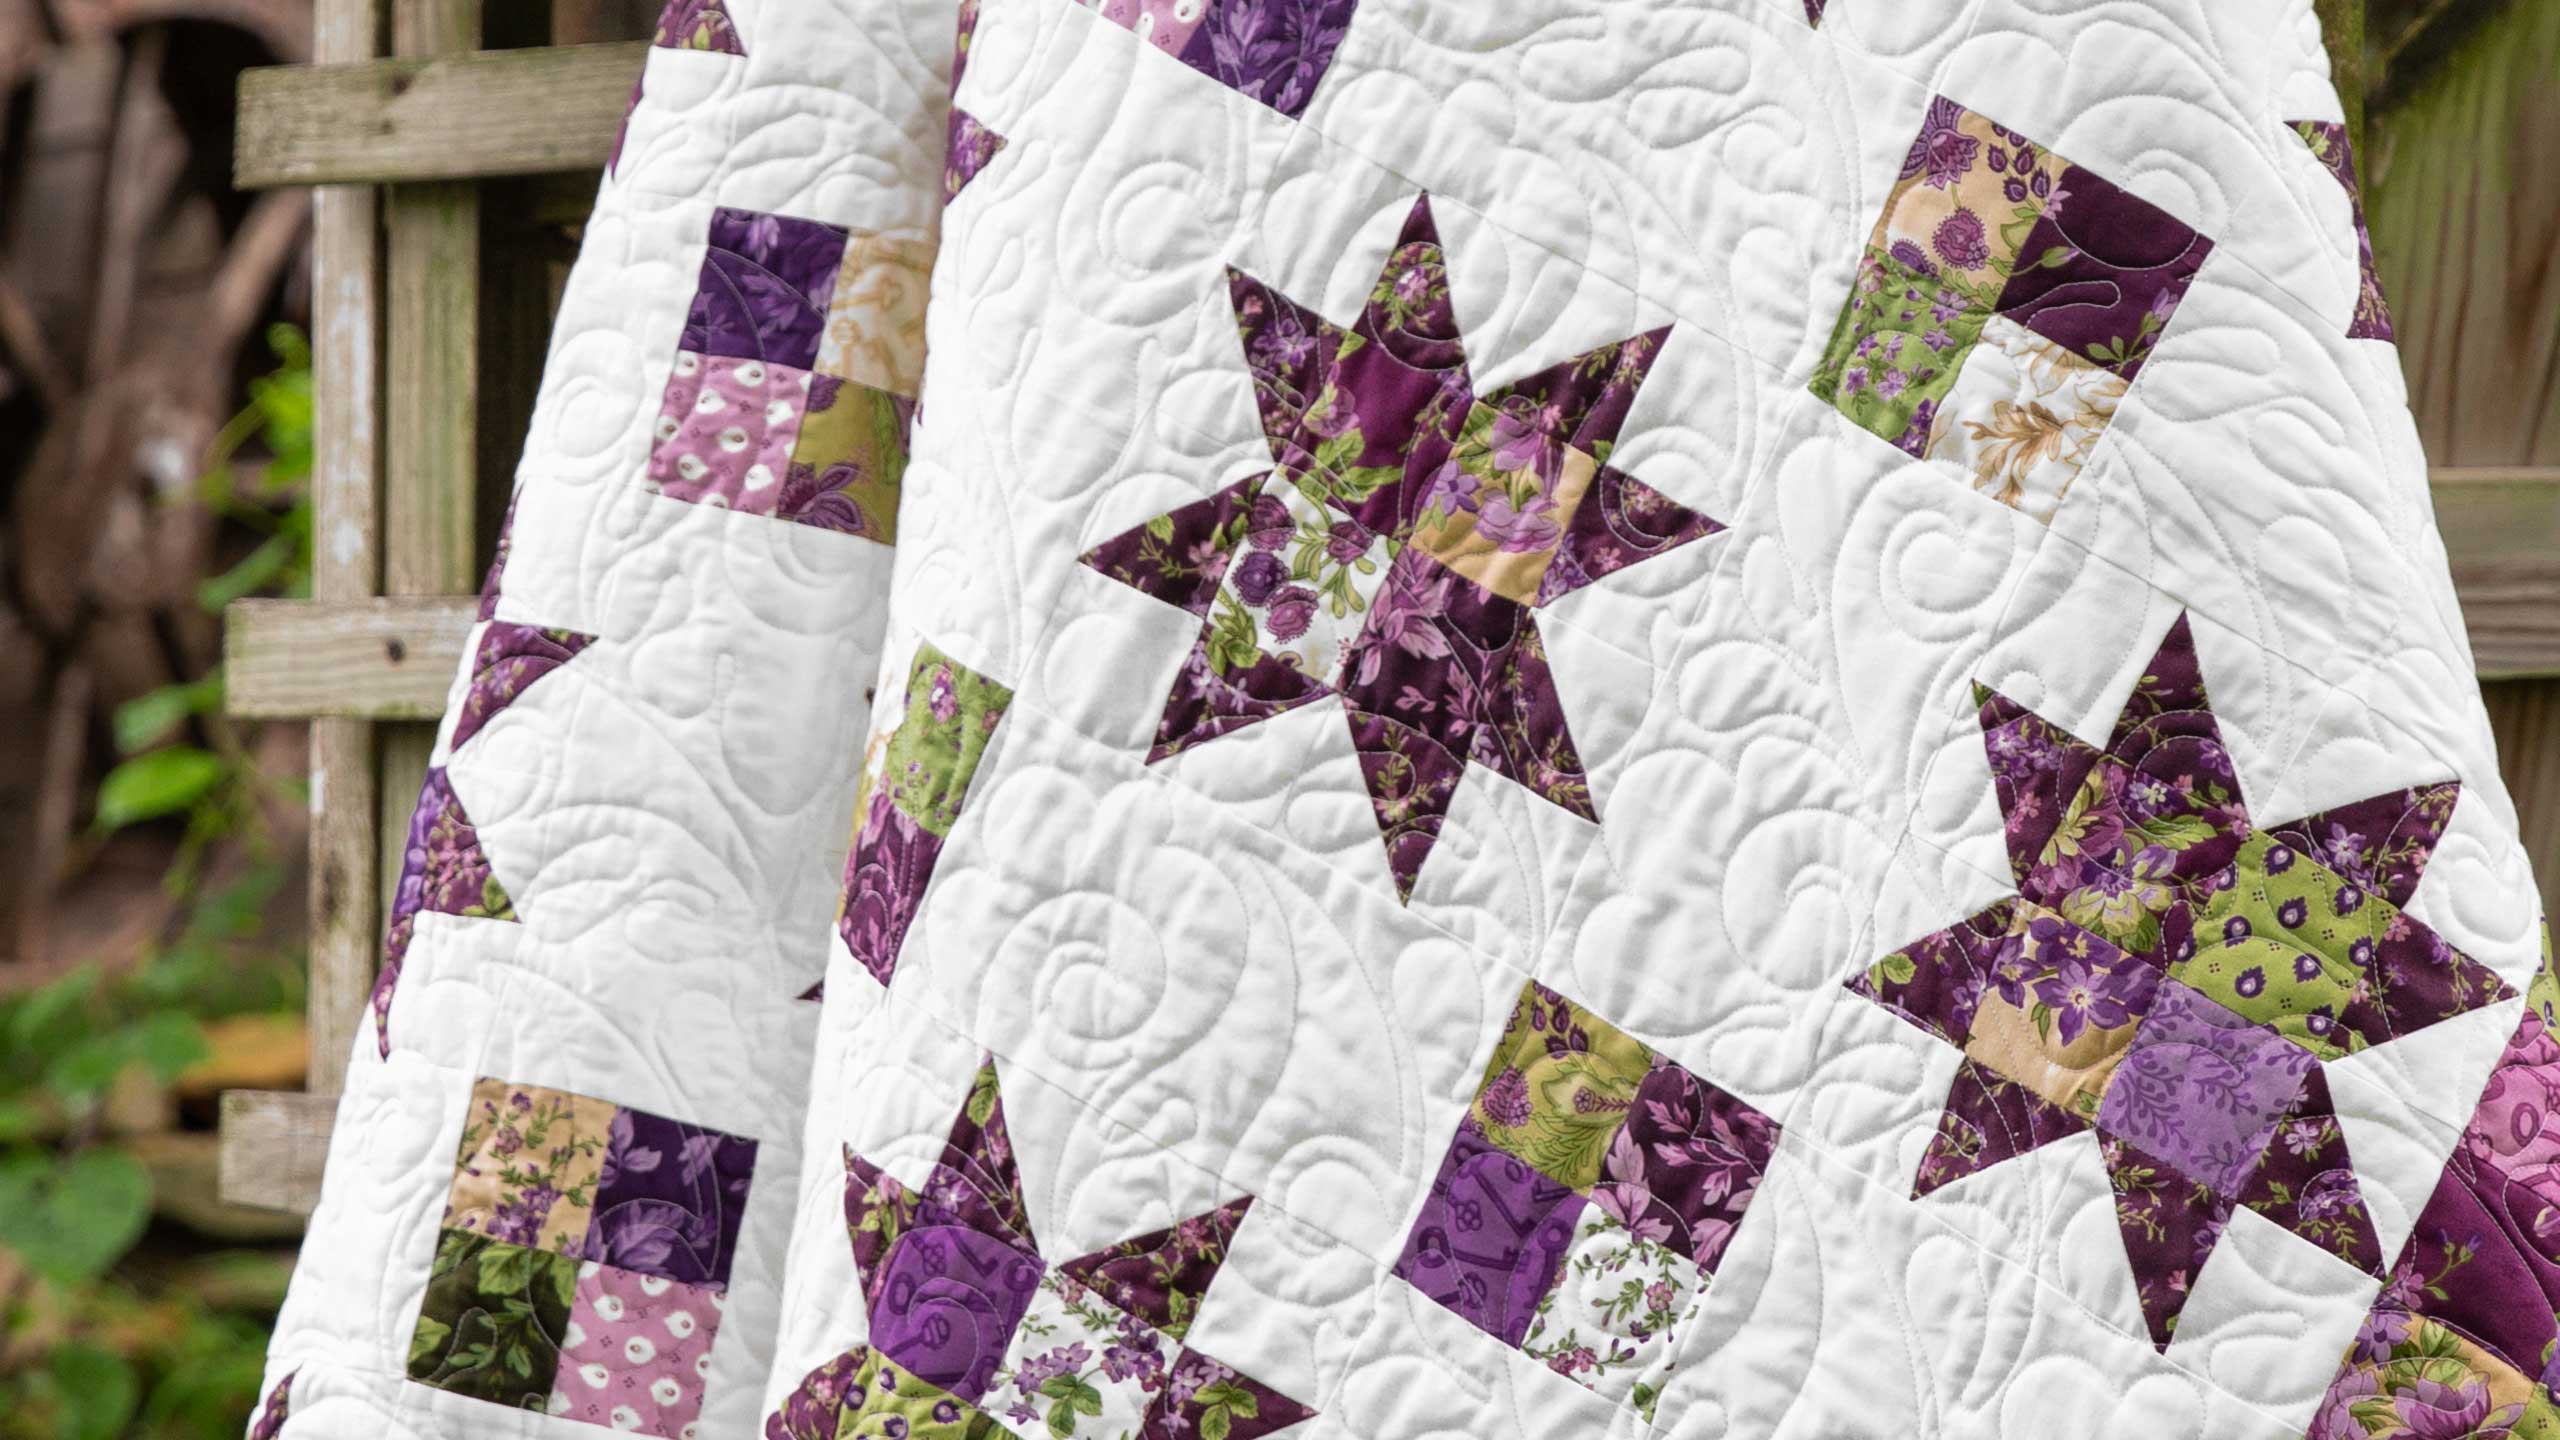
Hi everybody, it’s Jenny from the MSQC. And I’ve got a fun project for you today. Let’s take a look at this quilt behind me. Isn’t this a great quilt? First of all I love stars. What quilter doesn’t love stars. And this fabric, it’s so beautiful. So easy to make. Let me show you how. So to make this quilt what you’re going to need is one roll of 2 ½ inch strips. And we have used Aubergine by Debbie Beaves for Maywood Studio. And you can see how gorgeous that is. You’re going to need a little extra yardage. You’re going to need 4 ½ yards for your background. You can see there’s a lot of background on here. You’re also going to need a yard and a half of complimentary fabrics for your star legs. Now I chose to do all my star legs the same color. Obviously you could scrap yours up. And I used my border out here is part of all the four patches we’re going to make. This is a four patch star and it’s just, I just love it. It’s so cute.
So what we’re going to do first is we’re going to make our four patches. So that means you’re going to get two strips out of your, your bundle. And we’re, I’m just going to use two colors. I’ll use a, I’ll use a lighter green and maybe a purple color. Two different ones, put them together so they have a little bit of contrast. We’re going to put them right sides together and sew all the way down the side. So this is an easy quarter of an inch. Line up your strips and lay it under your presser foot, a quarter of an inch and just sew down the side. So what you’re going to do is you’re going to sew your whole jelly roll together in strips like this because we’re going to make four patches out of these. And you want your four patches to be different. You know I like to scrap mine up. And so what we’re going to do is once you get your two strips sewn together and again it’s wrong sides together and a quarter of an inch at the top, I’m going to fold them in half like this. And I”m just going to lay them here and trim my selvedge edge off over here. Let me move this down here I don’t need that anymore. Alright so now I’m going to make sure that my, my selvedge edge down here comes in a little further. And I”m going to make sure it crosses the line right there so that I can trim that off. And start right at the edge of my fabric. Alright so there goes our selvedges. And now we’re just going to cut 2 ½ pieces. And it’s easier to cut these before you iron. If you iron them open they tend to get a little bit wonky. And this way it’s easier to cut these before you iron them. And you’re just going to go along and cut all of yours in 2 ½ inch pieces like this. And I did this to all my strips first. I made all my four patches first. Then you’re going to come over here to the ironing board and we’re going to iron these open. And I like to iron, keep my dark to the, I mean my seam to the dark side.
So you’re going to go ahead and cut and iron all your patches. And you’re going to have all these little two patches. And I scraped mine up. In the back they’re all scrapy and so I have a piece here that’s already sewn together. And I”m going to put mine together so the green is going in opposite direction. And if you iron to the dark side all the time then your seams are going to go opposite ways. So see how this seam goes this way and this one goes that way, that’s the easiest way to nest a seam. And so we’re going to flip these over now and line these up. Make sure that they just smash right together and you can’t feel any fabric in between them. Alright I’m going to move this fabric for a minute because I don’t need that anymore. And we’ll sew these together. And you’re going to do this to all your four patches. So I made all of mine first. Alright so now we’ll press this open. And then let’s go look at the quilt.
So some of these four patches are made into our star blocks right here. The other four patches are just part of the sashing. And so that’s what makes this quilt so cool and so easy. And the reason it gets big fast. So this is our star block that we’re talking about right here. So now we need to make these legs. And the legs, for the legs what we’re going to do is my, you know I chose my fabric so all the legs would be the same. So I cut my fabric in 2 ½ inch squares. And you need eight of these for your legs. And so I’m going to count out four because I already have four done over here. And you’re going to need a square of background that is exactly the same size. So 2 ½ we’ll need eight of each of those. There we go. And we’re going to sew these together. How we’re going to sew these is I”m going to lay my white on top of my square like this. And then I’m either going to draw a line or press the line. And I will draw that line for you so you can see it right here. We’re just going to go straight on the corner, corner to corner diagonally like this. So just straight across. Oop let me get that right on there. Hold that down. There we go. And I’m going to sew directly on the line. I’m not sewing to either side of it. I’m sewing directly on it. So I want to go ahead and mark my little, my little legs like that. And I need two more. I have them over here. Honestly when you make this many star legs by the end of your making them you’ll get to where you just eyeball that right across which is what I do. It gets easier and easier you know sewing. It’s that whole thing where sewing is a learned skill. And as we go along it’s going to get easier and easier for us. Alright so now I’m going to lay these on top of my, my star leg fabric like this. And I’m going to do it to all of them. And then I can just chain piece these through.
So we’ll bring all of these over here to the sewing machine. And then we’re going to put our presser foot so the line lines up right in between it and the needle goes directly to the line and it goes straight across. And we’ll leave that on there and add the next one. This is called chain piecing. And the next and one more. And you’re going to do this to eight. I’m only doing it to four because I’ve already got four over there. Now what we’re going to do is we’re going to cut these apart and we’re going to trim one side off. So I”m going to go ahead and cut in between all of these like this. And then I’m just going to lay my ruler a quarter of an inch from that seam line and trim off the side like this. And up here. And this doesn’t have to be exact or anything because this is just the seam part you’re cutting off. Alright so now let’s press these open which means we’re going to put our darker side to the top. And I’m just going to set, set the seam right there. Setting the seam just relaxes your thread. And then we’re going to roll it back. Alright one more. Oop I’m having a hard time getting those apart. There we go. Alright a shot of steam. And we’re good to go. Now let me see where’s my other four, I have them here somewhere. Oh here they are, there’s one. Oh here we go. Just a little mess up here. Alright so let me show you how the star is laid out because this is super easy. We’re going to put all these blocks together so that the whites are what we sew together in the middle like this. And these are going to come on all four sides. And I have to remember that every time, whites together, whites together. Because it’s, because it’s for me it’s, you know, I lose that angle so easily. So here’s our block like this. And then we’re going to need four patches, same 2 ½ inch squares for the corners, just like that.
So to make this easy what I’m going to do is I’m going to pick up all these legs and I’m going to sew them all together all at once. So I”m going to lay them right sides together with my whites matching up. So just like this so they’ll come right together like this. And we’re going to put them through a quarter of an inch. Oop that one got folded. And chain piece. And we’re going to do all of these exactly the same and before we do anything else. So there’s one and here’s the last one, two, three, four, five, six, seven, eight one, two, three, four, four sets of legs. There we go. Now I’m going to clip these apart and then we’ll press them open. So the easiest way to put this block together I think and of course do what works best for you. Is I’m going to add my two pieces right here to this middle section. And I’m going to do that right now. Now if I’ve, I want these, I want these middle seams to nest as well. So if I have ironed, because there’s no correct way to iron that center seam, but if I’ve ironed it one way or the other I’m going to push it the other directions so that it nests with that bottom seam because these are already pressed. And hopefully, you know because there’s no dark when you’re ironing white to white so just make that work for you so it has less bulk and lays down nice and flat.
Alright now the other two leg pieces, well let’s iron this open first. Getting ahead of myself. And I”m going to make those seams go the way I want them to. Sometimes I actually sew those on before I iron them. Alright now these next two right here we’re going to put this way. And we’re going to sew a white square to either end of those. So again here’s our, here’s our legs and we’re going to sew white square to either end. So a quarter of an inch and I’m going to put two through or I’m just going to do one after the other and then flip them around. Now flip these around and add my square to the other side. Just like that. Now I’ll clip these apart. And now I’m going to add these to the top and bottom of my four patch unit and that will make my star. You want to make sure that this part of your star is matching up with the four patch because sometimes accidentally we get those on backwards. We don’t want to do that. We want our legs to go the right direction. Now I’m actually sewing this on before I iron it because there’s several more little seams here and I want them to go the opposite direction of my other seams so they can all nest. And then we’ll iron them all at once. And here’s the next one. Again make sure to nest your seams. Alrighty, now we’re going to press this open. And we’re going to give it a shot of steam.
Now when you’re dealing with small pieces like this a lot of the time these little pieces get wonky for me. I’m not sure why but they do. And so you just kind of want to trim this up so you have pretty straight edges. So see how this kind of bows a little bit right here. I”m just going to straighten that up. I”m not actually taking any sides off the block, I”m just going to straighten that up. And it already looks better. And so I”m just, I don’t why that happ
& Progress on Social