


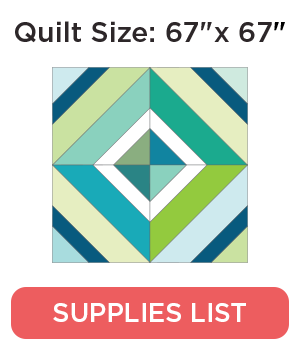
Summer Squares Quilt Tutorial
Jenny Doan
Summer Squares Quilt Tutorial
- 1 Roll x 2.5" Print Strips
- 1/2 Yard x White Fabric
- 1/2 Yard x Black Fabric
- 1 1/2 Yards x Fabric for Border
- 3/4 Yards x Fabric for Binding
- 4 1/4 Yards x Backing Fabric
- x
Featured products Get the Supplies Featured in this Tutorial


Finish your masterpiece and let us give it the finishing touch it deserves.
Subscribe to MSQC on YouTube
Hundreds of FREE tutorials and a new one from Jenny launches every Friday.
video transcript
Hi everybody, it’s Jenny from the Missouri Star Quilt Company. Take a look at this quilt behind me. Isn’t this fun? Don’t you love how the white squares pop and the black squares pop? Well I’m going to show you how to do this. So this is a take off on a quilt we made years ago called Summer in the Park. And it was so much fun to make it. And of course over the years and things happen and we’ve used that in several different quilts but the other day I had an idea. And I thought what happens if. And I thought what happens if we change the size of these strips. And we put smaller strips inside our strip sets. So to make this quilt you’re going to need one roll of 2 ½ inch strips. And we have used Eliza by Williamsburg for Windham fabrics. You’re going to need a half a yard of black fabric and a half a yard of white. Now these are your pop colors right here so whatever color you use just know you need a half a yard of each one of those. So for our outer border out here, this is a nice big eight inch border. And this makes a quilt that is 67 by 67. Now remember if you love this quilt and you see it on your bed you just have to add another jelly roll and double your yardage, you know. So just remember it’s easy to go up or down on these quilts by what pre cut you decide to add to it and you use. So for our back of the quilt we used 4 ¼ yards. And we used this beautiful print back and it just has these touches of gold in there. And I just think that just looks so pretty. So the quilt pattern we used on this is called Variety. Now when I choose a pattern for a quilt, I look at it and if it looks elegant to me I choose an elegant pattern. If it looks whimsical to me I’ll choose a whimsical pattern. If there’s a lot of sharp lines I tend to put something round in it, you know. So just, when you’re choosing a pattern, just you know, it’s always personal preference but, you know, feel free to make those decisions. So I also used the clearly perfect slotted trimmer. This block is cut on the 45 and that’s the degree of this ruler so you can use a ruler that has a 45 line on it as well. But this clearly perfect slotted trimmer in the large size makes it really easy.
Alright so let me show you how I did this. I have two strip sets. This is actually a tube method. And I put my two dark strips with a white strip in the middle . And then my next strips I put two light strips with a dark strip in the middle. And you can see I’ve already got these sewn together. Now just a little tip. If you use, if you cut these yourself I think you’re ok. But I used mine from two different manufacturers that cut 1 ½ inch strips. And they weren’t the same size. Now these strip sets need to be the same size so that they line up. But you can see, when they cut these, this one has a larger peak. They’re measuring from the outside of the peak to the outside of the peak. This one has a smaller peak. So they’re measuring from the inside. And so when you lay them together you can see they’re a little off. So make sure that your strips are all the same size, even if you pulled them in from your stash, check to make sure they’re all the same size because that will save you hours of headaches. I’m telling you.
Alright so what we’re going to do, I’ve sewn these two lights to a dark. And two darks to a light. We’re going to put them right sides together and we’re going to sew down both sides of this and make this a tube. So I’m just going to line these edges up right here like this and I’m going to start sewing. And I’m going to sew the whole length of this a quarter of an inch from the side. And I like to kind of get them lined up out here a little bit and just let the sewing machine take it through and keep going. Alright line up one more time. Stay on that quarter inch, straighten up and we’re almost to the end here. Alright so now what I’m going to do is I’m going to flip this around and I’m going to sew down the other side. Now again you want to make sure that these are nice and lined up. And if your strips are the same size they will be. I actually really learned that the hard way. I made several blocks and I’m like why aren’t these lining up. And then I discovered it was my two middle strips were a little different size. Alrighty. Now we’re at the end and I’m going to look and make sure I caught this whole side here and I did.
And then what we’re going to do is we’re going to start cutting these open. And we’re going to use our clearly perfect slotted trimmer and we’re going to shoot for a seven inch block on this. And so what I’m going to do is I’m going to lay my stitch line right here on their stitch line just like this. And we are going to cut up like this and we are going to cut down. And we are going to put this over here to the side. And what that gives us, look at this. What that gives us is this block right here that has those two pieces on either side. And it looks so cool. And so now we’re going to flip our ruler and we’re just going to keep going along this whole strip. So since I’m left handed I flip this over so I could cut from the other direction. And again I’m just going to lay my stitch line on their stitch line. And I’m going to cut this right here and just trim this edge right here. It’s a little tiny bit. And then I’ll get another one. And then I can just pull this over and I can flip my ruler. And I will be cutting the direction that is most comfortable for your hand. You want to make sure that you do that. And you’re just going to cut your whole strip like this. Line up my seam line on their seam line. Now if you’re using a 45 what you’re going to do is you are going to actually lay this on here this way. So you’ll put your 45 so that it goes along the edge of the ruler right here. And see this 45 right here. And you’ll pull this all the way over to the edge and you’re just going to make your cut right there. And that’s how you do it using a regular ruler. This is so much easier for my brain and makes it really easy. So you’re going to cut these all. And then we’re just going to open them up. Let me cut one more so I have a full block here. So seven, just like this. And then I’m just going to put this aside. Now actually if you cut the whole strip you’ll have this little piece left at the end. It’s a little bit of waste but maybe not. I have something to show you in the end. So I’m going to press these open. And I scrapped all of mine up. You’ll notice no block up here has the same four pieces in it. I thought this would look better scrappy. You can do it whatever way you want of course. But let me show you how these go together. Alright.
So now what we’re using to match when we set this quilt together is I made it in four blocks like this. I let my center white square be the middle and I put all my blocks together in fours. And so when you do that, I’m going to put this block together in fours. And of course we’ll have some of the same fabrics here because they come from the same strips. So here’s this one in fours. And then look what happens, the other ones, the black ones start to line up out here. . So let me get these on here. And so as you sew your blocks in fours all of a sudden you see these forming. So when you add your next row to it, it’s going to be like this. Let’s put one more in here so we can show you how that finishes up. And so then you end up with black squares and white squares and it just all comes together. It’s just so cool how it just like happens.
So I actually have another block over here that I have made. And I did it with solids because sometimes things are easier to see in solids. So I did two black strips with a colored green and two white strips with a colored blue. And so when you put them together with these solids it’s really fun because you get, everything is going to line up colorwise. And so you’re going to get this blue square like this. And your secondary square out here is going to be the black one like this. Do you see how that happens? So then you end up with a big, these big swaths of color that are just really fun to work with and really fun to do. Now obviously you’re going to put this together, when you put this together, again let’s look at the quilt because I’ve sewed four blocks together. So I put my white in the center and sewed this block to this block to this block to this block to this block. And then I added the next row. And when I add this next row that’s when your secondary block matches up with the one above it because this is a row here and this is a row here. So we have four rows on this. There’s 16 blocks.
But at the end of every strip, honestly when you start cutting these out, you’re going to have a piece that’s just about, I don’t know. It’s not, let me cut these few right here and let me show you because it’s not very much. So we’ll go here. I’ll cut one more here. Oop, hang on. So I’ve got one here like this. And then you end up with a piece like this. Now this, this is actually, I actually have a hard time with this kind of waste because I feel like there’s a lot going on here. We could do something really cool with this. And so my assistant Kathleen, she is also not a waster and she was a little worried about these so she put together this pillow using these tiny pieces. And I think it came together so cute. And it’s just, it’s just the leftover pieces. So whatever scrappy pieces you have leftover don’t be afraid to sew them together, see what happens. We’re not having the same thing happen with our squares but we’re having a lot of fun and you have a little decorative side pillow. Then she had to cut off some of those pieces and so she made an even smaller one with the pieces she cut off. And so it’s just really fun to see with the scraps. And you guys know I’m not a waster. Most of you are not wasters. So it’s just fun even though it’s not the same exact pattern, how cool will this look on a bed. You know, when you put that on your bed next to your quilt or you make a little table topper with it you know, to go along with the quilt that you’ve made. So we hope you enjoyed this fun tutorial on Summer Squares from the Missouri Star Quilt Company.
We hope you enjoyed watching this video. If you’re not already part of the Missouri Star quilt family you can hit the subscribe button below so you won’t miss a thing. And if you click that bell it will notify you every time a new tutorial comes out. See you next Friday.
& Progress on Social